Merlin
 Senior Editor
#017
United Kingdom
Joined: June 11, 2003
KitMaker: 17,582 posts
AeroScale: 12,795 posts
Posted: Friday, December 02, 2016 - 01:47 PM UTC
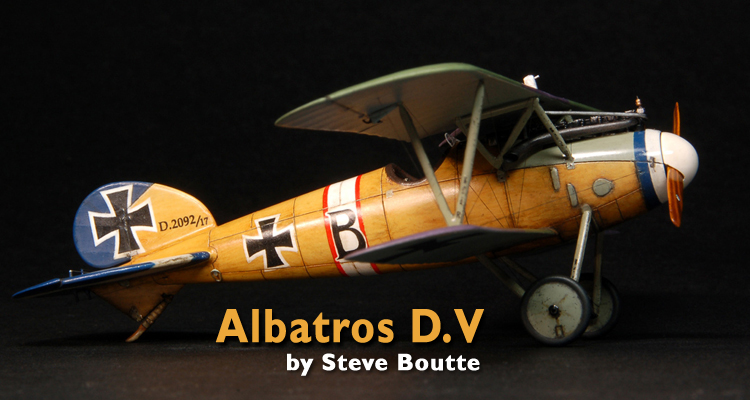
New member Steve Boutte proves small is beautiful with his immaculate 1:72 Albatros built from the Eduard kit.
 Link to Item
If you have comments or questions please post them here.
Thanks!
BEWARE OF THE FEW...
As I grow older, I regret to say that a detestable habit of thinking seems to be getting a hold of me. - H. Rider Haggard
AussieReg
Associate Editor #007
Victoria, Australia
Joined: June 09, 2009
KitMaker: 8,156 posts
AeroScale: 3,756 posts
Posted: Friday, December 02, 2016 - 05:15 PM UTC
Wow, that is a stunning build. The detail in 72nd scale is just amazing.
Thanks for sharing.
Cheers, D
ON the bench
Revell 1/24 '53 Corvette (building as '54)
Revell 1/24 BMW 507 Coupe and Cabrio
Italeri 1/48 Me262 B-1a/U1 Nightfighter
Monogram 1/24 '57 Chevy Nomad
Dragon 1/350 USS Frank Knox DD-742
Thessaloniki, Greece / Ελλάδα
Joined: August 30, 2016
KitMaker: 62 posts
AeroScale: 60 posts
Posted: Friday, December 02, 2016 - 09:57 PM UTC
Amazing build Steve!Congratulation. Christos.
Ontario, Canada
Joined: February 04, 2008
KitMaker: 2,507 posts
AeroScale: 1,814 posts
Posted: Saturday, December 03, 2016 - 03:27 AM UTC
" The Die Hards"
43rd MIDDLESEX REGIMENT
MACHINE GUN CORPS
XXX CORP
The most effective way to do it, is to do it.
- Amelia Earhart
Namabiiru
Associate Editor #399
Rhode Island, United States
Joined: March 05, 2014
KitMaker: 2,888 posts
AeroScale: 307 posts
Posted: Saturday, December 03, 2016 - 06:03 AM UTC
Simply amazing!

New York, United States
Joined: January 05, 2007
KitMaker: 236 posts
AeroScale: 11 posts
Posted: Saturday, December 03, 2016 - 08:54 PM UTC
Truly excellent work! What did you use for the final clear coat?

Berlin, Germany
Joined: October 12, 2008
KitMaker: 709 posts
AeroScale: 651 posts
Posted: Saturday, December 03, 2016 - 09:29 PM UTC
Just kudos! Build, paint and rigging - fantastic work on the right scale!
Sometimes you need to distance yourself to see things clearly - Lao Tzu -
... in scale and in real life -T.
Louisiana, United States
Joined: November 27, 2016
KitMaker: 4 posts
AeroScale: 4 posts
Posted: Saturday, December 03, 2016 - 09:57 PM UTC
Thanks so much for the kind words, I really appreciate them!
The clear coat was a combination of things: Future for the "metal" parts & Testor's Acryl semi-gloss clear for the "wood" & "cloth" surfaces. I used Tamiya clear on the prop & a few other things early on, but switched to Future because I found that it dried harder, making the possibility of fingerprints embedding in the clear less likely.
Steve
New Jersey, United States
Joined: June 02, 2006
KitMaker: 1,212 posts
AeroScale: 468 posts
Posted: Sunday, December 04, 2016 - 12:48 AM UTC
An impressive piece of work. Well done sir.
United Kingdom
Joined: July 13, 2008
KitMaker: 72 posts
AeroScale: 71 posts
Posted: Sunday, December 04, 2016 - 04:14 PM UTC
Lovely model - I almost thought it was Wingnut Wings.
Connecticut, United States
Joined: October 26, 2009
KitMaker: 424 posts
AeroScale: 389 posts
Posted: Sunday, December 04, 2016 - 07:06 PM UTC
Out standing model. Beautiful finish. What did you use for the rigging? And how did you attach it? It is really nice.
Captn Tommy
Louisiana, United States
Joined: November 27, 2016
KitMaker: 4 posts
AeroScale: 4 posts
Posted: Sunday, December 04, 2016 - 11:47 PM UTC
Thanks again! Tommy, I used Uschi van der Rosten super fine elastic thread for the rigging. I drilled blind holes on the underside of the top wing & holes through the bottom wing, as referenced in an article by John Seaman. I used thin CA glue to attach them. I had never done rigging before, & was not looking forward to attempting it. But, it went much smoother than I had feared. Here is a link for the thread.
http://www.uschivdr.com/products-in-detail/rigging/Colorado, United States
Joined: January 25, 2004
KitMaker: 11,669 posts
AeroScale: 11,011 posts
Posted: Saturday, December 10, 2016 - 12:09 PM UTC
". . .The most important thing is to know why you build and then get the most that you can out of building." via D.D.
#041
Kobenhavn, Denmark
Joined: July 20, 2006
KitMaker: 10,069 posts
AeroScale: 3,788 posts
Posted: Friday, January 06, 2017 - 09:19 PM UTC
As already pointed out, beautiful rigging - especially in this scale.
Thanks for sharing

Campaign'oholic - 252+ campaigns completed
TimReynaga
Associate Editor California, United States
Joined: May 03, 2006
KitMaker: 2,500 posts
AeroScale: 318 posts
Posted: Sunday, April 02, 2017 - 09:14 PM UTC
Absolutely beautiful. Your wood effects are perfect!
#482
United States
Joined: February 08, 2015
KitMaker: 83 posts
AeroScale: 14 posts
Posted: Wednesday, May 10, 2017 - 04:33 PM UTC


