

Paul, you SBS is awesome as usual. I am following along with interest to see what magic you work with this build.
Ernest
Hosted by Rowan Baylis
Building The Revell 1/48 Dakota

greif8

Joined: January 17, 2006
KitMaker: 673 posts
AeroScale: 492 posts

Posted: Sunday, December 31, 2017 - 02:38 PM UTC

drabslab

Joined: September 28, 2004
KitMaker: 2,186 posts
AeroScale: 1,587 posts

Posted: Monday, January 01, 2018 - 11:24 PM UTC
Fantastic work on those seats but do you think it will be noticeable once the fuselage is closed?


KelticKnot

Joined: May 11, 2015
KitMaker: 768 posts
AeroScale: 656 posts
Posted: Tuesday, January 02, 2018 - 01:42 AM UTC
Quoted Text
Fantastic work on those seats but do you think it will be noticeable once the fuselage is closed?
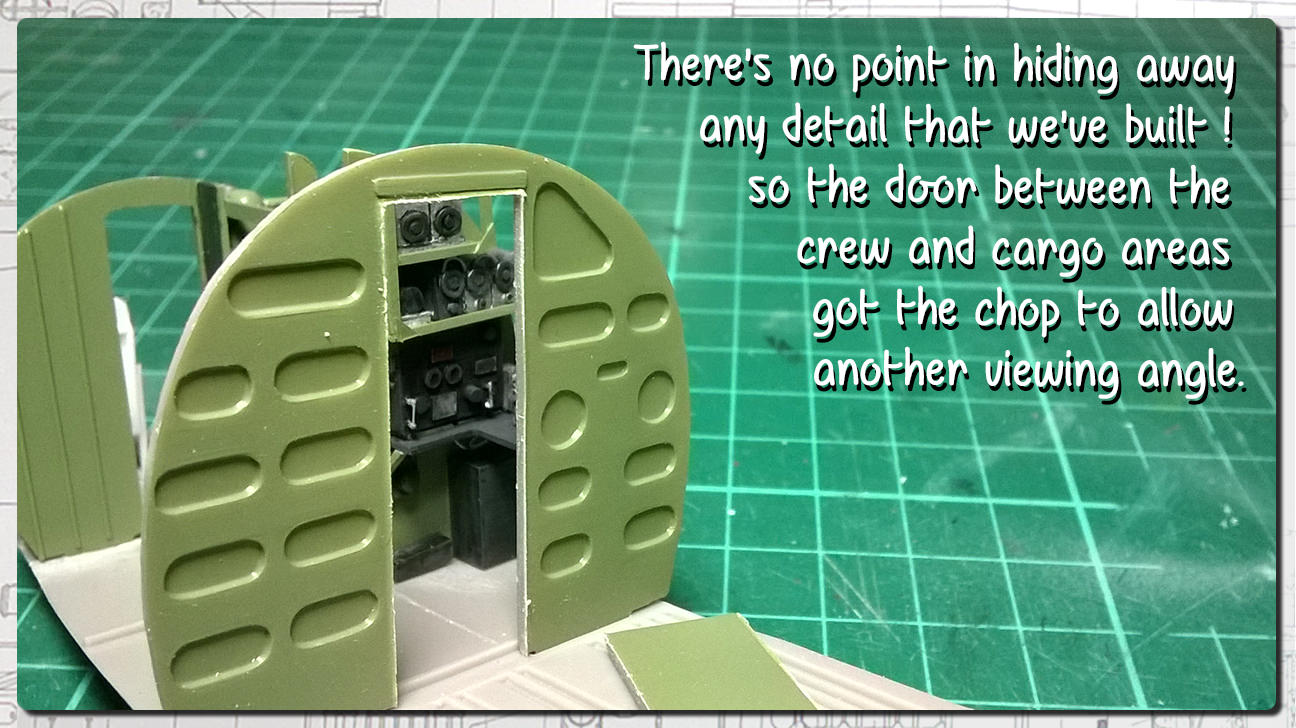
Closed fuselage? NEVER!

Seriously though, I plan on making as much visible as possible with cutaways


KelticKnot
Joined: May 11, 2015
KitMaker: 768 posts
AeroScale: 656 posts
Posted: Tuesday, January 02, 2018 - 01:56 AM UTC
Karl, those images are proving useful!
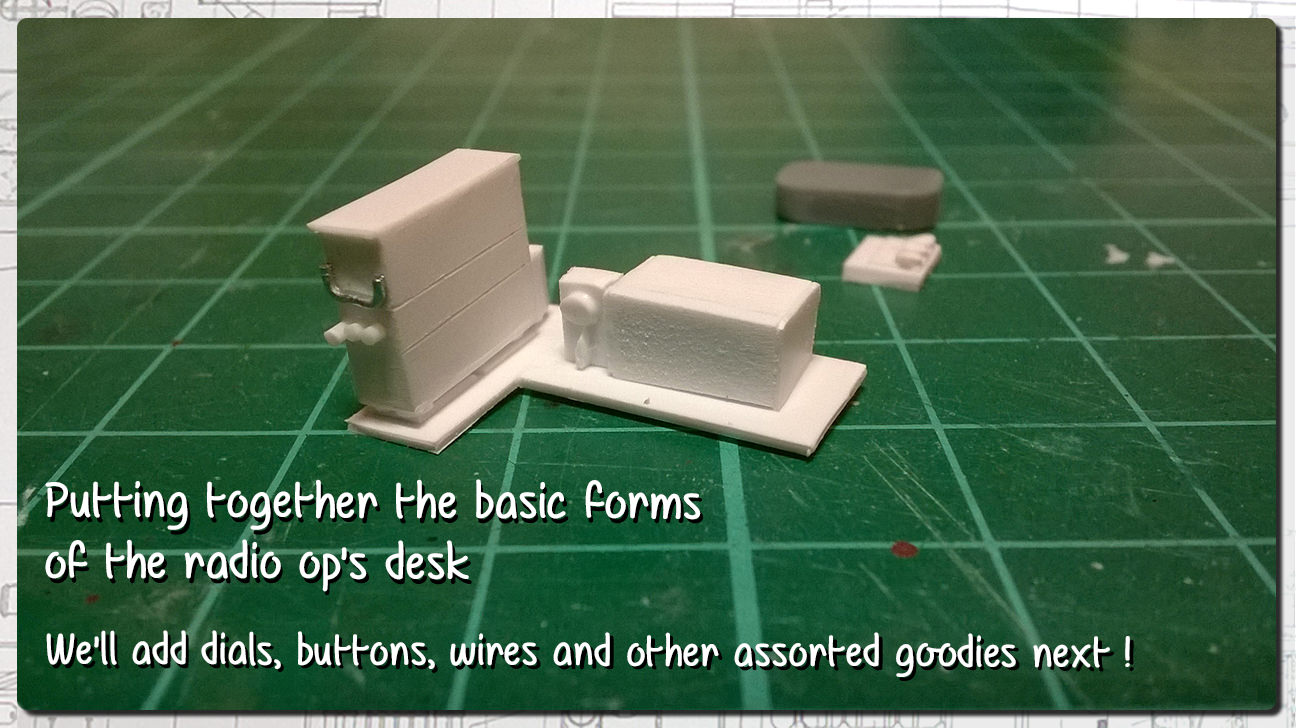
I've decided to strip out the kit's rather basic parts and build everything from scratch. Again, the kit parts aren't bad but they just lack crispness.
Sharp edges and corners will surely sell the illusion of scale better. Besides, there are areas that are just not represented and we can add a lot of interesting stuff in here !
KelticKnot
Joined: May 11, 2015
KitMaker: 768 posts
AeroScale: 656 posts
Posted: Friday, January 05, 2018 - 09:07 PM UTC
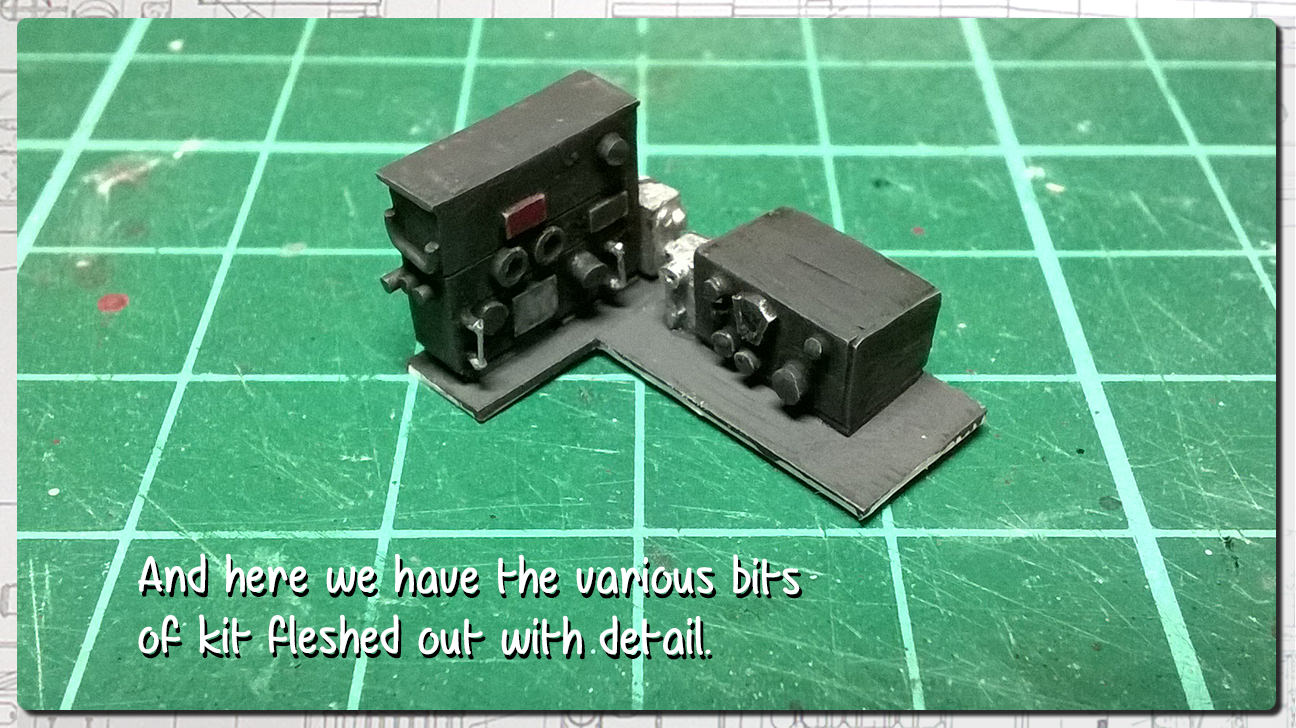
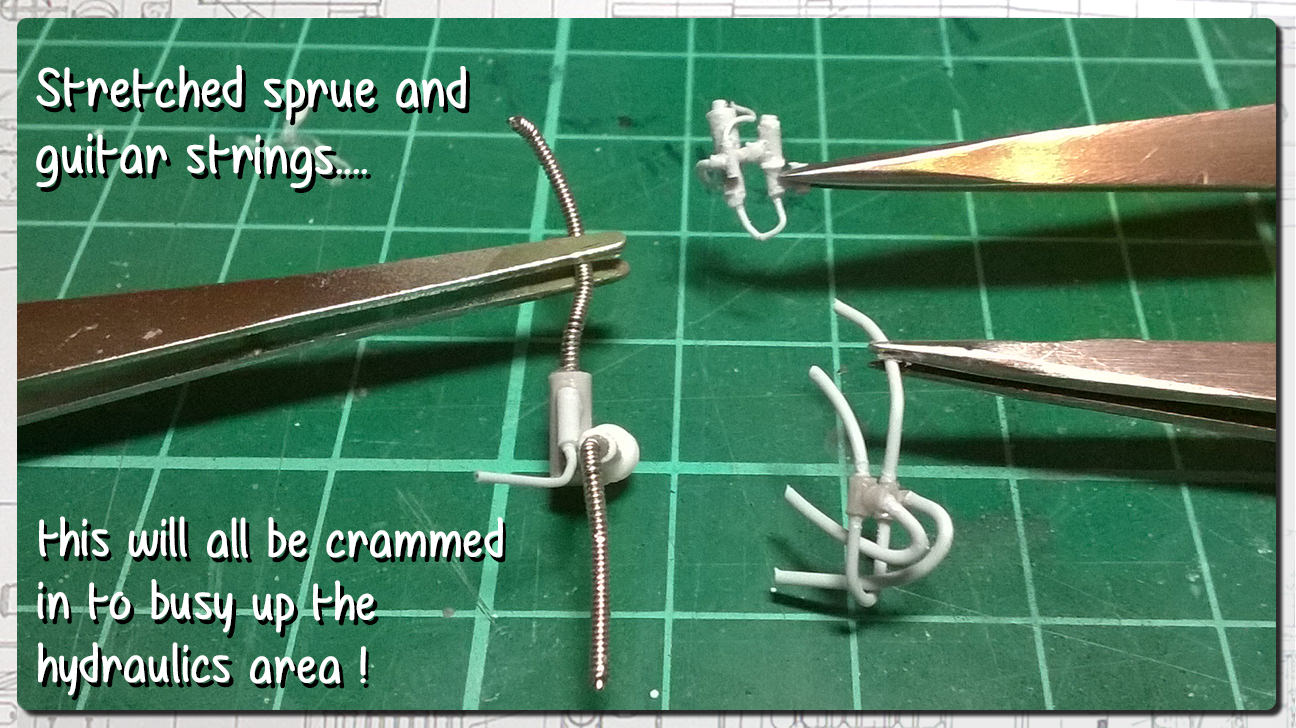
I've been working away at some of the smaller details in this area. It's all just stock styrene chopped up into tiny, fiddly bits.
KelticKnot
Joined: May 11, 2015
KitMaker: 768 posts
AeroScale: 656 posts
Posted: Monday, January 15, 2018 - 02:51 PM UTC

JClapp

#259

Joined: October 23, 2011
KitMaker: 2,265 posts
AeroScale: 1,715 posts

Posted: Monday, January 15, 2018 - 06:17 PM UTC
Looks great! this area might be a good candidate for a tiny LED light...

KelticKnot
Joined: May 11, 2015
KitMaker: 768 posts
AeroScale: 656 posts
Posted: Monday, January 15, 2018 - 09:10 PM UTC
Quoted Text
Looks great! this area might be a good candidate for a tiny LED light...
That's an interesting idea Jonathan, nothing like trying out yet another new technique ! The navigator's table on the port side has a lamp which could help illuminate the area....
KelticKnot
Joined: May 11, 2015
KitMaker: 768 posts
AeroScale: 656 posts
Posted: Monday, January 15, 2018 - 09:10 PM UTC
I've been playing around with foil scored into diamond shapes with a pencil to simulate the padding on some parts of the fuselage walls. As well as a couple of wall mounted parts I think this should round out this crew station nicely.
(and I've just noticed a tiny strut on the near edge of the table I'd made that I forgot to add! )
KelticKnot
Joined: May 11, 2015
KitMaker: 768 posts
AeroScale: 656 posts
Posted: Tuesday, January 16, 2018 - 05:29 PM UTC
KelticKnot
Joined: May 11, 2015
KitMaker: 768 posts
AeroScale: 656 posts
Posted: Wednesday, January 17, 2018 - 04:48 PM UTC
There's definitely a sickness when it comes to detailed scratchbuilding.....
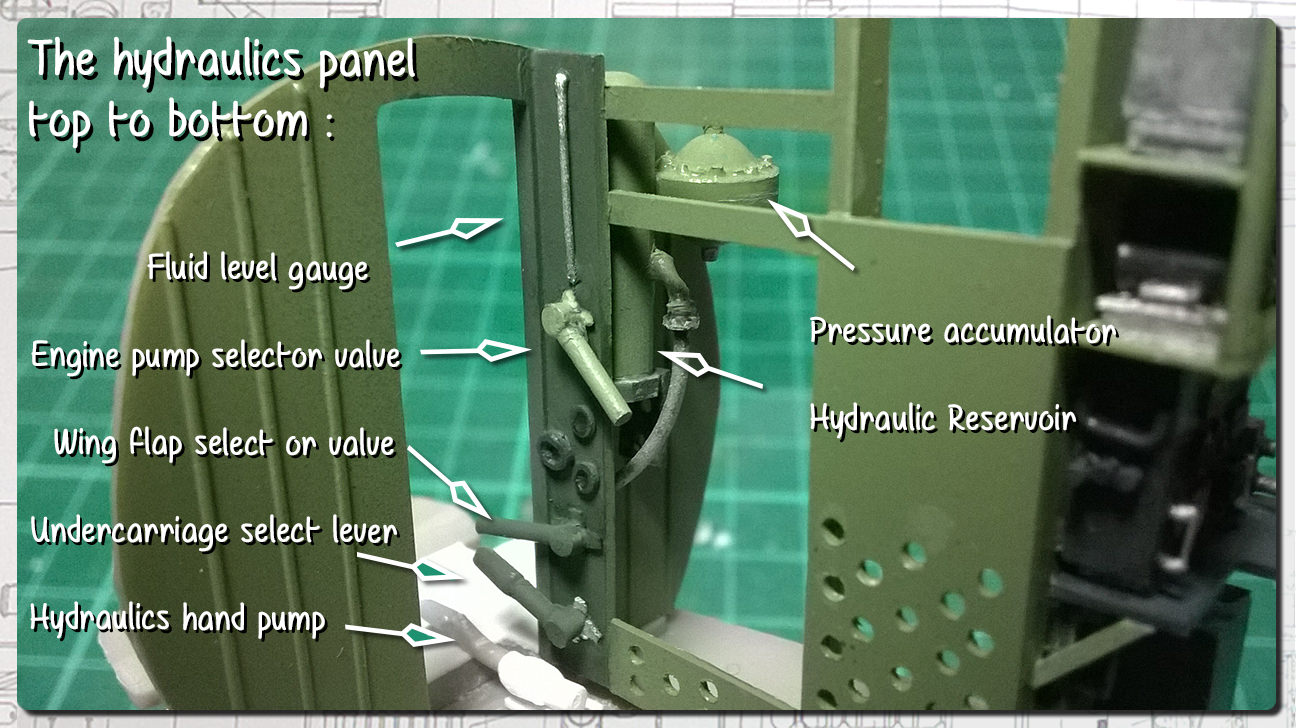
Unfortunately, beneath the hydraulic reservoir there is a tangle of pipework that not only feeds the various parts on the panel but also going off into other parts of the aircraft.
I'm going to have to cobble something together to represent this but it's far too difficult to faithfully model!
KelticKnot
Joined: May 11, 2015
KitMaker: 768 posts
AeroScale: 656 posts
Posted: Saturday, January 20, 2018 - 02:15 AM UTC
More microscopic madness !

goodn8
Joined: October 12, 2008
KitMaker: 709 posts
AeroScale: 651 posts
Posted: Saturday, January 20, 2018 - 02:52 PM UTC
Great work Paul, really love your scratched details!
Very well done so far and the use of sprues act fine, keep on that good job.
Thomas
Very well done so far and the use of sprues act fine, keep on that good job.
Thomas

KelticKnot
Joined: May 11, 2015
KitMaker: 768 posts
AeroScale: 656 posts
Posted: Sunday, January 21, 2018 - 07:59 PM UTC
Thank you Thomas !
Here's the finished hydraulics system. It's nowhere nearly as complex or detailed as the real thing but the idea is to make things look busy to the eye and :
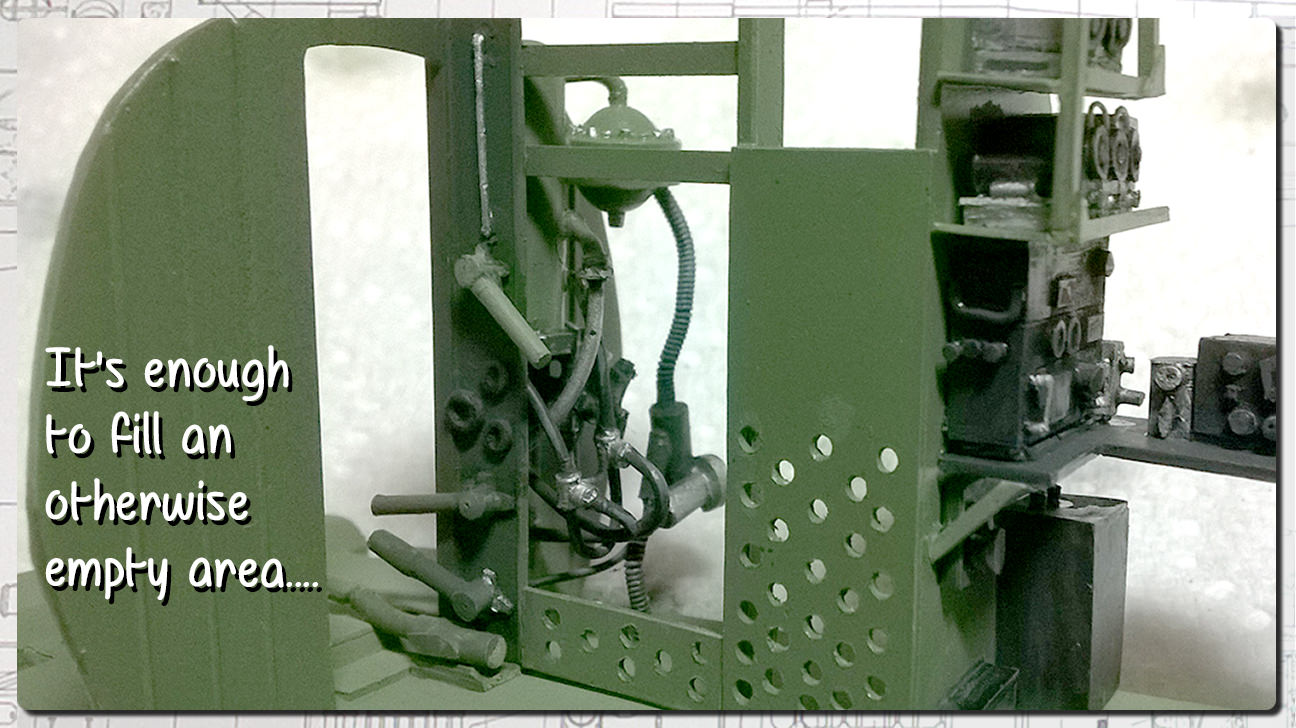
Here's the finished hydraulics system. It's nowhere nearly as complex or detailed as the real thing but the idea is to make things look busy to the eye and :
Joel_W
Joined: December 04, 2010
KitMaker: 11,666 posts
AeroScale: 7,410 posts
Posted: Monday, January 22, 2018 - 03:22 AM UTC
Paul,
Now that's detailing at it's finest for sure. All those hydraulic lines really give one the sense of a very busy area. And your scratch build electrical equipment is up to your usual standards.
Looking forward to your next update.
Joel
Now that's detailing at it's finest for sure. All those hydraulic lines really give one the sense of a very busy area. And your scratch build electrical equipment is up to your usual standards.
Looking forward to your next update.
Joel


rdt1953
Joined: February 06, 2015
KitMaker: 1,098 posts
AeroScale: 900 posts
Posted: Monday, January 22, 2018 - 03:29 AM UTC
Paul -
I always enjoy following your builds and this one is no exception- keep it up
please !
Cheers -Richard
I always enjoy following your builds and this one is no exception- keep it up
please !
Cheers -Richard

JPTRR

#051

Joined: December 21, 2002
KitMaker: 7,772 posts
AeroScale: 3,175 posts
Posted: Monday, January 22, 2018 - 08:16 PM UTC
Quoted Text
From what I remember of all those early kits, they had raised panel lines
This kit did when I built it c.1984. However, this runs into the conundrum of authentic and accurate vs CW of modeling. DC3/C47 was festooned with raised rivets. The raised panel lines are thus more authentic than recessed lines. Recessed lines are easier to work with but when I build these subjects, I leave the lines pn, FWIW

JPTRR
#051
Joined: December 21, 2002
KitMaker: 7,772 posts
AeroScale: 3,175 posts
Posted: Monday, January 22, 2018 - 08:22 PM UTC
Quoted Text
Looks great! this area might be a good candidate for a tiny LED light...
Great idea! Shep Paine did that with his B-29.
JPTRR
#051
Joined: December 21, 2002
KitMaker: 7,772 posts
AeroScale: 3,175 posts
Posted: Monday, January 22, 2018 - 08:35 PM UTC
Paul,
Your work amazes me. Excellence you create. Just found this post so catching up. Brings joy to a former DC-3 freightdog's heart.
I apologize if I am behind the conversations. One thing about the -3 is that the cowl flap controls were snugged up near the instrument panel combing along the copilots side. I recall them simple parts, could be nicely simulated with little sprue tabs.

RussellE
#306

Joined: June 27, 2010
KitMaker: 3,959 posts
AeroScale: 598 posts
Posted: Tuesday, January 23, 2018 - 01:45 AM UTC
Paul, I loved what you did with your 1/48 Lanc and can't wait to see what you do with your Dakota!
So far those cheques you've been writing have definitely been handled by your amazing scratch building skills! Wow!
So far those cheques you've been writing have definitely been handled by your amazing scratch building skills! Wow!

KelticKnot
Joined: May 11, 2015
KitMaker: 768 posts
AeroScale: 656 posts
Posted: Tuesday, January 23, 2018 - 03:35 AM UTC
First of all, many thanks everyone. This encouragement helped me take giant leaps of faith with the Lanc and I value it just as much here !
KelticKnot
Joined: May 11, 2015
KitMaker: 768 posts
AeroScale: 656 posts
Posted: Tuesday, January 23, 2018 - 03:38 AM UTC
Quoted Text
Quoted TextLooks great! this area might be a good candidate for a tiny LED light...
Great idea! Shep Paine did that with his B-29.
Funnily enough, a fibre optic wiring loom happened to arrive in the post today

I'll definitely turn one strand into the navigator's lamp but the others i'm not sure of yet.
The landing lamps on the wings are tempting candidates....
KelticKnot
Joined: May 11, 2015
KitMaker: 768 posts
AeroScale: 656 posts
Posted: Tuesday, January 23, 2018 - 03:48 AM UTC
Quoted Text
Paul,
... Brings joy to a former DC-3 freightdog's heart.
I apologize if I am behind the conversations. One thing about the -3 is that the cowl flap controls were snugged up near the instrument panel combing along the copilots side. I recall them simple parts, could be nicely simulated with little sprue tabs.
I had to dig through google to find that detail as it wasn't in any of the photo reference I have. But then I noticed that it's kinda hinted at in the interior molding on the kit. Needless to say that stuff will see the working end of a chisel
Any further insights are most welcome!
KelticKnot
Joined: May 11, 2015
KitMaker: 768 posts
AeroScale: 656 posts
Posted: Thursday, January 25, 2018 - 04:26 AM UTC
Moving on again !
I spent a few minutes the other day with a tea light candle, stretching various thickness's of sprue so that I've got a stock of different diameter rods to hand.
Obviously the benefit of a candle over a lighter for example, is that you have both hands free
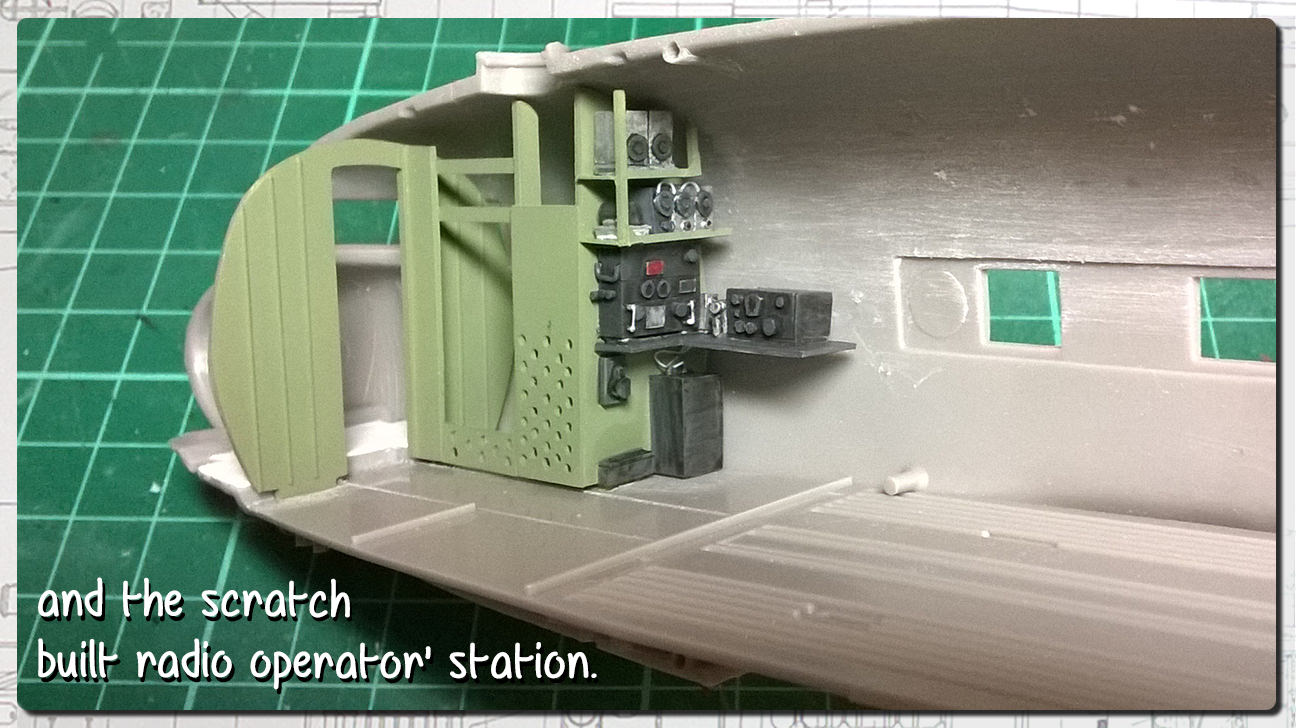
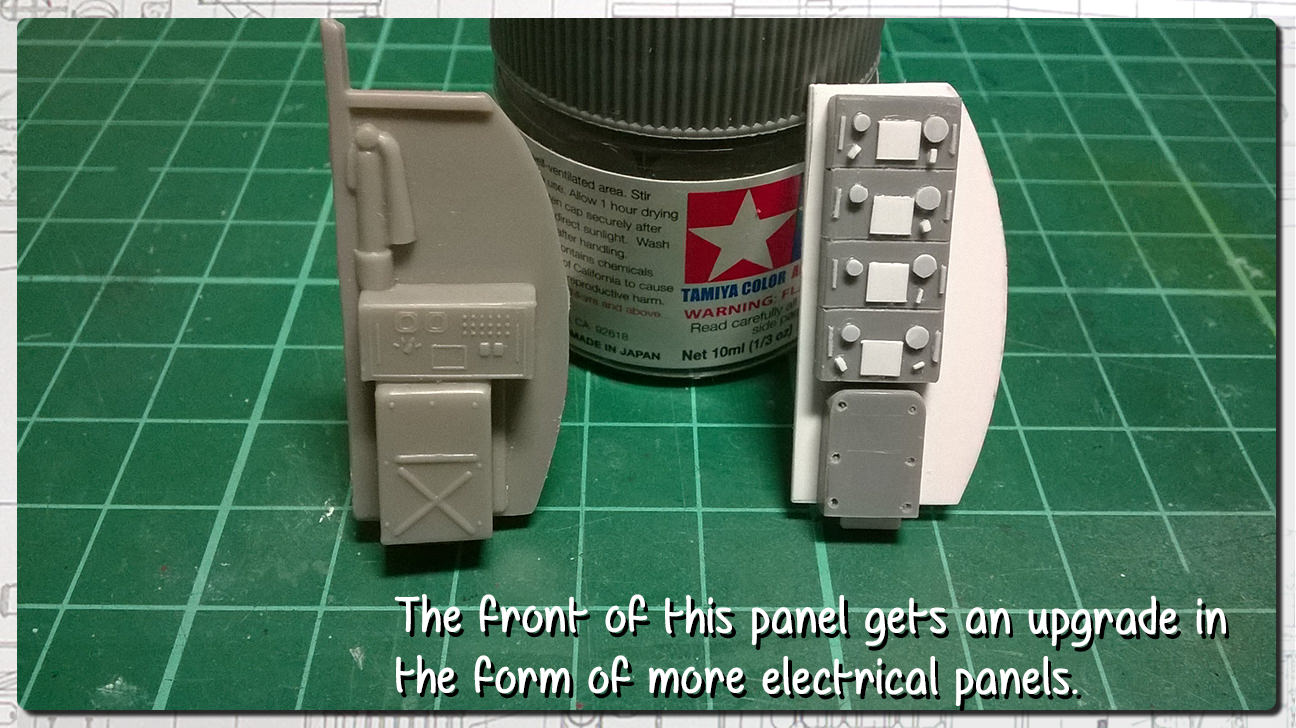
I've a few bits and pieces made up for the radio op area which will be attached directly to the fuselage wall. These will sit in reserve until the fuselage and padded wall come into play.
so....

Next up is all the dressing up of the navigator's desk which promises to be fun.
I spent a few minutes the other day with a tea light candle, stretching various thickness's of sprue so that I've got a stock of different diameter rods to hand.
Obviously the benefit of a candle over a lighter for example, is that you have both hands free
I've a few bits and pieces made up for the radio op area which will be attached directly to the fuselage wall. These will sit in reserve until the fuselage and padded wall come into play.
so....
Next up is all the dressing up of the navigator's desk which promises to be fun.
KelticKnot
Joined: May 11, 2015
KitMaker: 768 posts
AeroScale: 656 posts
Posted: Wednesday, January 31, 2018 - 01:57 PM UTC

All the while i'm doing this work i'm thinking about where I'll have the cutaway located. Certain details will be absent simply because I can't have them hanging in space !
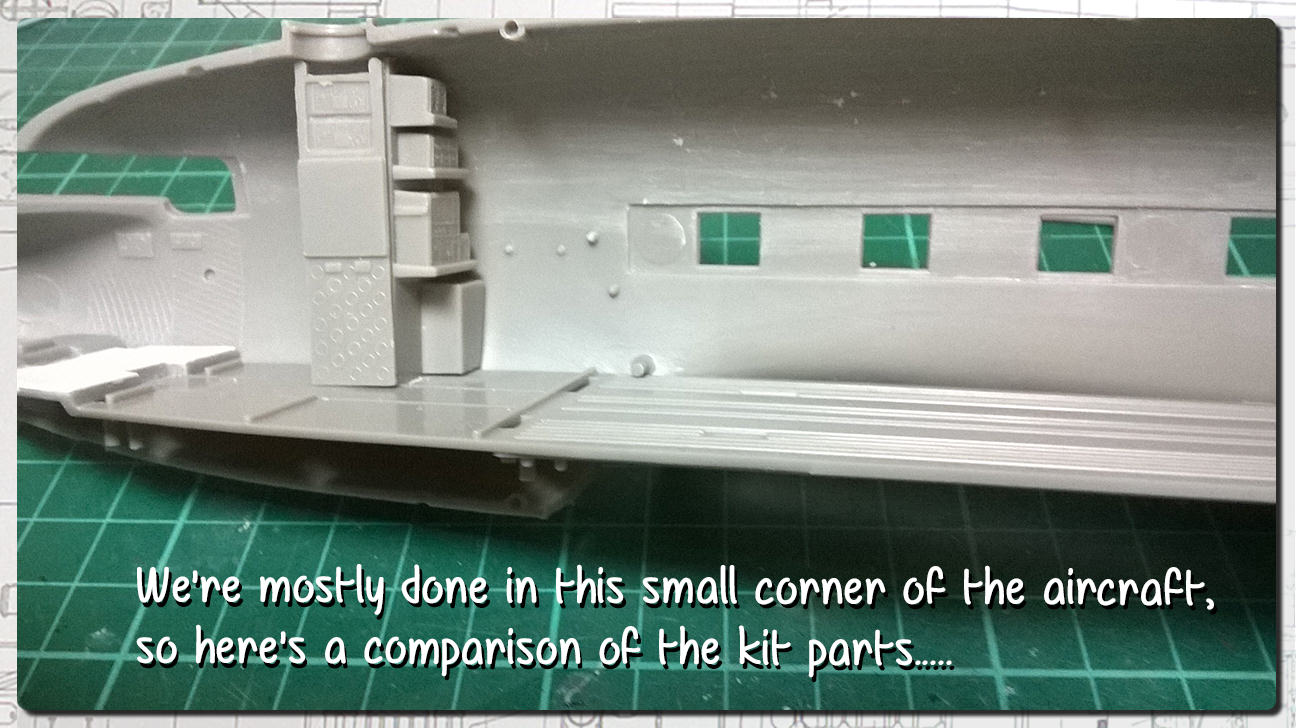
For a part of the aircraft I hadn't given much thought to at the start, this crew section has provided a mass of busy looking detail which should hopefully lure in the viewer for a closer look
 |

WEB HOSTING BY


Copyright ©2021 AeroScale and Kitmaker Network, a subsidiary of Silver Star Enterprises
All Rights Reserved. Please read our Conditions of Use and Privacy Policy.
All Rights Reserved. Please read our Conditions of Use and Privacy Policy.