Hi Joel
Great progress - and, while I'm sorry that I can't check in as often as I once could, I take that for granted on you builds!
It's interesting that you hit such a nasty gap at the rear of the cockpit. Checking back, I didn't encounter that in my build ( http://aeroscale.kitmaker.net/forums/247825) - there's a little gap, but it certainly didn't scream at me.
I guess it's one of those instances where the smallest changes in fit can add up to a big difference in the end. So - a definite heads-up to check as you go.
All the best
Rowan
Cold War (1950-1974)
Discuss the aircraft modeling subjects during the Cold War period.
Hosted by Tim Hatton
GWH 1/48 scale Lockheed T-33A early ver.
Posted: Saturday, April 28, 2018 - 02:07 AM UTC
Joel_W
Associate Editor
New York, United States
Joined: December 04, 2010
KitMaker: 11,666 posts
AeroScale: 7,410 posts
Joined: December 04, 2010
KitMaker: 11,666 posts
AeroScale: 7,410 posts
Posted: Sunday, April 29, 2018 - 09:47 PM UTC
Quoted Text
Hi Joel
Great progress - and, while I'm sorry that I can't check in as often as I once could, I take that for granted on you builds!
It's interesting that you hit such a nasty gap at the rear of the cockpit. Checking back, I didn't encounter that in my build ( http://aeroscale.kitmaker.net/forums/247825) - there's a little gap, but it certainly didn't scream at me.
I guess it's one of those instances where the smallest changes in fit can add up to a big difference in the end. So - a definite heads-up to check as you go.
All the best
Rowan
Rowan,
Thanks for the thumbs up. You're always part of my build adventures here no matter how often you have the time to check in.
I'm sure that the gap issue was mostly my doing. But it's filled primed, and painted, so no worry one way or the other.
Just finished shooting the basic color coats, and she's finally starting to look like a miniature T-33A
Joel
Joel_W
Associate Editor
New York, United States
Joined: December 04, 2010
KitMaker: 11,666 posts
AeroScale: 7,410 posts
Joined: December 04, 2010
KitMaker: 11,666 posts
AeroScale: 7,410 posts
Posted: Sunday, May 06, 2018 - 01:28 AM UTC
Well, I managed to get enough done this week for a small update, all via one of my air brushes.
The nose of the T-33A needed to have a split black nose panel, with the bottom portion smaller then the top one. the top was hard enough to mask, but the bottom one, which was one done on a separate day as I had to give the top a day to dry, was a real challenge to say the least. Thank goodness for Tamiya bendable vinyl tape.
Next up was the anti-glare panel. Easy enough to mask out, but the front was rounded. I used a piece of Tamiya tape on a small piece of .040 sheet, then punched a hole with my largest dia. punch. I cut it in half and peeled the tape off. Eye balled where the anti glare panel ended and pressed in place. then I just laid down two pieces of Tamiya tape, and I had the panel marked out. The only thing left was to tape off the windscreen frame as it wasn't painted flat Black. I air brushed on Tamiya XF-69 Nato Black as I like the way it looks in scale over plain old flat Black.
Next up on the list was painting the inside halves of the wing tip tanks with Nato Black.
Finally I finished painting the insides of the flaps Model Master Enamel FS34151 Interior Green, leaving the outside trailing edge still needing a color coat of ADC Gray. And finally as strange as it sounds, even though the wheel wheels, and air brake housings are all Interior Green, as my research pictures show the insides the interior surfaces of the gear doors and air brakes were Natural Metal. I had previously primed them black, so now I shot them with Alcad Aluminum ALC 101.
And that's about it for this update. As usual, thanks for stopping by and checking out my build, as it's always much appreciated.
Joel
Joel_W
Associate Editor
New York, United States
Joined: December 04, 2010
KitMaker: 11,666 posts
AeroScale: 7,410 posts
Joined: December 04, 2010
KitMaker: 11,666 posts
AeroScale: 7,410 posts
Posted: Friday, May 11, 2018 - 10:50 PM UTC
Finally, I've reached the decaling stage, but 1st I needed to lay down a really smooth and shiny coat of gloss. I've been experimenting with Tamiya X-22 Acrylic gloss, but it's never dried really smooth, nor have I been able to get a consistent coat laid down.
I Thinned the X-22 with Tamiya Yellow cap Lacquer based thinner 1:1, then applied a tack coat, followed by 2 sort of wet coats. Gave it 2 full days to dry. What I had was basically a repeat of my previous efforts. Ok to decal over, but I'd be risking some silvering and flash issues, as it was not really smooth to the touch. So I VERY lightly wet sanded the entire fuselage with Tamiya #2000 sanding sponge. You cold see the opaque residue both on the sponge and left on the body. But it was now smoother then ever before. A gentle wash of warm water, and I finally had the finish I was looking for: Smooth as a baby's butt.
For the decals I had purchased the Caracal Models ANG T-33A part 2 sheet which was printed by Cartograf. I've been using a modified decaling system that I got from Paul Budzik: Microscale Set, Sol, & Solvaset.
The decals laid down without any issues, and were extremely easy to do any reposition adjustments, to this end I contribute it to the smoothness of the surface more then anything else. Over all the 4 day decaling process went perfectly. The decals laid down into every single nook & cranny, and I couldn't see any issues once they dried. The only additional thing needed was after about a 1/2 hour I cut the two decals that went over the rudder and Vertical Stabilizer joint , added more Solvaset, and the end result looks as though they were painted separately.
There was a time many years ago when I would have cut out every single letter and number, and then pain snakingly applied them one at a time using tape as a guide, but those days are long gone with poor eye sight and slight shaking due to old age. So I've always been just a little leery of having decals with a lot of clear film as I always managed to have a little silvering issues. But not this time. The polishing solved that issue for me.
Two issues did come up with the Caracal decal placement sheet. The 1st one was that most of the ANG units didn't use the Red separation line where the fuselage pulls apart for engine maintenance. I found that rather strange, so I dug through my resource pictures and sure enough that is correct. I also found an issue with the black nose. The Caracal instructions calls for a split 2 part black nose of different proportions for the top and bottom, but my references has the nose as solid black with those proportions. Unfortunately, I didn't check till it was to late.
So while I didn't apply the Red line, I painted the nose incorrectly.
The decaling while completed, there is no top coat of gloss as yet.
Thanks for stopping by and checking out my build to date. It's always much appreciated.
Joel
I Thinned the X-22 with Tamiya Yellow cap Lacquer based thinner 1:1, then applied a tack coat, followed by 2 sort of wet coats. Gave it 2 full days to dry. What I had was basically a repeat of my previous efforts. Ok to decal over, but I'd be risking some silvering and flash issues, as it was not really smooth to the touch. So I VERY lightly wet sanded the entire fuselage with Tamiya #2000 sanding sponge. You cold see the opaque residue both on the sponge and left on the body. But it was now smoother then ever before. A gentle wash of warm water, and I finally had the finish I was looking for: Smooth as a baby's butt.
For the decals I had purchased the Caracal Models ANG T-33A part 2 sheet which was printed by Cartograf. I've been using a modified decaling system that I got from Paul Budzik: Microscale Set, Sol, & Solvaset.
The decals laid down without any issues, and were extremely easy to do any reposition adjustments, to this end I contribute it to the smoothness of the surface more then anything else. Over all the 4 day decaling process went perfectly. The decals laid down into every single nook & cranny, and I couldn't see any issues once they dried. The only additional thing needed was after about a 1/2 hour I cut the two decals that went over the rudder and Vertical Stabilizer joint , added more Solvaset, and the end result looks as though they were painted separately.
There was a time many years ago when I would have cut out every single letter and number, and then pain snakingly applied them one at a time using tape as a guide, but those days are long gone with poor eye sight and slight shaking due to old age. So I've always been just a little leery of having decals with a lot of clear film as I always managed to have a little silvering issues. But not this time. The polishing solved that issue for me.
Two issues did come up with the Caracal decal placement sheet. The 1st one was that most of the ANG units didn't use the Red separation line where the fuselage pulls apart for engine maintenance. I found that rather strange, so I dug through my resource pictures and sure enough that is correct. I also found an issue with the black nose. The Caracal instructions calls for a split 2 part black nose of different proportions for the top and bottom, but my references has the nose as solid black with those proportions. Unfortunately, I didn't check till it was to late.
So while I didn't apply the Red line, I painted the nose incorrectly.
The decaling while completed, there is no top coat of gloss as yet.
Thanks for stopping by and checking out my build to date. It's always much appreciated.
Joel
rdt1953
New Jersey, United States
Joined: February 06, 2015
KitMaker: 1,098 posts
AeroScale: 900 posts
Joined: February 06, 2015
KitMaker: 1,098 posts
AeroScale: 900 posts
Posted: Saturday, May 12, 2018 - 06:33 AM UTC
Looking really nice Joel ! Doesn't appear too late to correct the nose if you are so inclined but I wouldn't blame you if you left it as is . It's great to get my modeling fix by watching your build while I recharge my batteries ! Give us a heads up when you start your car project - Cheers - Richard
Posted: Saturday, May 12, 2018 - 07:33 AM UTC
The T-33 looks good, especially since she is marked as a bird of the 111th FIS.
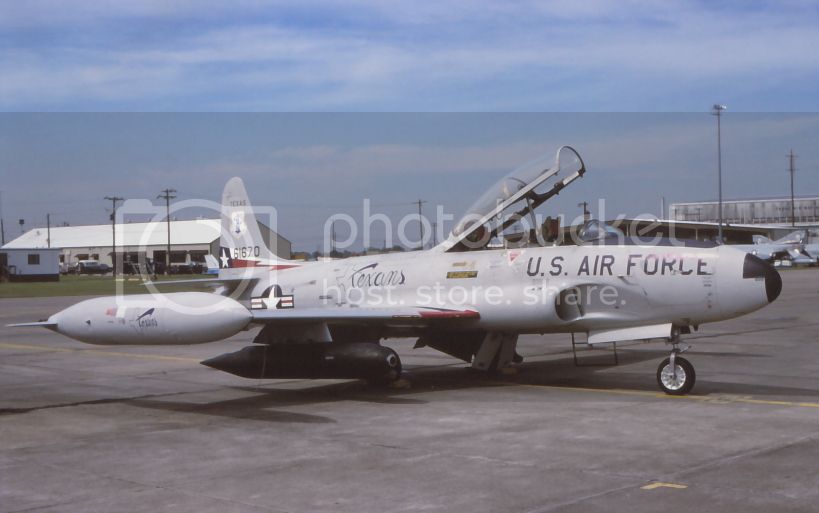
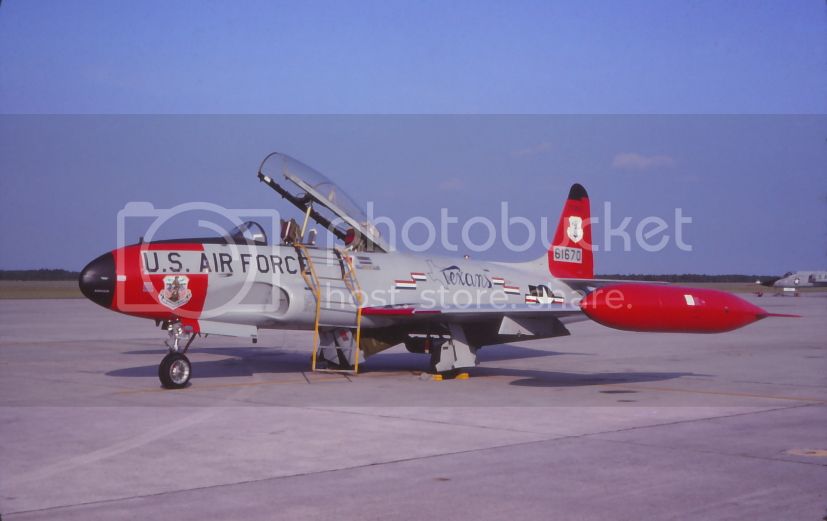
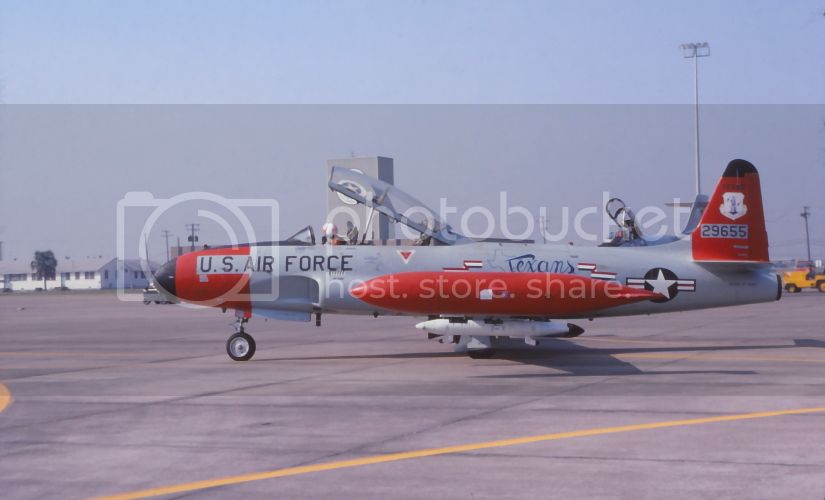
I scoured through slides I've collected, photos I've taken and the unit's book. While there are more images of T-33s with the solid colored nose, there were some with the split black. I even have a slide of 29655. However, it is in her red nose/tail/wingtips scheme prior to application of the flag fin flash.
Unless someone can locate an image of 29655 with the solid color nose it is just as likely the split is correct.
Joel_W
Associate Editor
New York, United States
Joined: December 04, 2010
KitMaker: 11,666 posts
AeroScale: 7,410 posts
Joined: December 04, 2010
KitMaker: 11,666 posts
AeroScale: 7,410 posts
Posted: Sunday, May 13, 2018 - 05:30 AM UTC
Quoted Text
Looking really nice Joel ! Doesn't appear too late to correct the nose if you are so inclined but I wouldn't blame you if you left it as is . It's great to get my modeling fix by watching your build while I recharge my batteries ! Give us a heads up when you start your car project - Cheers - Richard
Richard,
Glad that you approve of my efforts. And I'm thrilled that my most modest efforts are slowly charging your Mojo batteries.
Joel
Joel_W
Associate Editor
New York, United States
Joined: December 04, 2010
KitMaker: 11,666 posts
AeroScale: 7,410 posts
Joined: December 04, 2010
KitMaker: 11,666 posts
AeroScale: 7,410 posts
Posted: Sunday, May 13, 2018 - 05:39 AM UTC
Quoted Text
The T-33 looks good, especially since she is marked as a bird of the 111th FIS.
I scoured through slides I've collected, photos I've taken and the unit's book. While there are more images of T-33s with the solid colored nose, there were some with the split black. I even have a slide of 29655. However, it is in her red nose/tail/wingtips scheme prior to application of the flag fin flash.
Unless someone can locate an image of 29655 with the solid color nose it is just as likely the split is correct.
Daniel,
thanks so much for stopping by and appreciating my efforts to date. You seem to have a good deal of expertise and info on the Texas ANG 111 FS. Your affirmation of the nose being split as well as solid affirms what I've recently learned about the paint markings on the their aircraft, as there was quite a number of changes throughout their service time.
KursadA who I know from the ARC forums, is the owner of Caracal decals, posted several pictures to show where he got his information from.
So now I'm confident that the split nose is correct for the time period that I'm modeling.
Joel
Posted: Sunday, May 13, 2018 - 05:08 PM UTC
The 111th is my favorite squadron. My father served in that squadron and as a kid we would go to Ellington and from the fence watch the Phantoms and later the Fighting Falcons take-off and land. Also attended the family days there.
I have a kit in the stash (and some built even!) of nearly each type the 111th has operated from Jennys to Predators. I snatch up each release of Caracal's decals that feature the 111th regardless of scale.
Attached are two shots of 61670 in different schemes along with one of 29655 in the red scheme. These were scanned from slides I've collected.
Posted: Monday, May 14, 2018 - 12:50 AM UTC
Joel awesome work as per usual my friend! I love the lines of the T-33 while no hot rod in jet terms it has a style, grace and poise all it's own. And so many countries flew it the choices of paint schemes are virtually endless. I have one in Japanese markings in 1/72nd scale I got from my eldest when they finally admitted that building kits wasn't for them (I had harboured hopes they might take after Dad).
Also good to know that Caracal decals has done their homework regarding the subject in question. Always good to find you can trust the info you're given.
Willard79
Wellington, New Zealand
Joined: June 01, 2014
KitMaker: 189 posts
AeroScale: 179 posts
Joined: June 01, 2014
KitMaker: 189 posts
AeroScale: 179 posts
Posted: Monday, May 14, 2018 - 01:25 AM UTC
Hi Joel, with the decals on, it's really taking shape and looking the part. That nose profile is such a contrast between top and side views. Glad you reconciled the black configuration on the nose before you did anything drastic.
All the best for the finishing straight.
Regards.
All the best for the finishing straight.
Regards.
Joel_W
Associate Editor
New York, United States
Joined: December 04, 2010
KitMaker: 11,666 posts
AeroScale: 7,410 posts
Joined: December 04, 2010
KitMaker: 11,666 posts
AeroScale: 7,410 posts
Posted: Monday, May 14, 2018 - 02:11 AM UTC
Quoted Text
The 111th is my favorite squadron. My father served in that squadron and as a kid we would go to Ellington and from the fence watch the Phantoms and later the Fighting Falcons take-off and land. Also attended the family days there.
I have a kit in the stash (and some built even!) of nearly each type the 111th has operated from Jennys to Predators. I snatch up each release of Caracal's decals that feature the 111th regardless of scale.
Attached are two shots of 61670 in different schemes along with one of 29655 in the red scheme.
Daniel,
You're certainly our resident expert on the Texas 111 FIS. I gotta admit that I really like the Red scheme but I'm more then satisfied with the all ADC and the Texas markings as it does make a proud statement.
I've posted from time to time that I grew up halfway between Grumman's main plant in Bethpage NY, and Republic plants in Farmingdale. My brother and I use to ride out bikes to both plants all the time, and just hang by the main fence. So my aviation soft spot is for anything that they built.
I must confess that I was considering doing the 123rd FIS ANG from Oregon as I did my F-15 with those markings. But I saw the light and went with the 111th.
Joel
Joel_W
Associate Editor
New York, United States
Joined: December 04, 2010
KitMaker: 11,666 posts
AeroScale: 7,410 posts
Joined: December 04, 2010
KitMaker: 11,666 posts
AeroScale: 7,410 posts
Posted: Monday, May 14, 2018 - 02:19 AM UTC
Quoted Text
Joel awesome work as per usual my friend! I love the lines of the T-33 while no hot rod in jet terms it has a style, grace and poise all it's own. And so many countries flew it the choices of paint schemes are virtually endless. I have one in Japanese markings in 1/72nd scale I got from my eldest when they finally admitted that building kits wasn't for them (I had harboured hopes they might take after Dad).
Also good to know that Caracal decals has done their homework regarding the subject in question. Always good to find you can trust the info you're given.
Chris,
thanks for the thumbs up, it's always greatly appreciated.
Being a prop guy, I prefer earlier generation jets, but I still build just about anything that flew through the Iraqi wars.
I've been pretty fortunate to get feedback from several of the AM decal companies that I've used. AOA and Caracal are my favorites by far. Not only do these guy make great decals that are well researched, but they're modelers as well.
Sorry to hear that your kids didn't follow in your footsteps, but if it's any consolation neither did my son. My two other past times are photography and now once again fishing. He has no interest in photography but he did fish with me while he was in High School, then he lost interest in it when cars and girls became super important to him.
Joel
Joel_W
Associate Editor
New York, United States
Joined: December 04, 2010
KitMaker: 11,666 posts
AeroScale: 7,410 posts
Joined: December 04, 2010
KitMaker: 11,666 posts
AeroScale: 7,410 posts
Posted: Monday, May 14, 2018 - 02:27 AM UTC
Quoted Text
Hi Joel, with the decals on, it's really taking shape and looking the part. That nose profile is such a contrast between top and side views. Glad you reconciled the black configuration on the nose before you did anything drastic.
All the best for the finishing straight.
Regards.
Hey Spud,
Yeah, she's finally starting to look the part for sure. I can finally see the light at the end of the tunnel as what I thought was going to be a real easy and quick build, is taking a lot longer. Good thing that the kit didn't hide any surprises. I've built two other GWH kits in 1/48 scale, and each one was a joy to build.
I'm already looking forward to my next build which will be a race car. right now I'm really leaning towards the fujimi 1/24 scale Porsche 917K long tail from the 1971 LeMans race. It's not a overly complex kit, so I can concentrate on trying to achieve a super smooth and glossy paint job.
Joel
Willard79
Wellington, New Zealand
Joined: June 01, 2014
KitMaker: 189 posts
AeroScale: 179 posts
Joined: June 01, 2014
KitMaker: 189 posts
AeroScale: 179 posts
Posted: Monday, May 14, 2018 - 03:02 AM UTC
Quoted Text
I can finally see the light at the end of the tunnel as what I thought was going to be a real easy and quick build, is taking a lot longer.
I hear that. I'm oh so close with my I-16, and trying not to stuff it up at the last stage.
All the best.
Posted: Monday, May 14, 2018 - 09:10 AM UTC
My kids (both girls) adore fishing and hunting and nag their old man to take them when he trundles off to fish or hunt.
Yeah I hear that Joel I'll build anything if I like it or I'm commissioned to do so. I'm in the midst of a couple of large scale builds for a guy up in Auckland but they're subjects close to my heart specifically Revell's 1/32 scale Tornado and A 1/32 scale Tamiya F-15E Strike Eagle. Hence my presence has been lacking here on Aeroscale but I am lurking around watching what y'all are up too.
And as usual the T-33 is definitely up to what I describe as the "Joel Willstein level of excellence"!
Joel_W
Associate Editor
New York, United States
Joined: December 04, 2010
KitMaker: 11,666 posts
AeroScale: 7,410 posts
Joined: December 04, 2010
KitMaker: 11,666 posts
AeroScale: 7,410 posts
Posted: Monday, May 14, 2018 - 08:35 PM UTC
Quoted Text
My kids (both girls) adore fishing and hunting and nag their old man to take them when he trundles off to fish or hunt.
Yeah I hear that Joel I'll build anything if I like it or I'm commissioned to do so. I'm in the midst of a couple of large scale builds for a guy up in Auckland but they're subjects close to my heart specifically Revell's 1/32 scale Tornado and A 1/32 scale Tamiya F-15E Strike Eagle. Hence my presence has been lacking here on Aeroscale but I am lurking around watching what y'all are up too.
And as usual the T-33 is definitely up to what I describe as the "Joel Willstein level of excellence"!
Chris,
If we didn't live on opposite sides of the world, we've surely be wetting a line together. Unfortunately, not much chance of that happening unless I win the lottery.
I'm speechless, which is a rare occurrence in these parts for me, when you posted: :Joel Willstein level of excellence". Thank you my friend for those words. You've made my day.
I'm really impressed that you get commission builds, I've never had the opportunity to do one. Must be even more pressure to the build as you're now building to someone else's standards.
Joel
Joel_W
Associate Editor
New York, United States
Joined: December 04, 2010
KitMaker: 11,666 posts
AeroScale: 7,410 posts
Joined: December 04, 2010
KitMaker: 11,666 posts
AeroScale: 7,410 posts
Posted: Monday, May 14, 2018 - 08:39 PM UTC
Quoted Text
Quoted TextI can finally see the light at the end of the tunnel as what I thought was going to be a real easy and quick build, is taking a lot longer.
I hear that. I'm oh so close with my I-16, and trying not to stuff it up at the last stage.
All the best.
Spud,
Close seems to cause me more issues and screw ups then almost anything else, as my mind is slowly starting to focus on my next build. I have a hard fast golden rule to only work on one build at a time, and never put it down with the intention to come back to it at a later date. If I put it down, then I'm on R&R till I pick it up again, or it takes a one way trip to the recycling center. I just never learned how to focus on two or more builds as the same time. I will open the box to see what I need for the planned build so everything is here at the start with no surprises, and do my research, but that's it.
Joel
Posted: Tuesday, May 15, 2018 - 01:38 AM UTC
Hi Joel glad I could make your day my friend!
The biggest pressure with commission builds is completing them in a timely fashion as I can't fuss over them like I can with my usual builds. The guy I'm working for is thrilled with how I build models and leaves it up to me just how and what I do with them so no pressure in that respect (except the pressure I usually put on myself to make a quality build).
I'm working on the Tornado at present and gathering info on the Strike Eagle. The conformal fuel tanks have changed the lines of the bird quite a bit which I didn't realise till now. The Tamiya kit is something I wouldn't have bought myself as the price tag here is close to 300 NZD new and my significant other would lay waste to my sorry butt if I did! I have the Revell rendition ($55 NZD second hand) to build at some point which I'll put in a build log when I do. The other plus for commission builds is I don't generally put them up on Aeroscale.
As a last point your build of the T-33 has me itching to build the kit myself ...... a prop guy like me turning into a jet jock go figure!
Joel_W
Associate Editor
New York, United States
Joined: December 04, 2010
KitMaker: 11,666 posts
AeroScale: 7,410 posts
Joined: December 04, 2010
KitMaker: 11,666 posts
AeroScale: 7,410 posts
Posted: Tuesday, May 15, 2018 - 06:56 PM UTC
Quoted Text
Hi Joel glad I could make your day my friend!
The biggest pressure with commission builds is completing them in a timely fashion as I can't fuss over them like I can with my usual builds. The guy I'm working for is thrilled with how I build models and leaves it up to me just how and what I do with them so no pressure in that respect (except the pressure I usually put on myself to make a quality build).
I'm working on the Tornado at present and gathering info on the Strike Eagle. The conformal fuel tanks have changed the lines of the bird quite a bit which I didn't realise till now. The Tamiya kit is something I wouldn't have bought myself as the price tag here is close to 300 NZD new and my significant other would lay waste to my sorry butt if I did! I have the Revell rendition ($55 NZD second hand) to build at some point which I'll put in a build log when I do. The other plus for commission builds is I don't generally put them up on Aeroscale.
As a last point your build of the T-33 has me itching to build the kit myself ...... a prop guy like me turning into a jet jock go figure!
Chris,
just once I'd love to get a commission build.
As for a prop guy slowly turning into jet Jock, well, I seem to be right behind you in the line.
Joel
Joel_W
Associate Editor
New York, United States
Joined: December 04, 2010
KitMaker: 11,666 posts
AeroScale: 7,410 posts
Joined: December 04, 2010
KitMaker: 11,666 posts
AeroScale: 7,410 posts
Posted: Friday, May 18, 2018 - 11:12 PM UTC
Well, another week has passed and a little more progress has been made. I sealed the decals in Tamiya X-22 Gloss cut with Mr. Color 400 Self Leveling Thinner 1:1. Just amazing stuff. Then I used a home made enamel base wash of a generic oil Lamp Black thinned with Turpenoid, and gave the entire aircraft a coating of it. After it had dried for 10 min or so, I wiped off 90% of it with a damp cotton cloth making sure that I went very easy over any panel lines and always at a 45 degree or greater angle. this way I stood a better chance of not sucking up the panel line wash.
This accomplished two weathering phases. 1st as I said, all the panel lines received a wash, and since they're so shallow and petite, black worked perfectly. The 2nd weathering phase was to create a slight oxidation look to the paint which was well maintained, but if it flew, it had some wear and tear to it. the result is just enough to knock down the new paint look.
I let this cure for a good 48 hrs., then I applied a Matt clear coat using Testors Dullcoat cut with Mr. Color 400 Self Leveling Thinner but at a 2:3 ratio. I applied a tack coat, then two wet coats, and let it dry for 24 hrs. Then I very lightly rubbed down the surface with a #4000 Micro Mesh pad and plenty of water. The surface is now silky smooth, and the decals look more like the were painted on.
I removed the windscreen masks and the cockpit masks, glued on the wing tip tanks, that will need a touch of adjusting, and then took some pictures.
Gotta say that she's finally starting to really look the part of a Texas 111 FIS ANG T-33A.
Joel
Willard79
Wellington, New Zealand
Joined: June 01, 2014
KitMaker: 189 posts
AeroScale: 179 posts
Joined: June 01, 2014
KitMaker: 189 posts
AeroScale: 179 posts
Posted: Saturday, May 19, 2018 - 01:44 AM UTC
Looking very nice Joel. Yes, I imagine subtle is the name of the game for this build. Easy to say. So far so good, finish line must be in sight?
regards.
regards.
thegirl
Alberta, Canada
Joined: January 19, 2008
KitMaker: 6,743 posts
AeroScale: 6,151 posts
Joined: January 19, 2008
KitMaker: 6,743 posts
AeroScale: 6,151 posts
Posted: Saturday, May 19, 2018 - 01:50 AM UTC
It has been some time since my last visit on your build , making wonderful progress on her . Awesome job on the decals and the rest of the build , in whole ...Super !
Terri
Terri
Joel_W
Associate Editor
New York, United States
Joined: December 04, 2010
KitMaker: 11,666 posts
AeroScale: 7,410 posts
Joined: December 04, 2010
KitMaker: 11,666 posts
AeroScale: 7,410 posts
Posted: Saturday, May 19, 2018 - 02:00 AM UTC
Quoted Text
Looking very nice Joel. Yes, I imagine subtle is the name of the game for this build. Easy to say. So far so good, finish line must be in sight?
regards.
Spud,
subtle and little steps is the name of the game with this build. I'm almost in sight of the finish line, but not quite. I always manage to have at least one hiccup just when I thought I was home free.
Joel
Joel_W
Associate Editor
New York, United States
Joined: December 04, 2010
KitMaker: 11,666 posts
AeroScale: 7,410 posts
Joined: December 04, 2010
KitMaker: 11,666 posts
AeroScale: 7,410 posts
Posted: Saturday, May 19, 2018 - 02:07 AM UTC
Quoted Text
It has been some time since my last visit on your build , making wonderful progress on her . Awesome job on the decals and the rest of the build , in whole ...Super !
Terri
Hi Terri,
So glad you had time to stop by for a look, and like what you see. Progress in baby steps has been my middle name of late, but sooner or later I'll cross that finish line
Then my 1st race car in nearly 10 years. It's going to be the Fujimi 1/24 scale Porsche 917K Long Tail Martini winner of the 1971 12 hrs of Sebring. my memory is a little blurry about if I was at that race or the 1970 one. It's been a really long time.
Joel