Hello again, Guys!
After the Mirage was done and left my bench, there’s now space and hopefully time for another “quick build” with a Prop.
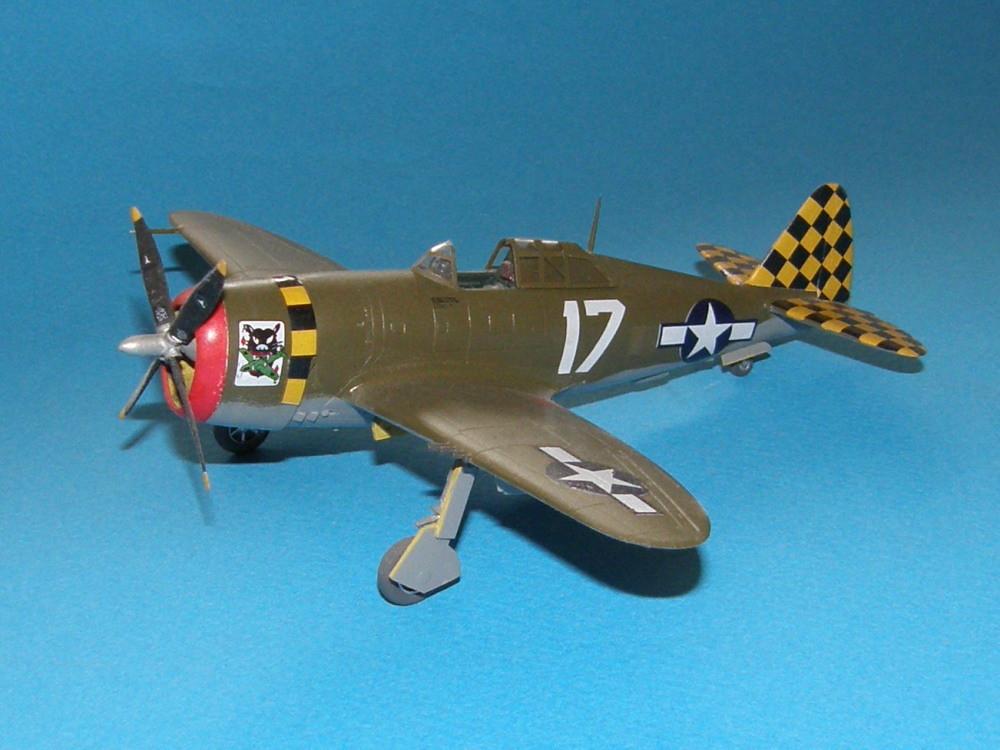
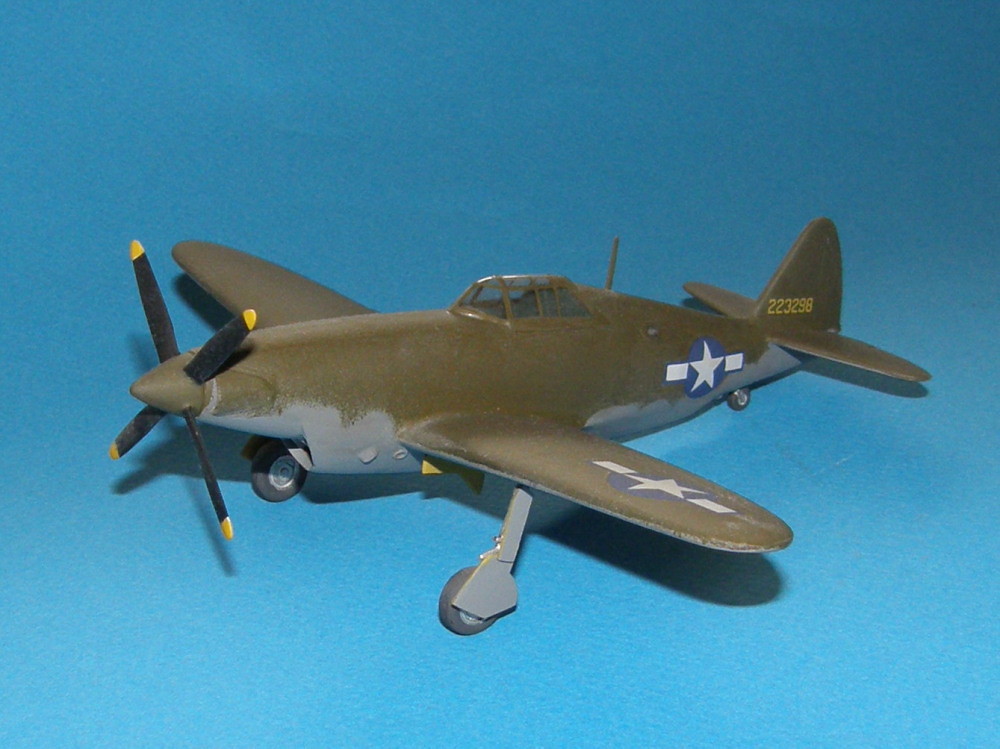
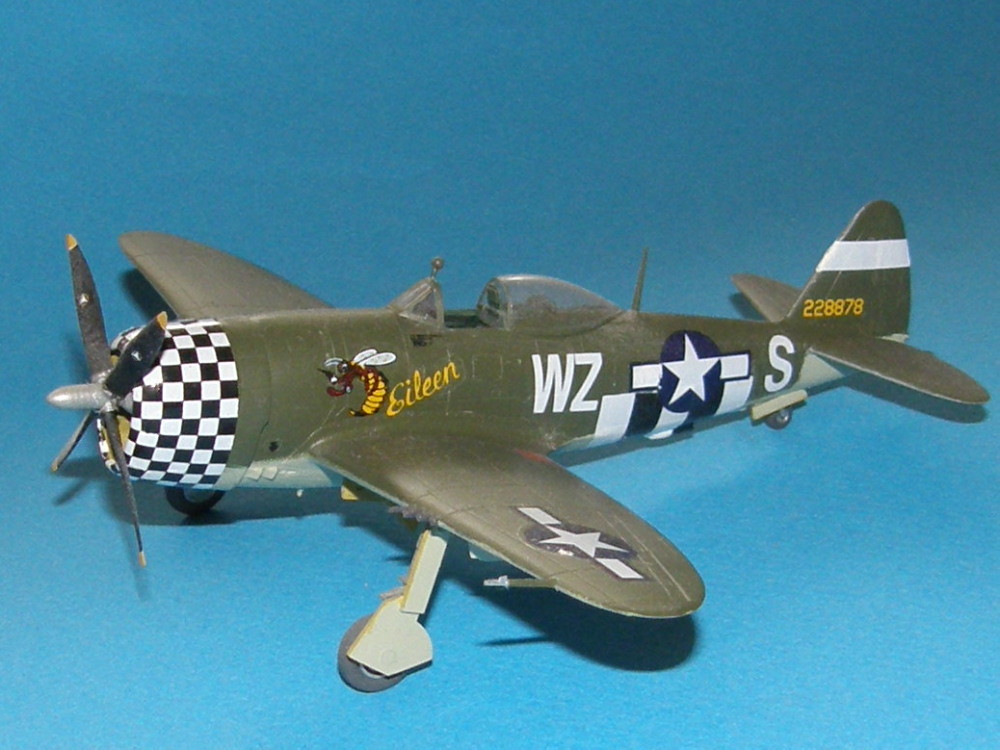
ACADEMY’S 1/72 P-47D Thunderbolt Razorback – Checkertail markings, Italy 1944
I’m aiming it for the MTO-Campaign, so maybe someone’s interested in a few more details in a little build log.
Choosing this kit after compared quality/price with the other brands although I know about the issues (maybe more in 48 scale).
… legs/prop nose too long, measurements not accurately, Cannon alignment, Cockpit floor etc.
On the other hand, nicely molded with fine surface details and panel lines and a good fit so far.
Hints, tips and comments are always appreciated.
But anyhow I’ll give it a try as I haven’t yet a P-47 but I like the Jug.
Should be a short enjoyable OOB-build, but…
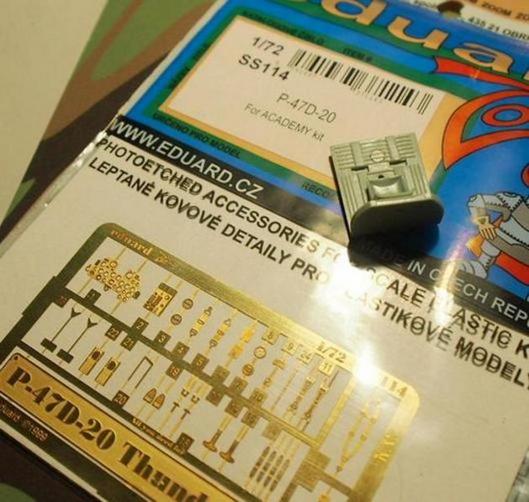
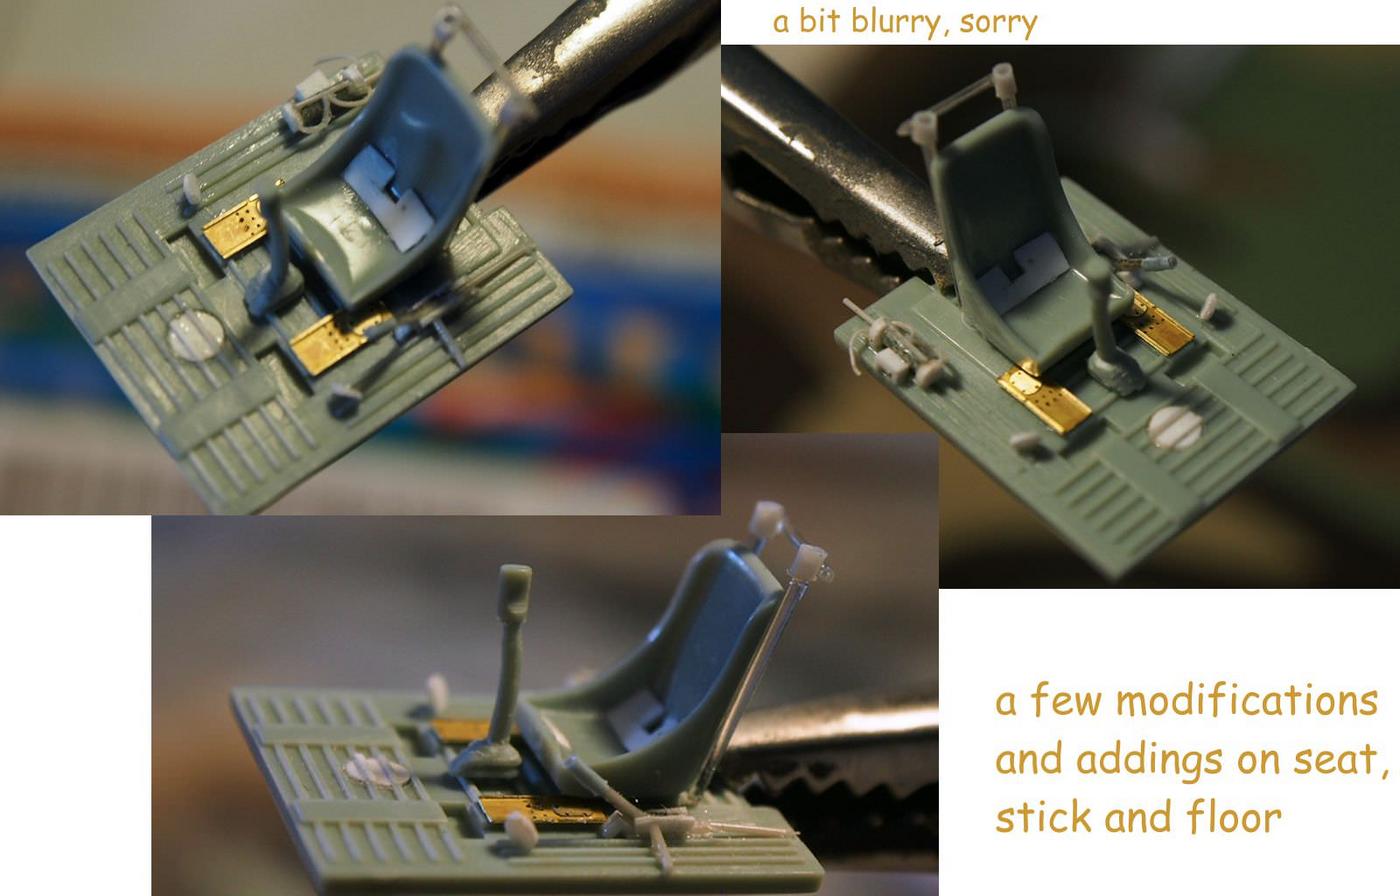
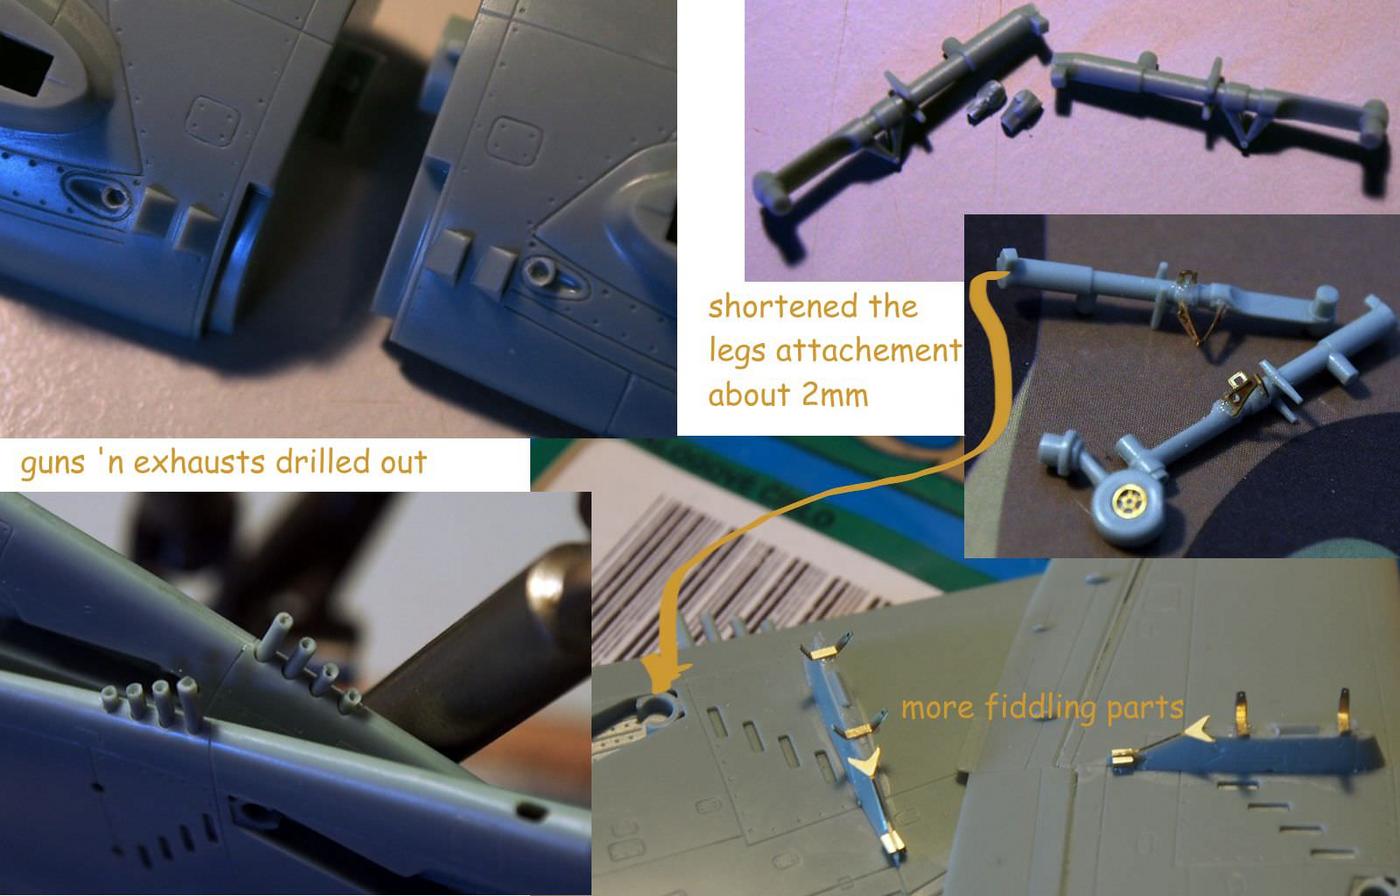
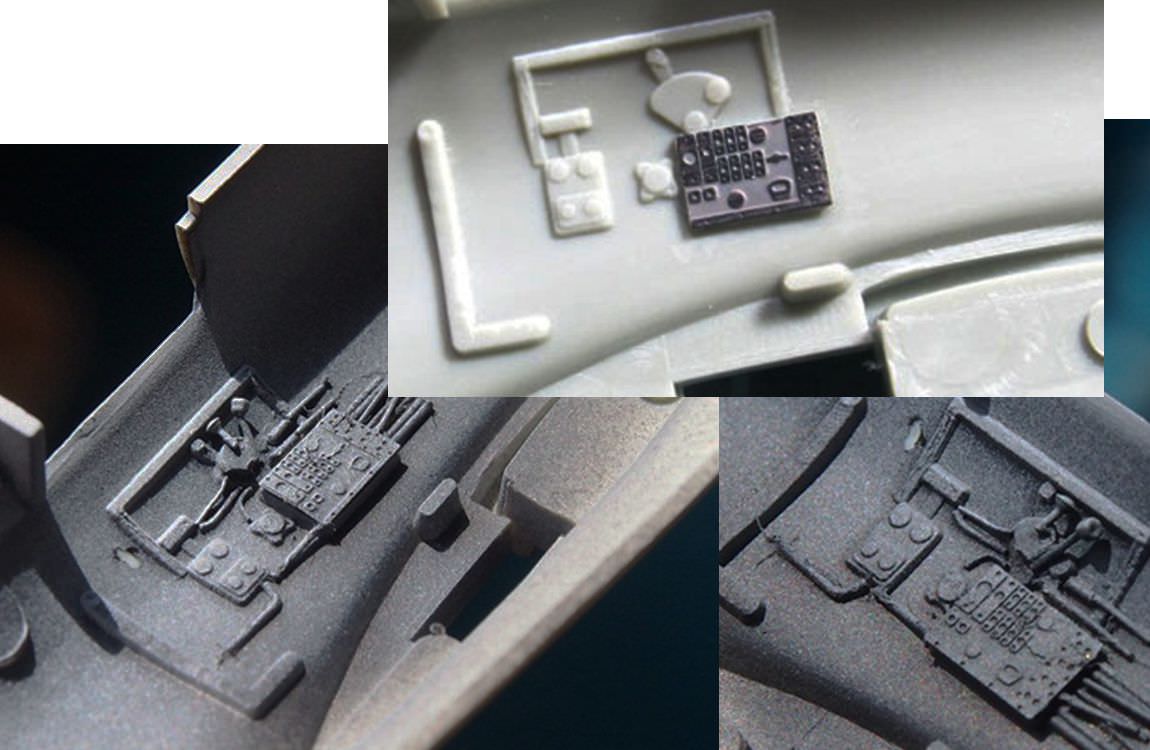
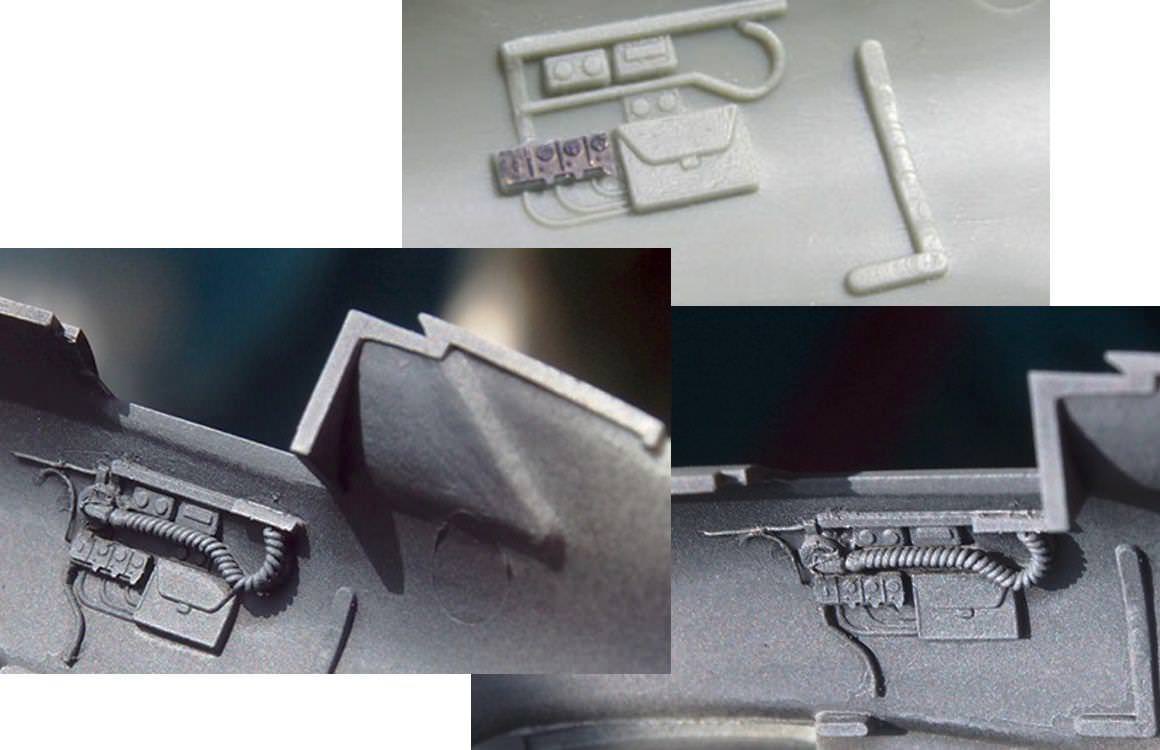
As I try to practice new things, I got me a small Eduard e/p-fret for cheap, so I’m working the first time with etched stuff. After some research, I also decided do some surgery and additional styrene – not that much and not correcting everything! Planning to leave the wheel wells as they come.
But I like to display it with open canopy so there should be something visible in the pit.
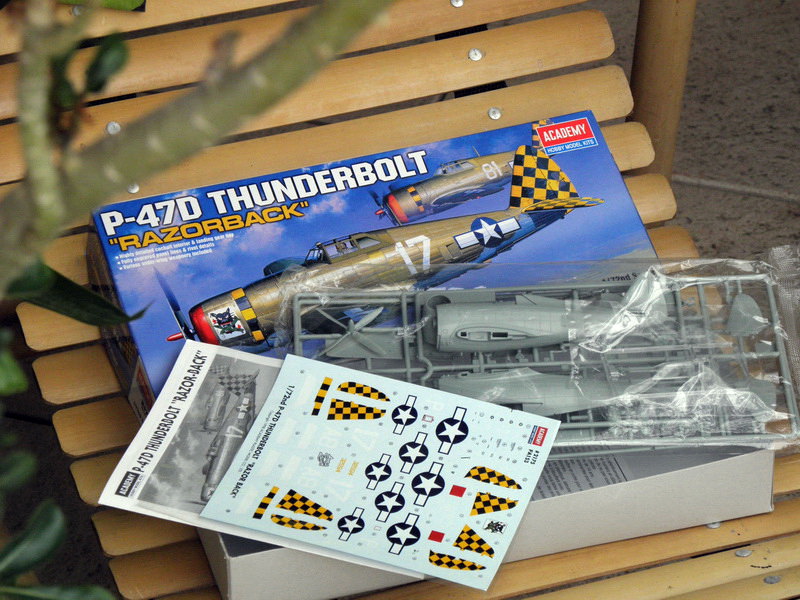
Found great additional information in Nigel’s P-47 Thunderbolt SIG-thread.
The history of those Squads ‘n Guys might be commonly known, especially in the U.S., but for me the special historical background was totally new and caught my interest.
About the pilot:
Cecil O. Dean
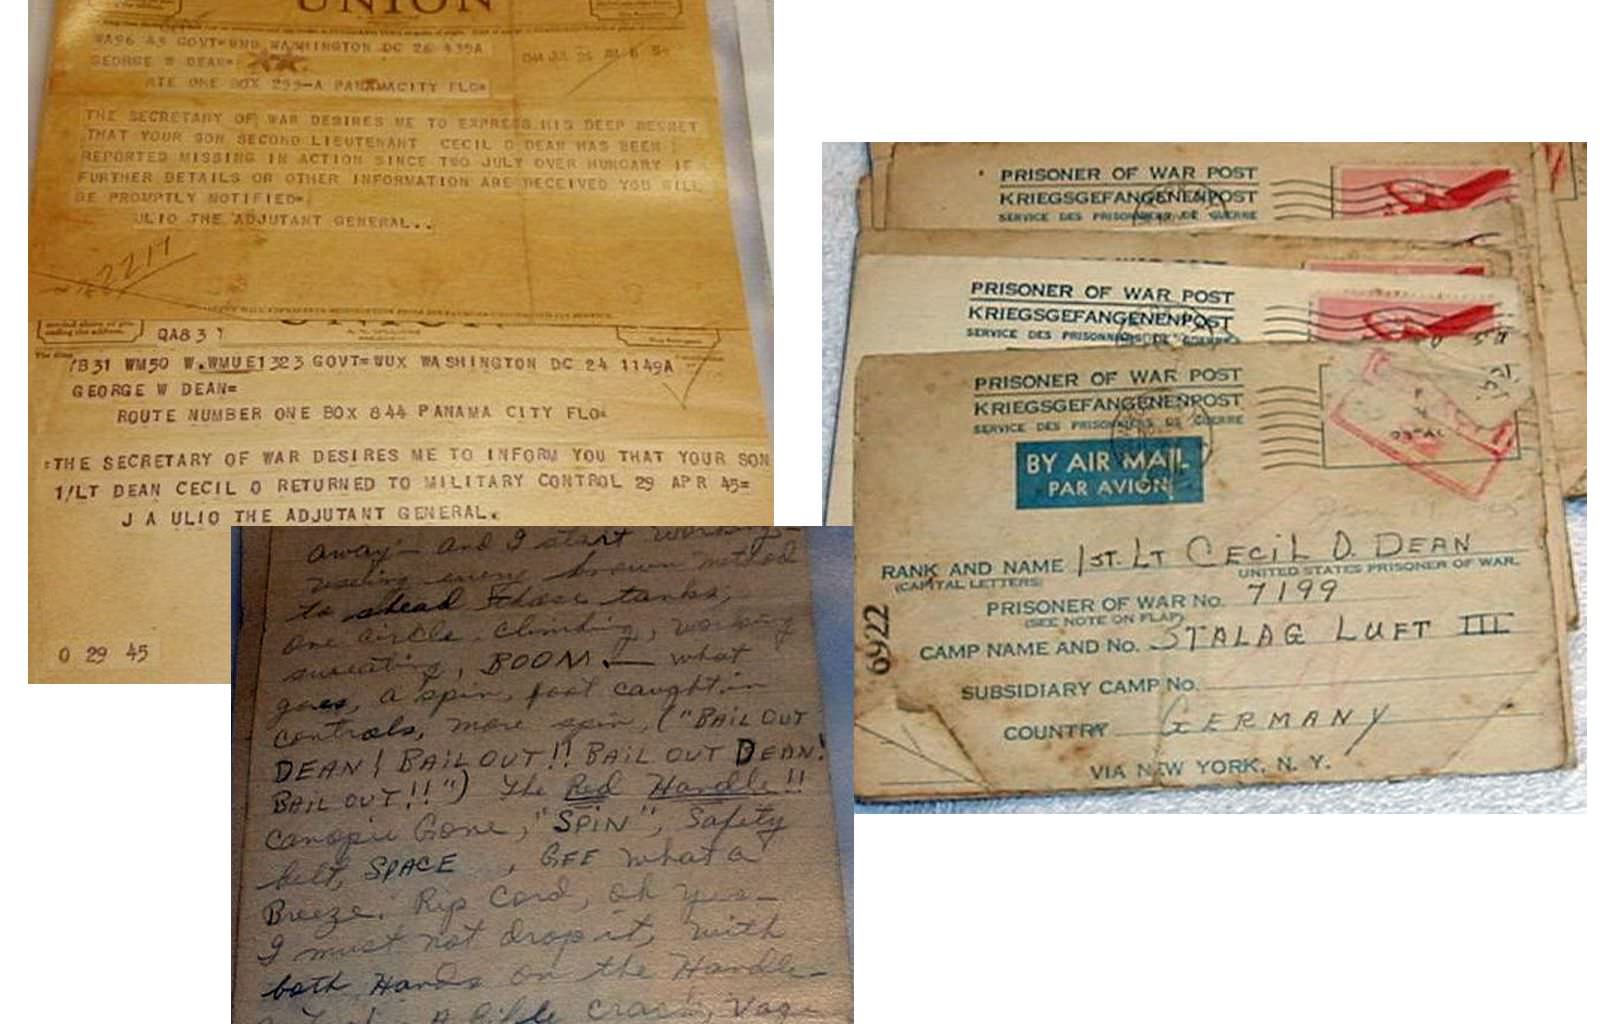
“…He began his aviation service as an Enlisted Pilot, fought in WWII with the 317th Fighter Sq of the 325th Fighter Group -The Checkertail Clan. He has 6 confirmed kills and was shot down over Hungary in July of 1944 and became a POW for 10 months. He flew P-40s (one kill), P-47s (3 kills) and P-51 Mustangs (2 kills).”
Somewhat I’ve found in the web makes the build even more personal. Thanks the author for sharing that!
Partially (only shown for historical reasons, no commercial interests):
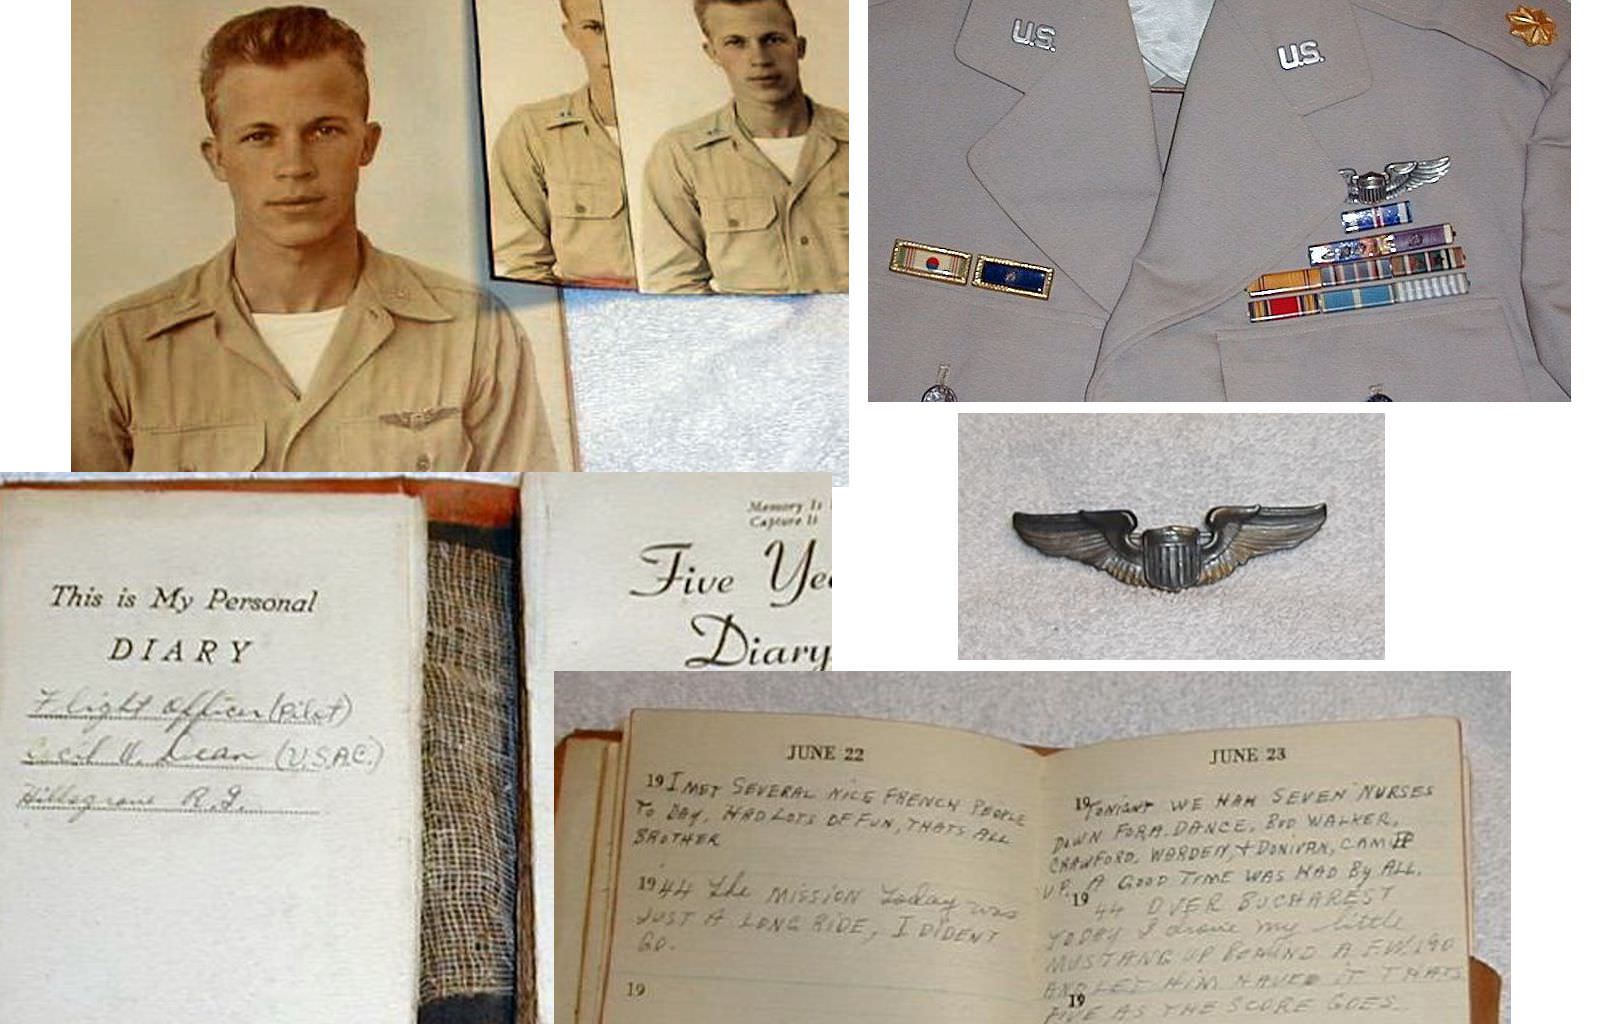
“BAIL OUT DEAN, BAIL OUT!”
About the Squad:
“The 317th Fighter Squadron was activated on 1 July 1942 at Theodore Green Airport, Providence, Rhode Island, as part of the 325th Fighter Group, the "Checker Tails". After six months of intensive training in the P-40 Warhawk, the 317th embarked for North Africa aboard the USS Ranger, in consort with its sister squadrons, the 318th and 319th. The 317th flew its first combat mission in the Mediterranean Theater of Operations (MTO) under 12th Air Force on 17 April 1943. Flying P-40 Warhawks, P-47 Thunderbolts and P-51 Mustangs, the 317th fought in 13 separate campaigns where it earned two Distinguished Unit Citations in action over Italy and Sardinia. In October 1945, after the conclusion of the European air war, the 317th returned to the United States and was inactivated.”
The inside of the book was signed by Dean, “Clan Members” and pilots of the 325th FG , Names might be known by someone.
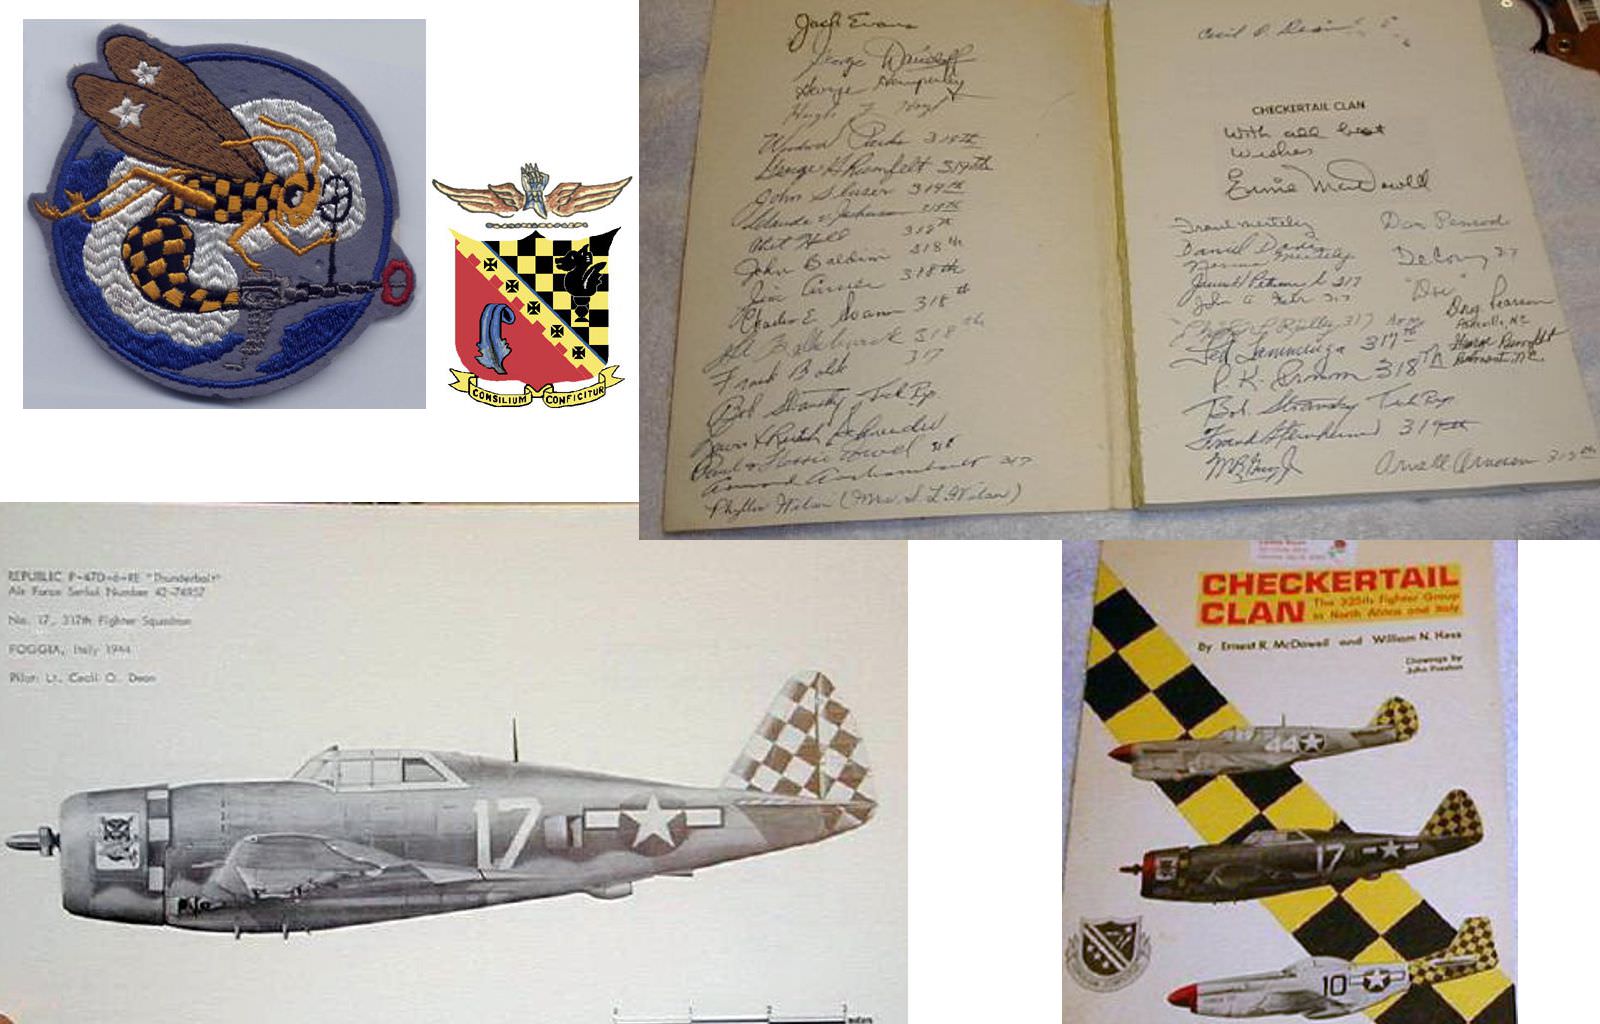
BTW – help needed:
The pic of the a/c shows the canopy maybe plain NMF – any suggestions? I know, it was fairly common among P-47's but on this unit?
So far:
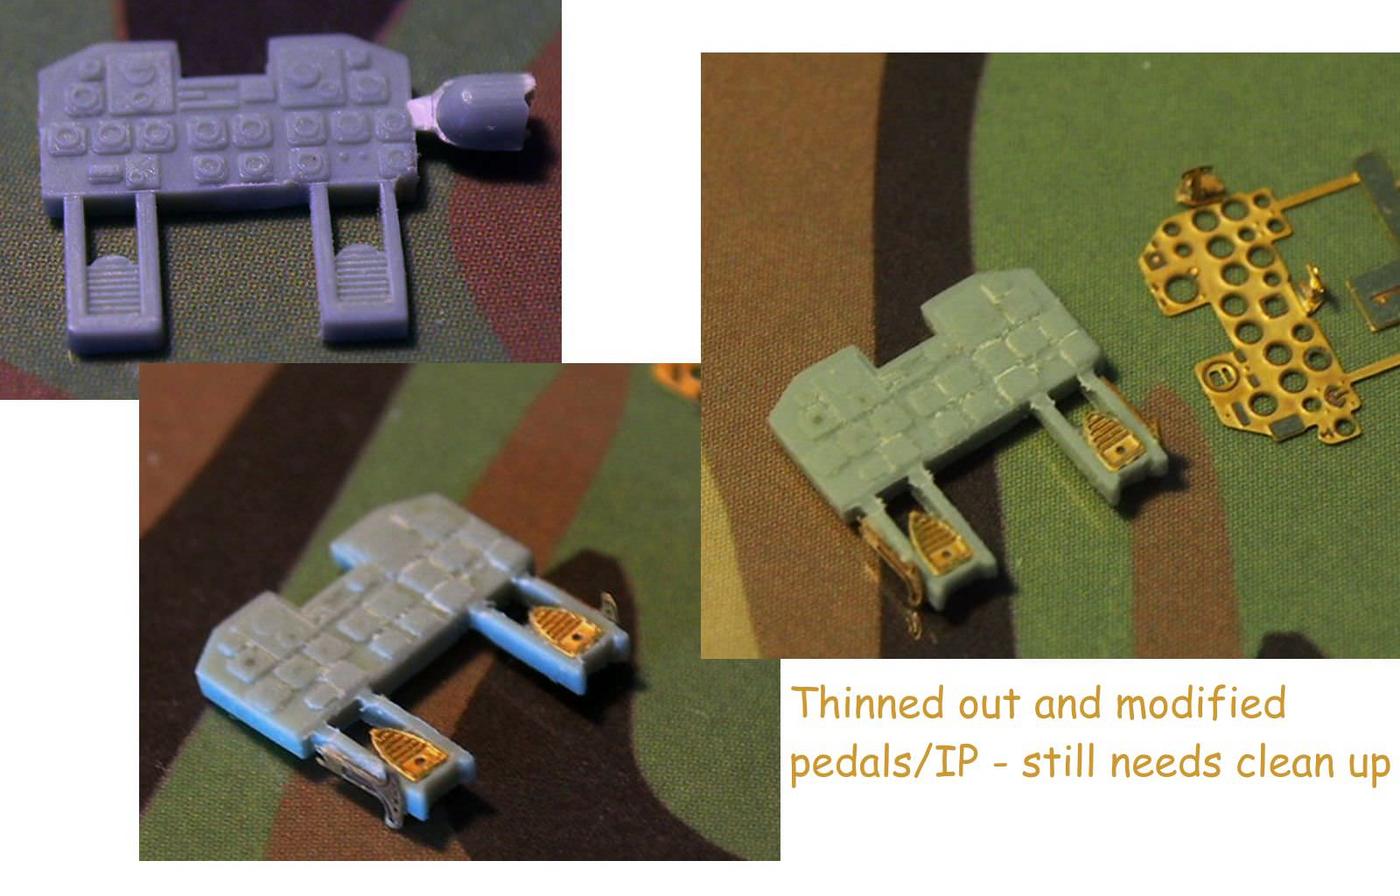
More soon after moving on with the fuselage halves and maybe some Primer ...
Th mas
World War II
Discuss WWII and the era directly before and after the war from 1935-1949.
Hosted by Rowan Baylis
Build Academy's 1/72 P-47 Razorback
goodn8
Berlin, Germany
Joined: October 12, 2008
KitMaker: 709 posts
AeroScale: 651 posts
Joined: October 12, 2008
KitMaker: 709 posts
AeroScale: 651 posts
Posted: Wednesday, August 22, 2018 - 01:58 AM UTC
Posted: Wednesday, August 22, 2018 - 10:55 AM UTC
always had a soft spot for the "jug"
following with interest Thomas
chris1
Auckland, New Zealand
Joined: October 25, 2005
KitMaker: 949 posts
AeroScale: 493 posts
Joined: October 25, 2005
KitMaker: 949 posts
AeroScale: 493 posts
Posted: Wednesday, August 22, 2018 - 12:21 PM UTC
Hi Thomas,
I'm following along,it's a nice kit I've built a couple BUT a word of warning the decals are typical Academy,not good.
I'll be interested in how you deal with the tail checkerboards as this is where I really struggled.
The drilled barrels look good,I'll have a hunt through my P-47 library and see what I can find regarding the canopy will post once I've got some info . I'm sure Nige will know in any case.
Cheers
Chris
goodn8
Berlin, Germany
Joined: October 12, 2008
KitMaker: 709 posts
AeroScale: 651 posts
Joined: October 12, 2008
KitMaker: 709 posts
AeroScale: 651 posts
Posted: Friday, August 24, 2018 - 09:12 AM UTC
Thanks, guys
Russell, thank you very much for stopping by and follow the topic!
Chris, appreciate your support and help! I never tried out Academy decals before but I realised their issues. Let's see.
Th mas
Russell, thank you very much for stopping by and follow the topic!
Chris, appreciate your support and help! I never tried out Academy decals before but I realised their issues. Let's see.
Th mas
goodn8
Berlin, Germany
Joined: October 12, 2008
KitMaker: 709 posts
AeroScale: 651 posts
Joined: October 12, 2008
KitMaker: 709 posts
AeroScale: 651 posts
Posted: Friday, August 24, 2018 - 09:13 AM UTC
Here's a little more progress.
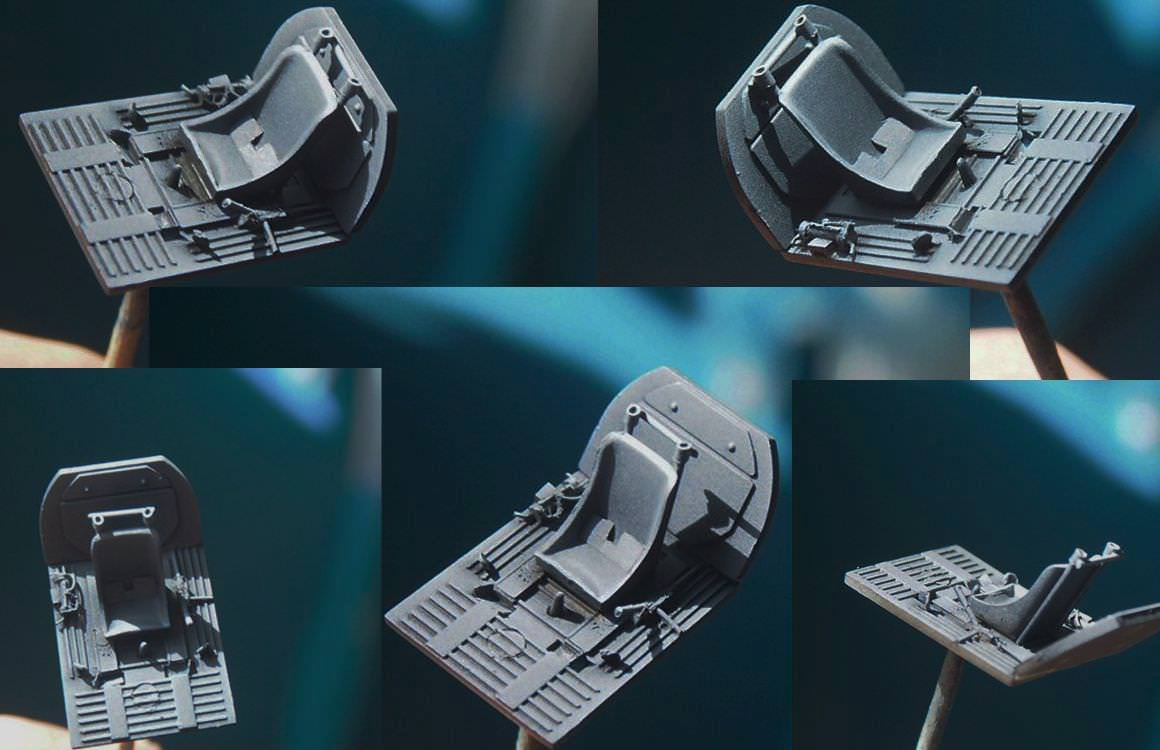
Gave some parts a few layers of black and grey primer. Used again Vallejo, not sure if I always stay with their product.
Colorisation should be next ...
Th mas
SHAKY962
Buenos Aires, Argentina
Joined: May 21, 2012
KitMaker: 765 posts
AeroScale: 316 posts
Joined: May 21, 2012
KitMaker: 765 posts
AeroScale: 316 posts
Posted: Friday, August 24, 2018 - 10:52 AM UTC
Nice start!!!!
Jessie_C
British Columbia, Canada
Joined: September 03, 2009
KitMaker: 6,965 posts
AeroScale: 6,247 posts
Joined: September 03, 2009
KitMaker: 6,965 posts
AeroScale: 6,247 posts
Posted: Saturday, August 25, 2018 - 04:19 AM UTC
Here's mine, straight out of the box.
goodn8
Berlin, Germany
Joined: October 12, 2008
KitMaker: 709 posts
AeroScale: 651 posts
Joined: October 12, 2008
KitMaker: 709 posts
AeroScale: 651 posts
Posted: Sunday, August 26, 2018 - 08:58 AM UTC
Jose,
thanks! Hope I can move on straight.
Jessica,
really appreciate you’re passing by!
Didn’t recognized your neat build before, expecting more something with a “51” in the Name (though I’m aware about your exceptions).
Thanks for share and I like the way you done it, especially without all weaponry as I planned to do same.
Can you remember how you handled the decals? Looking close, they still appear fairly thick.
Th mas
Jessie_C
British Columbia, Canada
Joined: September 03, 2009
KitMaker: 6,965 posts
AeroScale: 6,247 posts
Joined: September 03, 2009
KitMaker: 6,965 posts
AeroScale: 6,247 posts
Posted: Monday, August 27, 2018 - 03:20 AM UTC
The decals were Academy's usual awful. I used very hot water and Solvaset to get them to behave. A puddle of wet Future can also help to prevent silvering.
Joel_W
Associate Editor
New York, United States
Joined: December 04, 2010
KitMaker: 11,666 posts
AeroScale: 7,410 posts
Joined: December 04, 2010
KitMaker: 11,666 posts
AeroScale: 7,410 posts
Posted: Monday, August 27, 2018 - 05:07 AM UTC
Thomas,
I've been spending a little less time here in Aeroscale these days, as I've been building and posting my race cars over at AutoModeler. But When I saw your Jug build, I just had to stop by and check it out.
So far it really looks good. The extra detailing in the pit really makes a big difference, and since you're going to leave the canopy open, it will really stand out.
I usually use AM decals for all my builds, but after seeing how Jessica made them work, you should be ok.
And Jessica, it's a treat not only seeing one of your posts, but one of your builds as well.
Joel
Jessie_C
British Columbia, Canada
Joined: September 03, 2009
KitMaker: 6,965 posts
AeroScale: 6,247 posts
Joined: September 03, 2009
KitMaker: 6,965 posts
AeroScale: 6,247 posts
Posted: Monday, August 27, 2018 - 05:41 AM UTC
Quoted Text
And Jessica, it's a treat not only seeing one of your posts, but one of your builds as well.
Joel
If Thomas will forgive the indulgence, I built that one as part of a trio. Here are the other two.
goodn8
Berlin, Germany
Joined: October 12, 2008
KitMaker: 709 posts
AeroScale: 651 posts
Joined: October 12, 2008
KitMaker: 709 posts
AeroScale: 651 posts
Posted: Monday, August 27, 2018 - 06:56 AM UTC
Arrrgh, thread hijacked...
just kidding, always welcome Jessica! Nice ones.
Joel,
glad that you sneaked in!
I do not really spend that much effort like I did on the Mirage's pit. Just a bit more than the kit offers, what should speed up the build. I think from a normal distance on this scale it'll look hopefully more of interest.
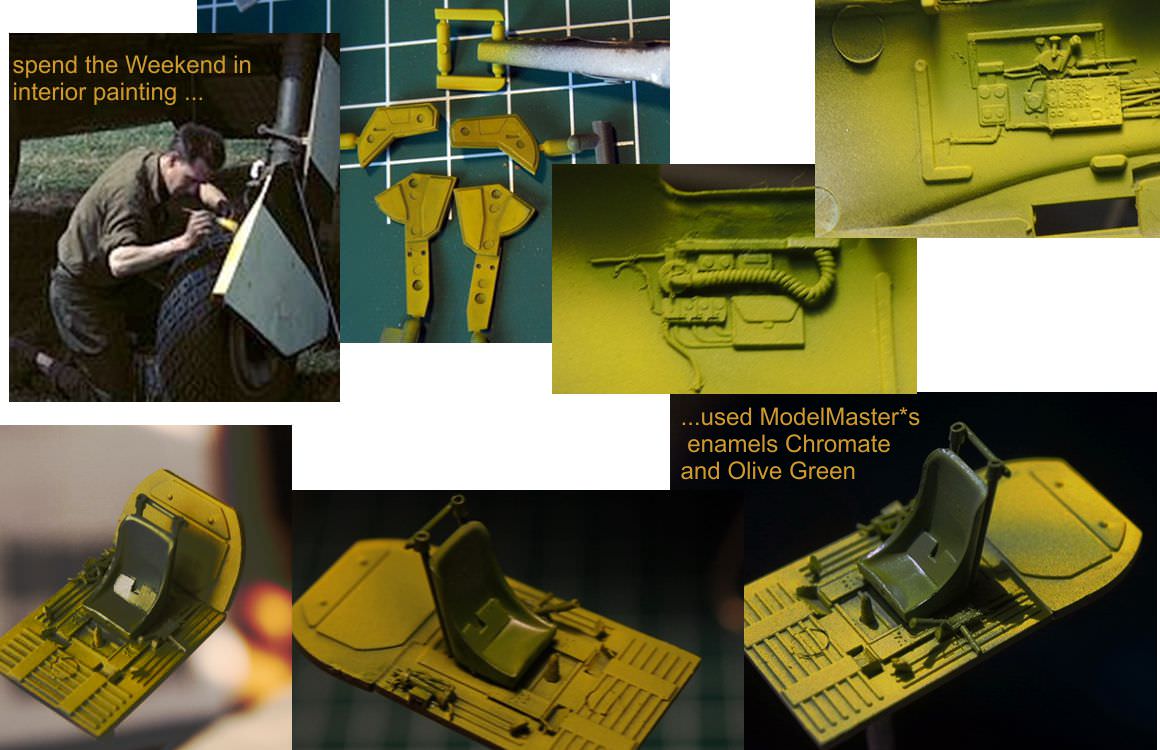
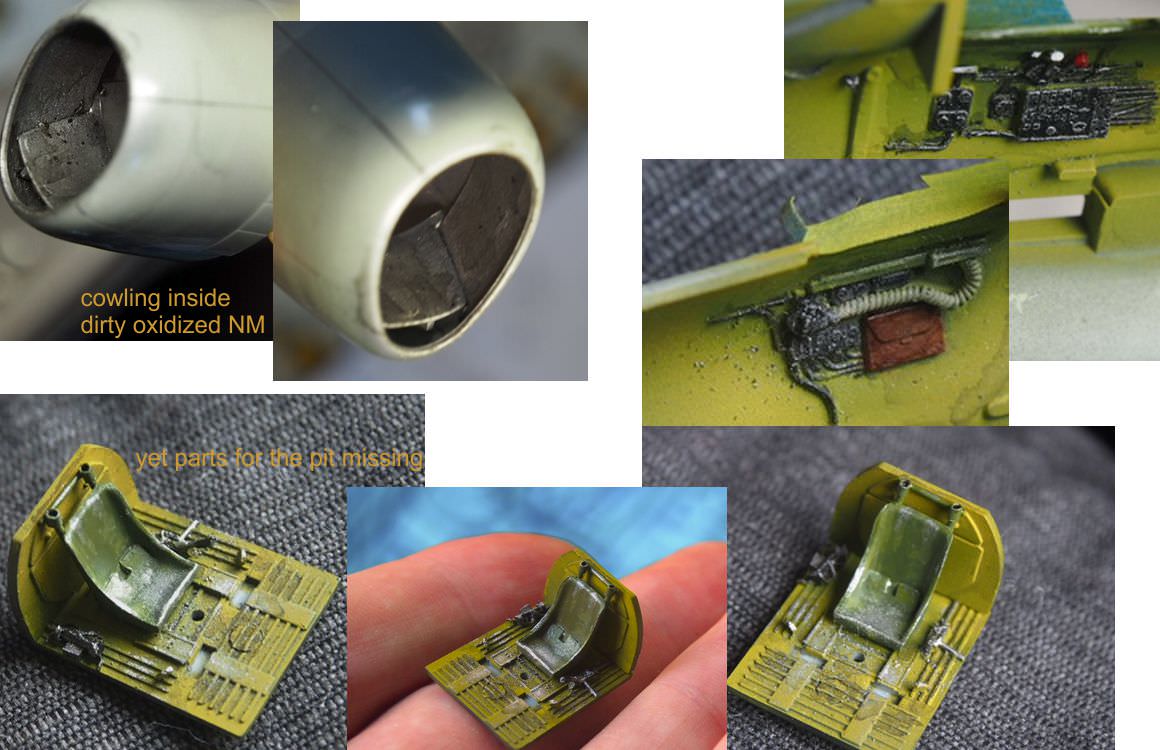
Fought over the weekend with interior colors and some detailing. Still need touch ups and adding the missing parts.
Used enamels from Model Master (Chromate and Olive Green) and some acrylics.
... with these colors it's quite a challenge taking a pic that shows nearly a correct tone...
Th mas
chris1
Auckland, New Zealand
Joined: October 25, 2005
KitMaker: 949 posts
AeroScale: 493 posts
Joined: October 25, 2005
KitMaker: 949 posts
AeroScale: 493 posts
Posted: Monday, August 27, 2018 - 09:27 AM UTC
Hi Thomas.
Regarding the NMF canopy. I've had a quick look through my P-47 library and the answer from what I've discovered is inconclusive. I have the book you showed but different covers which doesn't answer your question.
However you could hedge your bets a little in the colour section of the P-47 Thunderbolt Aces of the 9th and 15th Air Forces several are shown with the canopy surround having been painted but worn away to show the NMF underneath, more NMF than paint I have about 30 books on the JUG so will keep looking hope that helps so far.
PS.For the decals I'd suggest that you cut them into smaller manageable pieces rather than trying one big piece.
Chris
Twentecable
Overijssel, Netherlands
Joined: September 13, 2003
KitMaker: 339 posts
AeroScale: 244 posts
Joined: September 13, 2003
KitMaker: 339 posts
AeroScale: 244 posts
Posted: Monday, August 27, 2018 - 08:43 PM UTC
So much effort, so much detail and we all know how much is to been seen after closing up the hull. Brave effort sire!
Gr TC
Gr TC
thegirl
Alberta, Canada
Joined: January 19, 2008
KitMaker: 6,743 posts
AeroScale: 6,151 posts
Joined: January 19, 2008
KitMaker: 6,743 posts
AeroScale: 6,151 posts
Posted: Tuesday, August 28, 2018 - 02:10 AM UTC
Coming along very well so far Thomas
Terri
Terri
goodn8
Berlin, Germany
Joined: October 12, 2008
KitMaker: 709 posts
AeroScale: 651 posts
Joined: October 12, 2008
KitMaker: 709 posts
AeroScale: 651 posts
Posted: Wednesday, August 29, 2018 - 01:56 AM UTC
Chris,
thank you very much for your research and time you spend in!
Impressed by collecting so many books about a single a/c. The Infos were very helpful and I might go wit a more or less worn exterior color on the frame. On the other hand a NMF would be an eye catcher when painture works and break off the uniformity.
Th mas
goodn8
Berlin, Germany
Joined: October 12, 2008
KitMaker: 709 posts
AeroScale: 651 posts
Joined: October 12, 2008
KitMaker: 709 posts
AeroScale: 651 posts
Posted: Wednesday, August 29, 2018 - 01:57 AM UTC
Lars,
thanks for the look and the compliments! True words about the work ends up inside a fairly dark shaded room. But the limited areas one can see reduceing also the amount of detailing what is less time consuming and as for me it can be done a bit roughly as all will fade/blend when closed up except some prominent highlights.
Th mas
goodn8
Berlin, Germany
Joined: October 12, 2008
KitMaker: 709 posts
AeroScale: 651 posts
Joined: October 12, 2008
KitMaker: 709 posts
AeroScale: 651 posts
Posted: Wednesday, August 29, 2018 - 01:57 AM UTC
Quoted Text
Coming along very well so far Thomas
Terri
Terri,
thank you so much for stopping over and leave a kind reply. Much appreciated!
Hope this build will moving along as well.
Read about your issues in your "Zero"-log and I'm sure this new cute kitty-pet will get a beautiful home since you overcome the lost. Again, sorry for that - have had pets too.
Th mas
goodn8
Berlin, Germany
Joined: October 12, 2008
KitMaker: 709 posts
AeroScale: 651 posts
Joined: October 12, 2008
KitMaker: 709 posts
AeroScale: 651 posts
Posted: Friday, August 31, 2018 - 06:13 AM UTC
Quick update:
After bending end painting etched belts for the first time I have to say that the paint layer is far too thick - have to redo...
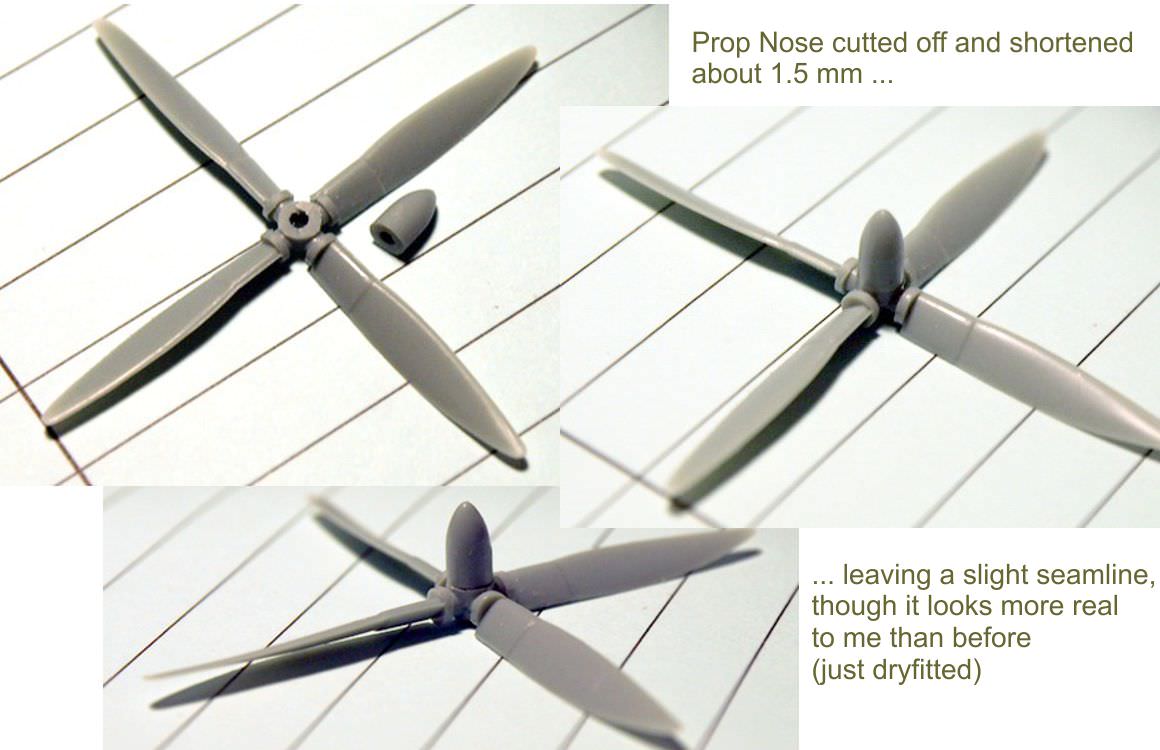
Meanwhile checked the prop and thought about how I can shorten the nose. Finally decided to cut it off close to the hub and remove about 1.5 mm (sorry, no "before-pics"; and the cutted off ring? - ask my carpet monster)
So this is how it turns out with a fine seamline that should match.
Th mas
Joel_W
Associate Editor
New York, United States
Joined: December 04, 2010
KitMaker: 11,666 posts
AeroScale: 7,410 posts
Joined: December 04, 2010
KitMaker: 11,666 posts
AeroScale: 7,410 posts
Posted: Thursday, September 06, 2018 - 10:08 AM UTC
Thomas,
Very nicely done correction to the hub. As for the Pit, more then enough detail for 1/72 scale.
looking forward to your next update.
Joel
Very nicely done correction to the hub. As for the Pit, more then enough detail for 1/72 scale.
looking forward to your next update.
Joel
alves
Rio de Janeiro, Brazil
Joined: May 26, 2005
KitMaker: 47 posts
AeroScale: 11 posts
Joined: May 26, 2005
KitMaker: 47 posts
AeroScale: 11 posts
Posted: Friday, September 07, 2018 - 02:07 PM UTC
Hi,
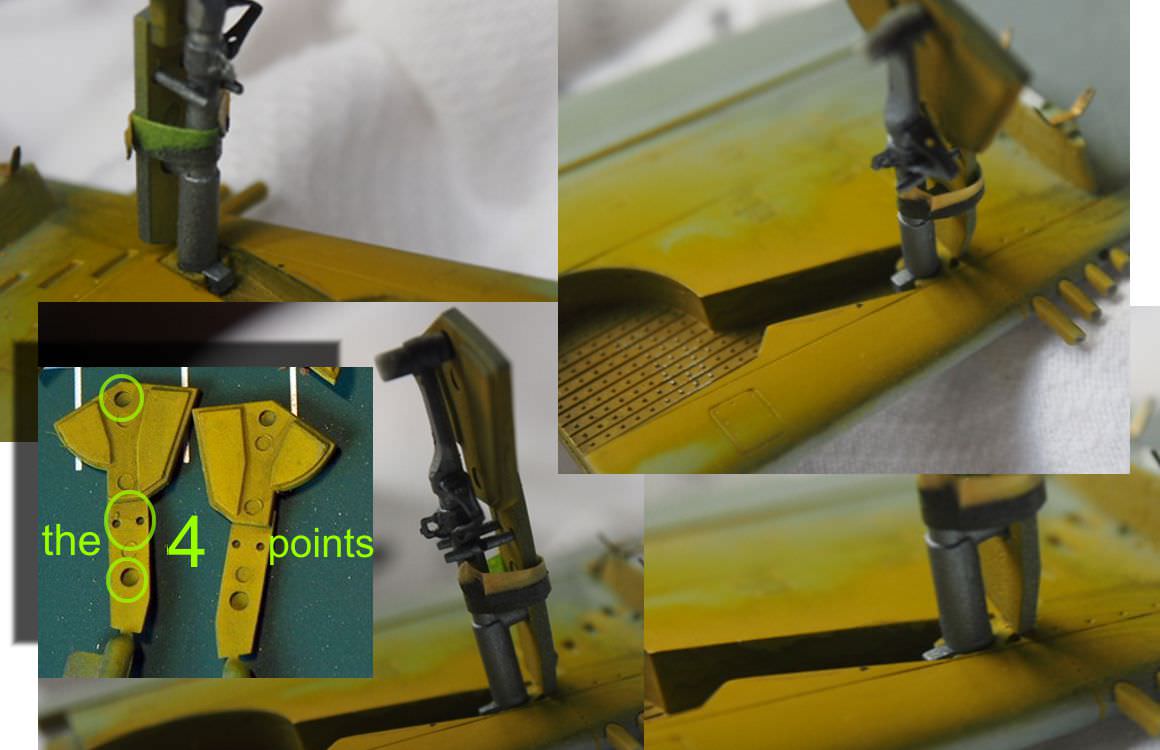
About shorting the legs of landing gear.I did not understand. There are four points to connect to the landing gear door. Did you shorten the door too?
Regards
About shorting the legs of landing gear.I did not understand. There are four points to connect to the landing gear door. Did you shorten the door too?
Regards
goodn8
Berlin, Germany
Joined: October 12, 2008
KitMaker: 709 posts
AeroScale: 651 posts
Joined: October 12, 2008
KitMaker: 709 posts
AeroScale: 651 posts
Posted: Saturday, September 08, 2018 - 01:44 AM UTC
Quoted Text
Thomas,
Very nicely done correction to the hub. As for the Pit, more then enough detail for 1/72 scale.
looking forward to your next update.
Joel
Joel ,
thank you - really appreciate your visit !
Especially as I know you’re under medical diagnostics and treatment. Hope everything will turn out good with no more bigger proceedings and just a sufficient pharmacologic therapy.
My best wishes for solving your health issues!
Th mas
goodn8
Berlin, Germany
Joined: October 12, 2008
KitMaker: 709 posts
AeroScale: 651 posts
Joined: October 12, 2008
KitMaker: 709 posts
AeroScale: 651 posts
Posted: Saturday, September 08, 2018 - 01:47 AM UTC
Quoted Text
Hi,
About shorting the legs of landing gear.I did not understand. There are four points to connect to the landing gear door. Did you shorten the door too?
Regards
Fernando,
thanks for having a look!
As for your question:
No further shortenings or corrections on the flap necessary, just sanded a bit after removed from the sprue. It will fit the 4 connecting points and is now close to the well’s side edge.
For me those well recognized 4 points are harder to correct when cutting the leg anywhere else than on the base. Not to mention how to bring a 2-piece leg nicely together…
So I went that way.
Before cutting there is a bigger gap between wing and flap about the size to cut off from the leg.
But if you shorten the leg much more it could result in additional (but managing) work.
Just dryfitted to show:
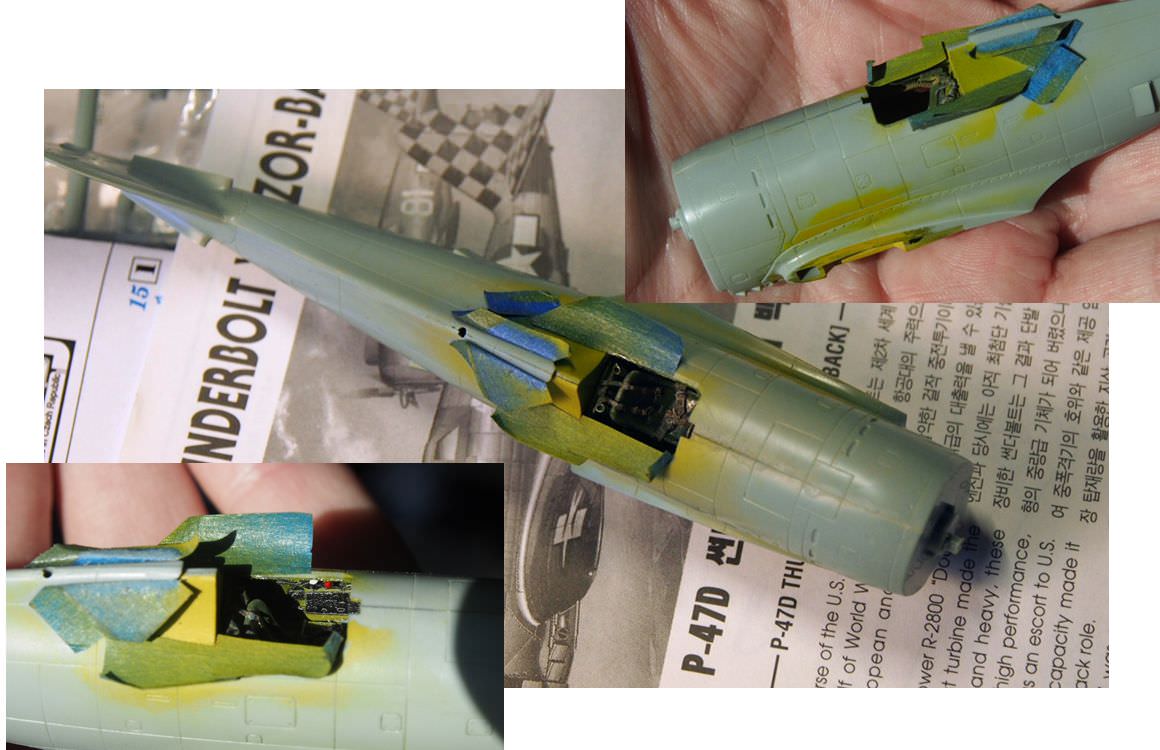
Meanwhile the pit went away into the dark, today I closed the fuselage halves and work on the seam lines. Some progress pics coming soon
Th mas
alves
Rio de Janeiro, Brazil
Joined: May 26, 2005
KitMaker: 47 posts
AeroScale: 11 posts
Joined: May 26, 2005
KitMaker: 47 posts
AeroScale: 11 posts
Posted: Saturday, September 08, 2018 - 06:42 AM UTC
Hi,
Thank you very much for the explanations. This really clarified my doubt. I will continue to accompany the build. Regards
goodn8
Berlin, Germany
Joined: October 12, 2008
KitMaker: 709 posts
AeroScale: 651 posts
Joined: October 12, 2008
KitMaker: 709 posts
AeroScale: 651 posts
Posted: Saturday, September 08, 2018 - 07:59 AM UTC
Hi there again!
Here's a bit more detail of the latest work.
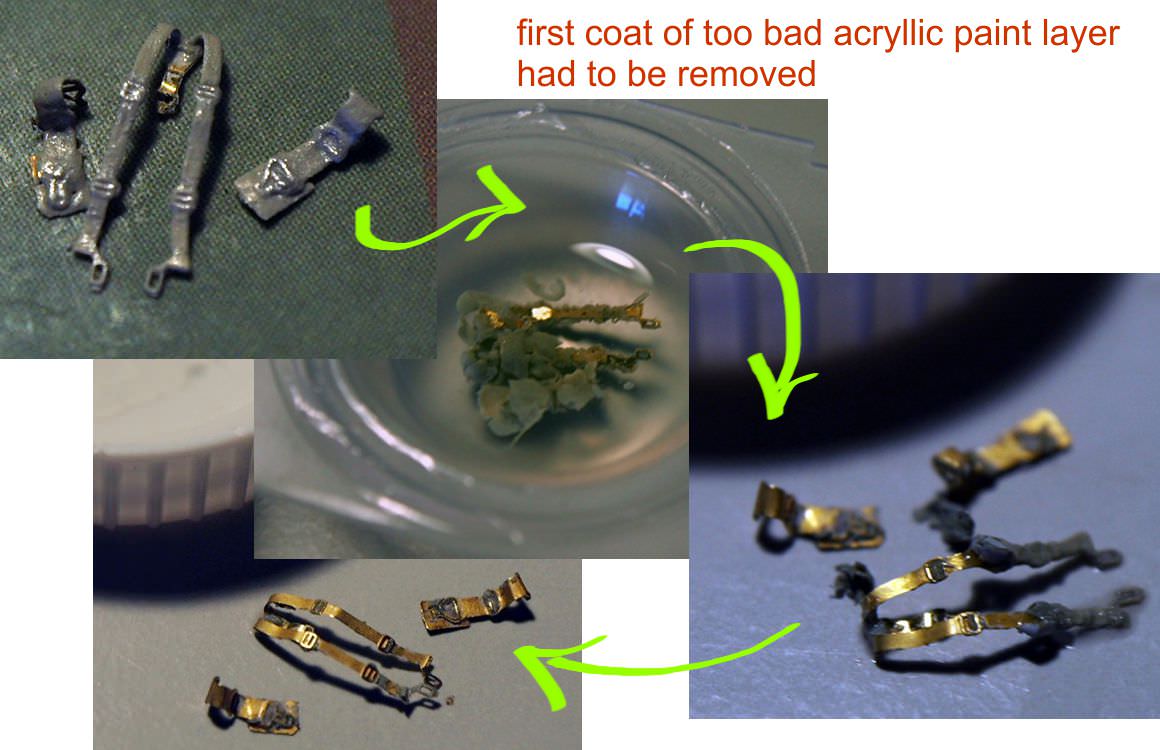
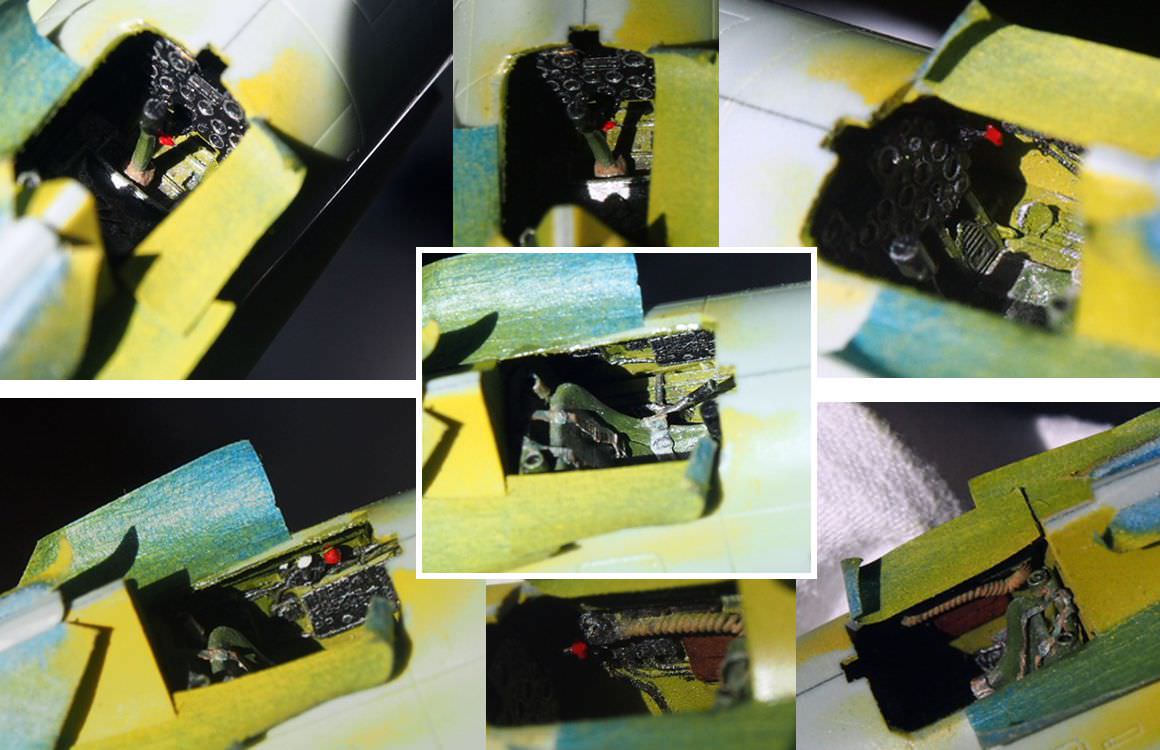
After the Prop-surgery I went back to the belts and I tell you, I was really struggling with my first time using etched seatbelts.
First paint had to be removed and after that I had to try again. You can see how the paint (Humbrol Acrylic “Hemp”) teared off and a careful brushing with clear water removed it nearly all.
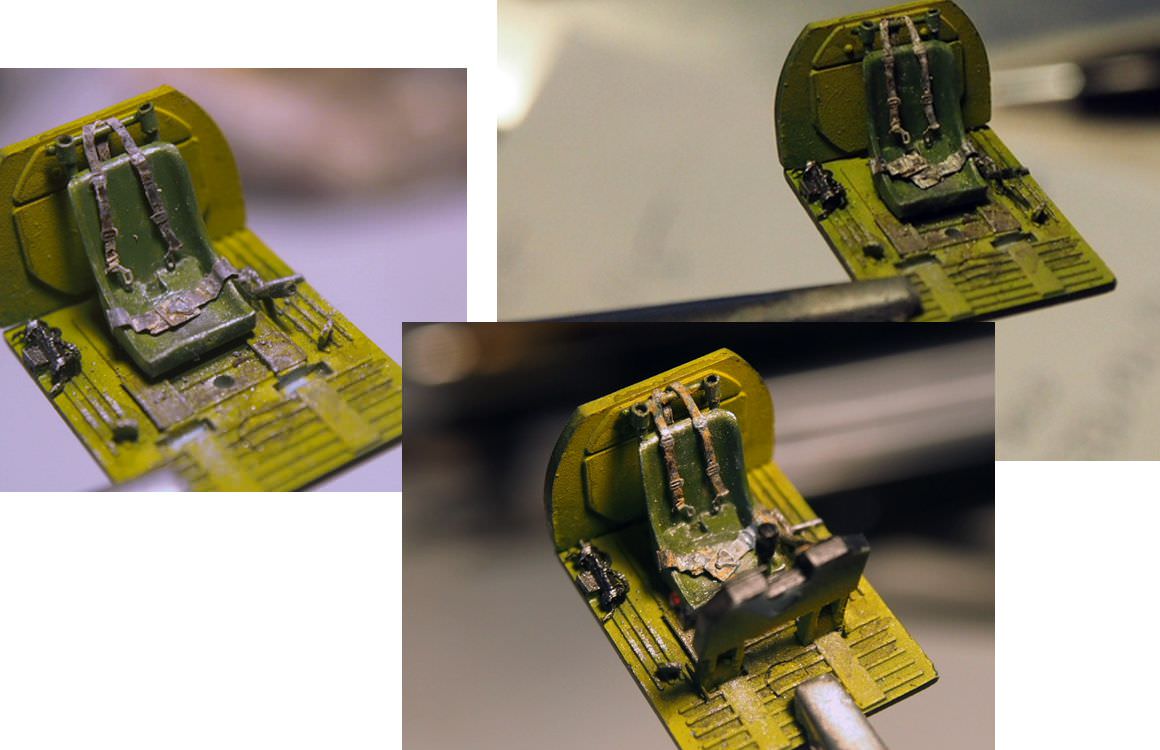
Next I used just different pigments/wash but the result wasn’t quite satisfying. Also my fault was, glue/fixing it with CA-Gel and matte varnish that messed up the details. Not really what was going for as they look quite abused now and a bit messy . But anyhow – it’s the Mediterranean, and Cecil has to use what comes -so why not? I’ll leave it like that… .
edit- Any further hints for etched harness/belts are welcome
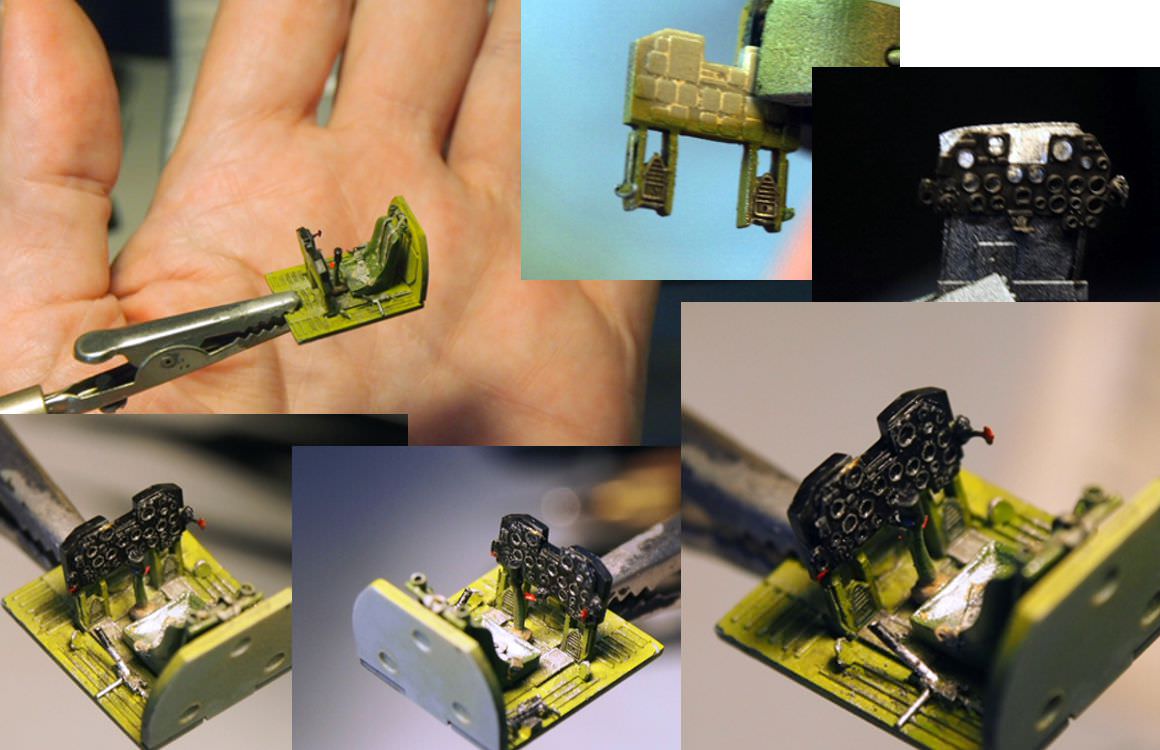
Installed the instrument panel and off it goes into the fuselage.
Not much is still visible from a fair distance …
… a bit more to see from different angles:
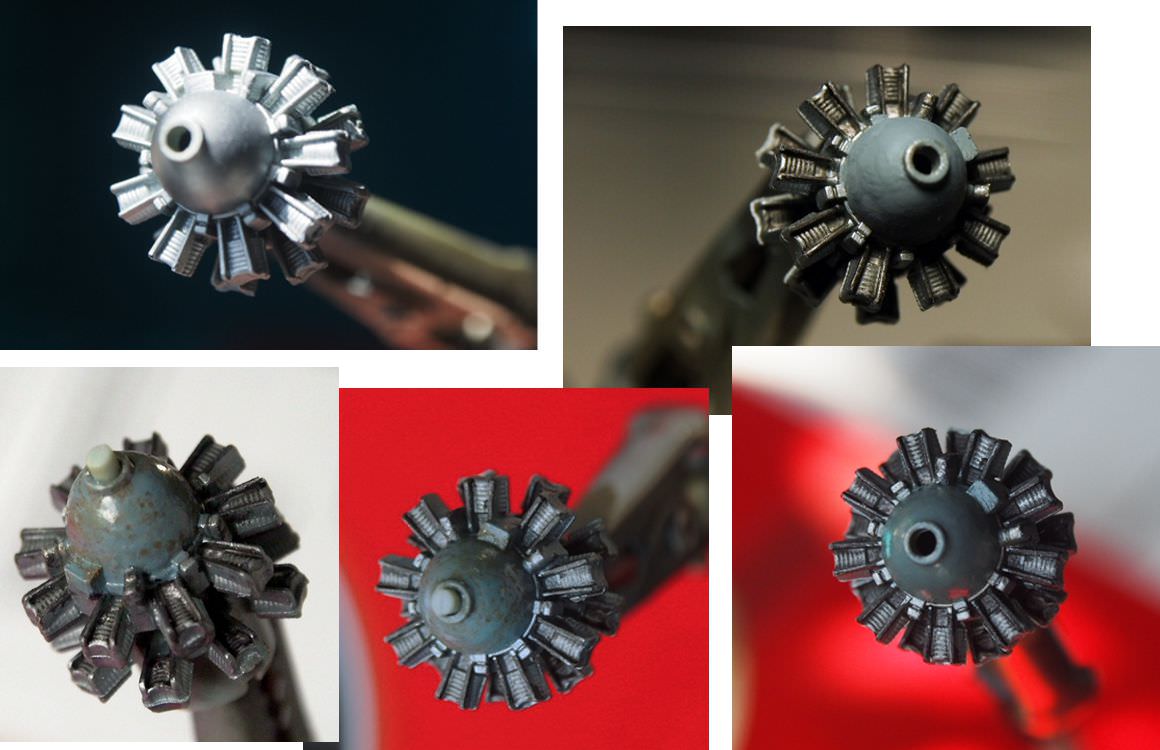
Worked on the simplified Engine as well and left it oob. Using Testor’s stainless steel, dark iron and medium grey and a little wash around the dome.
, Th mas