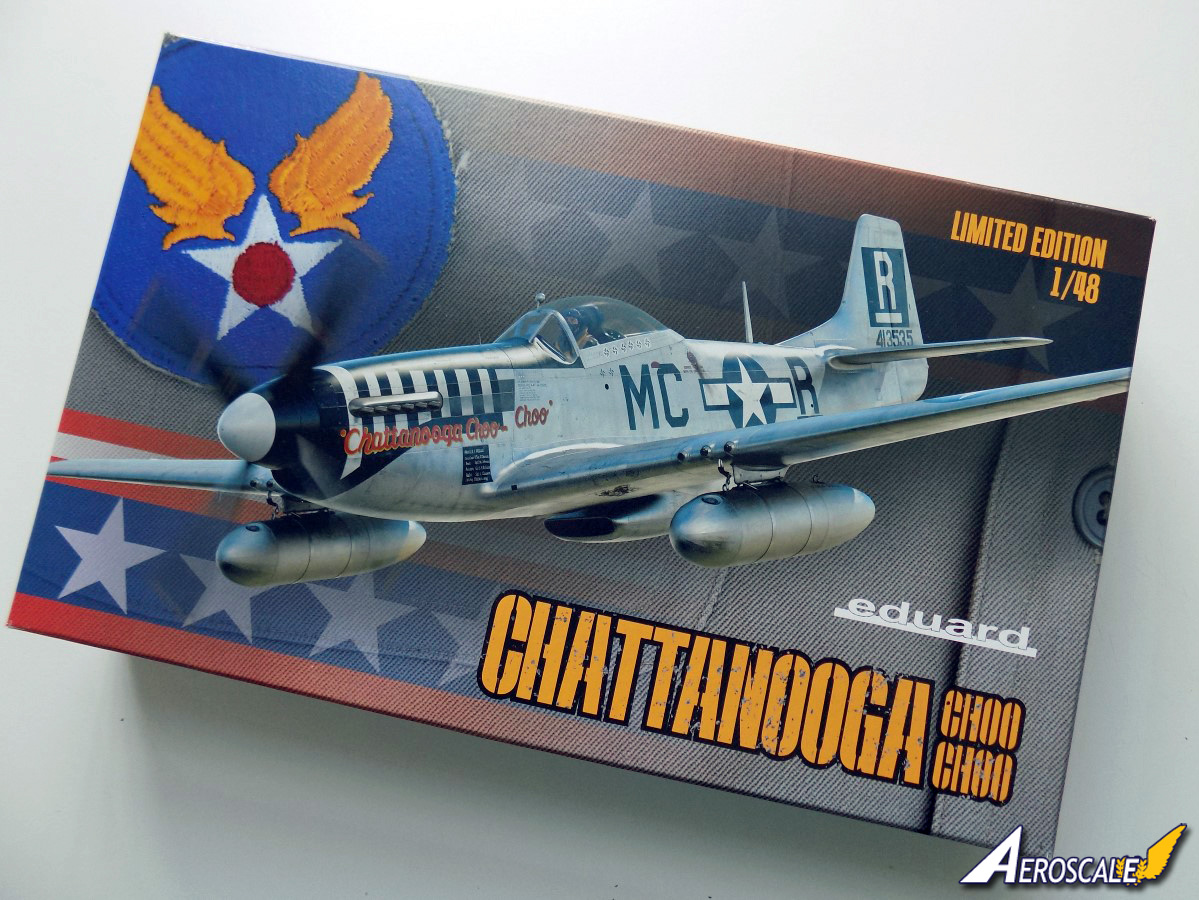
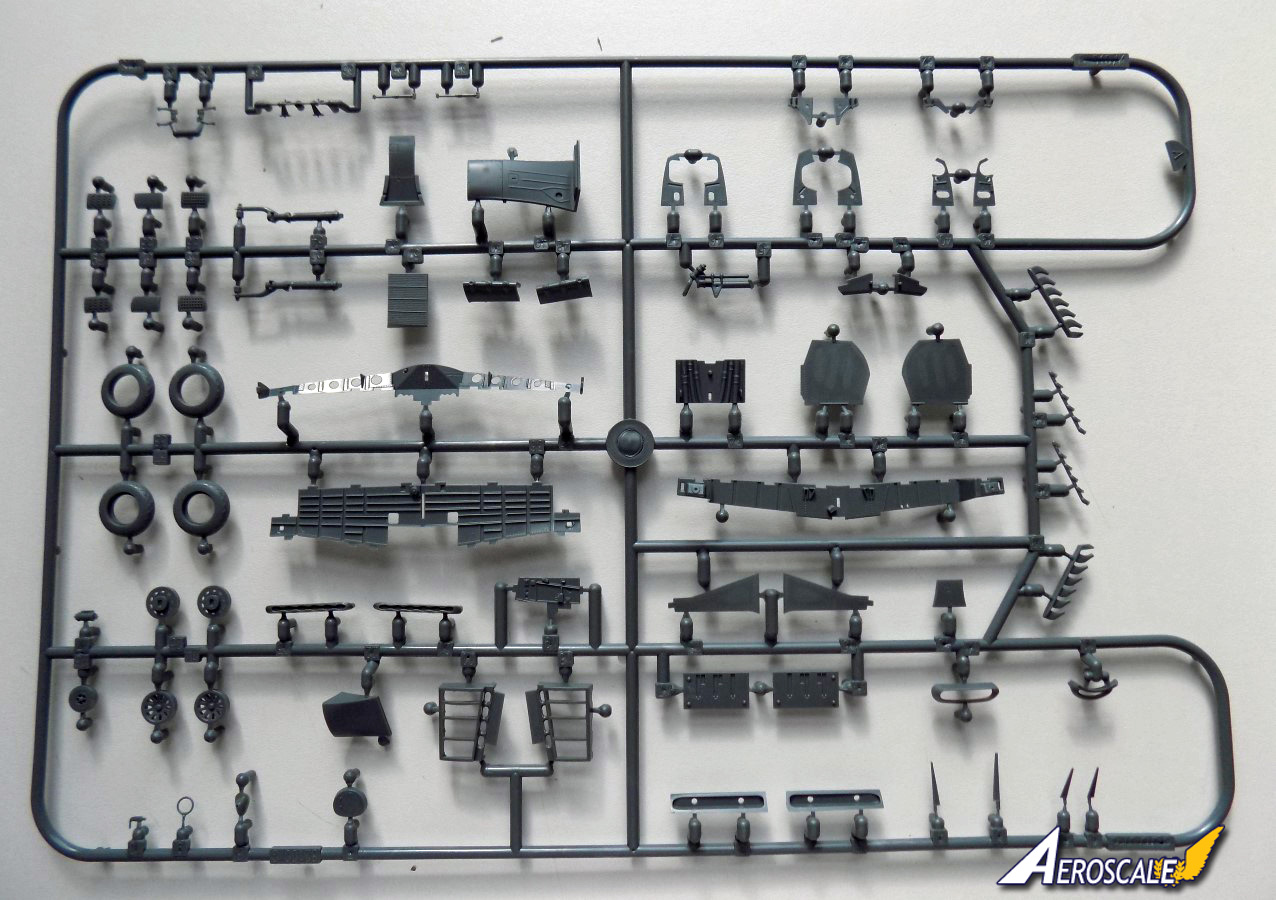
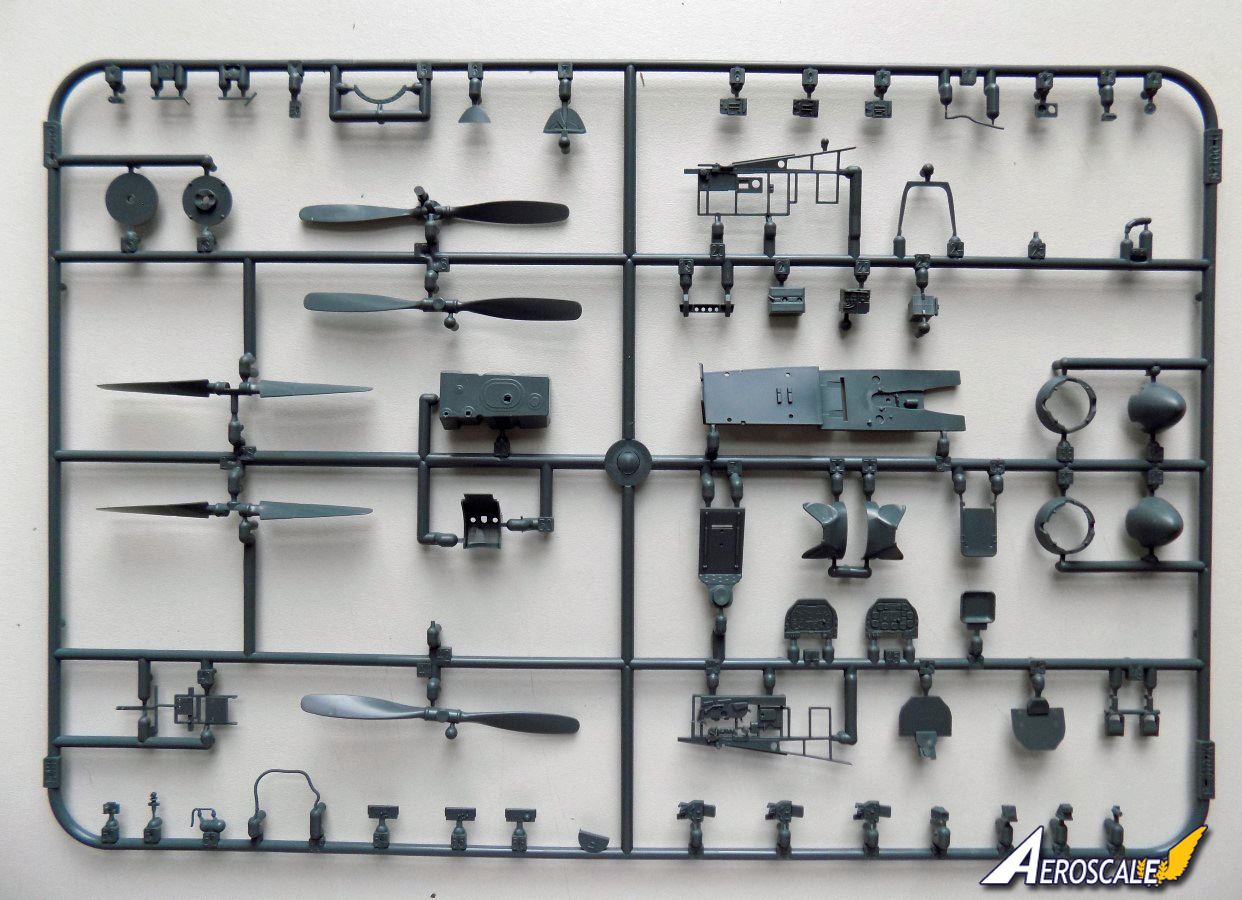
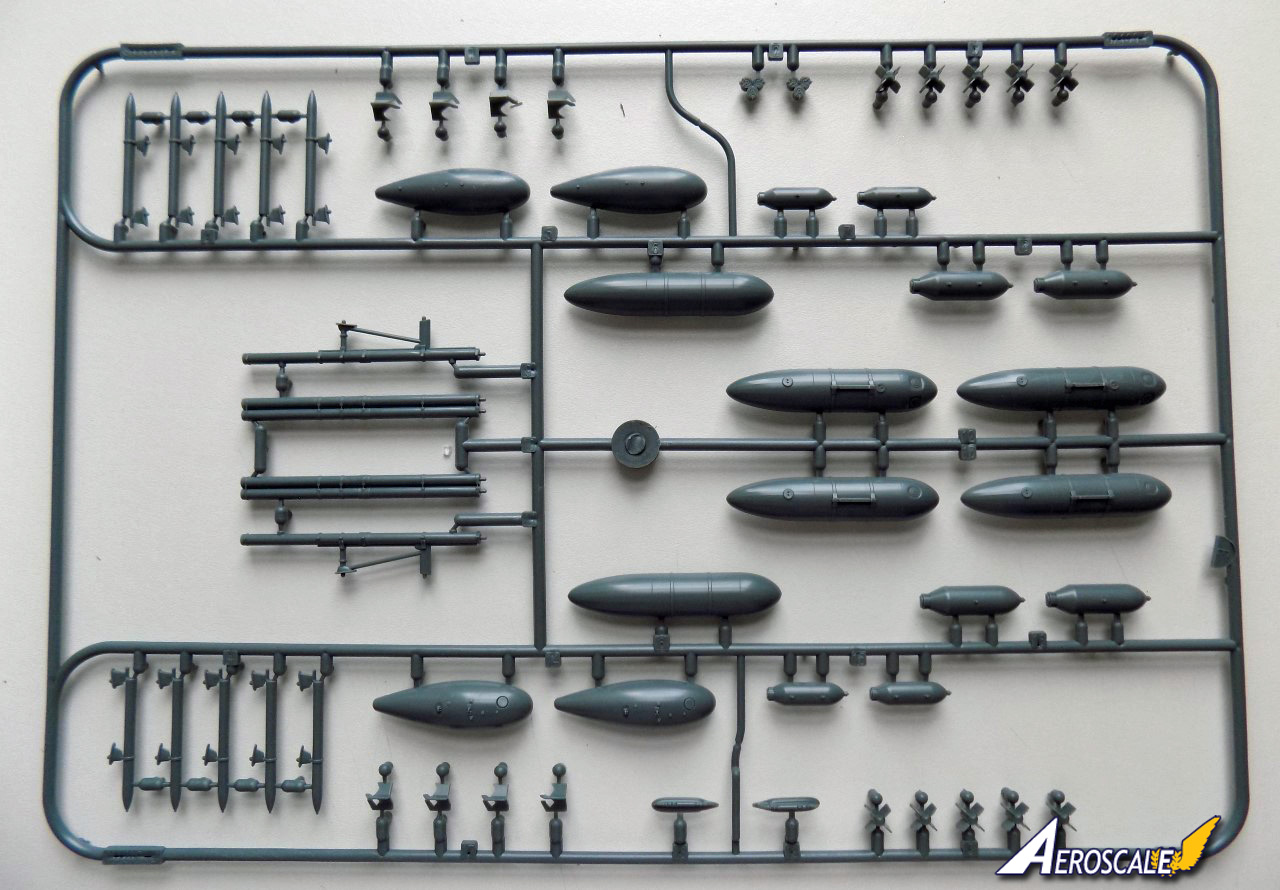
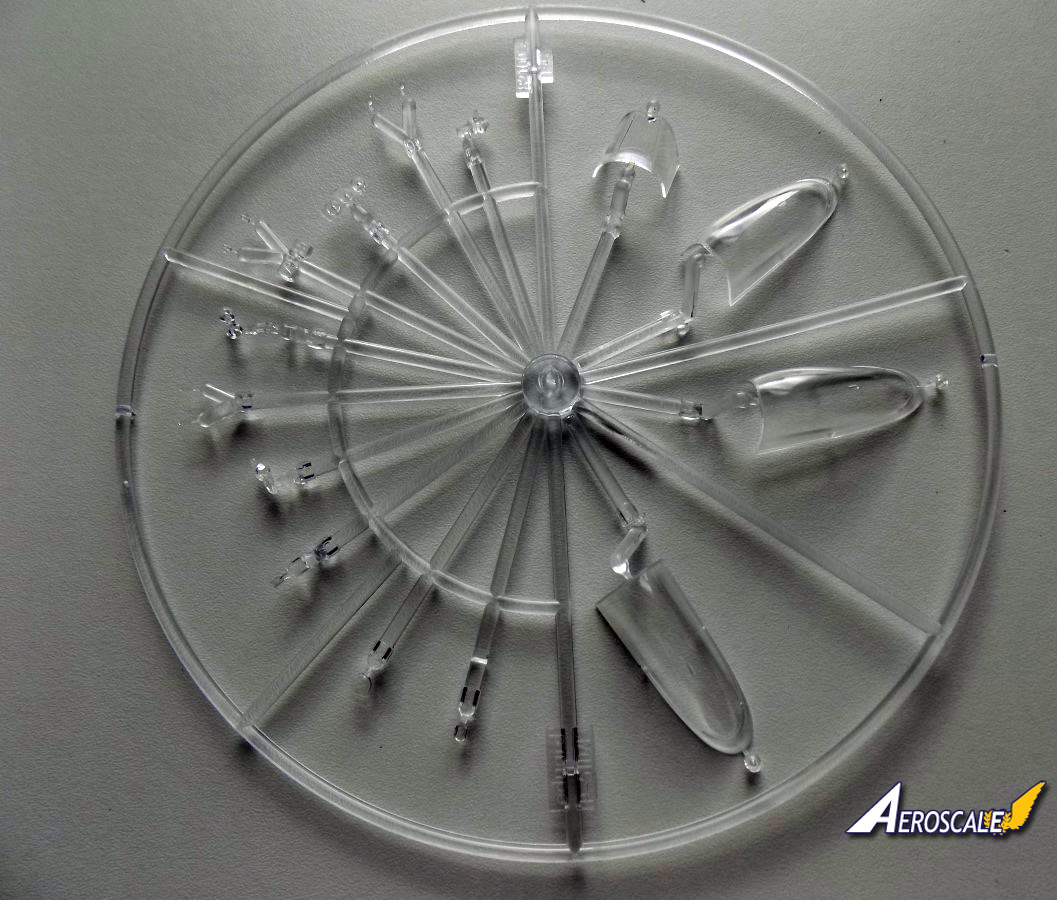
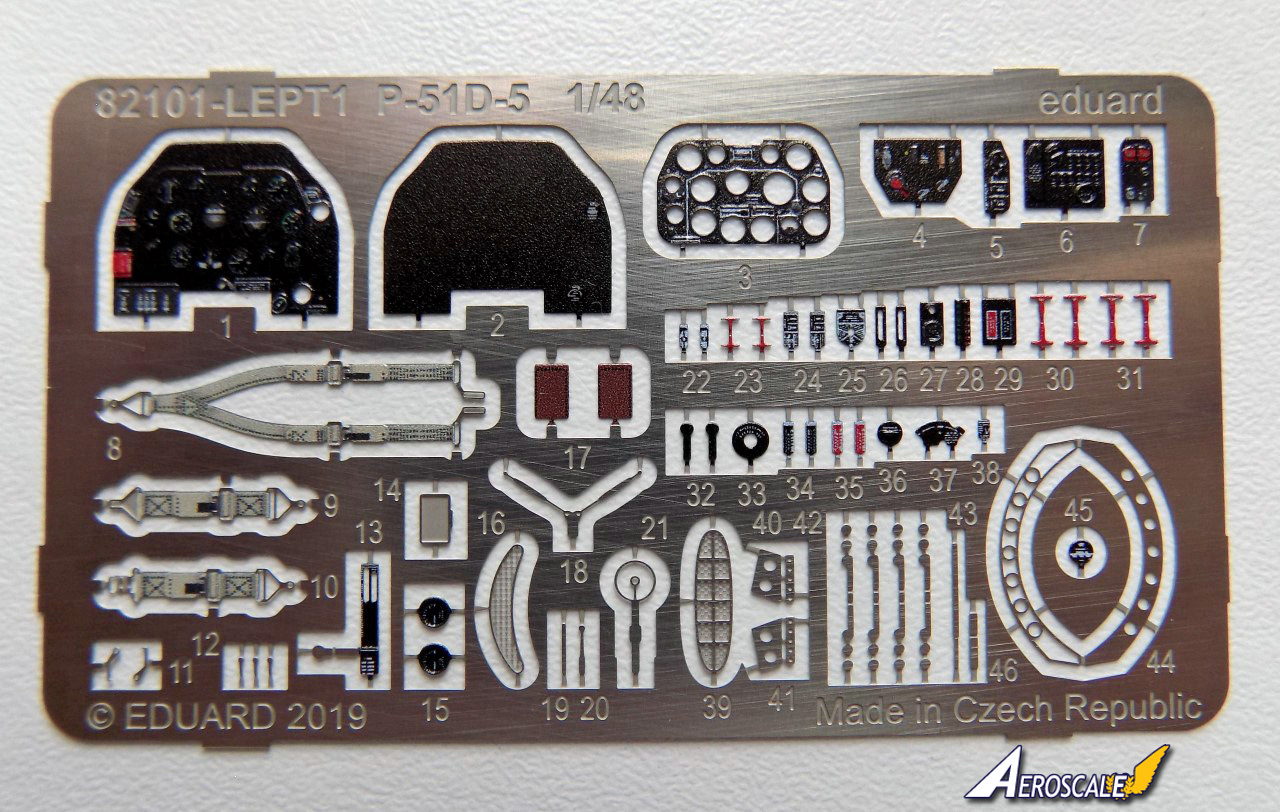
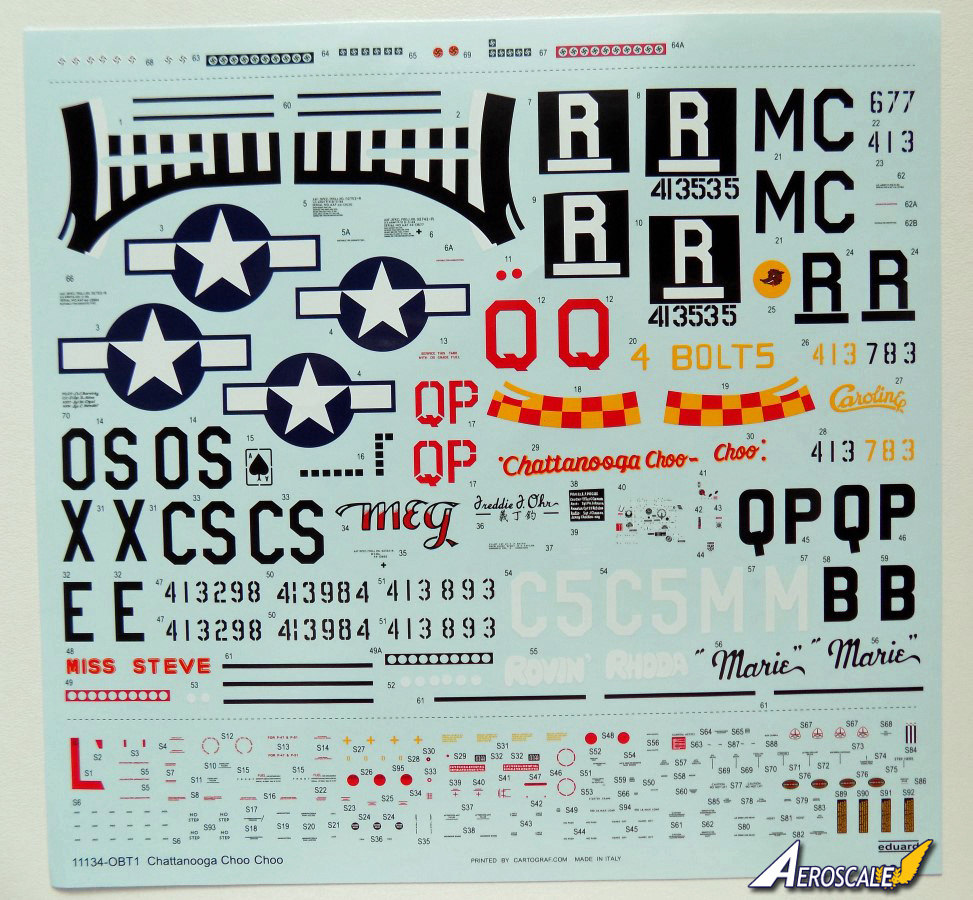
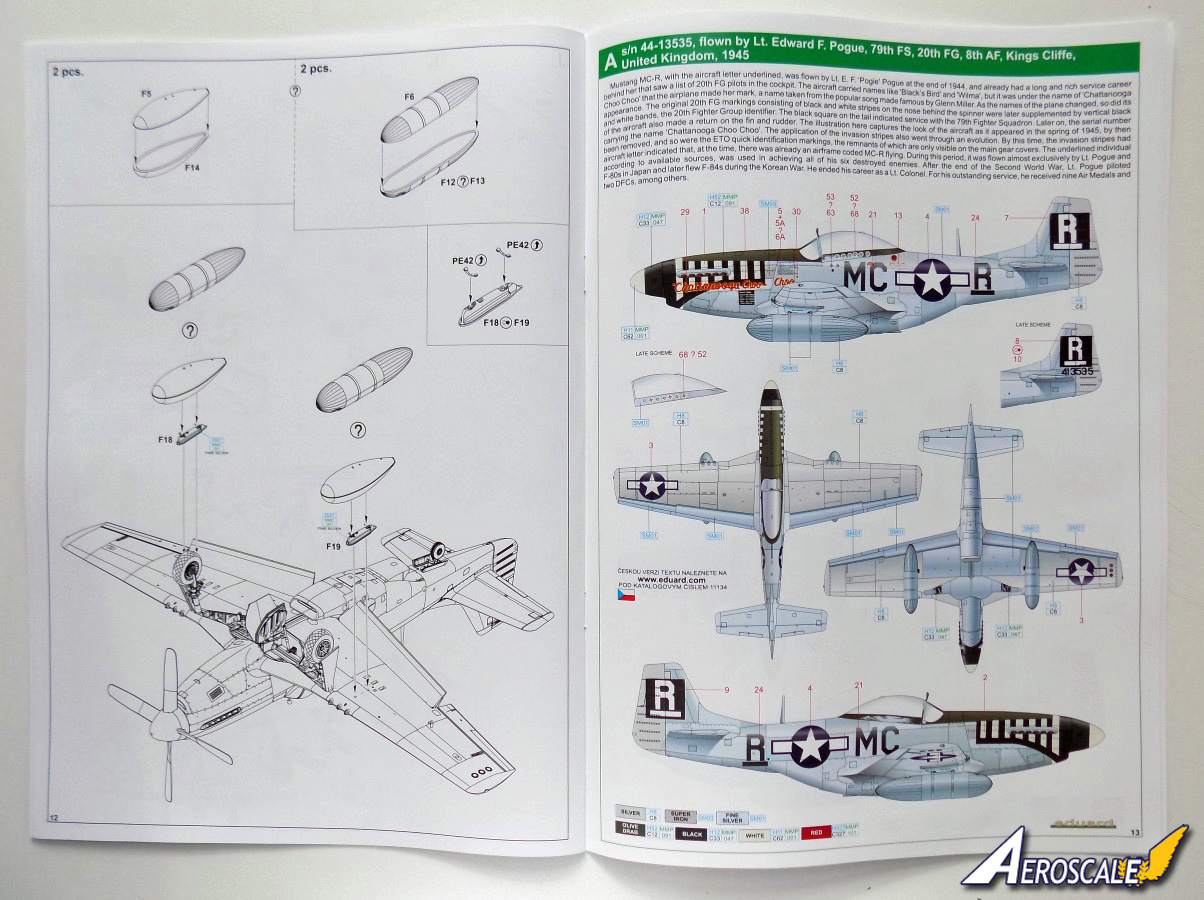
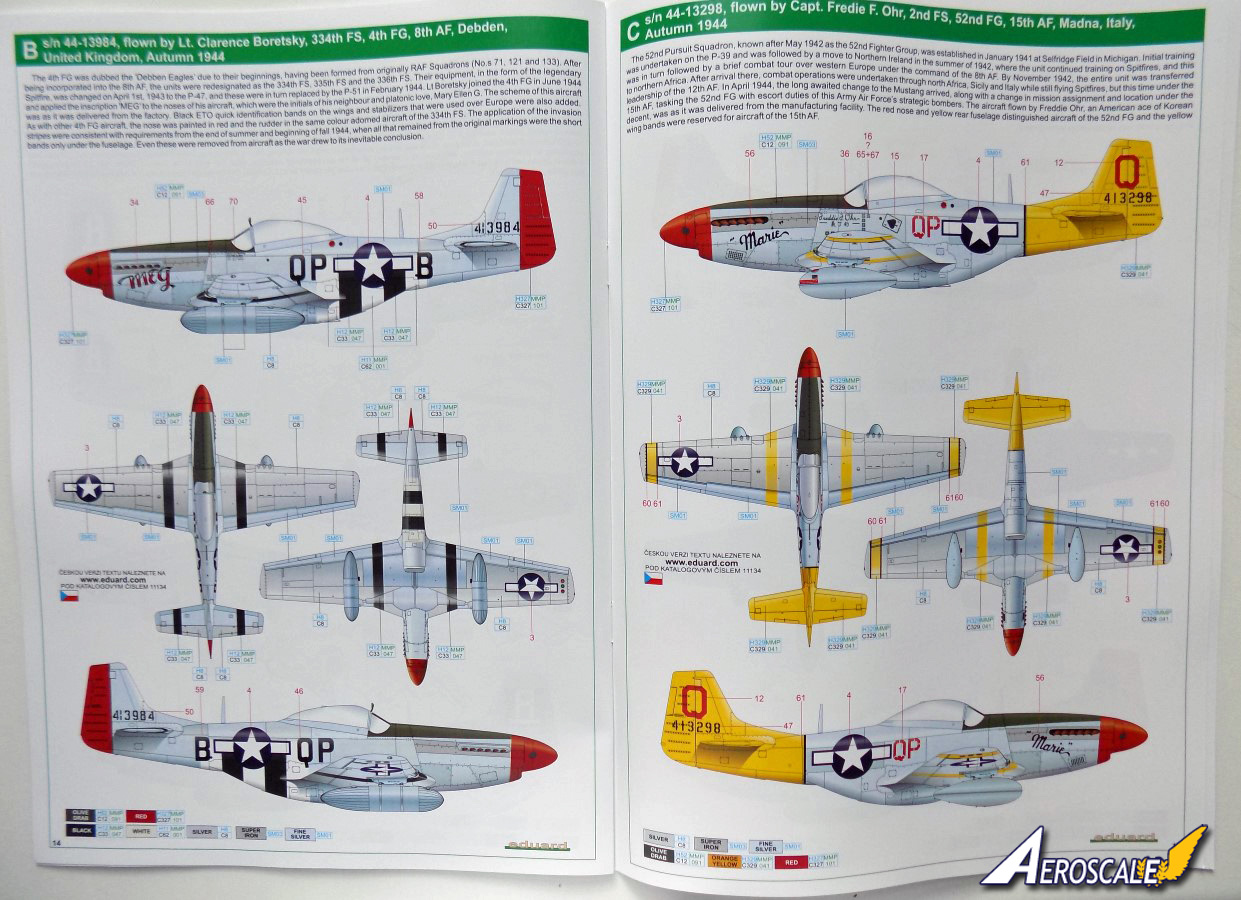
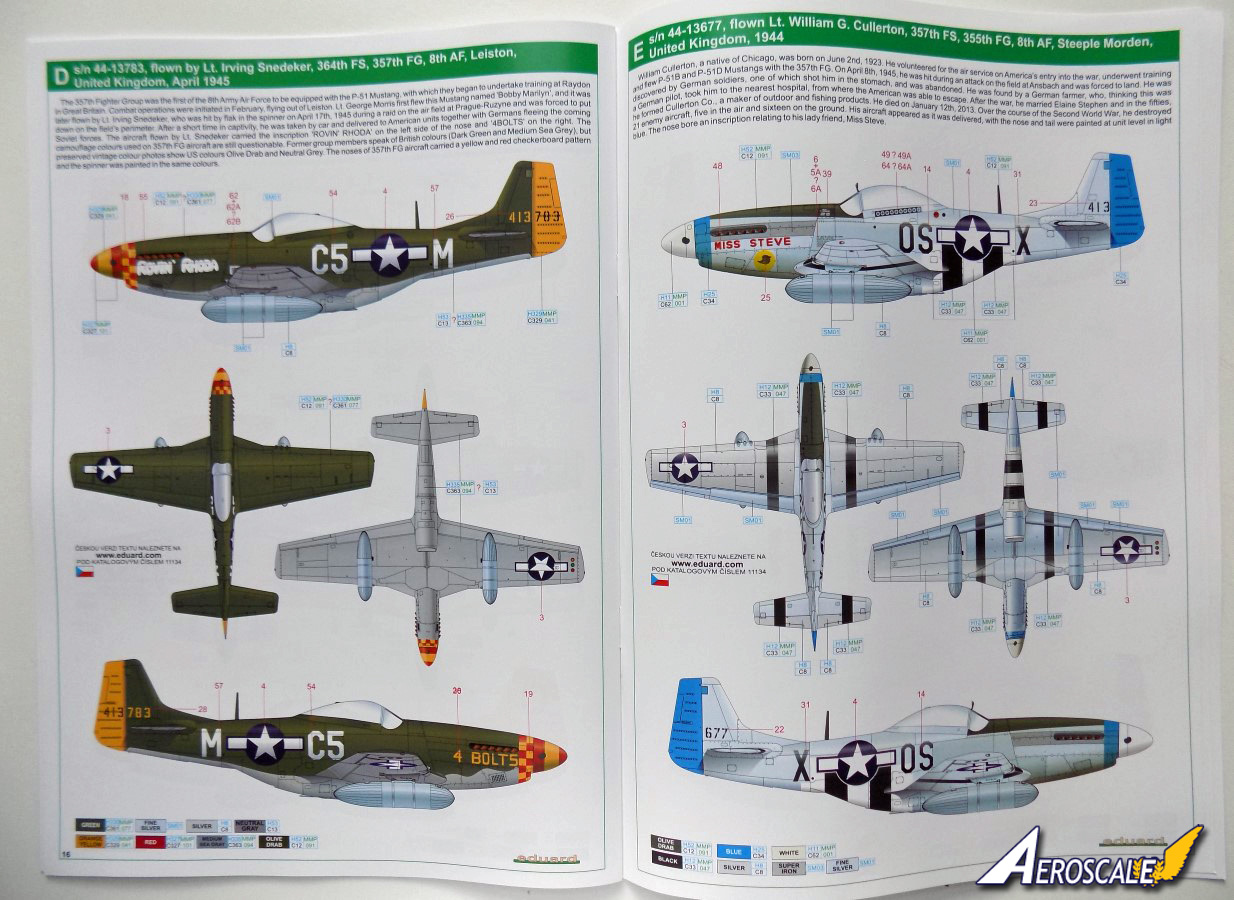
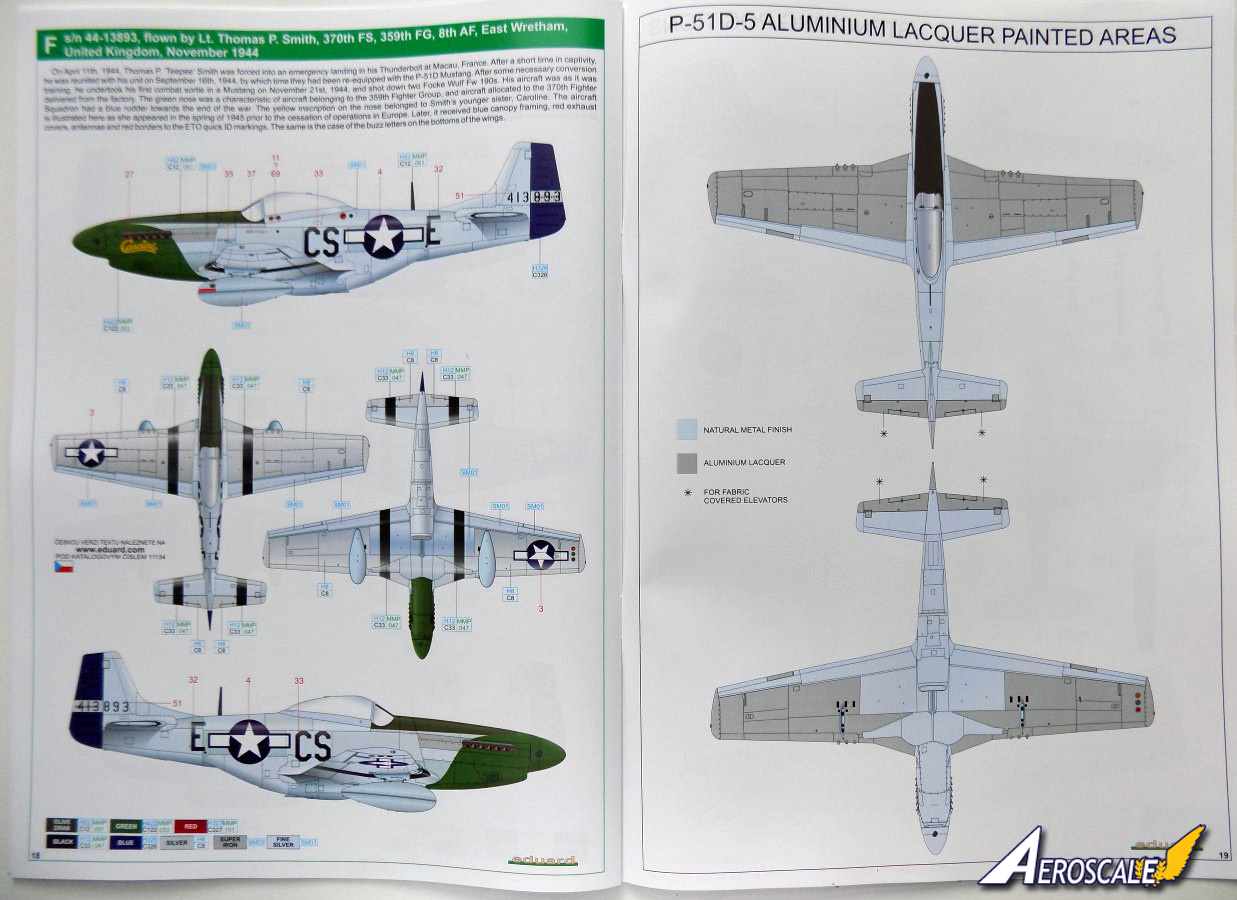
Coming soon, well as soon as I finish work tonight I will start building a pre-release new tool Eduard 1/48th P-51D-5 Mustang.
Thanks to the lovely guys and girls at Eduard for sending in one of the few samples to be set out, and we at Aeroscale are one of the lucky few.
So some teaser images first, would have took more but I'm now late for work .
Andy
Hosted by Rowan Baylis
Eduard 1/48th P-51D-5 Mustang build
Posted: Monday, July 29, 2019 - 07:22 PM UTC
Venko555
Bulgaria
Joined: December 07, 2013
KitMaker: 908 posts
AeroScale: 206 posts
Joined: December 07, 2013
KitMaker: 908 posts
AeroScale: 206 posts
Posted: Monday, July 29, 2019 - 08:13 PM UTC
Hi,
I preordered mine, will get it probably next week, so I will follow your build with interest
Which marking option will you build?
Cheers!
I preordered mine, will get it probably next week, so I will follow your build with interest
Which marking option will you build?
Cheers!
RhinoSpit
Bas-Rhin, France
Joined: September 22, 2016
KitMaker: 224 posts
AeroScale: 191 posts
Joined: September 22, 2016
KitMaker: 224 posts
AeroScale: 191 posts
Posted: Monday, July 29, 2019 - 11:56 PM UTC
I'll follow this build with a big interest !
I can't wait until August 7th!
M4A1Sherman
New York, United States
Joined: May 02, 2013
KitMaker: 4,403 posts
AeroScale: 254 posts
Joined: May 02, 2013
KitMaker: 4,403 posts
AeroScale: 254 posts
Posted: Tuesday, July 30, 2019 - 02:57 AM UTC
Hello, Andy!
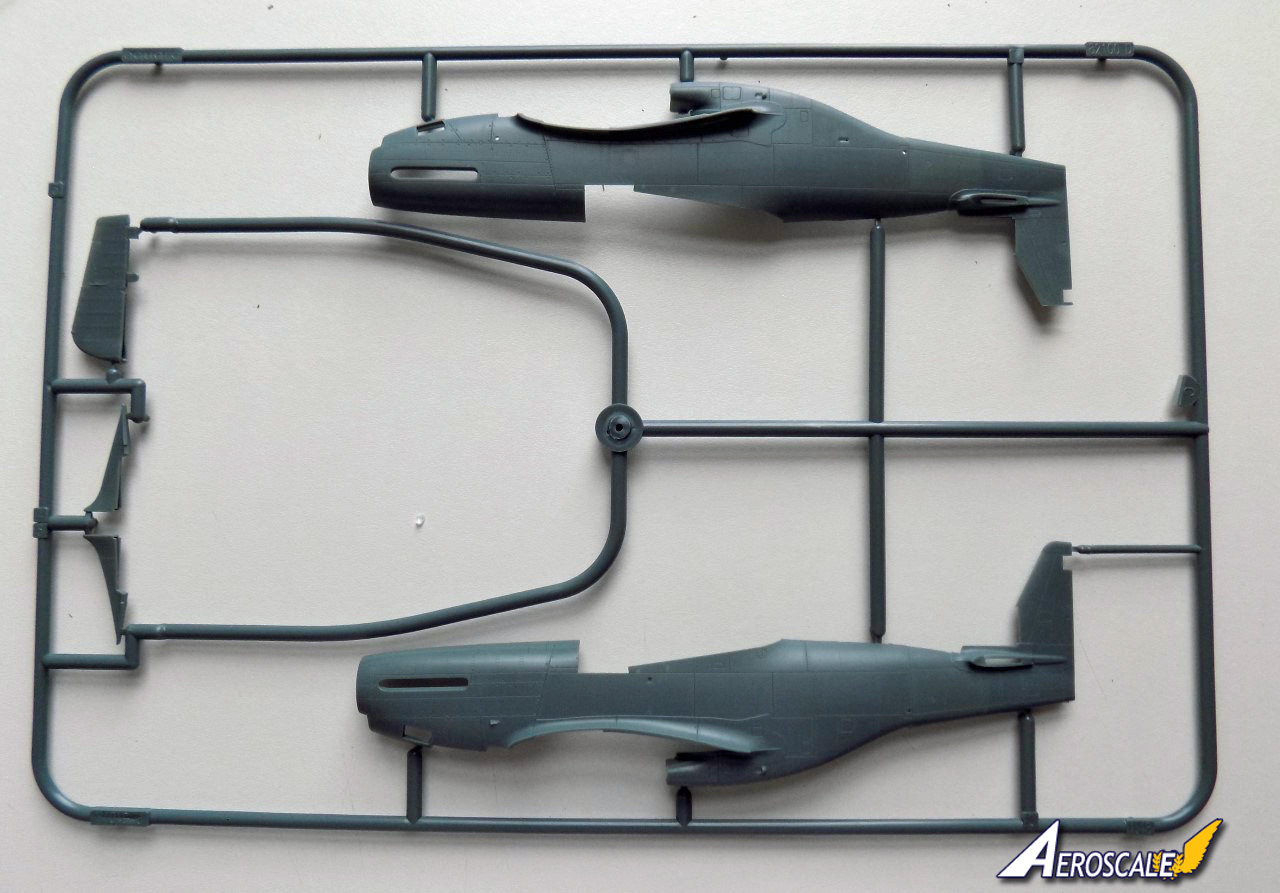
I've been talking about this new 1/48 P-51D-5 from Eduard on AEROSCALE ever since last week when I first spotted it over on "The MODELLING NEWS". There are several questions I've been mulling over in my own mind. I've noticed that the two Fuselage halves show the two top Engine Cowl Cowling Panels as being molded integrally with the right and left Fuselage halves.
Wouldn't it have been better if EDUARD had molded these two top Engine cowlings as a ONE-PIECE part, thereby avoiding a pesky join at the "center-line" of said top Engine Cowling Panels..?
EDUARD markets SINGLE-PIECE resin top Engine Cowling Panels replacement-part for use with their 1/48 Spitfire Mk.IX kits, in "early" and "late" permutations. I think I would have much preferred if EDUARD had provided a single-piece PLASTIC part, representing the two top Engine Cowling Panels for their new
P-51, which likely might have been preferred by other modelers, as well(?).
The "joins" of the Fuselage Spine, the bottom Engine Cowling Panels, and the bottoms of the Radiator Scoop and Tail Empennage are other areas of concern for me for the very same reasons..
Unless the "fit" of these above-mentioned "joins" are so very well engineered that valuable time and effort would be saved by not having to fill said "joins", and subsequently having to sand and re-scribe the Panel lines and the Rivets, then I will have no worries...
EDUARD might have considered these various areas and done cost and engineering studies. It's entirely possible that EDUARD might have found that the extra engineering, tooling and labor would have been cost-prohibitive...
Then again, modelers have become happily used to EDUARD's excellent "fit" of the parts in their latest Aircraft model kits. It is my hope that this will hold true with this brand-new Mustang...
Your thoughts..?
VR, Dennis
I've been talking about this new 1/48 P-51D-5 from Eduard on AEROSCALE ever since last week when I first spotted it over on "The MODELLING NEWS". There are several questions I've been mulling over in my own mind. I've noticed that the two Fuselage halves show the two top Engine Cowl Cowling Panels as being molded integrally with the right and left Fuselage halves.
Wouldn't it have been better if EDUARD had molded these two top Engine cowlings as a ONE-PIECE part, thereby avoiding a pesky join at the "center-line" of said top Engine Cowling Panels..?
EDUARD markets SINGLE-PIECE resin top Engine Cowling Panels replacement-part for use with their 1/48 Spitfire Mk.IX kits, in "early" and "late" permutations. I think I would have much preferred if EDUARD had provided a single-piece PLASTIC part, representing the two top Engine Cowling Panels for their new
P-51, which likely might have been preferred by other modelers, as well(?).
The "joins" of the Fuselage Spine, the bottom Engine Cowling Panels, and the bottoms of the Radiator Scoop and Tail Empennage are other areas of concern for me for the very same reasons..
Unless the "fit" of these above-mentioned "joins" are so very well engineered that valuable time and effort would be saved by not having to fill said "joins", and subsequently having to sand and re-scribe the Panel lines and the Rivets, then I will have no worries...
EDUARD might have considered these various areas and done cost and engineering studies. It's entirely possible that EDUARD might have found that the extra engineering, tooling and labor would have been cost-prohibitive...
Then again, modelers have become happily used to EDUARD's excellent "fit" of the parts in their latest Aircraft model kits. It is my hope that this will hold true with this brand-new Mustang...
Your thoughts..?
VR, Dennis
Posted: Tuesday, July 30, 2019 - 06:00 AM UTC
Nice one Andy!
I'm not jealous in the least...
I'm really looking forward to seeing how it goes together before tackling one myself further down the line.
All the best
Rowan
I'm not jealous in the least...
I'm really looking forward to seeing how it goes together before tackling one myself further down the line.
All the best
Rowan
Posted: Tuesday, July 30, 2019 - 08:37 PM UTC
Its nice to have you around guys and following this build.
Not sure which scheme I will be going for but I'm torn between schemes A and C.
I believe Dennis that the cowling was probably moulded like that for ease of assembly and no doubt Eduard will release a Brassin engine set for this kit in the future, which would feature resin panels.
As for fit of the underside, when I get there I will let you know how well it all goes together.
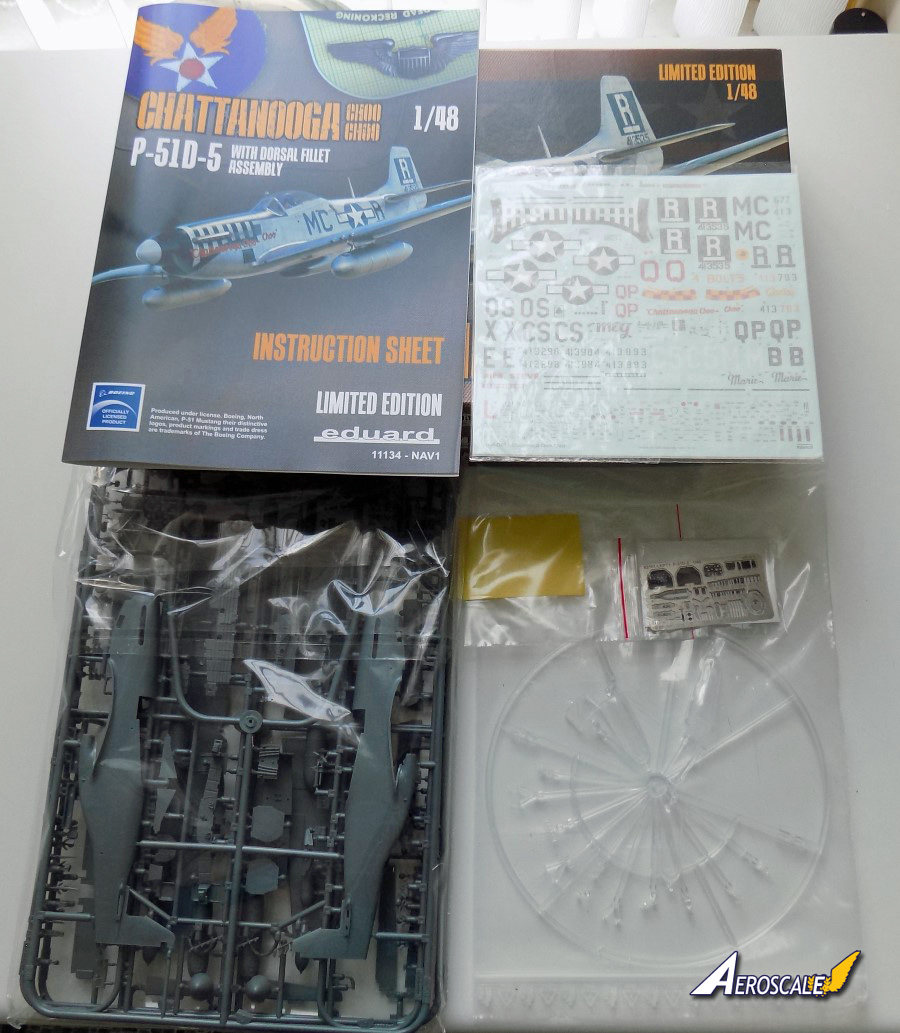
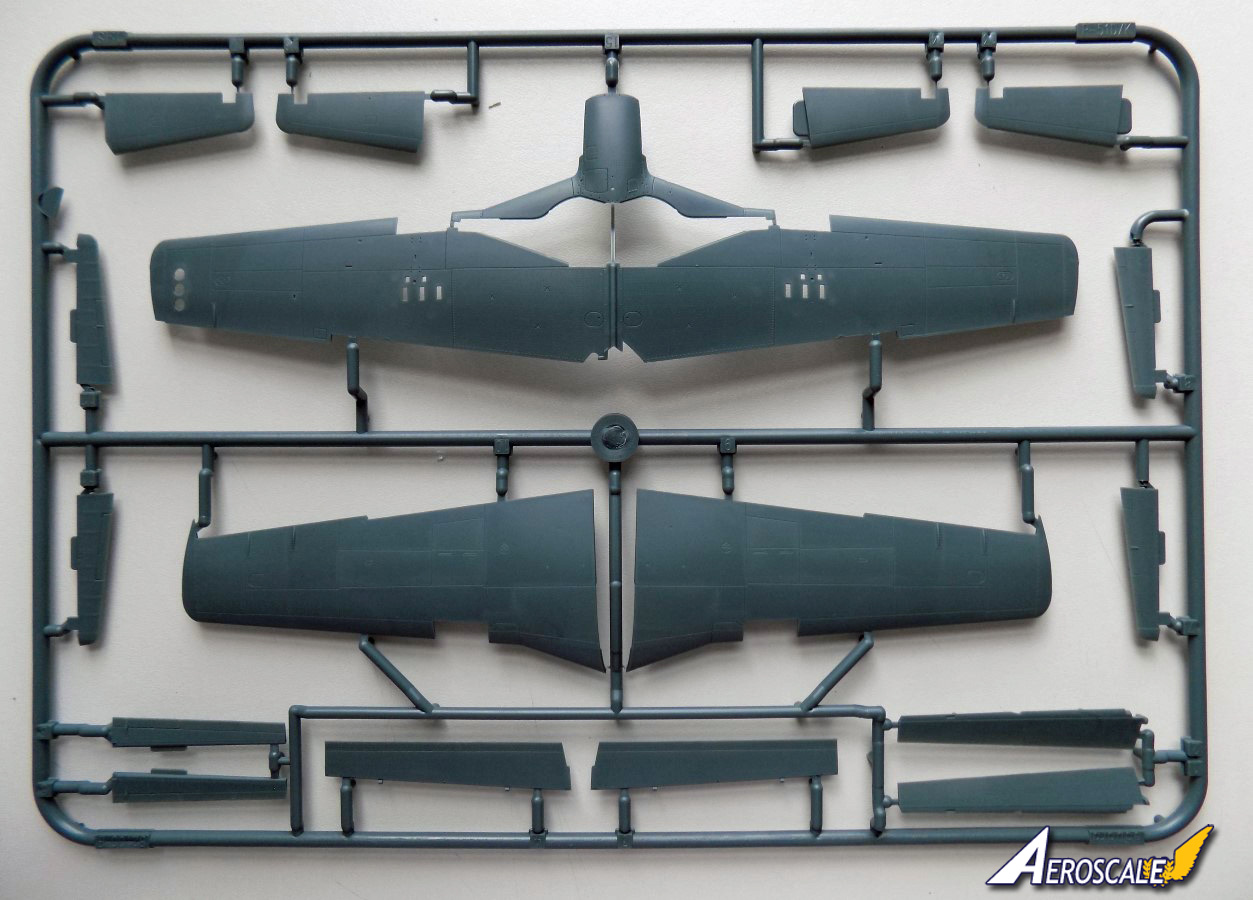
Anyhoo here are some pics of the contents of the box.
Andy
Posted: Wednesday, July 31, 2019 - 03:38 AM UTC
Quoted Text
Wouldn't it have been better if EDUARD had molded these two top Engine cowlings as a ONE-PIECE part, thereby avoiding a pesky join at the "center-line" of said top Engine Cowling Panels..?
Hi Dennis
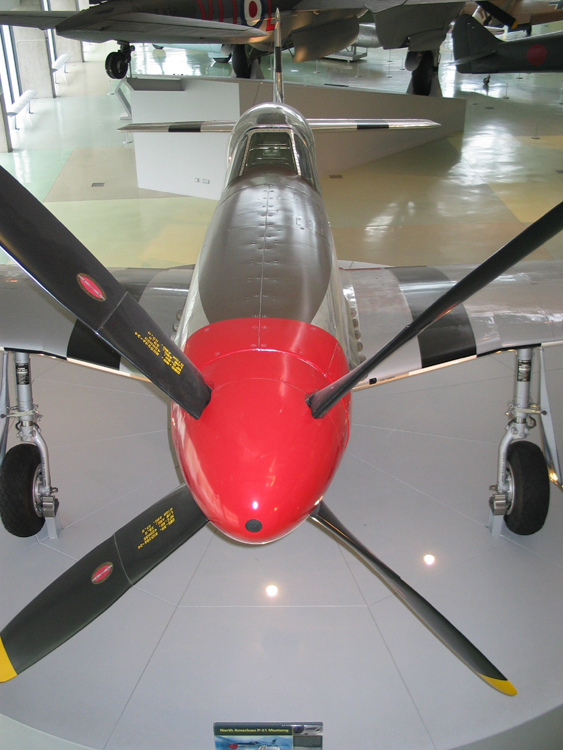
Going by the walkaround I shot for Dragon many years ago at the RAF Museum, you want to keep that line at the top of the cowling panels. It'll be interesting to see how well the fasteners are reproduced that far 'round on the parts - it could be an argument for a separate part to keep the panel line and fasteners crisp.
All the best
Rowan
M4A1Sherman
New York, United States
Joined: May 02, 2013
KitMaker: 4,403 posts
AeroScale: 254 posts
Joined: May 02, 2013
KitMaker: 4,403 posts
AeroScale: 254 posts
Posted: Wednesday, July 31, 2019 - 05:06 AM UTC
Hi, Rowan!
My point, exactly... I don't want ANY of that exquisite detail to be obliterated by a lot of unnecessary filling, sanding, re-scribing, polishing, etc... This kind of thing has been a sore point with modelers, for years...
PS- Ahhh... A PROPER Wing Spar!!!
My point, exactly... I don't want ANY of that exquisite detail to be obliterated by a lot of unnecessary filling, sanding, re-scribing, polishing, etc... This kind of thing has been a sore point with modelers, for years...
PS- Ahhh... A PROPER Wing Spar!!!
M4A1Sherman
New York, United States
Joined: May 02, 2013
KitMaker: 4,403 posts
AeroScale: 254 posts
Joined: May 02, 2013
KitMaker: 4,403 posts
AeroScale: 254 posts
Posted: Wednesday, July 31, 2019 - 05:18 AM UTC
Hello Andy, and Everyone Else!
Andy- I very much appreciate that you'll be keeping us ALL posted on your progress with this new P-51. I think that group participation in any one modeler's build is what makes for a fine article/thread. In looking over the parts contained in this new 1/48 EDUARD rendition of the '51, I must say that so far, I'm VERY impressed...
What are your initial thoughts and impressions?
I like the fact that EDUARD has chosen to mold quite a few of the various Cockpit details as separate parts, a la the latest 1/48 TAMIYA 61119 Spitfire Mk.I kit. However, I'm also wondering if EDUARD will continue in their tradition of manufacturing such "boutique items" as BRASSIN and BIG SIN multi-media super-detailing sets for this new Mustang as they've done for their other aircraft kits???
The molding of separate Main Wheel Bay parts is also noteworthy, as are a lot of the other features which are included in this kit. I like the fact that EDUARD has chosen to mold separate Tires, Inner and Outer Wheel discs, separate Exhaust Shrouds and separate Carburetor Intake and Radiator Intake Scoops. There are different Radio Masts, an IDF Loop, and three different styles of Propellers, two different styles of Propeller Spinners, a whole RAFT of under-wing stores, separate Gun Fairings and three different styles of Dust Covers for the Tail Wheel Assembly. LOVE the new PE set, as well! I'm hoping that the fit of the parts will be as impressive as their content!
Modelers take note:
This is the first time, (In my recollection or experience, anyway) that ANY model manufacturer has made the effort to illustrate the "Lacquer-Painted" surfaces of the P-51. This is a very important feature to be aware of when depicting any model of a P-51 in her Natural-Metal state. I won't go into specific details in this post, for brevity's sake...
Andy- Have you decided upon which of the SIX different color schemes and markings you're going to build your '51, yet..?
At present, among several other various types of modeling projects, I have a 1/48 AIRFIX P-51D on one of my workbenches. She will be a brand-new, as yet un-assigned USAAF P-51D-10NA in overall Natural-Aluminum, "fresh from the factory", un-adorned in any specific US Fighter Squadron or Fighter Group markings. And yes, I'll be including "puttied-up and Lacquer-Painted" Wings and control surfaces!
PS- Not readily apparent, but possibly illustrated and/or directed on another page of EDUARD's painting Instructions:
The Rudder should also be "Lacquer-Painted"...
Andy- I very much appreciate that you'll be keeping us ALL posted on your progress with this new P-51. I think that group participation in any one modeler's build is what makes for a fine article/thread. In looking over the parts contained in this new 1/48 EDUARD rendition of the '51, I must say that so far, I'm VERY impressed...
What are your initial thoughts and impressions?
I like the fact that EDUARD has chosen to mold quite a few of the various Cockpit details as separate parts, a la the latest 1/48 TAMIYA 61119 Spitfire Mk.I kit. However, I'm also wondering if EDUARD will continue in their tradition of manufacturing such "boutique items" as BRASSIN and BIG SIN multi-media super-detailing sets for this new Mustang as they've done for their other aircraft kits???
The molding of separate Main Wheel Bay parts is also noteworthy, as are a lot of the other features which are included in this kit. I like the fact that EDUARD has chosen to mold separate Tires, Inner and Outer Wheel discs, separate Exhaust Shrouds and separate Carburetor Intake and Radiator Intake Scoops. There are different Radio Masts, an IDF Loop, and three different styles of Propellers, two different styles of Propeller Spinners, a whole RAFT of under-wing stores, separate Gun Fairings and three different styles of Dust Covers for the Tail Wheel Assembly. LOVE the new PE set, as well! I'm hoping that the fit of the parts will be as impressive as their content!
Modelers take note:
This is the first time, (In my recollection or experience, anyway) that ANY model manufacturer has made the effort to illustrate the "Lacquer-Painted" surfaces of the P-51. This is a very important feature to be aware of when depicting any model of a P-51 in her Natural-Metal state. I won't go into specific details in this post, for brevity's sake...
Andy- Have you decided upon which of the SIX different color schemes and markings you're going to build your '51, yet..?
At present, among several other various types of modeling projects, I have a 1/48 AIRFIX P-51D on one of my workbenches. She will be a brand-new, as yet un-assigned USAAF P-51D-10NA in overall Natural-Aluminum, "fresh from the factory", un-adorned in any specific US Fighter Squadron or Fighter Group markings. And yes, I'll be including "puttied-up and Lacquer-Painted" Wings and control surfaces!
PS- Not readily apparent, but possibly illustrated and/or directed on another page of EDUARD's painting Instructions:
The Rudder should also be "Lacquer-Painted"...
Posted: Wednesday, July 31, 2019 - 09:06 PM UTC
Quoted Text
Hello Andy, and Everyone Else!
Andy- I very much appreciate that you'll be keeping us ALL posted on your progress with this new P-51. I think that group participation in any one modeler's build is what makes for a fine article/thread. In looking over the parts contained in this new 1/48 EDUARD rendition of the '51, I must say that so far, I'm VERY impressed...
What are your initial thoughts and impressions?
Hi Dennis,
My initial thoughts are its a very nicely detailed kit, with some very good exterior details.
There are a couple of points which do bug me a little, such as a few parts have come off the sprue trees in transit and were rattling around the bag. Not that bad for the grey parts but two of the main canopies had come off, which might get scratched, but at least the clear parts are in thier own bag.
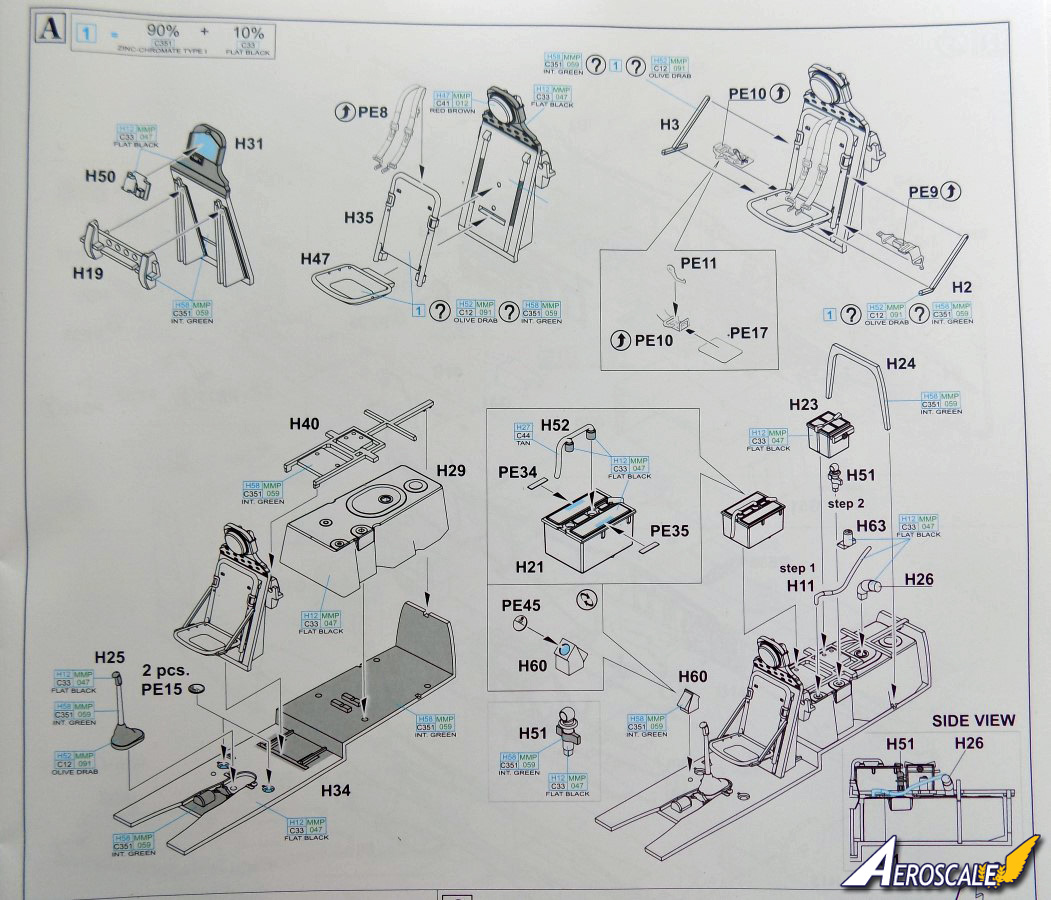
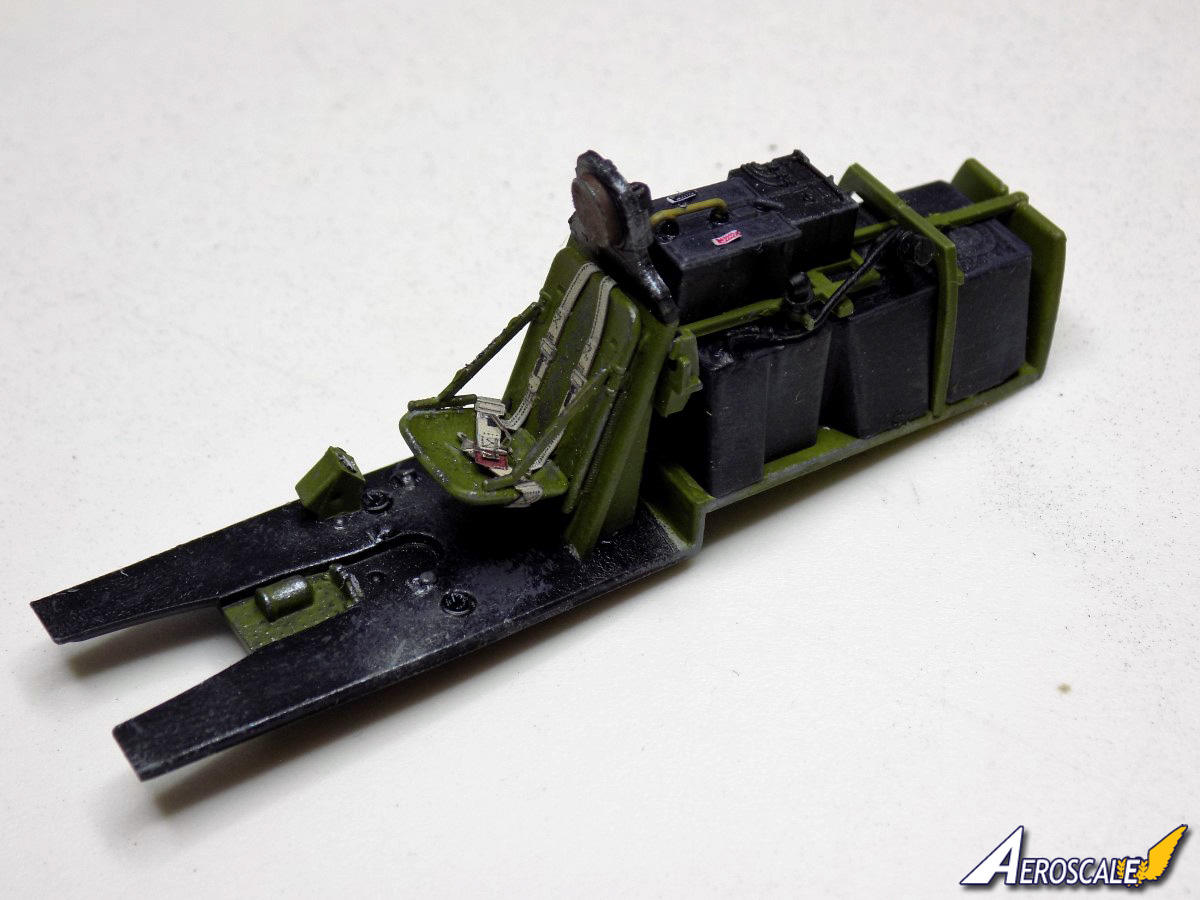
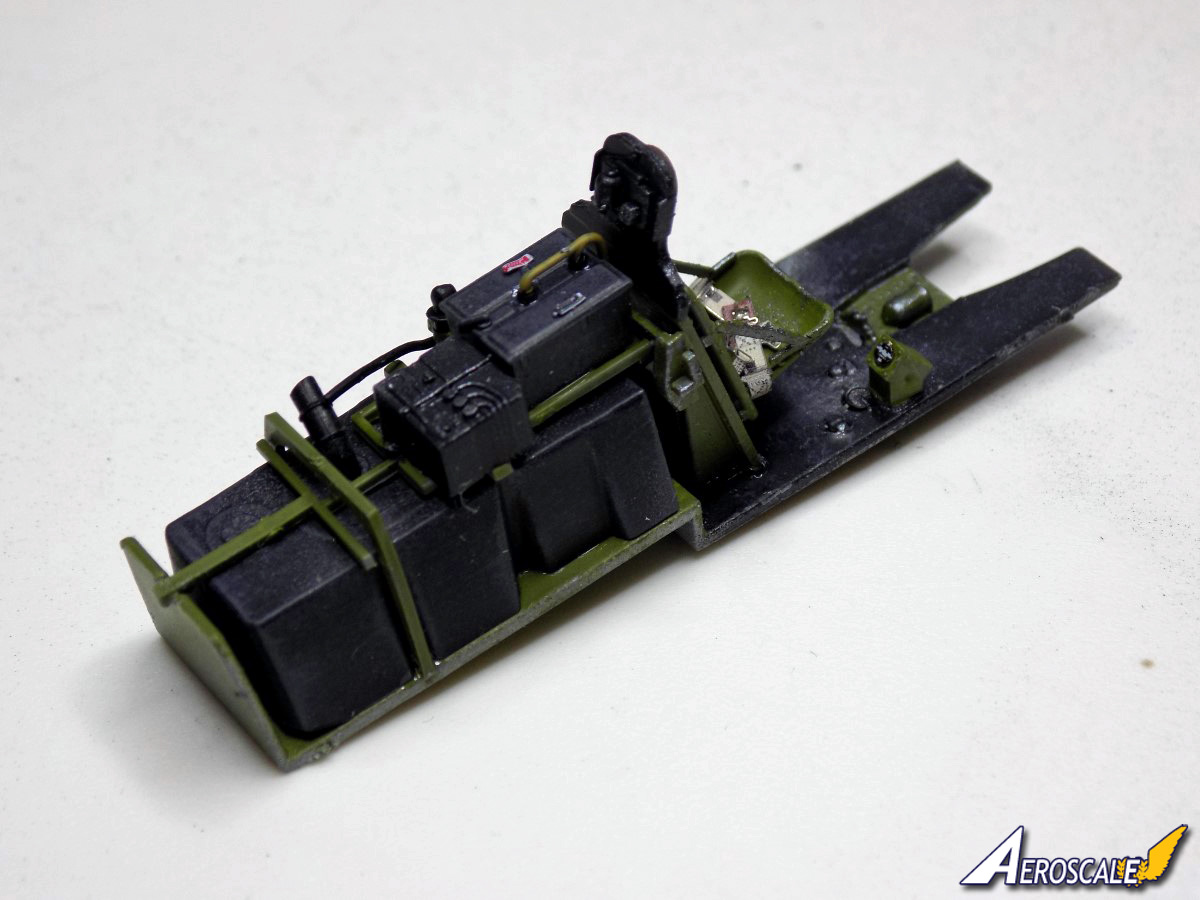
Well day one of the build, and the cockpit is built as per step A in the instructions.
Unfortunately the control column was missing from my kit. It hadn't fallen off the sprue as I checked the pics I took of the sprue and its missing from there.
Everything goes together very well, with no issues in the instructions or the assembly, and there is a nice bit of detail.
No doubt Eduard will produce a resin cockpit for the Mustang, but too tell the truth I can't see how it would improve the kits parts to be honest.
Next up is the cockpit sidewalls, and getting the fuselage halves together.
Andy
thegirl
Alberta, Canada
Joined: January 19, 2008
KitMaker: 6,743 posts
AeroScale: 6,151 posts
Joined: January 19, 2008
KitMaker: 6,743 posts
AeroScale: 6,151 posts
Posted: Thursday, August 01, 2019 - 12:56 PM UTC
Will be following your build Andy . Just got my notice from Hannants today , kit is on it's way . I must say that this is a very impressive kit indeed . Far better then Airfix and Mengs . It's WOW . And that wheel bay puts a smile on my face . Nice job on the pit so far .
Terri , one hugh Mustang fan
Posted: Thursday, August 01, 2019 - 07:34 PM UTC
Hi Andy
Great start!
That's a pain about the control column. I take it you've checked it's not still in the bag the sprues arrived in?
All the best
Rowan
Great start!
That's a pain about the control column. I take it you've checked it's not still in the bag the sprues arrived in?
All the best
Rowan
M4A1Sherman
New York, United States
Joined: May 02, 2013
KitMaker: 4,403 posts
AeroScale: 254 posts
Joined: May 02, 2013
KitMaker: 4,403 posts
AeroScale: 254 posts
Posted: Thursday, August 01, 2019 - 08:27 PM UTC
Hello, Andy!
If you don't have any luck in finding your missing Control Column, I have several extra P-51D kits made by different manufacturers, from which I can "pirate" a Control Column, and subsequently forward to you.
You can let me know what you want to do...
VR, Dennis
PS- I "pre-ordered" 2 of these on the 26th of July. Should hear something, soon...
Posted: Friday, August 02, 2019 - 10:46 AM UTC
Quoted Text
Will be following your build Andy . Just got my notice from Hannants today , kit is on it's way . I must say that this is a very impressive kit indeed . Far better then Airfix and Mengs . It's WOW . And that wheel bay puts a smile on my face . Nice job on the pit so far .
Terri , one hugh Mustang fan
Thanks Terri, the kit is so far an absolute joy to build, very Tamiyaesk in fit quality. The wheel bay is beautiful.
Andy
Posted: Friday, August 02, 2019 - 10:51 AM UTC
Quoted Text
Hi Andy
Great start!
That's a pain about the control column. I take it you've checked it's not still in the bag the sprues arrived in?
All the best
Rowan
Hi Rowan,
Yep checked the bag and nothing there. Mind you most of the parts near enough fall off the sprues anyway, so it might have come away when the kit was packed, as I have a box of un-sprued parts now lol.
Andy
Quoted Text
Hello, Andy!
If you don't have any luck in finding your missing Control Column, I have several extra P-51D kits made by different manufacturers, from which I can "pirate" a Control Column, and subsequently forward to you.
You can let me know what you want to do...
VR, Dennis
PS- I "pre-ordered" 2 of these on the 26th of July. Should hear something, soon...
Hi Dennis,
Thanks for the offer but I will scratch something from some brass rod, as I will close the canopy up anyway, so not much will be seen way down in the depths of the cockpit.
Hope your kits turn up soon, so far they are very easy to build, and a joy.
Andy
Posted: Friday, August 02, 2019 - 07:29 PM UTC
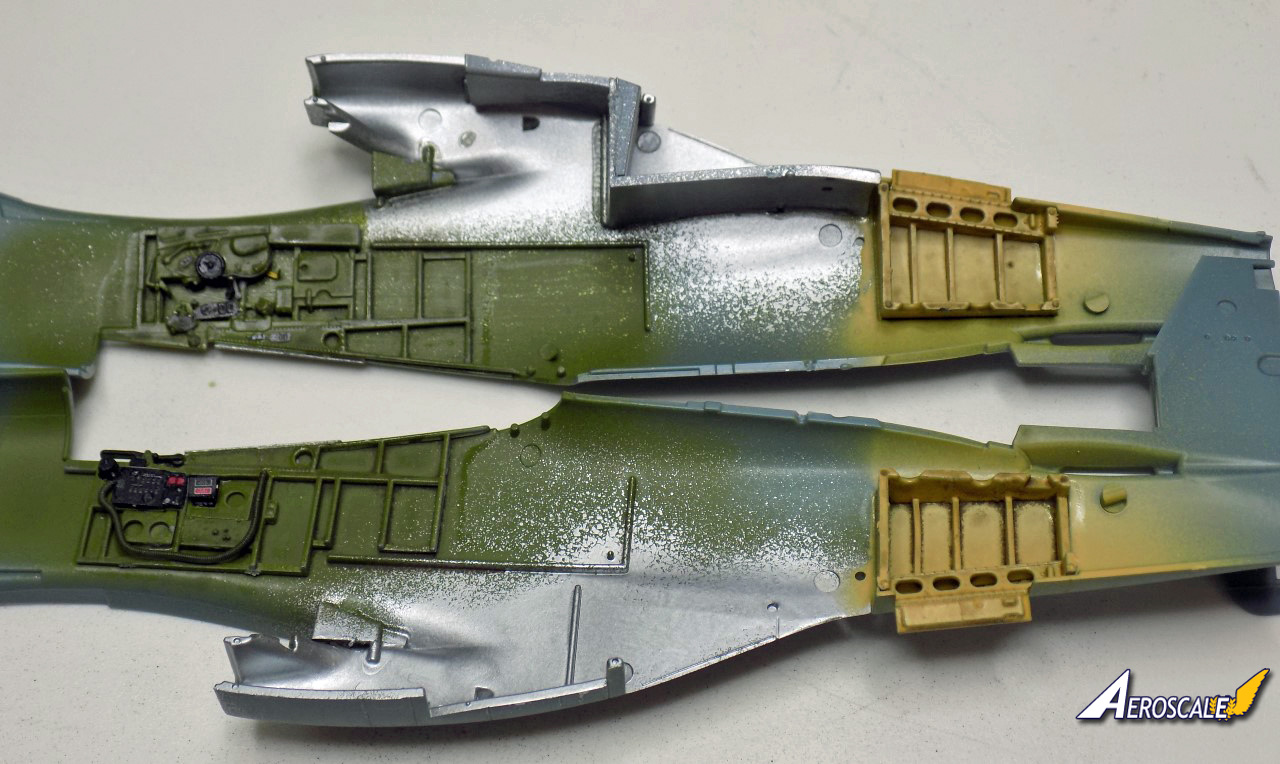
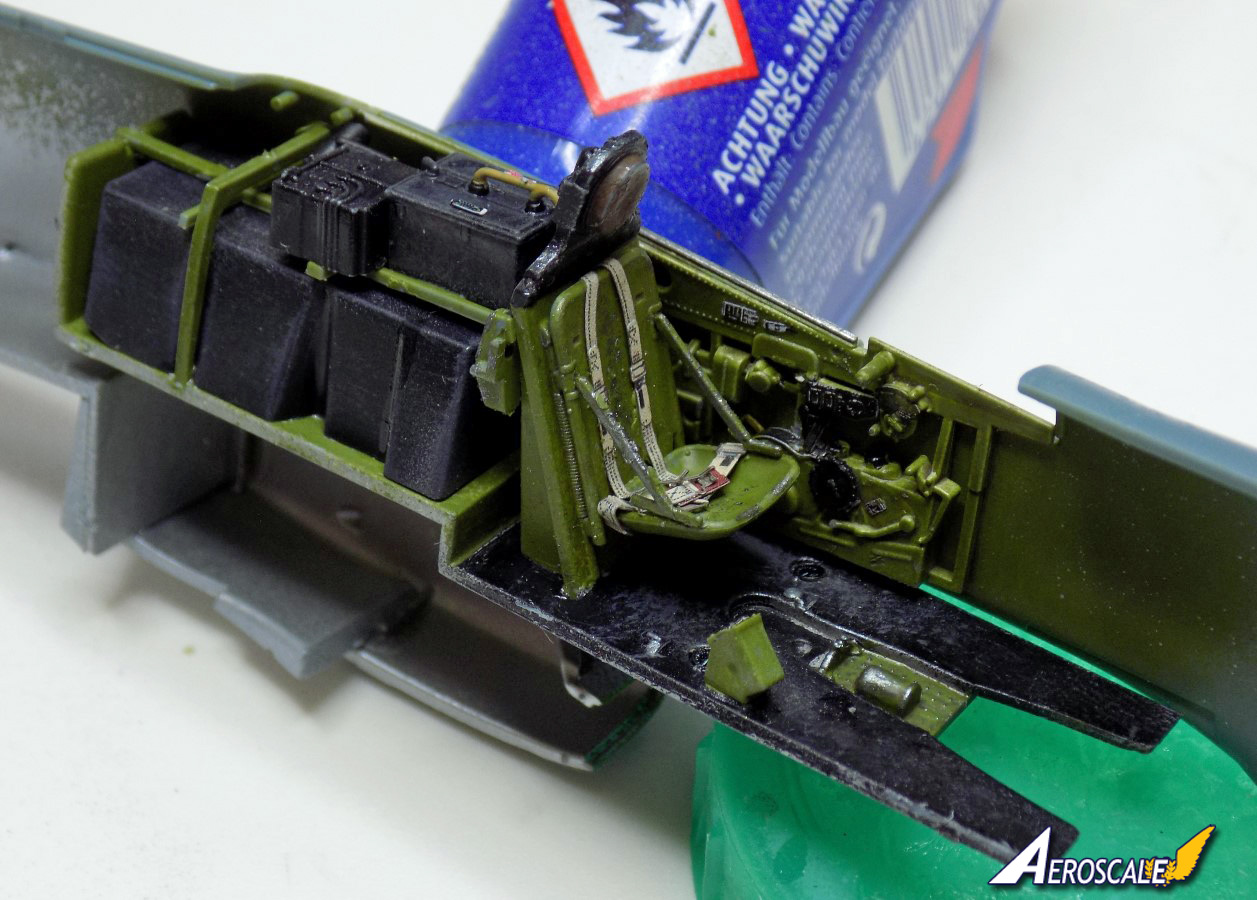
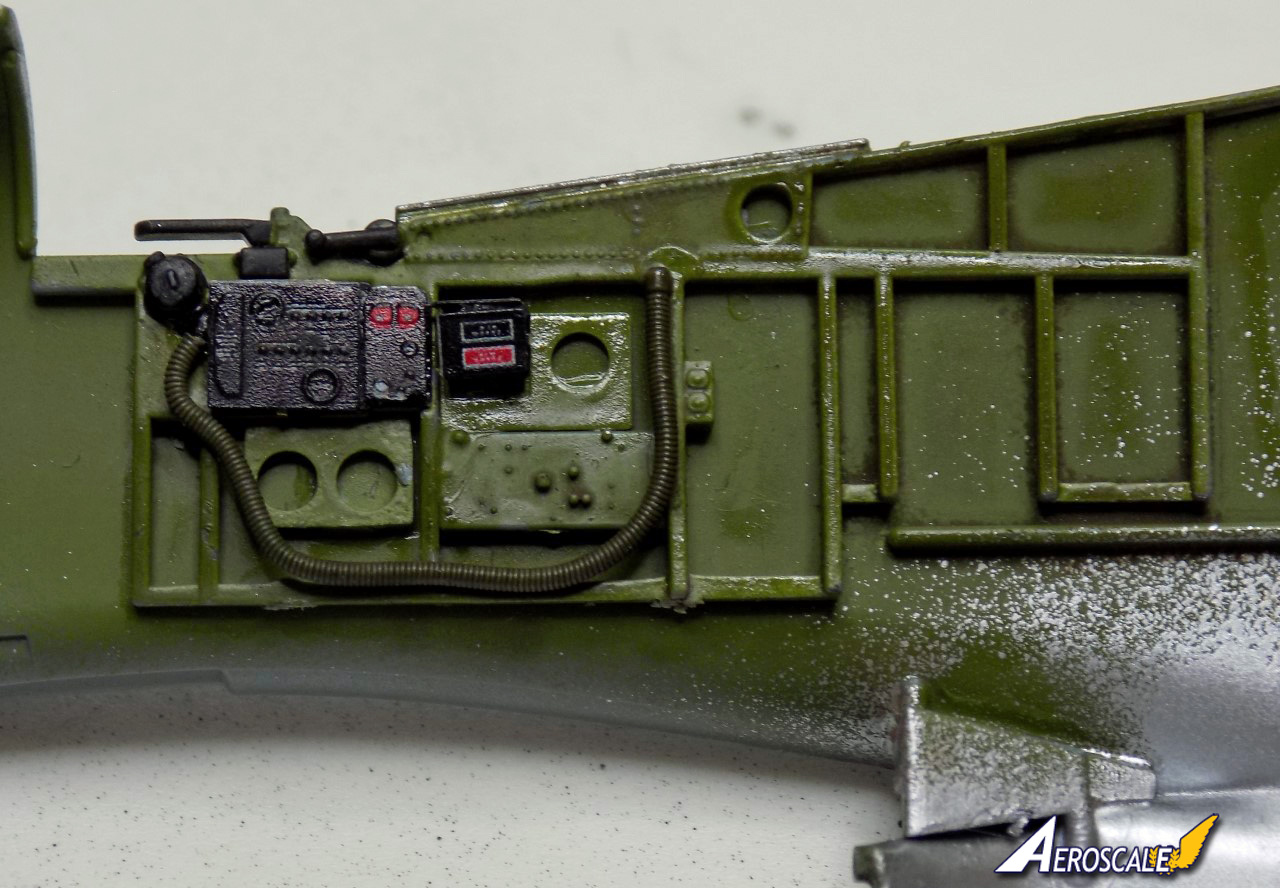
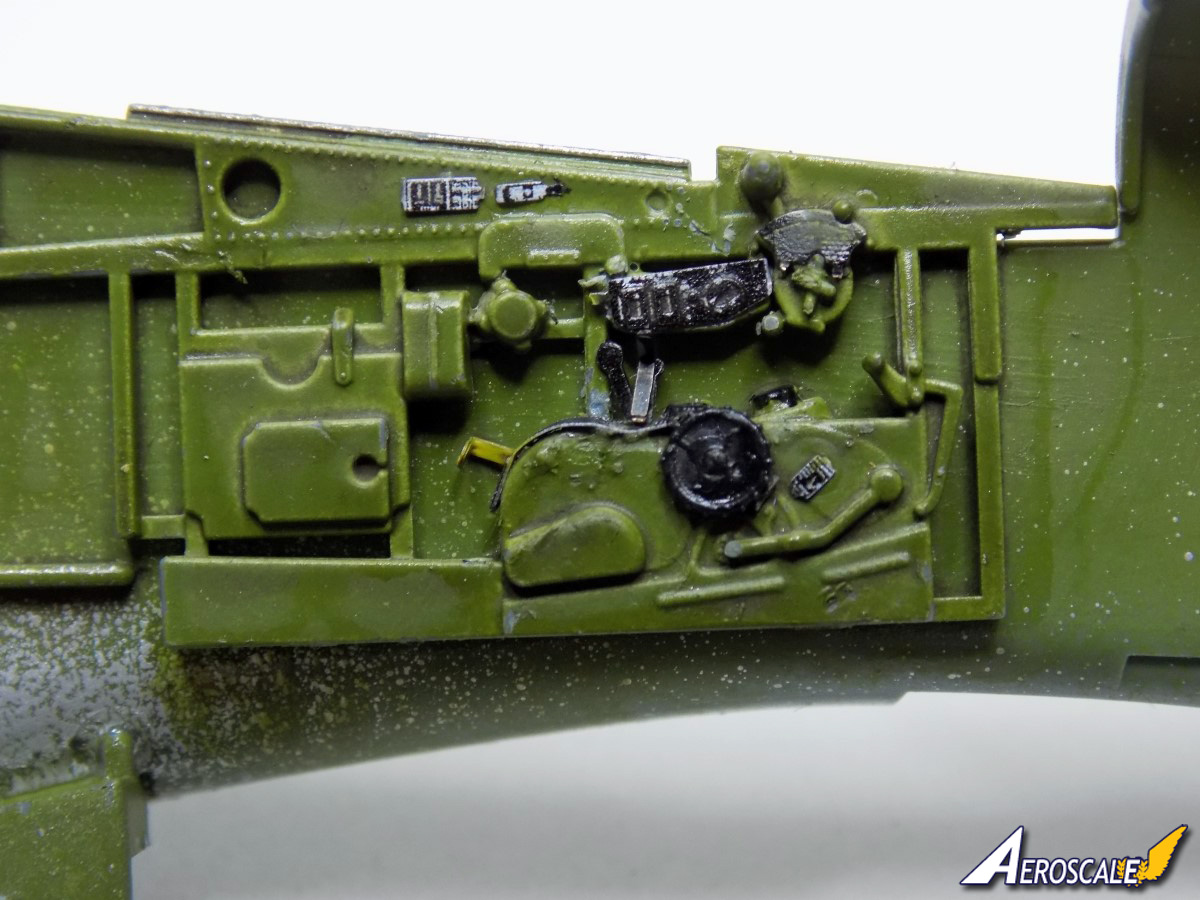
Cockpit side walls are built, just need to dull coat them and weather them a bit.
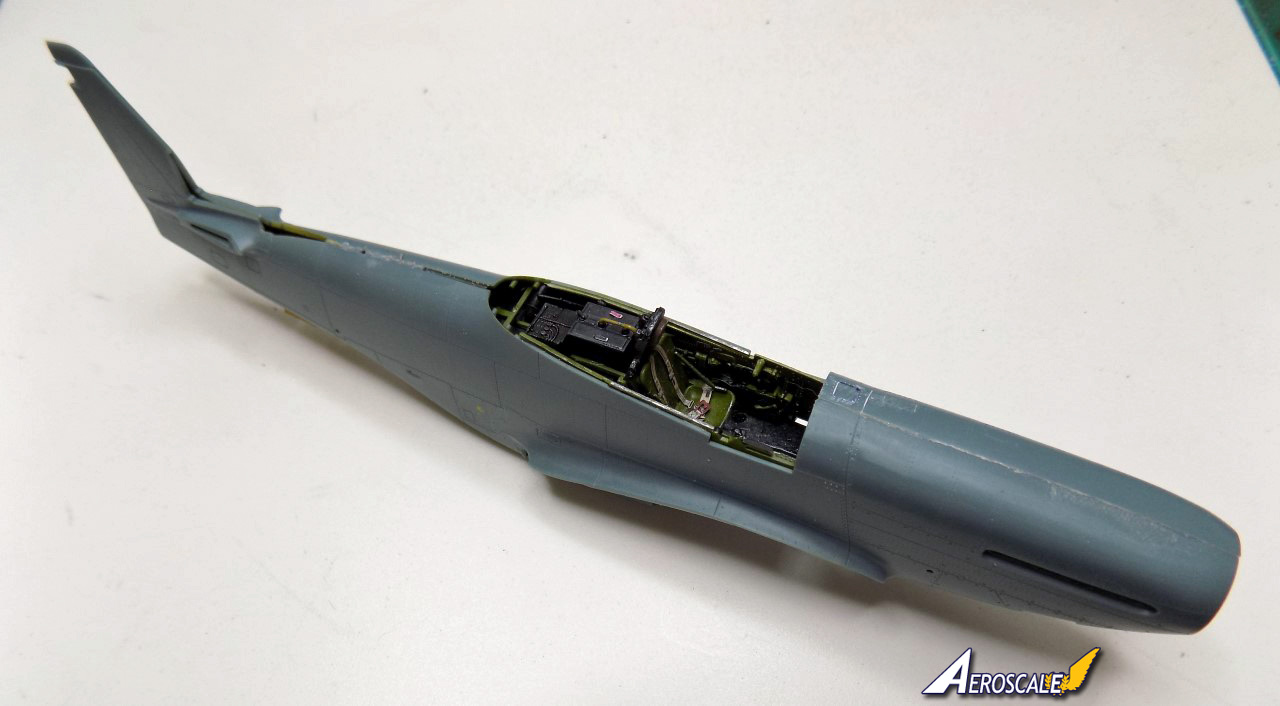
All the parts for the internals added before the cockpit and fuselage are joined up.
Cockpit added.
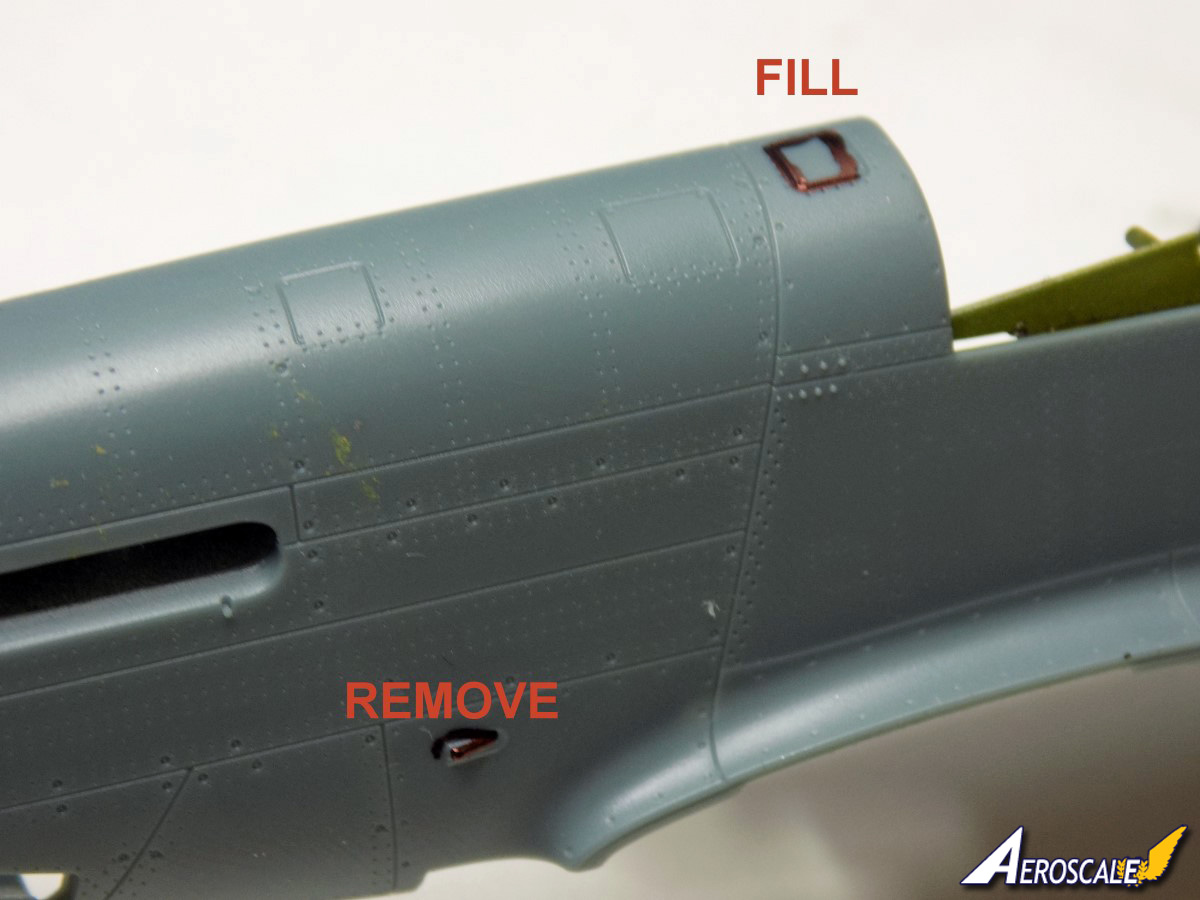
One fuselage half needs a small panel filled, and a lump in the lower half removed, both are very easy to do.
Fuselage closed up, fit is exceptional, with very little seam work needed.
Andy
All the parts for the internals added before the cockpit and fuselage are joined up.
Cockpit added.
One fuselage half needs a small panel filled, and a lump in the lower half removed, both are very easy to do.
Fuselage closed up, fit is exceptional, with very little seam work needed.
Andy
thegirl
Alberta, Canada
Joined: January 19, 2008
KitMaker: 6,743 posts
AeroScale: 6,151 posts
Joined: January 19, 2008
KitMaker: 6,743 posts
AeroScale: 6,151 posts
Posted: Saturday, August 03, 2019 - 12:08 AM UTC
So far the kit has awesome detail ! It's like a mini 32 scale Tamiya mustang .
Nice work on the painting up the pit and getting the halves closed up . One really doesn't have to add much for details in the pit . Looking forward to your next up-date .
Terri
Nice work on the painting up the pit and getting the halves closed up . One really doesn't have to add much for details in the pit . Looking forward to your next up-date .
Terri
M4A1Sherman
New York, United States
Joined: May 02, 2013
KitMaker: 4,403 posts
AeroScale: 254 posts
Joined: May 02, 2013
KitMaker: 4,403 posts
AeroScale: 254 posts
Posted: Saturday, August 03, 2019 - 03:17 AM UTC
Quoted Text
So far the kit has awesome detail ! It's like a mini 32 scale Tamiya mustang .
Nice work on the painting up the pit and getting the halves closed up . One really doesn't have to add much for details in the pit . Looking forward to your next up-date .
Terri
Hi, Terri and Everyone Else!
Well, you see..? There are different schools of thought as far as the details in the Cockpit, etc are concerned. Even though my scale for aircraft kits is 1/48, I like to detail many of my Aircraft with their Cockpits as shown in the "open"-position. In other words, their Canopies are slid back, as in the cases of P-40s, Hellcats, Corsairs, P-51Ds, P-47s, Fw.190s, Dauntless', Avengers, Wildcats, etc or in the case of aircraft like the P-38, early P-51s/P-51As/A-36 etc through P-51C with the overhead Canopy Panel open and the Side Canopy Panel "open" as well. In the case of my latest TAMIYA Spitfire Mk.I, the Hood is slid back, and the Pilot's Door is folded "down", in its "open" position. P-39s have their very own "Car Doors", so the question with them is more or less moot.
All of that means is that I will detail my Cockpits to the "Nth"-degree, as far as including ANYTHING WHICH CAN BE SEEN through the open aperture of the Cockpit, without having to remove the Seats!
If I know a specific "detail-item" cannot be seen in this respect, I won't bother with it. There are enough modelers out there that will include such unseen details anyway; more power to 'em...
I will also detail the Engines of any Radial-Engined Aircraft as far back as possible, but no further back than the the "face" of the second row of Cylinders. I like to pose my 1/48 Aircraft as if they were "ready for flight", so that means NO open Engine Cowling Panels or Engine Access Panels for In-line Engined Aircraft, and NO open Gun Bay Doors, Radio Compartment Hatches, etc. I will also "detail-up" my Landing Gear Bays...
There's a good chance that I will wait on starting to build my EDUARD P-51Ds, pending EDUARD's releasing BRASSIN and/or BIG SIN multi-media detail sets. That of course, is contingent on if EDUARD actually proceeds to do so. If they do not, I MAY even resort to buying the some of the "boutique" sets which EDUARD specifically makes for the 1/48 AIRFIX P-51Ds, and then "adapting" certain of these parts to fit the EDUARD Mustang kit. Then again, if I see that the Cockpit parts are "good enough" in the kits themselves, I MAY dispense with buying all of that "extra stuff"...
Maybe I'm nuts, but that's just me...
I NEVER "look down my nose" at modelers who build their models "OOTB"... "To each, their own", as the saying goes...
VR, Dennis
Posted: Saturday, August 03, 2019 - 07:18 AM UTC
Hi Andy
It's looking great. The placards on the side consoles really bring things to life, and I've got to say the oxygen hose is quite exceptionally well done for an injection moulding.
Hi Dennis
I think we can almost guarantee they will. (In a way I'd love it if they didn't, because I've maybe unwisely signed up to review-build the beast further down the line with everything bar the kitchen sink thrown in. )
All the best
Rowan
It's looking great. The placards on the side consoles really bring things to life, and I've got to say the oxygen hose is quite exceptionally well done for an injection moulding.
Quoted Text
There's a good chance that I will wait on starting to build my EDUARD P-51Ds, pending EDUARD's releasing BRASSIN and/or BIG SIN multi-media detail sets. That of course, is contingent on if EDUARD actually proceeds to do so.
Hi Dennis
I think we can almost guarantee they will. (In a way I'd love it if they didn't, because I've maybe unwisely signed up to review-build the beast further down the line with everything bar the kitchen sink thrown in. )
All the best
Rowan
M4A1Sherman
New York, United States
Joined: May 02, 2013
KitMaker: 4,403 posts
AeroScale: 254 posts
Joined: May 02, 2013
KitMaker: 4,403 posts
AeroScale: 254 posts
Posted: Saturday, August 03, 2019 - 08:48 AM UTC
Quoted Text
Cockpit side walls are built, just need to dull coat them and weather them a bit.
All the parts for the internals added before the cockpit and fuselage are joined up.
Cockpit added.
One fuselage half needs a small panel filled, and a lump in the lower half removed, both are very easy to do.
Fuselage closed up, fit is exceptional, with very little seam work needed.
Andy
Hi, Andy!
Once again, Thanks for all of your efforts in bringing your project to the rest of us!
By the way, that "lump" is an Oil Breather/Over-flow Outlet...
There should be a "hole" in approximately the same place in the Right Forward Fuselage-half. If you check wartime photos of P-51s in action, you'd see a trail of oil making its way back towards the Tail from being exposed to the slipstream of the airplane. Interestingly, this trail of oil follows the airflow of the Laminar-Flow Wing designed into all P-51s...
Many P-51s even had a small "J"-shaped pipe or a small length of hose stuck into this hole, in order to keep too much oil from accumulating on the Fuselage sides...
Please be aware that I'm not "picking"; just trying to be helpful, is all...
M4A1Sherman
New York, United States
Joined: May 02, 2013
KitMaker: 4,403 posts
AeroScale: 254 posts
Joined: May 02, 2013
KitMaker: 4,403 posts
AeroScale: 254 posts
Posted: Saturday, August 03, 2019 - 08:58 AM UTC
Quoted Text
Hi Andy
It's looking great. The placards on the side consoles really bring things to life, and I've got to say the oxygen hose is quite exceptionally well done for an injection moulding.Quoted TextThere's a good chance that I will wait on starting to build my EDUARD P-51Ds, pending EDUARD's releasing BRASSIN and/or BIG SIN multi-media detail sets. That of course, is contingent on if EDUARD actually proceeds to do so.
Hi Dennis
I think we can almost guarantee they will. (In a way I'd love it if they didn't, because I've maybe unwisely signed up to review-build the beast further down the line with everything bar the kitchen sink thrown in. )
All the best
Rowan
CHEERS, Mate!
M4A1Sherman
New York, United States
Joined: May 02, 2013
KitMaker: 4,403 posts
AeroScale: 254 posts
Joined: May 02, 2013
KitMaker: 4,403 posts
AeroScale: 254 posts
Posted: Monday, August 05, 2019 - 03:52 AM UTC
Hello, All!
For those of you who may be interested-
I've just "pre-ordered" my new 1/48 TAMIYA P-38F/G Lightning at LUCKY MODELS this morning...
Brett Greene's "SQUADRON" 13-minute "in-box" video-review over at "HYPERSCALE" was the deciding factor, for me...
For those of you who may be interested-
I've just "pre-ordered" my new 1/48 TAMIYA P-38F/G Lightning at LUCKY MODELS this morning...
Brett Greene's "SQUADRON" 13-minute "in-box" video-review over at "HYPERSCALE" was the deciding factor, for me...
Posted: Monday, August 05, 2019 - 06:55 PM UTC
Quoted Text
By the way, that "lump" is an Oil Breather/Over-flow Outlet...
There should be a "hole" in approximately the same place in the Right Forward Fuselage-half. If you check wartime photos of P-51s in action, you'd see a trail of oil making its way back towards the Tail from being exposed to the slipstream of the airplane. Interestingly, this trail of oil follows the airflow of the Laminar-Flow Wing designed into all P-51s...
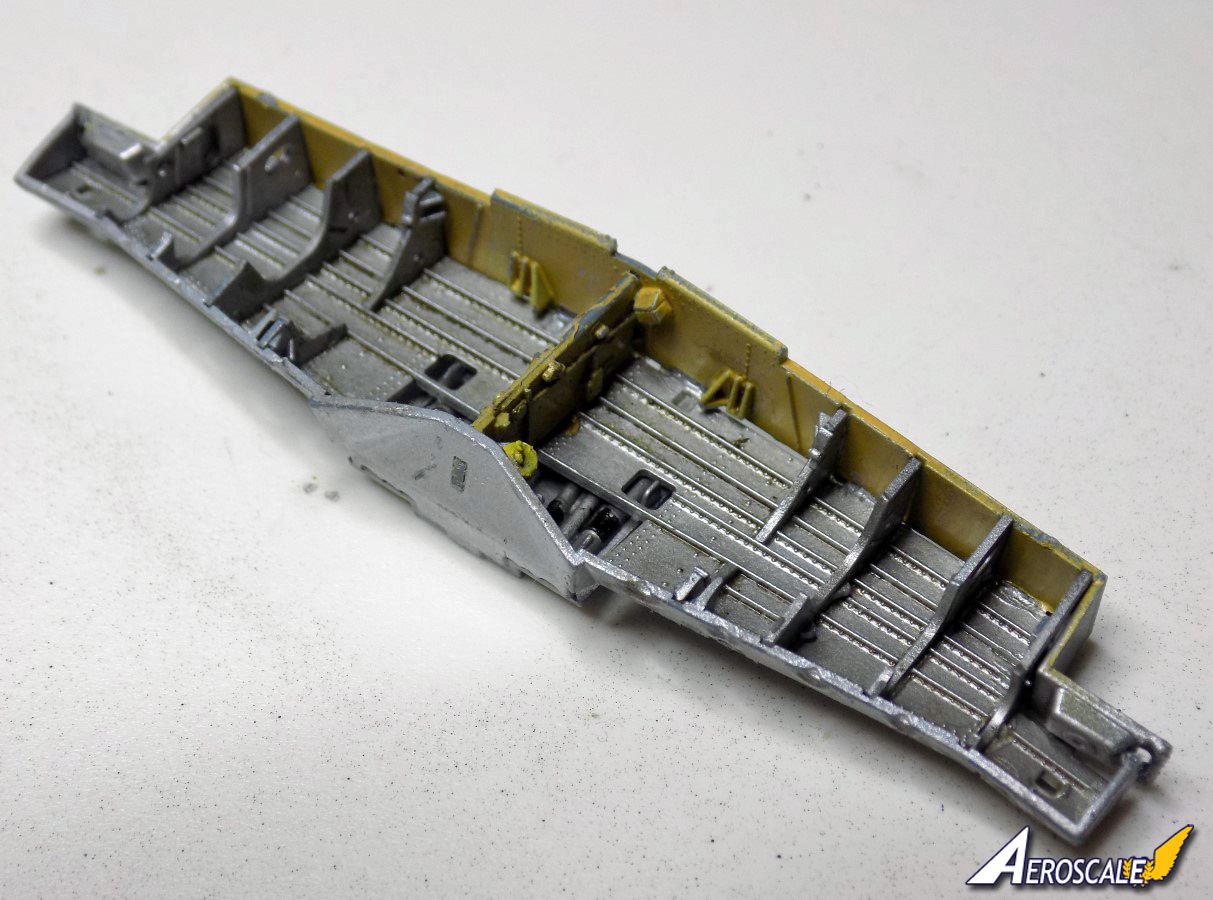
Thanks Dennis, knew it was that really, but had a brain fart and couldn't think what it was lol.
Yep just checked and there is a hole on the other side.
Undercarriage bay built, a little bit fiddly but very well detailed.
Next up, is making it look like a plane, by attaching the wings, and tail assembly.
Andy
M4A1Sherman
New York, United States
Joined: May 02, 2013
KitMaker: 4,403 posts
AeroScale: 254 posts
Joined: May 02, 2013
KitMaker: 4,403 posts
AeroScale: 254 posts
Posted: Monday, August 05, 2019 - 10:01 PM UTC
Quoted Text
Quoted TextBy the way, that "lump" is an Oil Breather/Over-flow Outlet...
There should be a "hole" in approximately the same place in the Right Forward Fuselage-half. If you check wartime photos of P-51s in action, you'd see a trail of oil making its way back towards the Tail from being exposed to the slipstream of the airplane. Interestingly, this trail of oil follows the airflow of the Laminar-Flow Wing designed into all P-51s...
Thanks Dennis, knew it was that really, but had a brain fart and couldn't think what it was lol.
Yep just checked and there is a hole on the other side.
Undercarriage bay built, a little bit fiddly but very well detailed.
Next up, is making it look like a plane, by attaching the wings, and tail assembly.
Andy
Hello, Andy and Everyone Else!
Really LOVE the looks of that Landing Gear Bay! There is NO need for an after-market Landing Gear Bay needed here! The only extra detailing I'll be adding to my Landing Gear Bay(s) is a little bit of "obvious" plumbing...
In the meantime, for those of your who are a little bit curious, there is an "in-depth" review with accompanying photos over on "HYPERSCALE", this morning. Brett Green has said in his review that this new EDUARD P-51D's textures, attention to Interior detail and Surface details have to be the finest he's ever seen- Even better than EDUARD's latest 1/48 Fw.190 kits...
Not to say that Andy isn't giving us a GREAT "blow-by-blow" build-review here on AEROSCALE! KUDOS, Andy!
I'm really liking what I'm seeing! I've emailed my seller as to the status of my two "pre-ordered" kits; he says I should probably see them by the end of this month... Happy Days!!!
ReluctantRenegade
Wien, Austria
Joined: March 09, 2016
KitMaker: 2,408 posts
AeroScale: 105 posts
Joined: March 09, 2016
KitMaker: 2,408 posts
AeroScale: 105 posts
Posted: Tuesday, August 06, 2019 - 06:20 PM UTC
How common was an OD camouflaged P-51D in April ‘45? AFAIK the general directive to abandon camouflaging was given in late ‘43 - early ‘44.