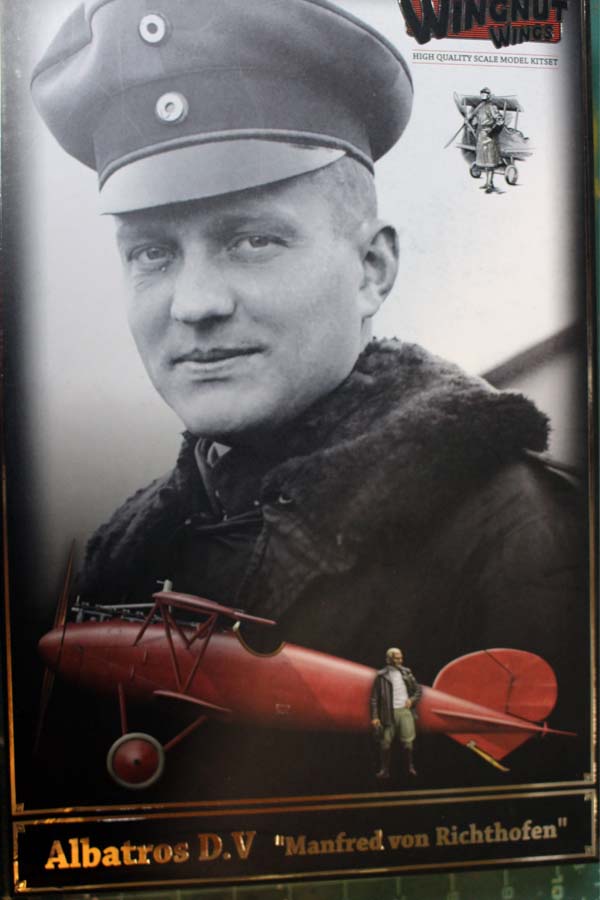
WnW Albatros D.V Manfred von Richtofen
ColinEdm
 Associate Editor
Alberta, Canada
Joined: October 15, 2013
KitMaker: 1,355 posts
AeroScale: 107 posts
Posted: Sunday, September 08, 2019 - 02:46 AM UTC
Well, we'll see if I bit off more than I can chew with this one, started on WnW's Albatros D.V...
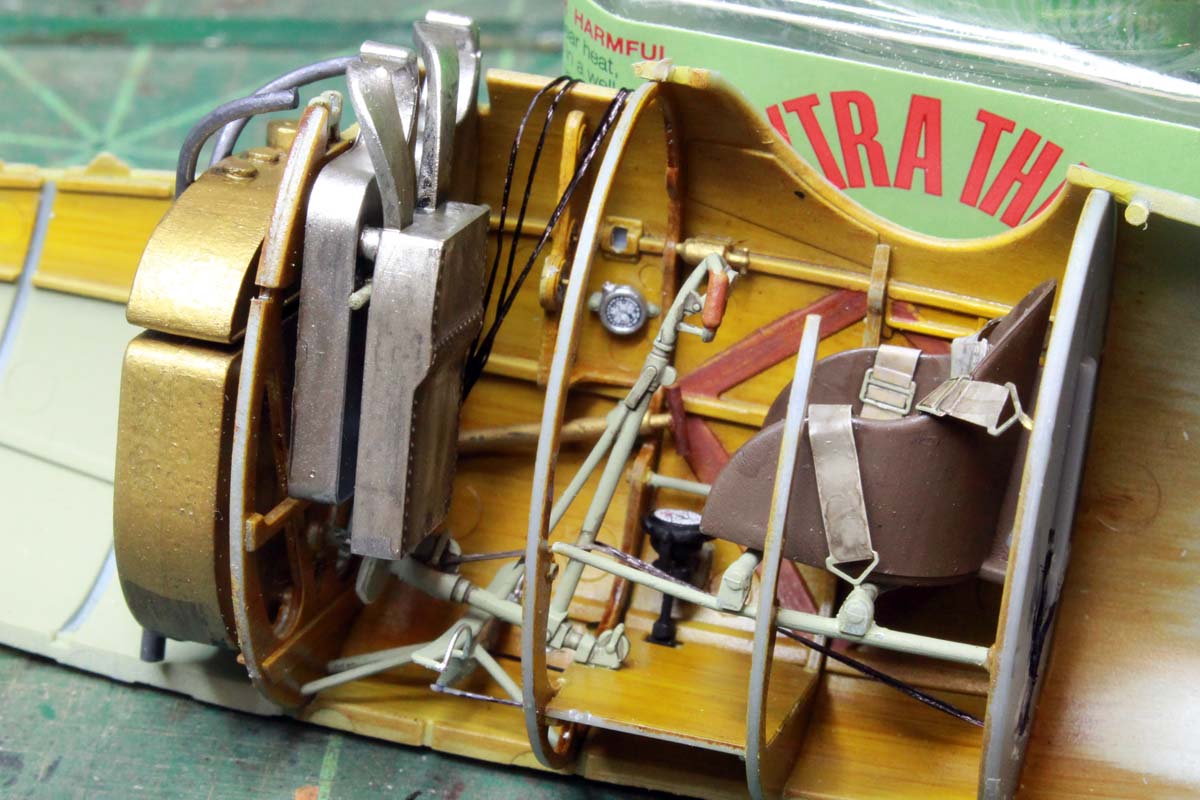
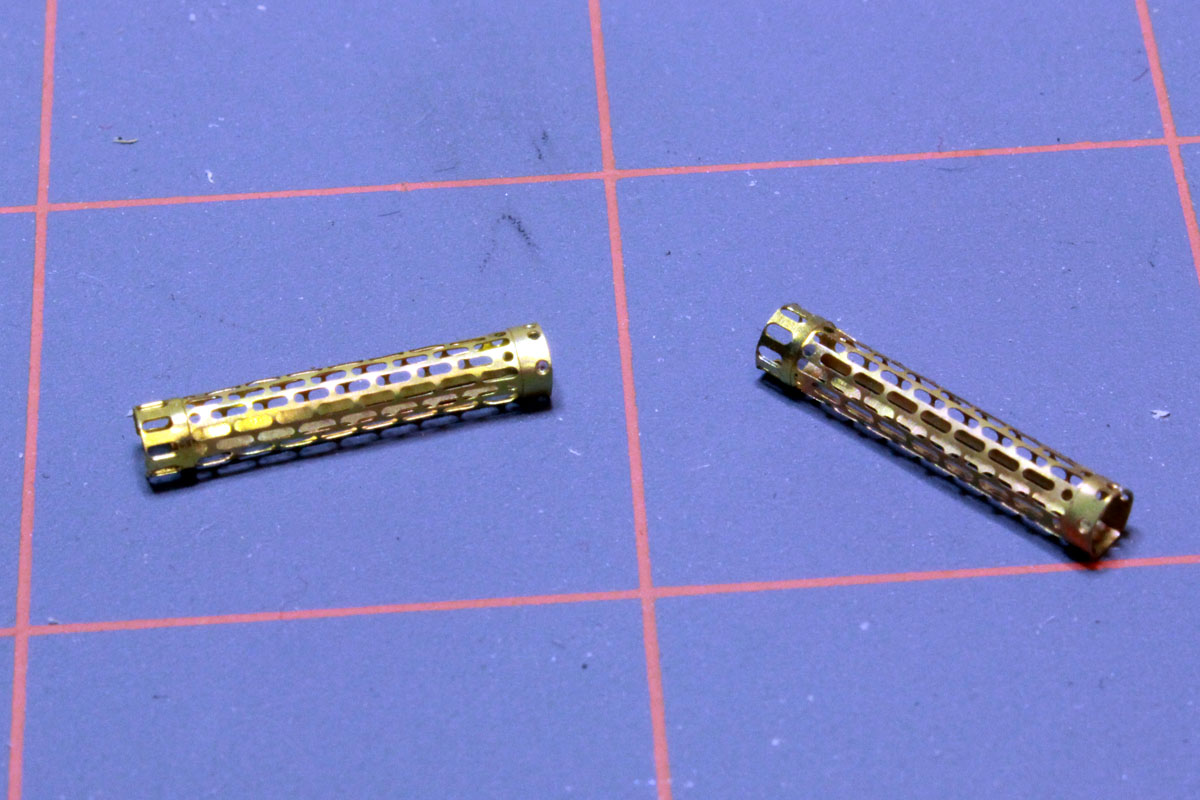
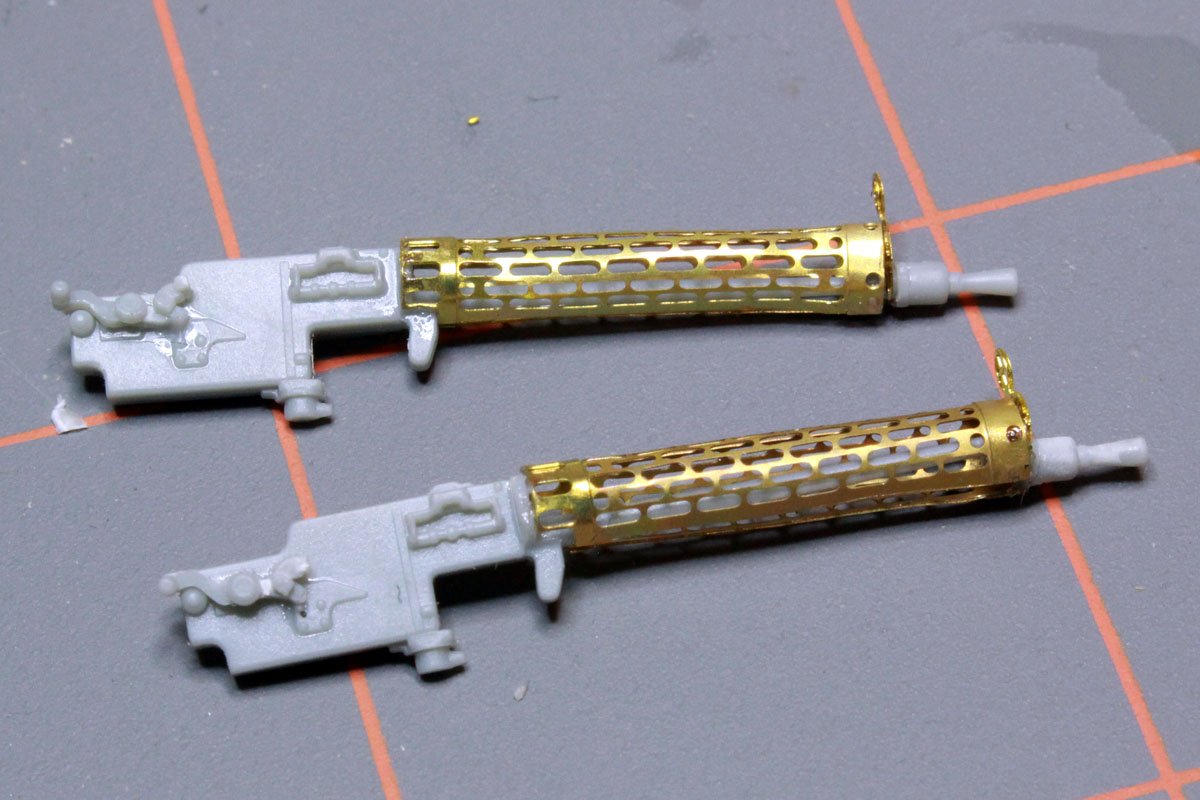
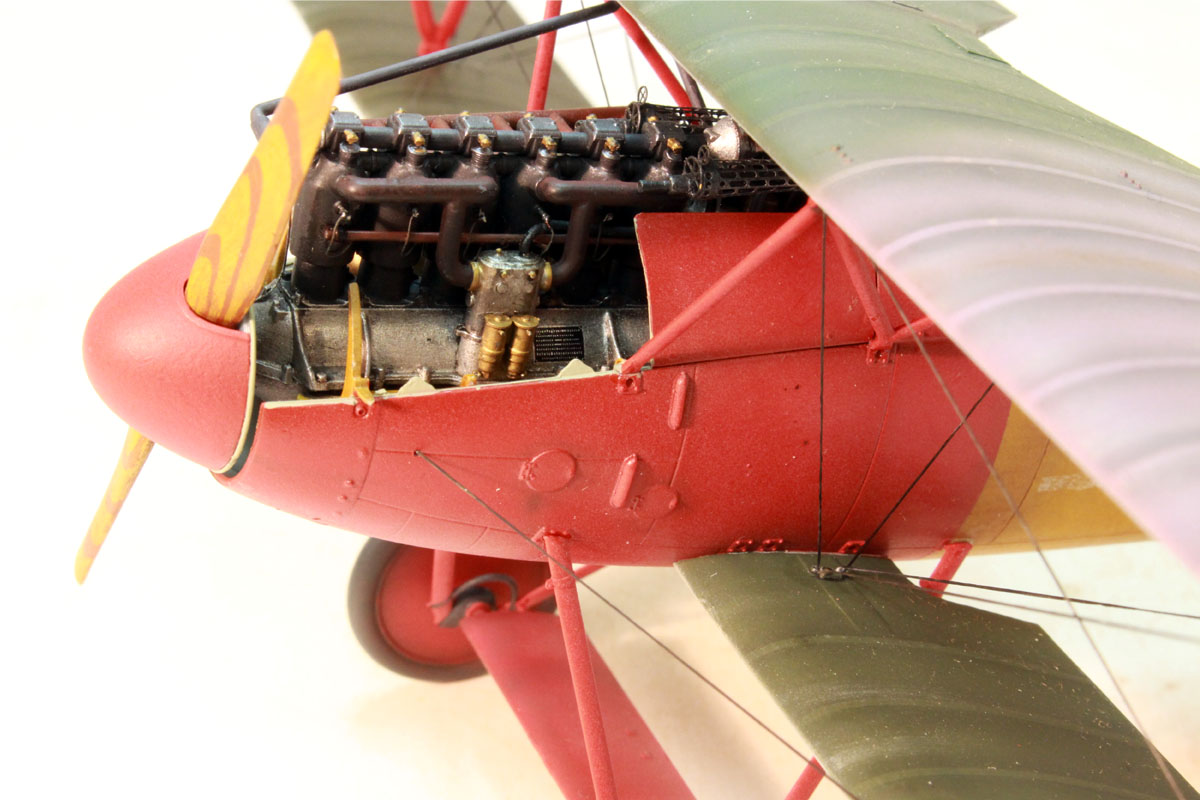
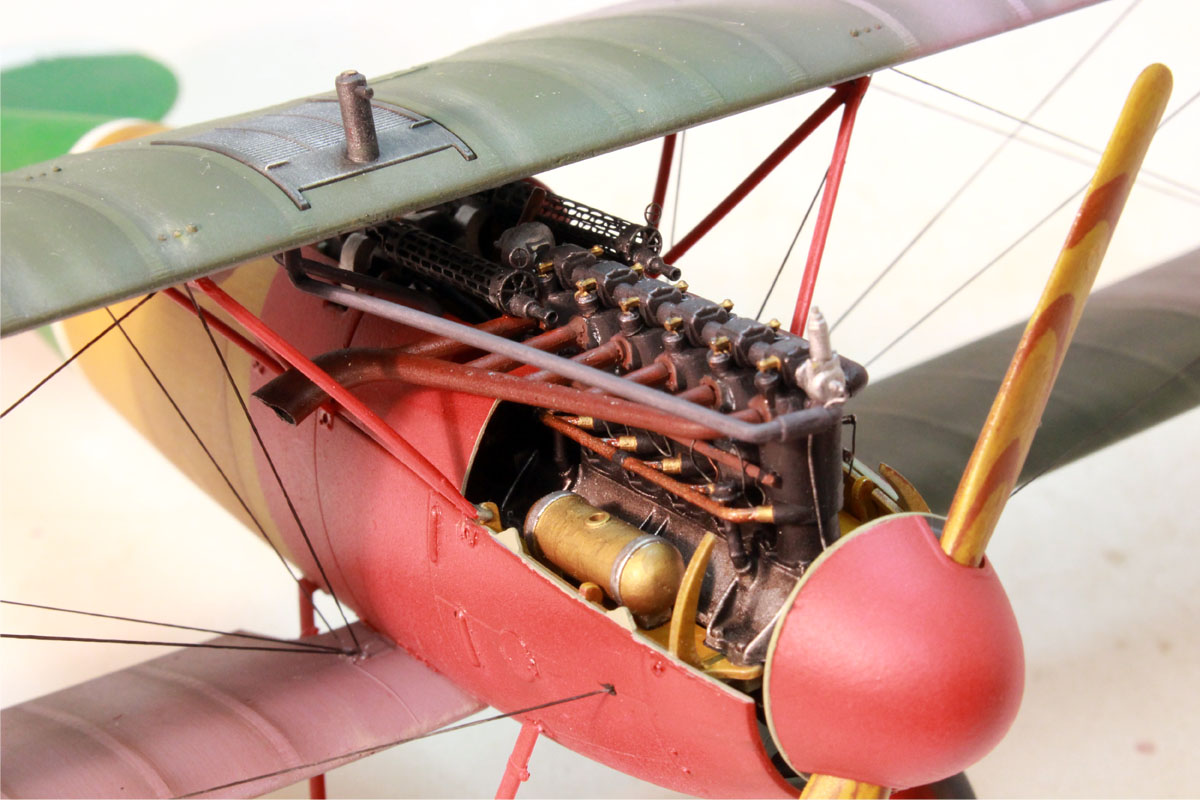
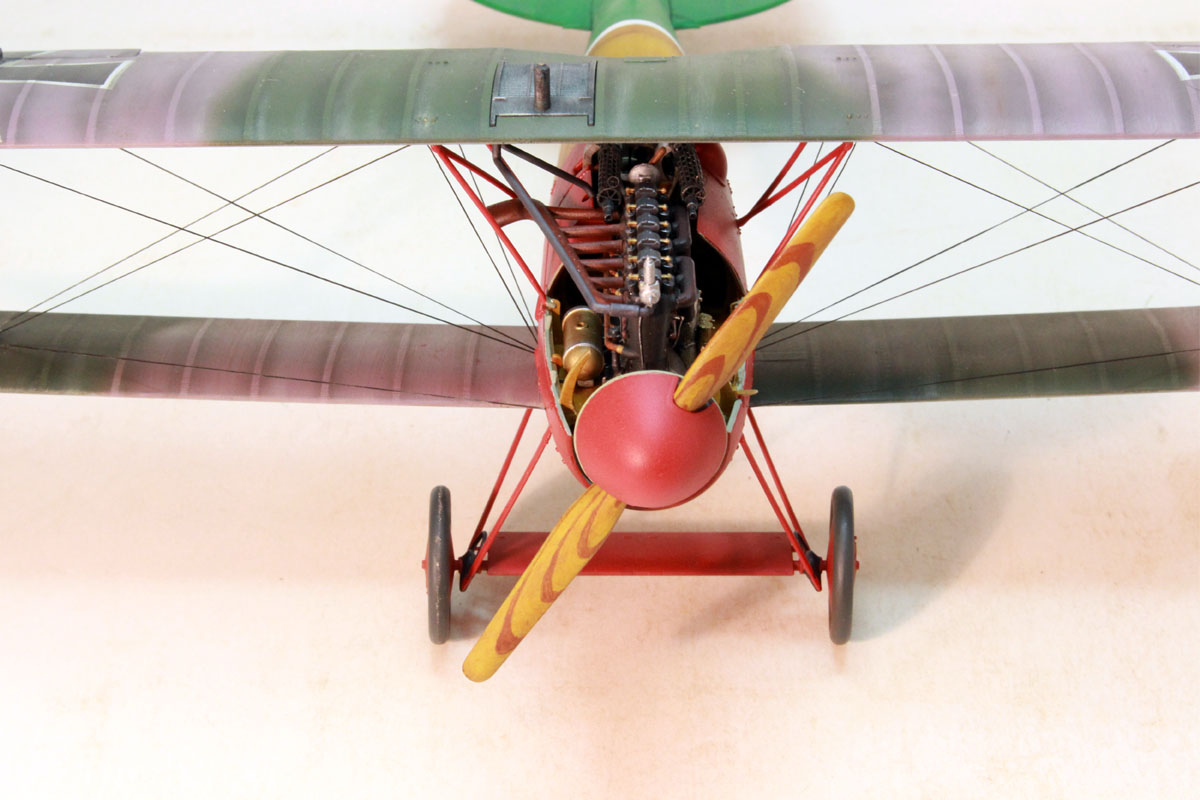
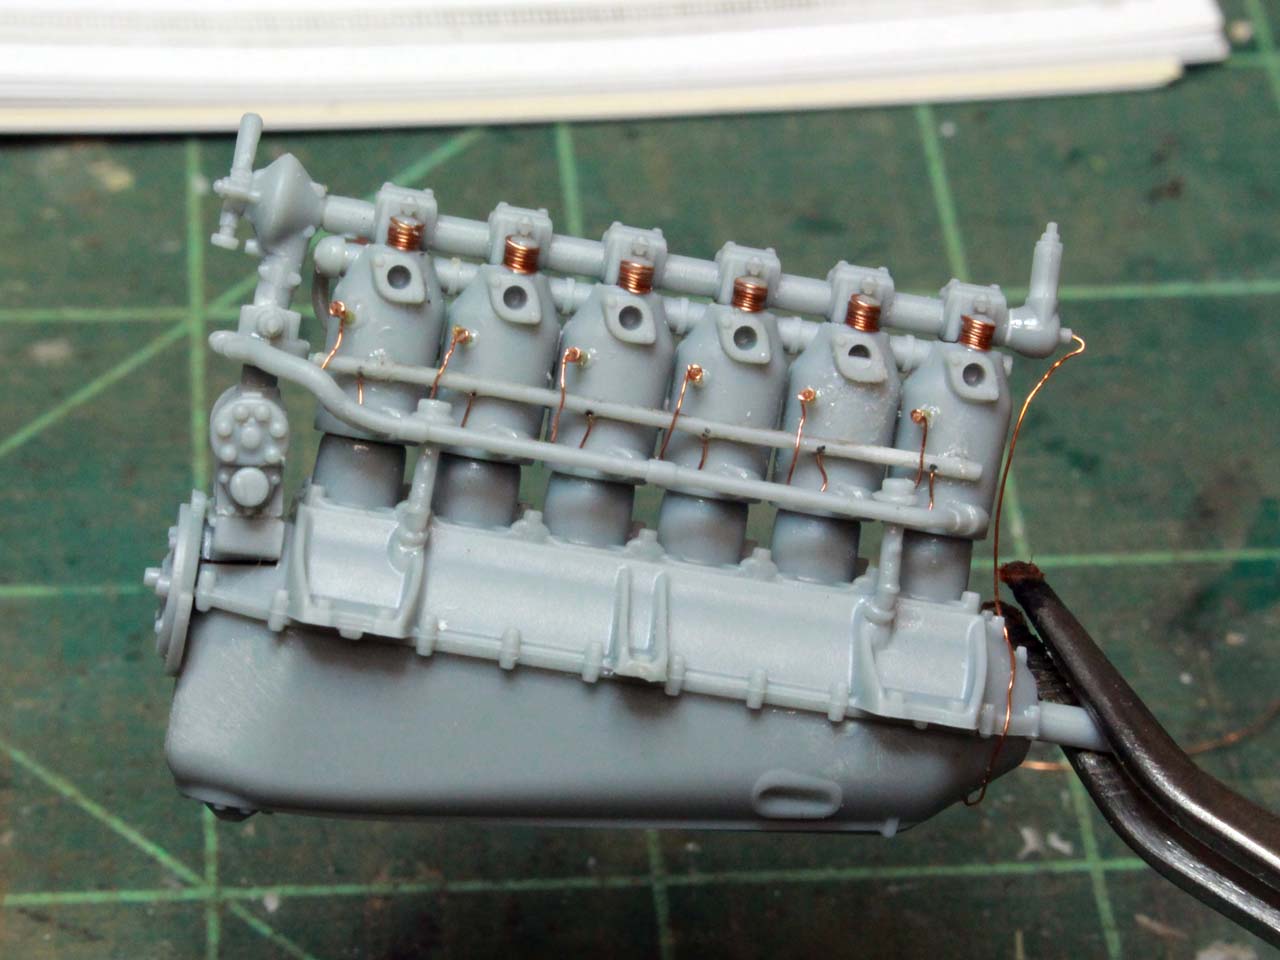
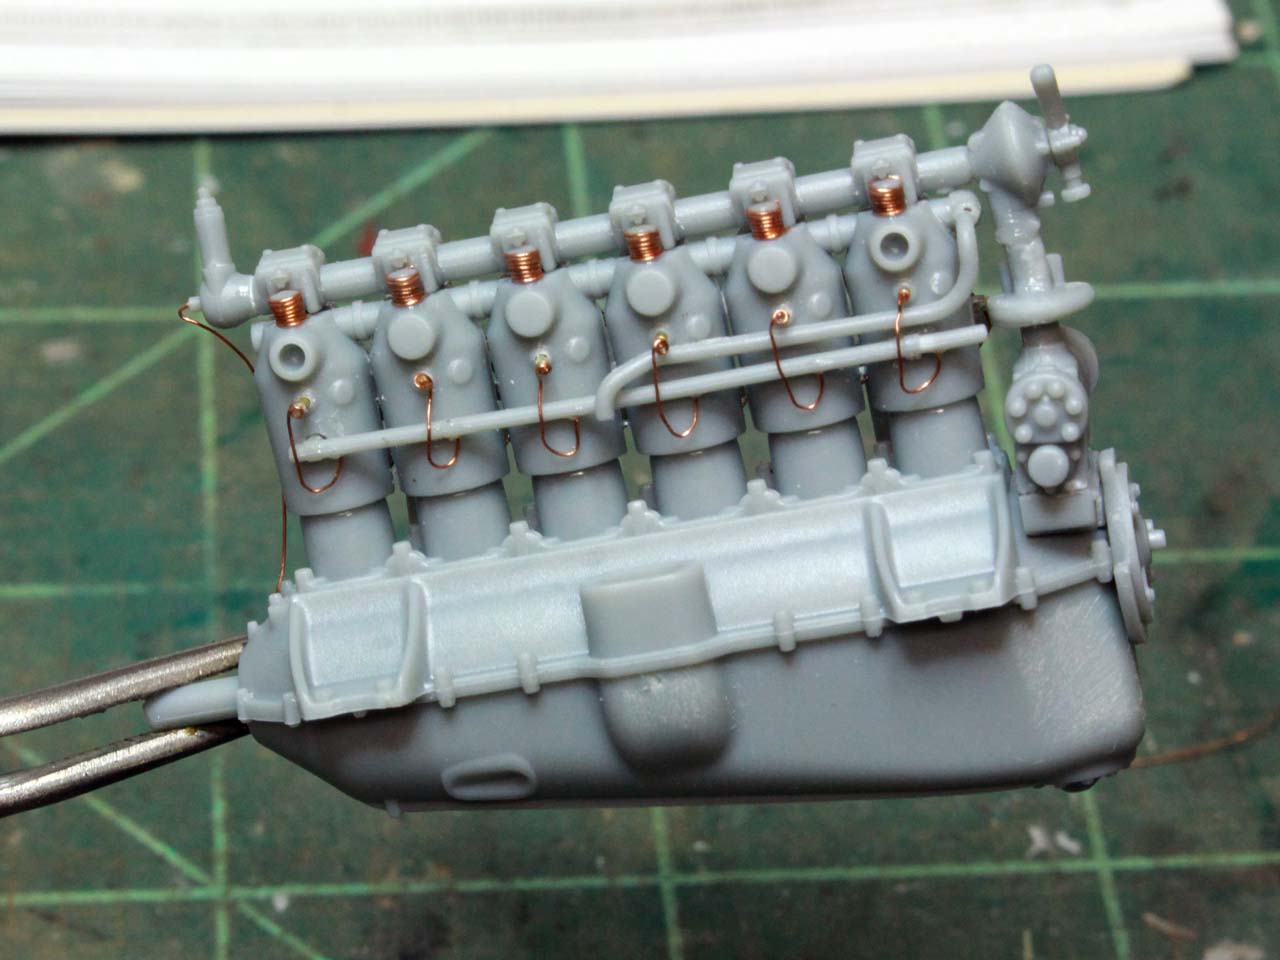
A little bit intimidated by the rigging I'll have to do, but here goes! Decided to start on the engine first, decided to add a bit of detail, made valve springs out of fine copper wire.
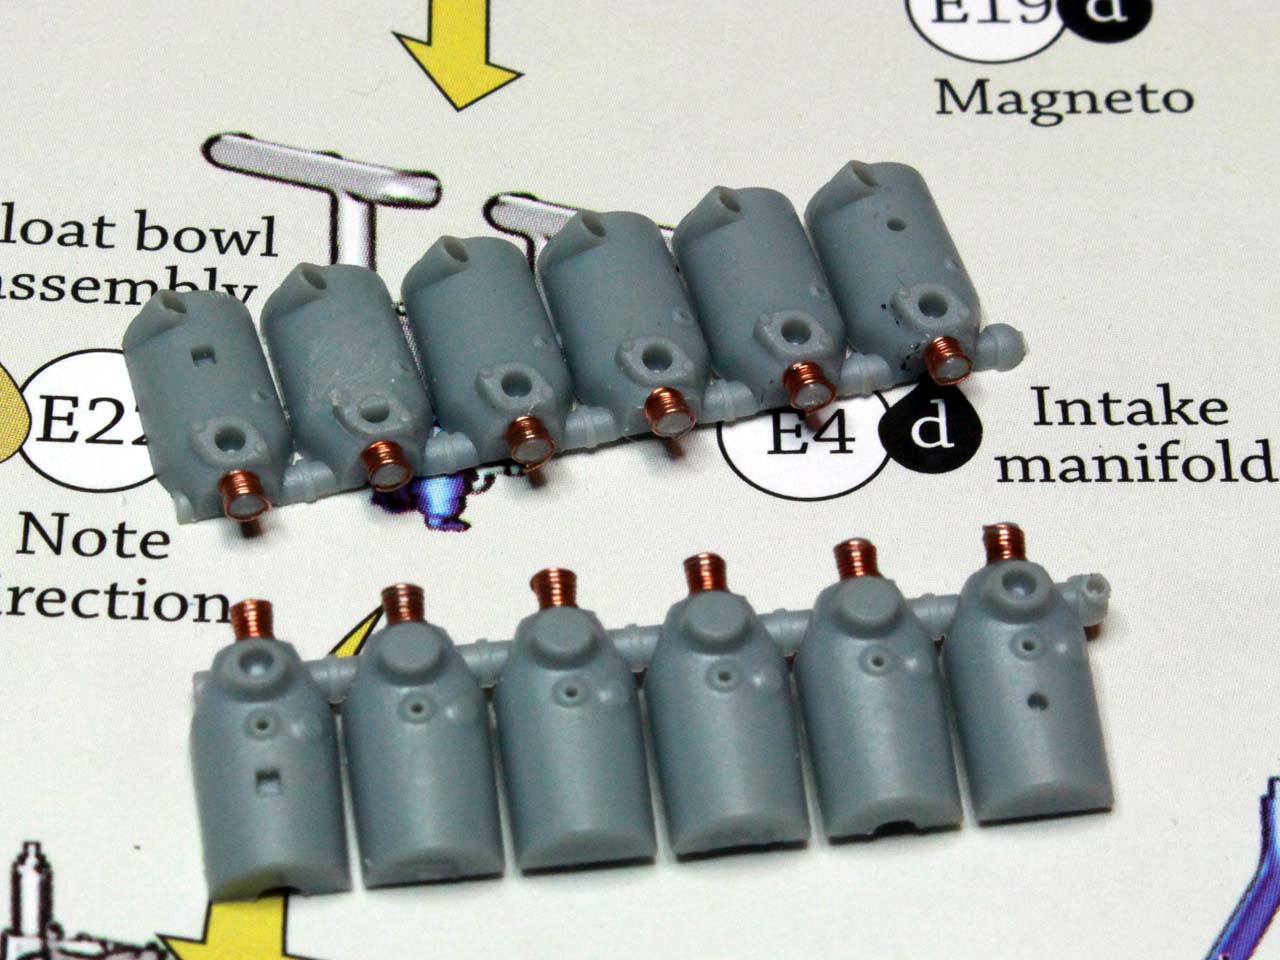
Then spark plugs and wires, didn't have the gumption to do the wires to the magnetos though...
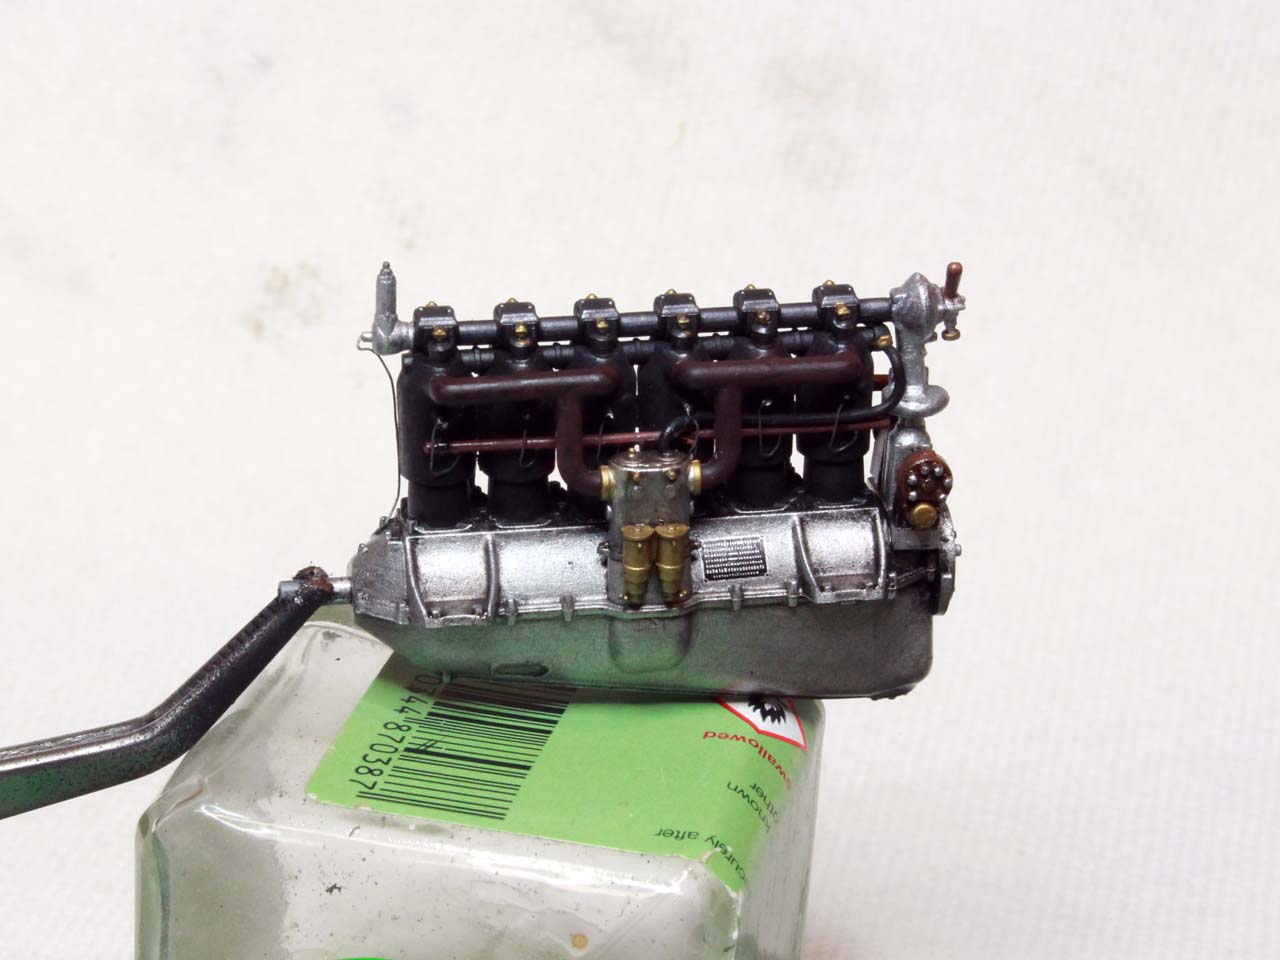
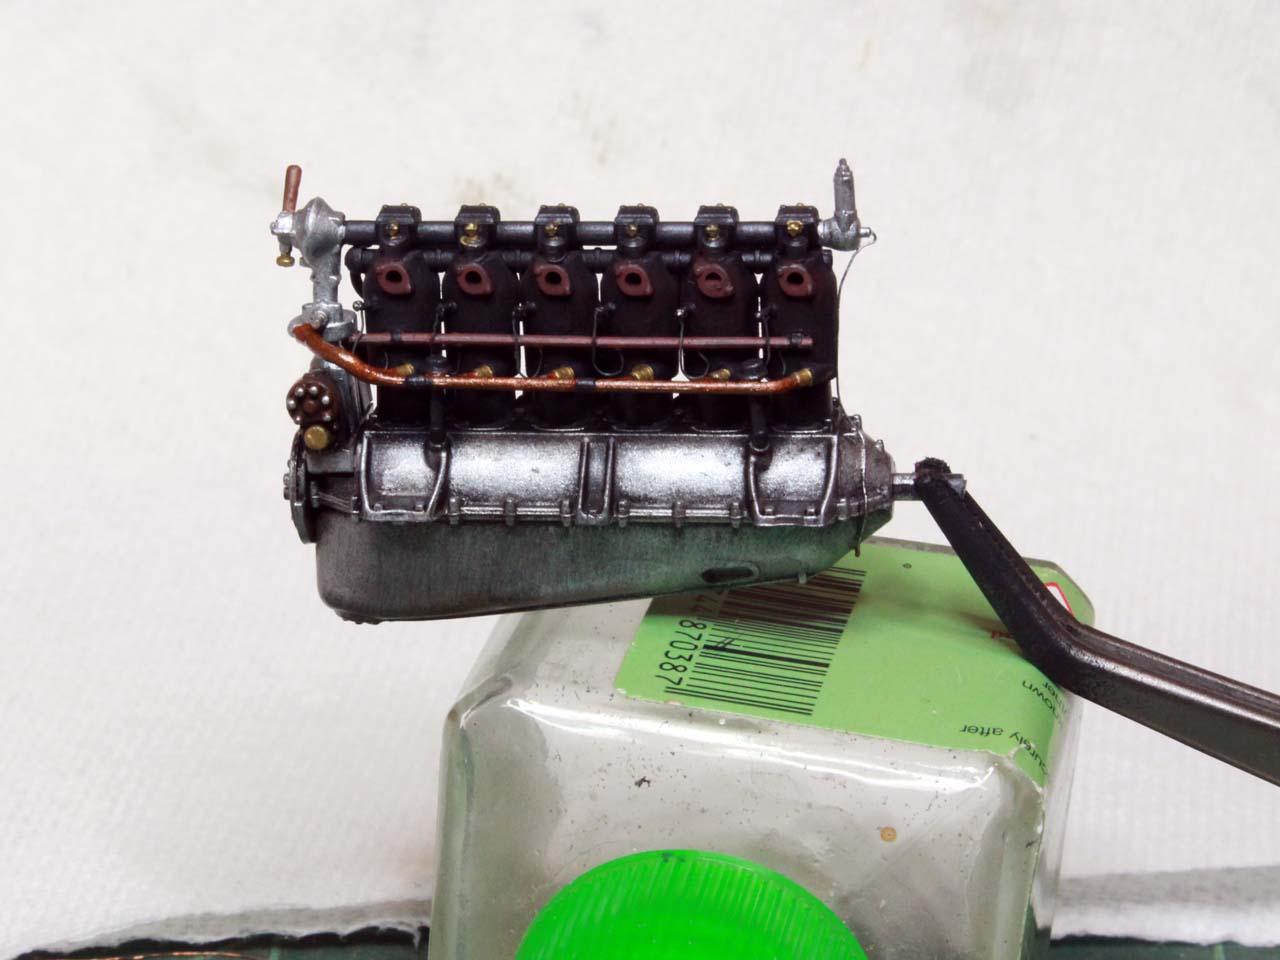
Painted up:
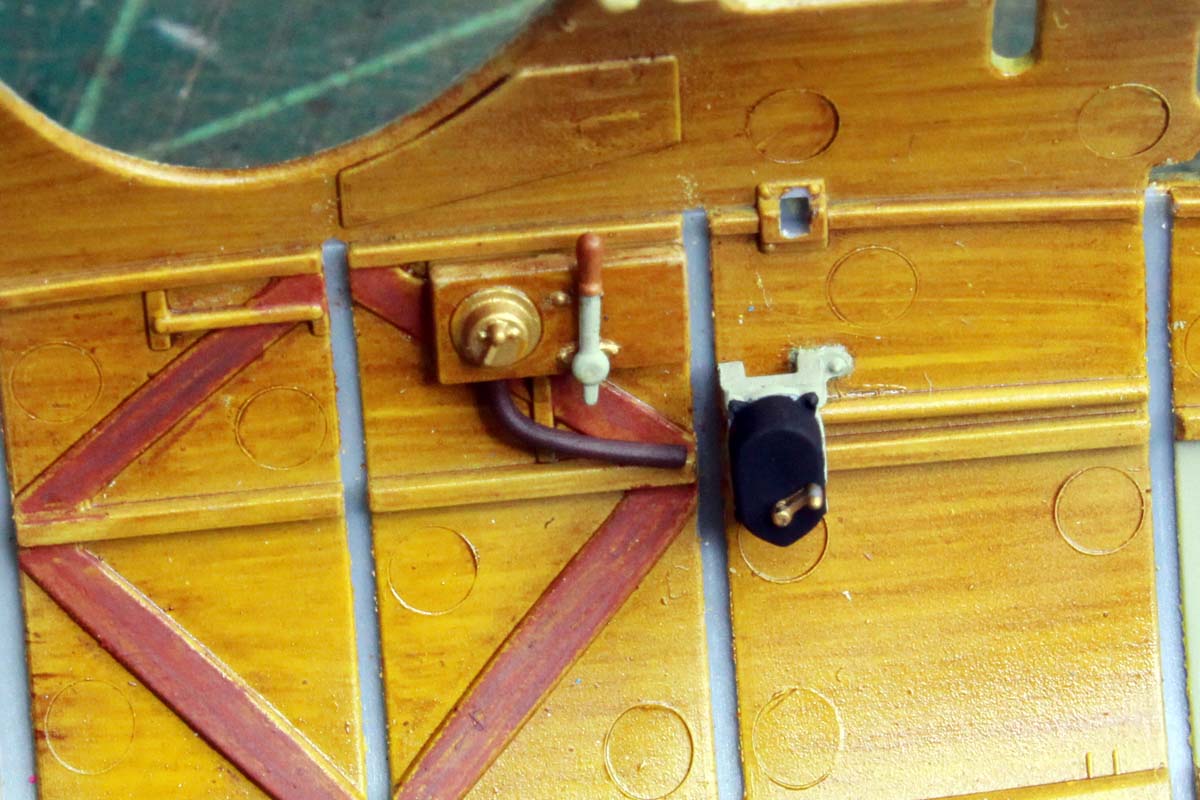
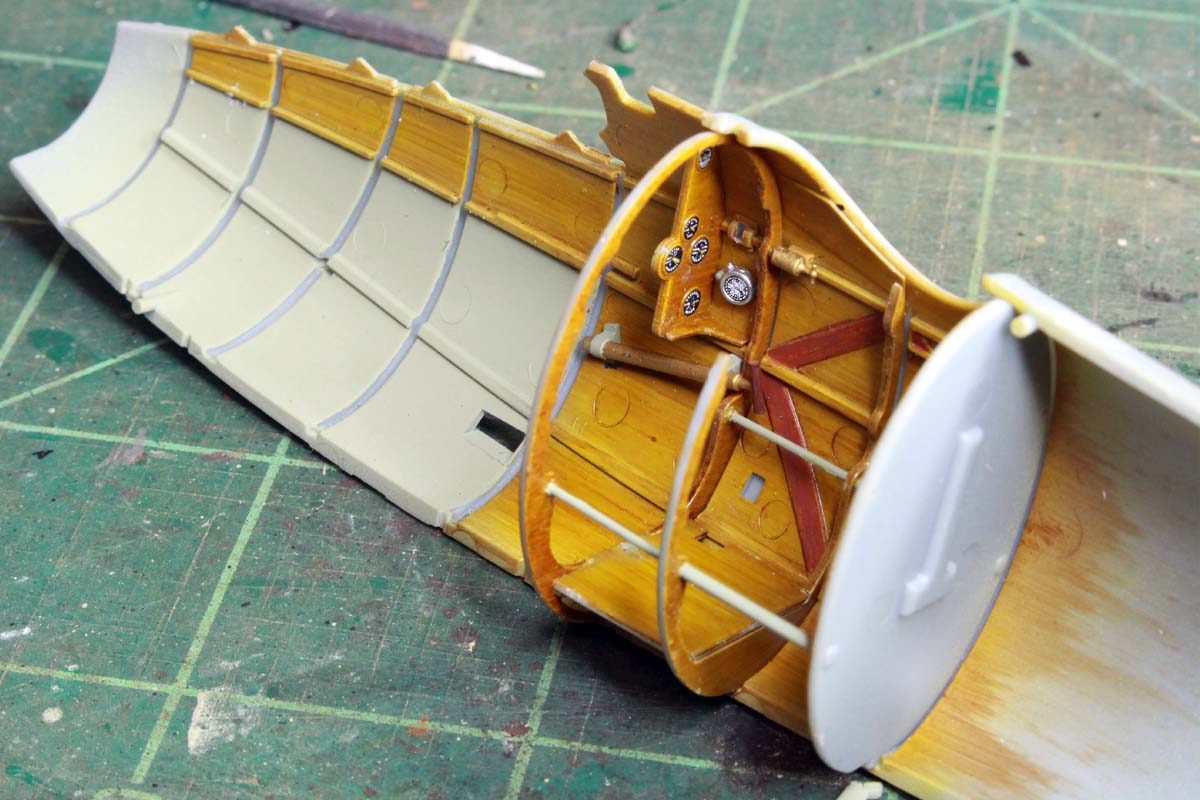
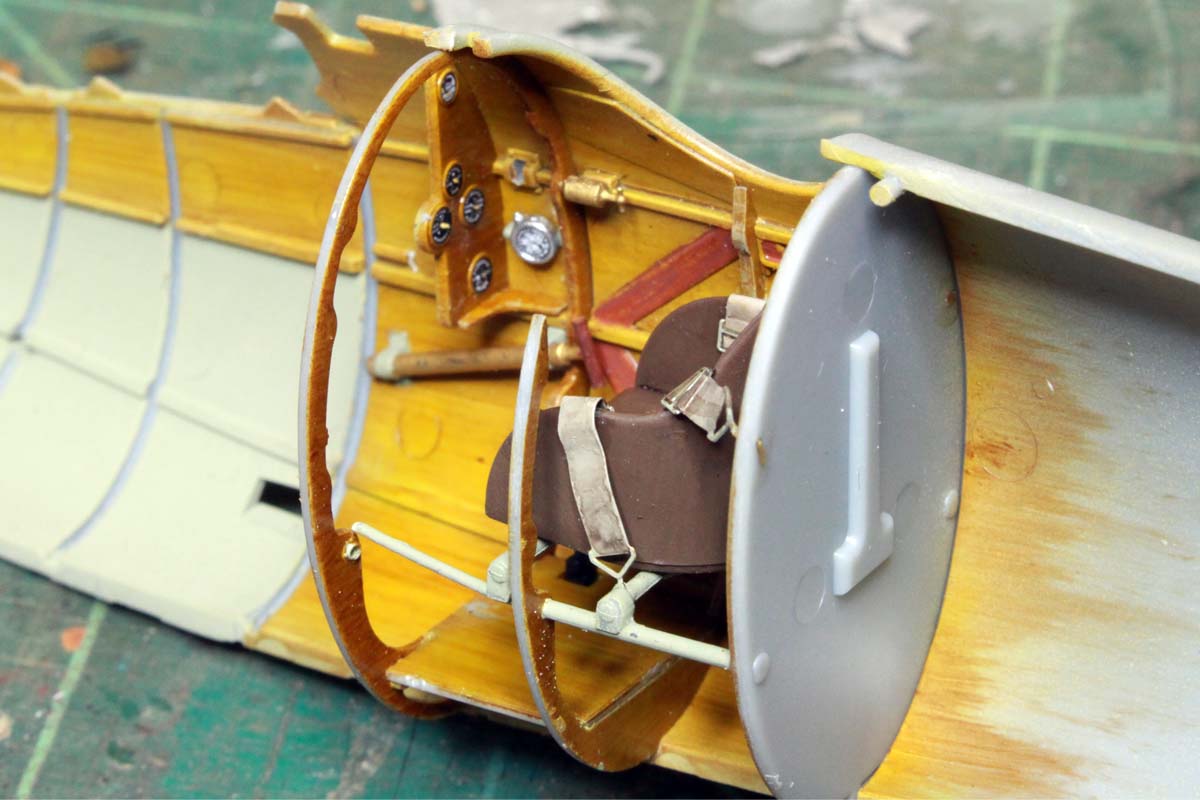
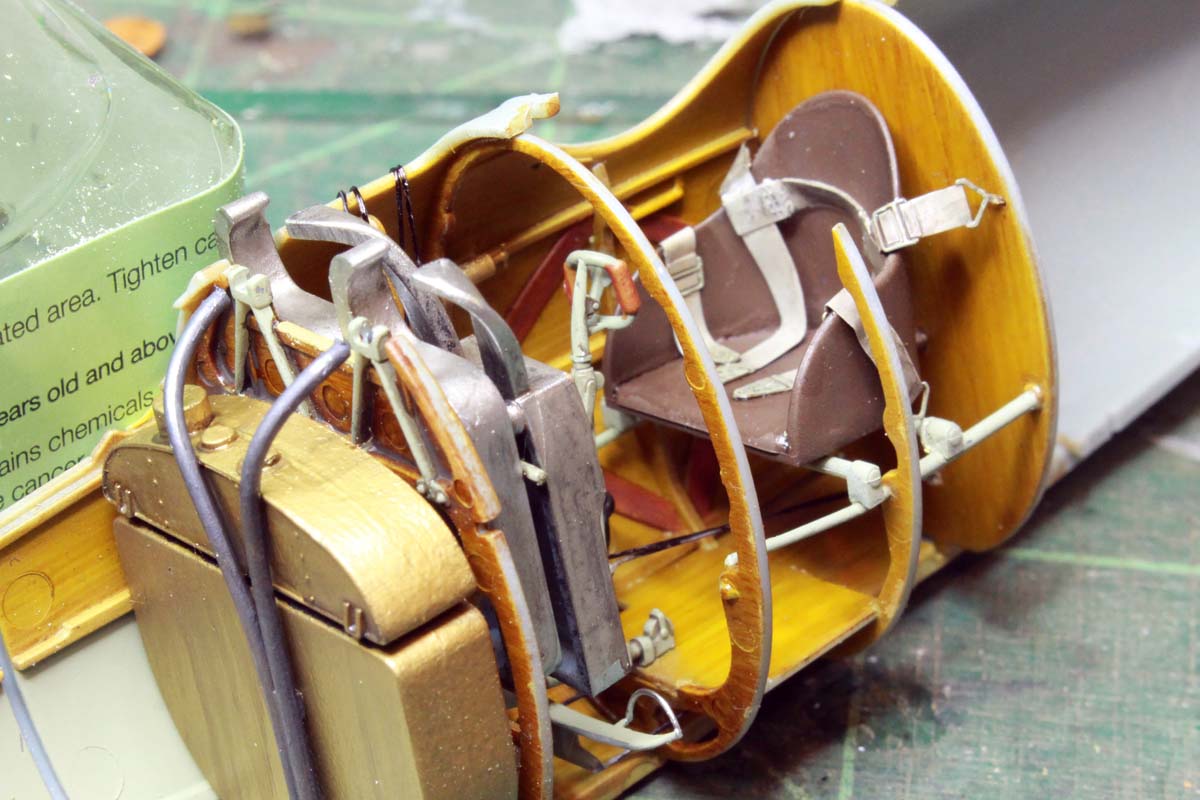
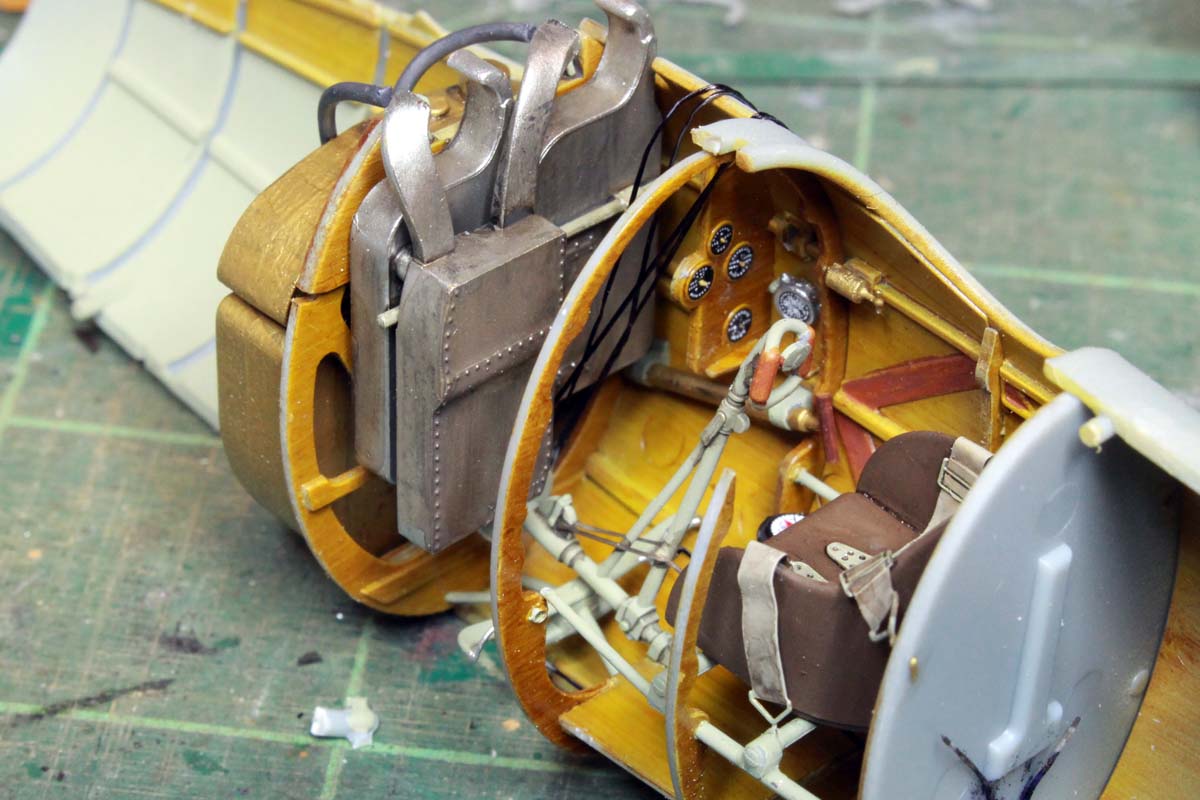
Starting on the fuselage interior and cockpit now.

The voices are back.....excellent....
Connecticut, United States
Joined: October 26, 2009
KitMaker: 424 posts
AeroScale: 389 posts
Posted: Monday, September 09, 2019 - 01:41 AM UTC
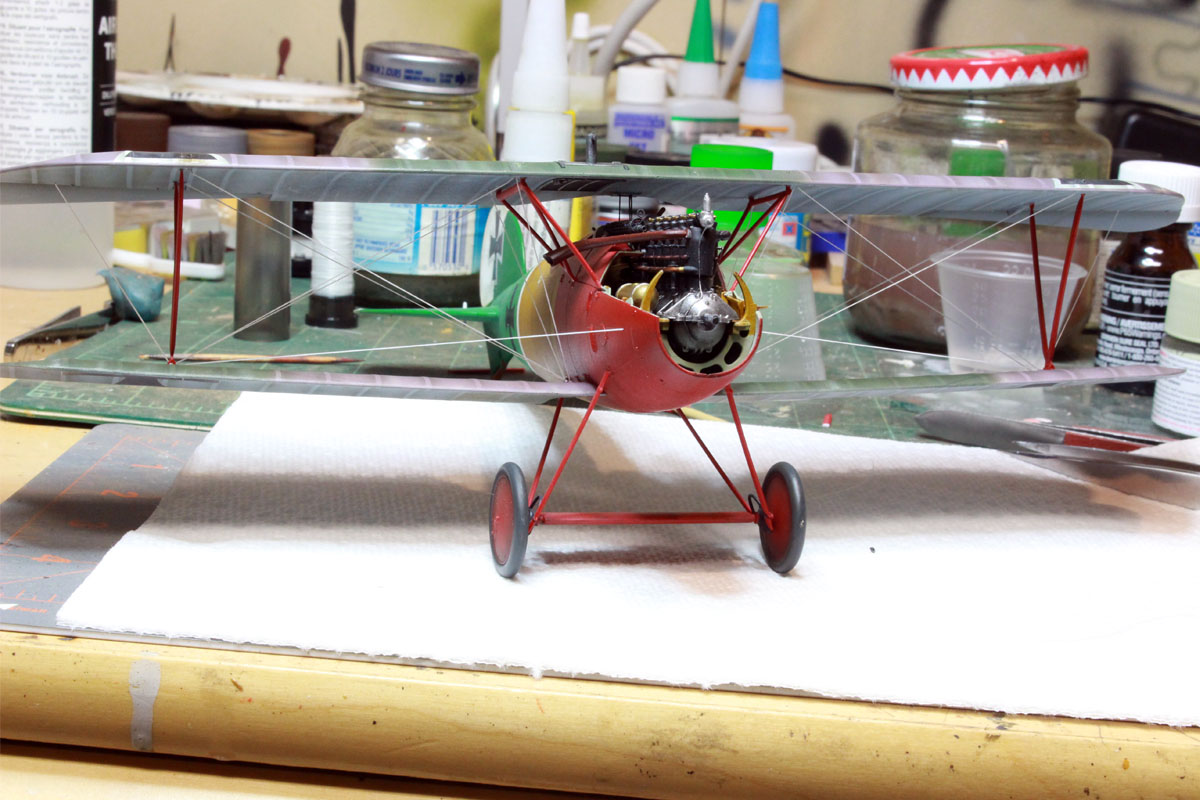
Small point....
the picture of Von R... shows an Alb.D-5. The Fokker D-5 was a bi-plane with a rotary engine.
THAT SAID...
What beautiful work you did on the engine! I am an engineman myself. really like what you did with the Mercedes. the valve springs stand out. Nice Job.
Captn Tommy
ColinEdm
Associate Editor Alberta, Canada
Joined: October 15, 2013
KitMaker: 1,355 posts
AeroScale: 107 posts
Posted: Sunday, September 15, 2019 - 09:17 AM UTC
The voices are back.....excellent....
ColinEdm
Associate Editor Alberta, Canada
Joined: October 15, 2013
KitMaker: 1,355 posts
AeroScale: 107 posts
Posted: Sunday, September 29, 2019 - 05:33 AM UTC
The voices are back.....excellent....
ColinEdm
Associate Editor Alberta, Canada
Joined: October 15, 2013
KitMaker: 1,355 posts
AeroScale: 107 posts
Posted: Friday, October 11, 2019 - 03:57 AM UTC
The voices are back.....excellent....
England - East Midlands, United Kingdom
Joined: November 06, 2005
KitMaker: 753 posts
AeroScale: 311 posts
Posted: Friday, October 11, 2019 - 04:49 AM UTC
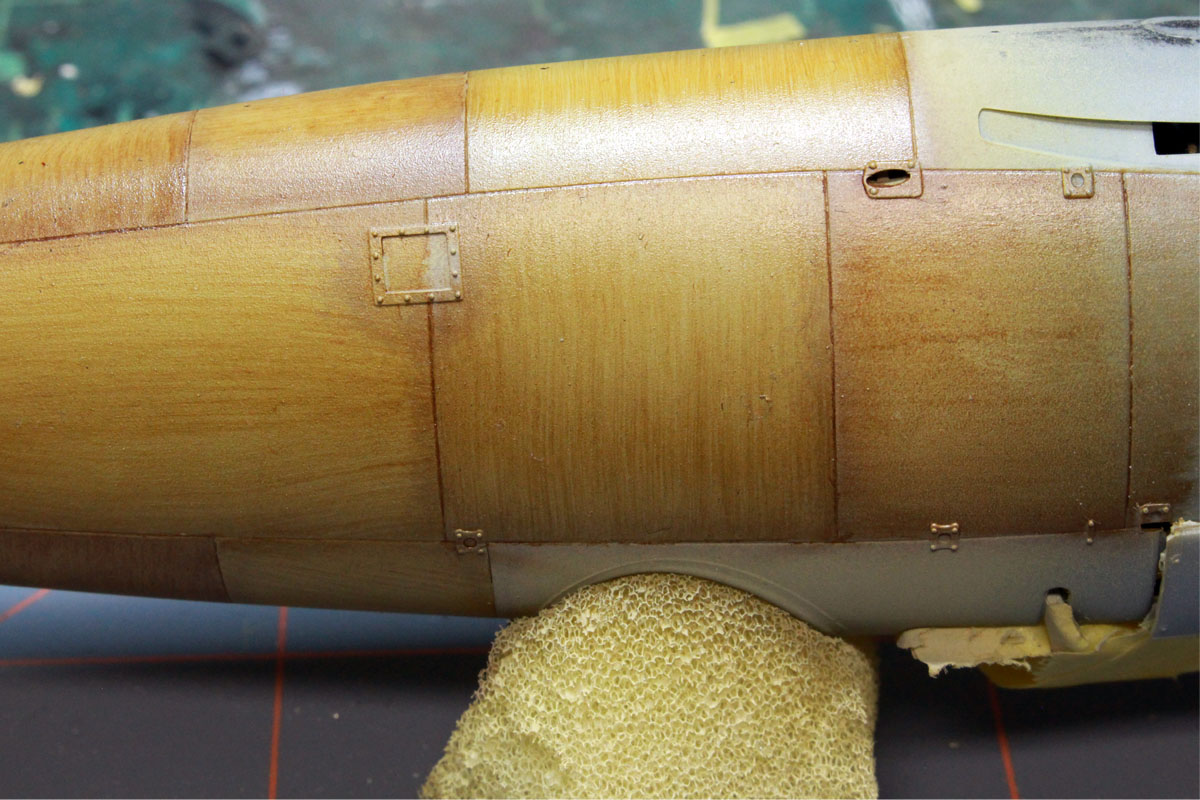
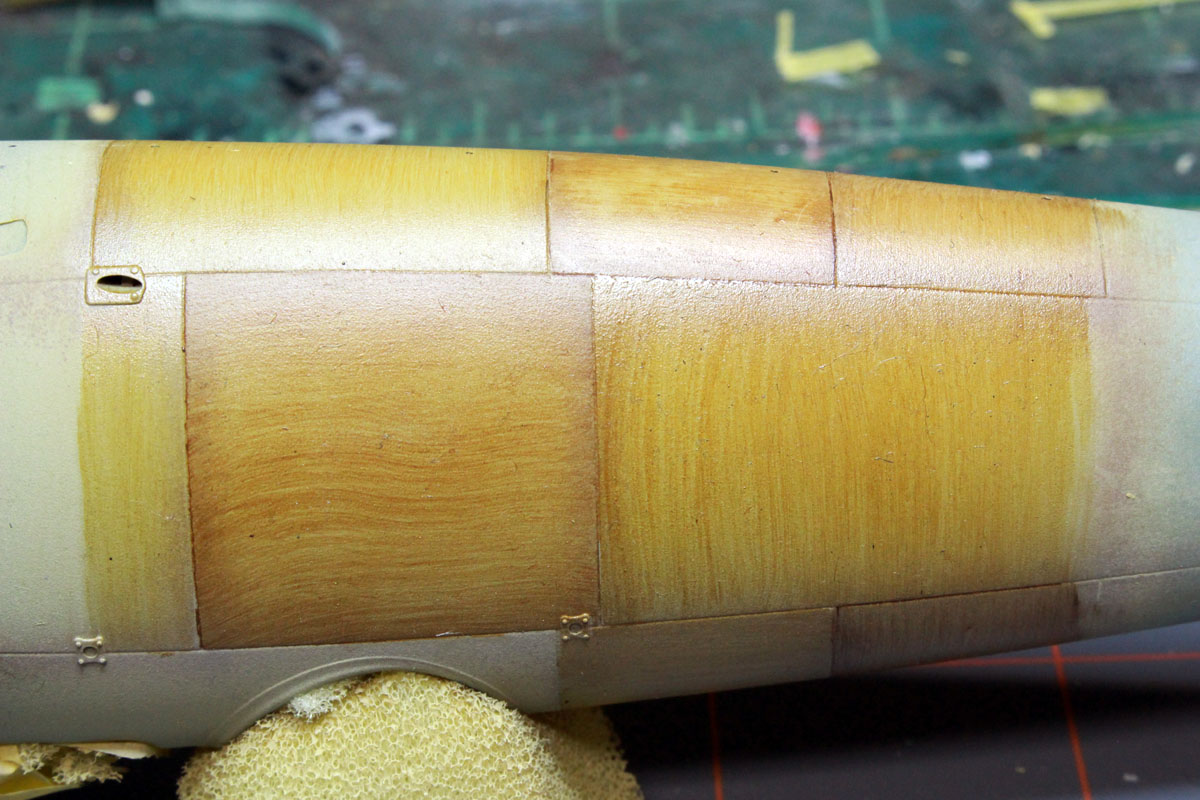
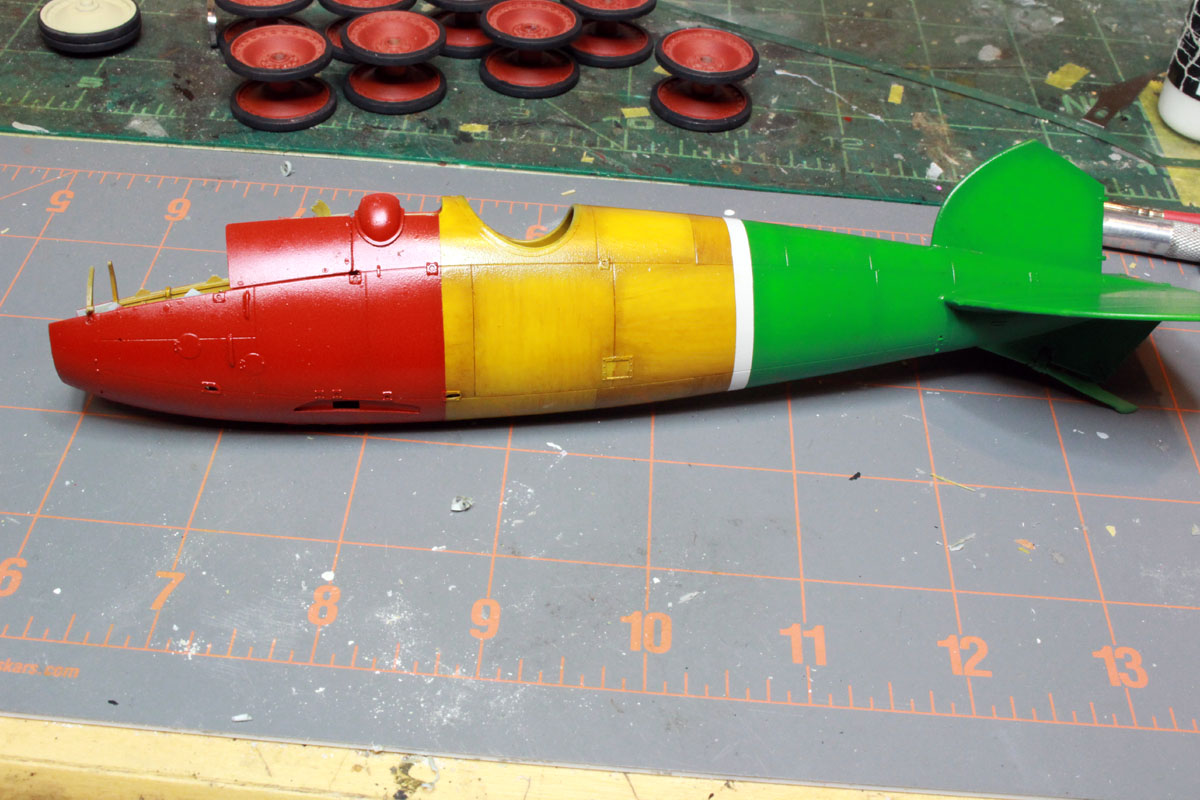
Tremendous wood-grain effects. Keep up the great work!
Gary
Alberta, Canada
Joined: January 19, 2008
KitMaker: 6,743 posts
AeroScale: 6,151 posts
Posted: Friday, October 11, 2019 - 01:19 PM UTC
Hi Colin , lovely work so far on your Albbie

Terri
Colorado, United States
Joined: January 25, 2004
KitMaker: 11,669 posts
AeroScale: 11,011 posts
Posted: Friday, October 11, 2019 - 02:05 PM UTC
". . .The most important thing is to know why you build and then get the most that you can out of building." via D.D.
ColinEdm
Associate Editor Alberta, Canada
Joined: October 15, 2013
KitMaker: 1,355 posts
AeroScale: 107 posts
Posted: Monday, October 14, 2019 - 04:05 AM UTC
The voices are back.....excellent....
Connecticut, United States
Joined: October 26, 2009
KitMaker: 424 posts
AeroScale: 389 posts
Posted: Wednesday, October 16, 2019 - 06:17 AM UTC
Sir are you going to us the camo wings or the red wings.
Just curious...
I prefer the red wings... who says he couldn't have flown some patrols between painting sessions. Or photograph sessions.
Captn Tommy
ColinEdm
Associate Editor Alberta, Canada
Joined: October 15, 2013
KitMaker: 1,355 posts
AeroScale: 107 posts
Posted: Wednesday, October 16, 2019 - 04:14 PM UTC
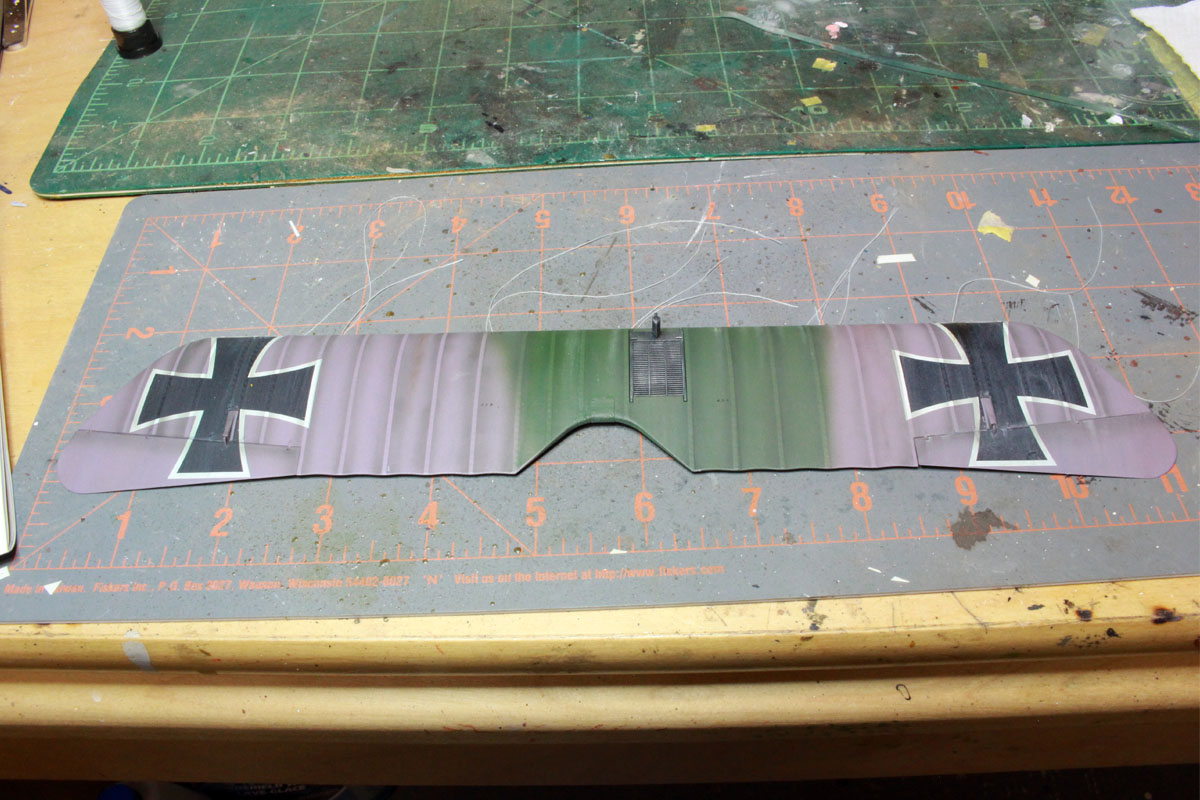
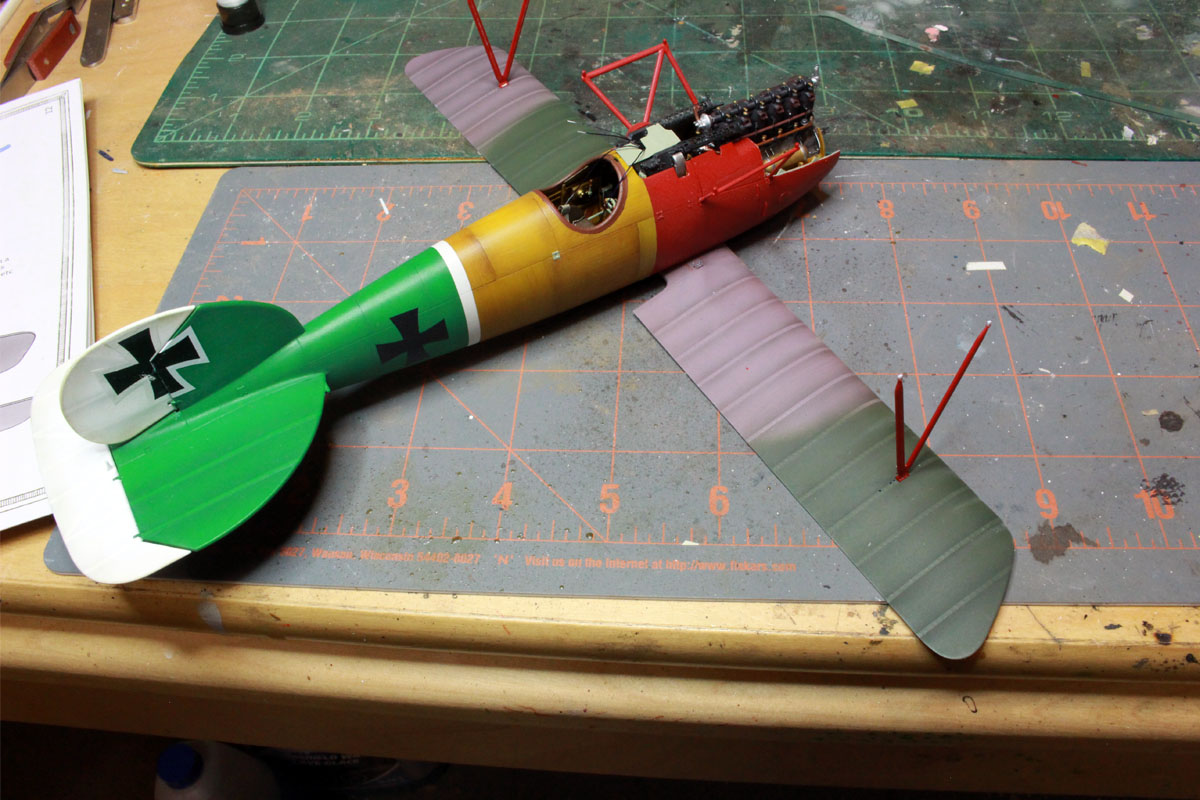
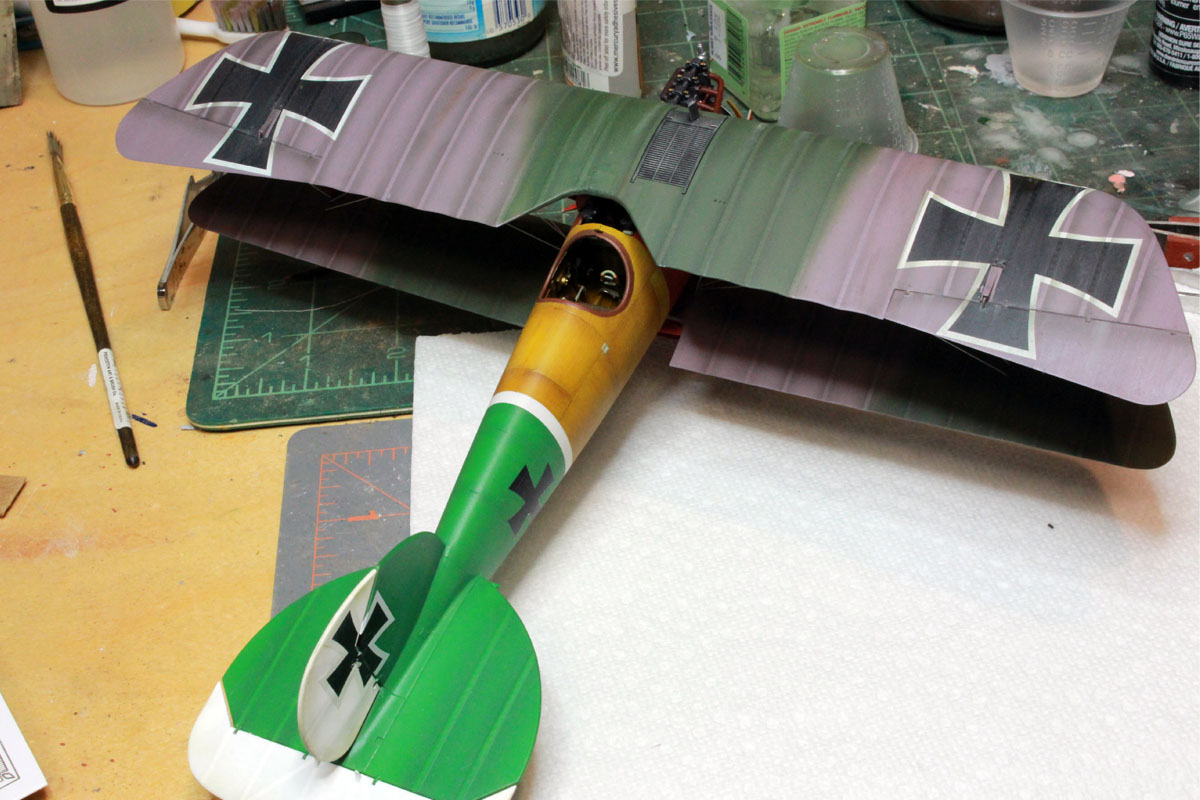
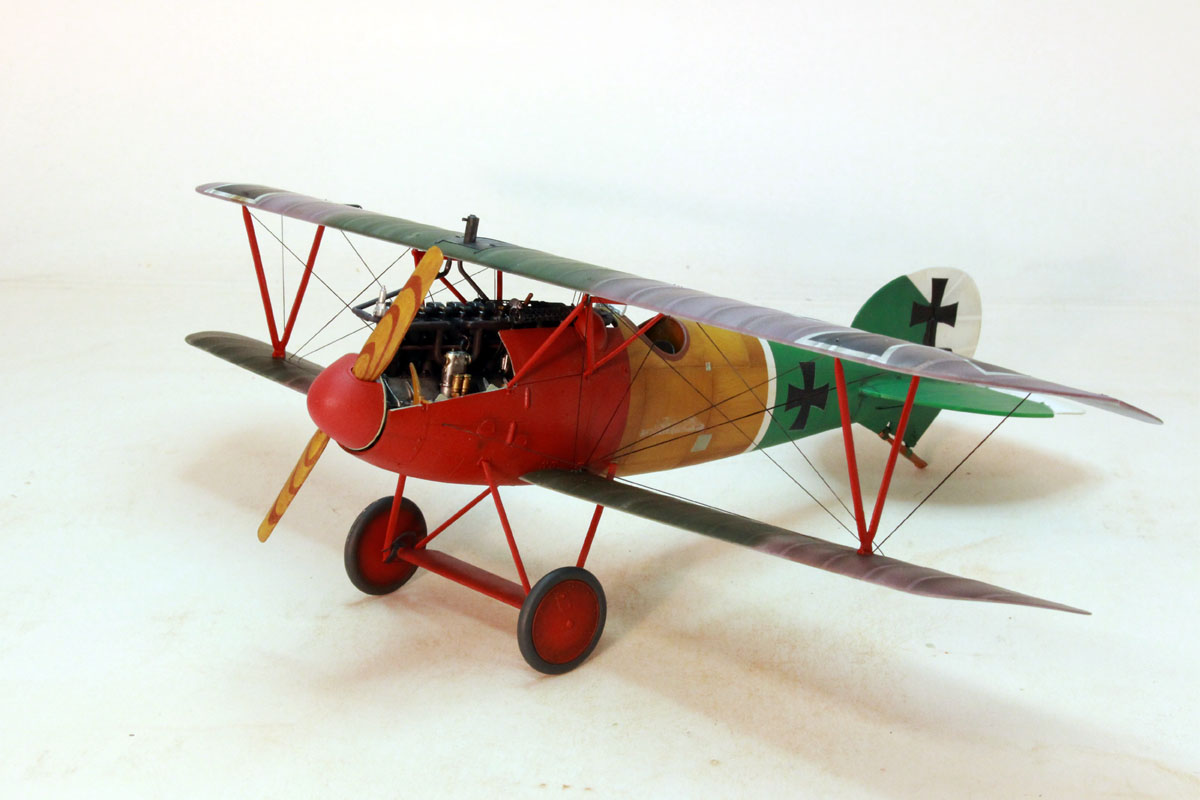
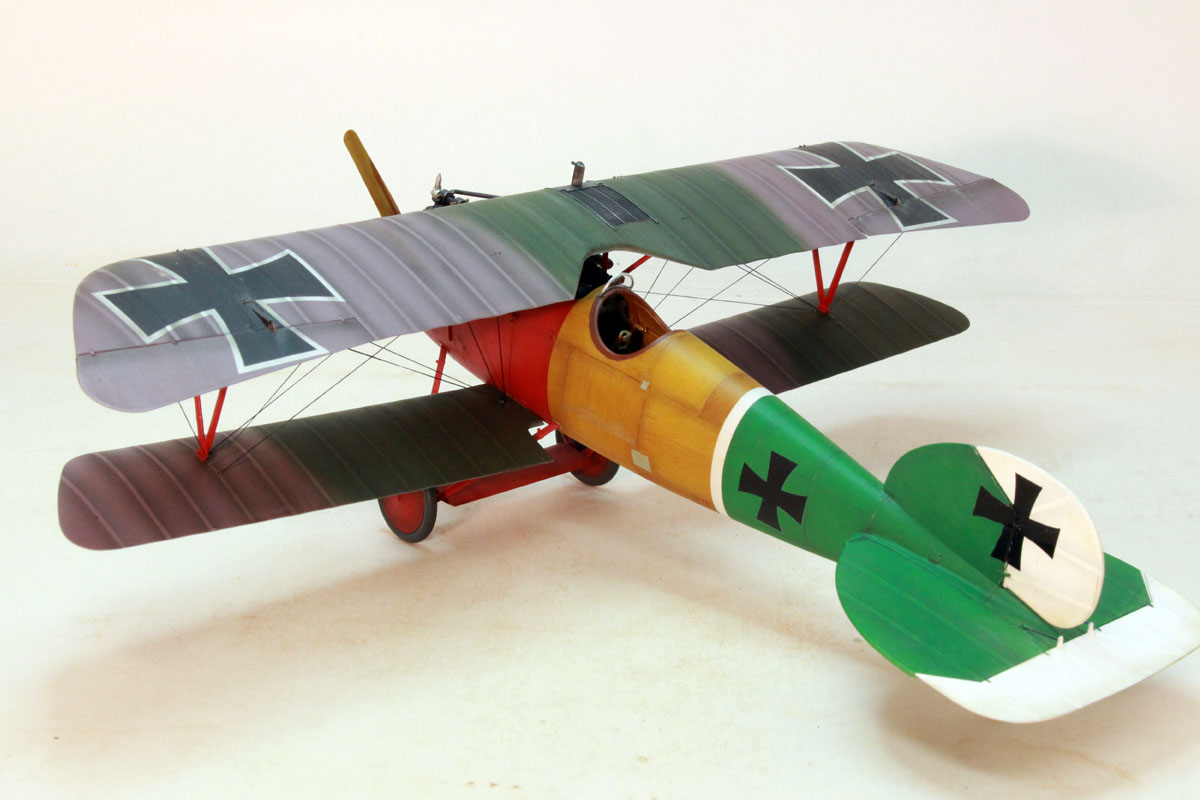
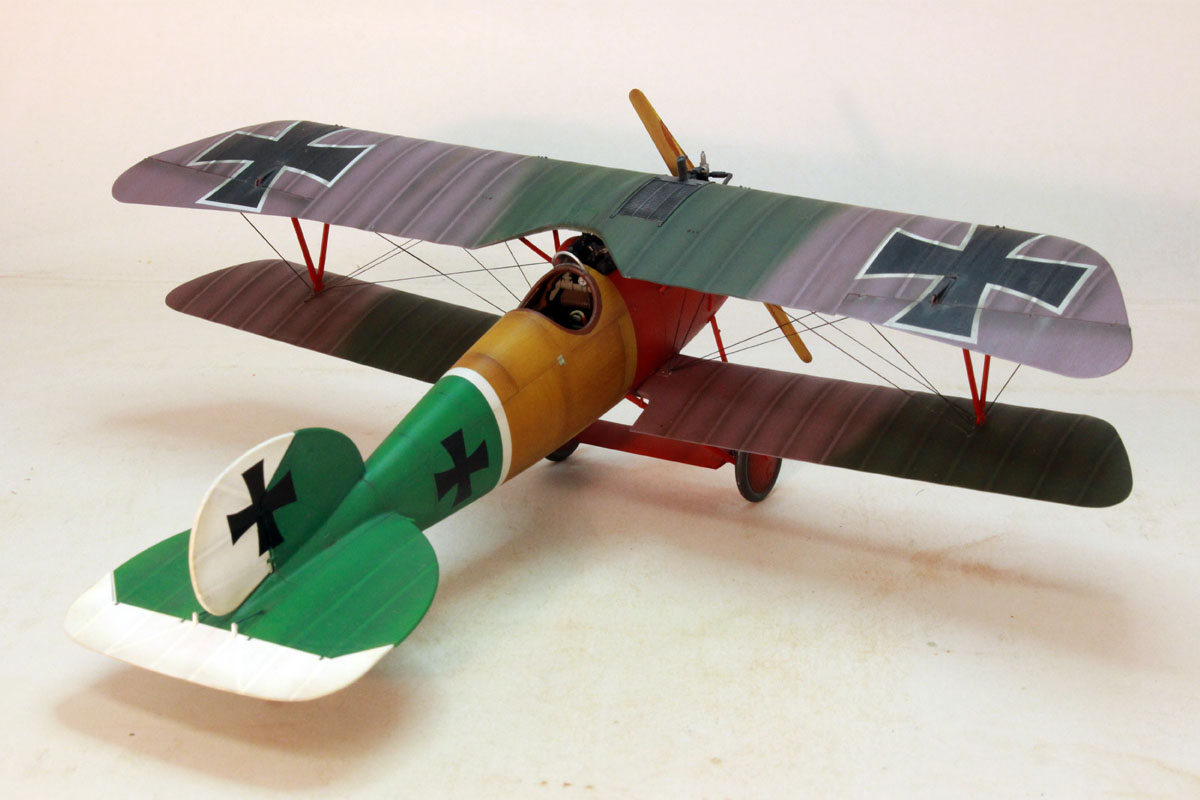
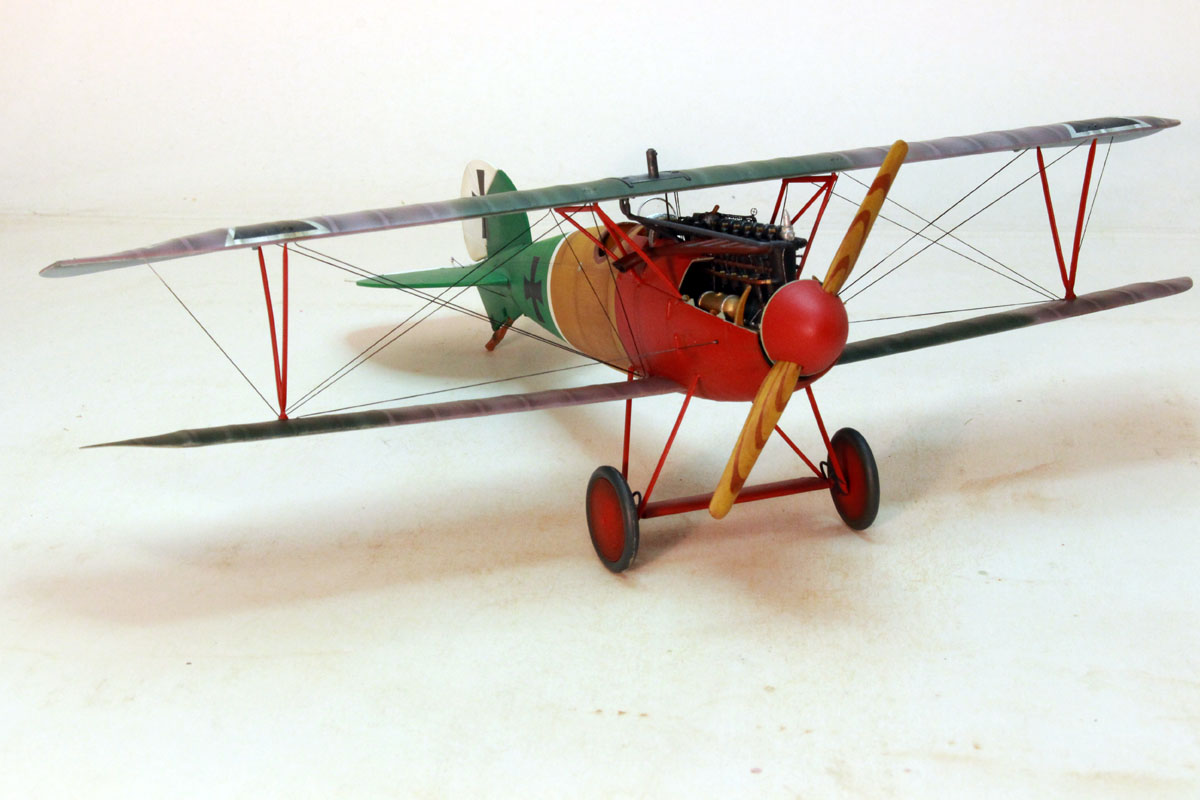
I was planning on doing the camo wings, red nose, green tail.
The voices are back.....excellent....
ColinEdm
Associate Editor Alberta, Canada
Joined: October 15, 2013
KitMaker: 1,355 posts
AeroScale: 107 posts
Posted: Saturday, November 09, 2019 - 05:11 AM UTC
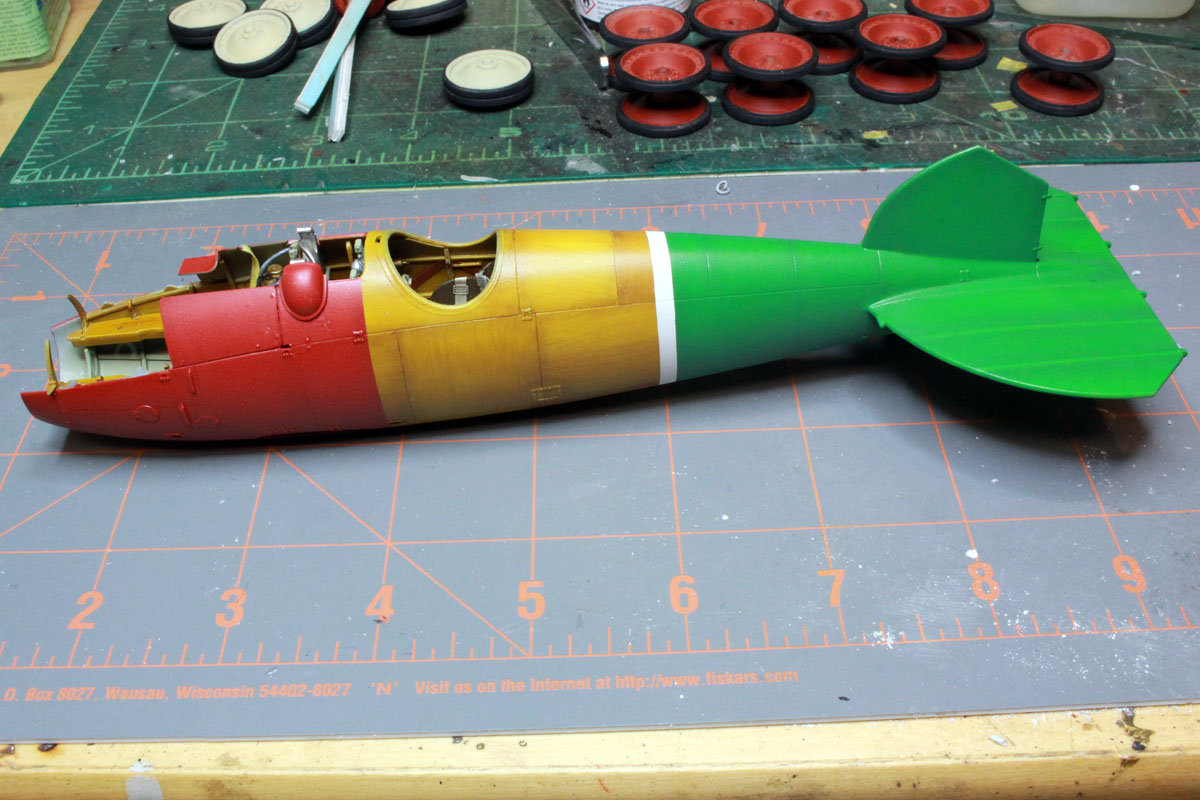
slowly moving forward on this, got the fuselage colours on, generally happy with how it turned out except for the fact that the sating coat is too shiny to my taste so I will probably hit it with some matte.
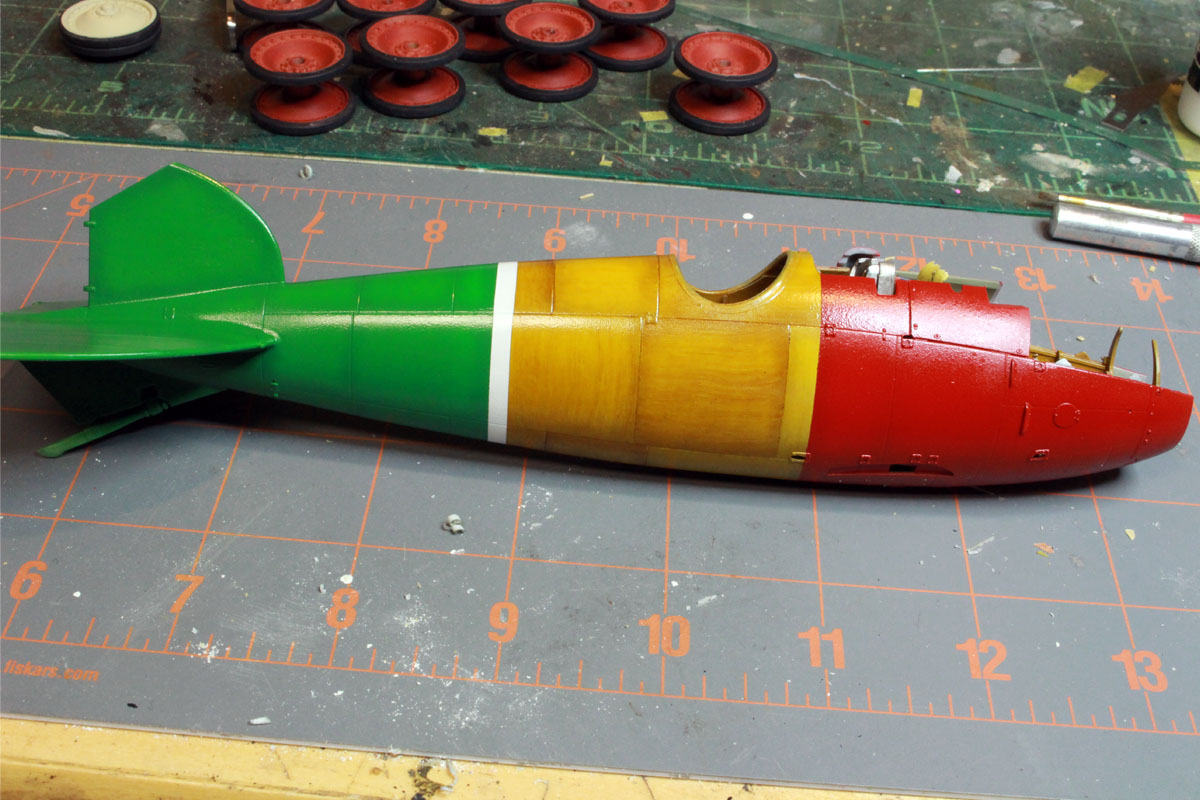
some detail painting to do then on to the wings.
The voices are back.....excellent....
ColinEdm
Associate Editor Alberta, Canada
Joined: October 15, 2013
KitMaker: 1,355 posts
AeroScale: 107 posts
Posted: Saturday, November 09, 2019 - 10:35 AM UTC
Shot a matte coat on, looks much better:
The voices are back.....excellent....
Australia
Joined: December 05, 2012
KitMaker: 88 posts
AeroScale: 2 posts
Posted: Saturday, November 09, 2019 - 09:35 PM UTC
Love your work. Looking forward to seeing more.
Connecticut, United States
Joined: October 26, 2009
KitMaker: 424 posts
AeroScale: 389 posts
Posted: Tuesday, November 19, 2019 - 04:50 AM UTC
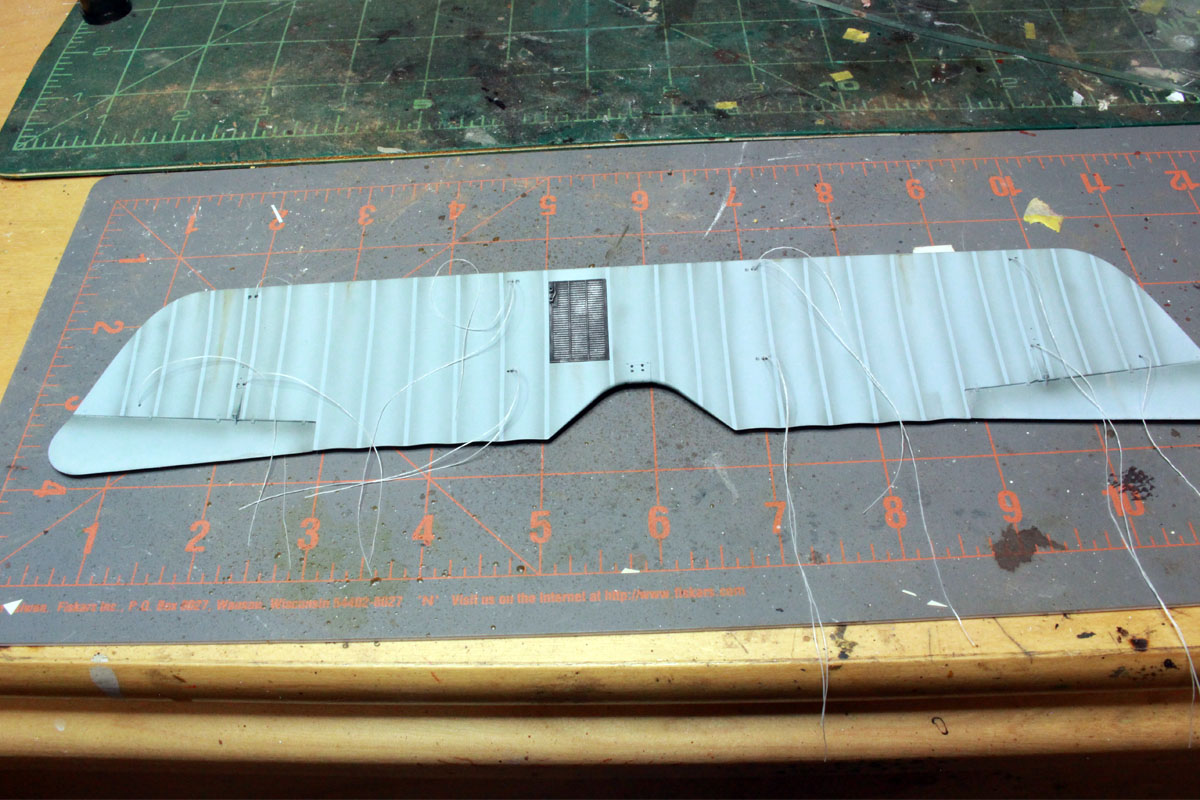
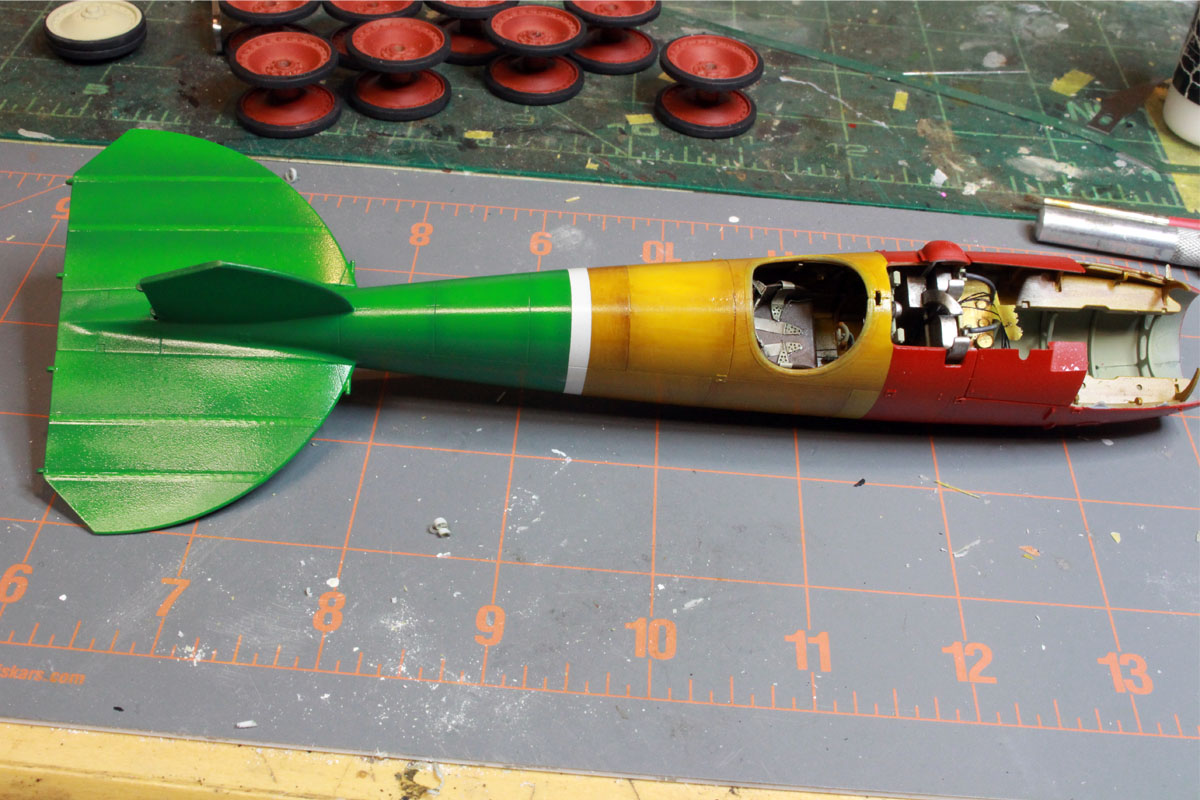
have to laugh at the Italian looking fuselage.
the interior is fantastic!
I like the frames being a different shade of "vanish" as if from a different vendor to Albatros. even in this world a different vender can supply a zinc chromate primed part that is a different (darker/lighter) hue. this stands out on an unpainted primed aluminum bird.
outstanding
Captn Tommy

#306
Victoria, Australia
Joined: June 27, 2010
KitMaker: 3,959 posts
AeroScale: 598 posts
Posted: Tuesday, November 19, 2019 - 03:30 PM UTC
In the words of one Bart Simpson: "Superb!"
Stay home and build models!
In 1/72
Gloster Gladiator MkII for the Bi-planes Campaign
In 1/350
Airfix 1:350 Type 45 Destroyer
ColinEdm
Associate Editor Alberta, Canada
Joined: October 15, 2013
KitMaker: 1,355 posts
AeroScale: 107 posts
Posted: Friday, November 22, 2019 - 10:20 AM UTC
Thanks for the kind words! Work and life are conspiring to keep me away ftom the bench right now but hopefully with the Christmas break coming I can make some progress!

The voices are back.....excellent....
ColinEdm
Associate Editor Alberta, Canada
Joined: October 15, 2013
KitMaker: 1,355 posts
AeroScale: 107 posts
Posted: Friday, January 03, 2020 - 02:52 PM UTC
The voices are back.....excellent....
ColinEdm
Associate Editor Alberta, Canada
Joined: October 15, 2013
KitMaker: 1,355 posts
AeroScale: 107 posts
Posted: Sunday, January 05, 2020 - 11:45 AM UTC
...aaaand my first attempt at a laminated wooden prop...might try again.
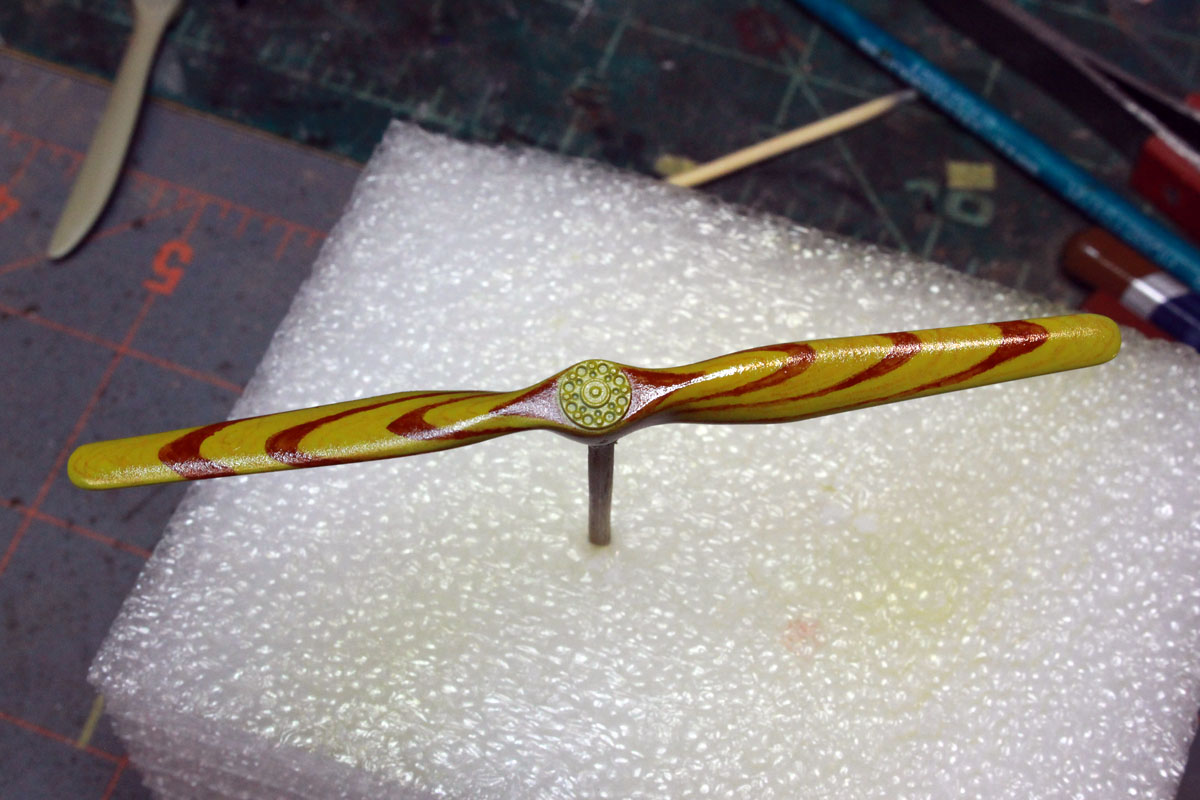
The voices are back.....excellent....
#306
Victoria, Australia
Joined: June 27, 2010
KitMaker: 3,959 posts
AeroScale: 598 posts
Posted: Monday, January 06, 2020 - 09:23 PM UTC
Excellent progress Colin
keep working on that propeller, you'll get there!

Stay home and build models!
In 1/72
Gloster Gladiator MkII for the Bi-planes Campaign
In 1/350
Airfix 1:350 Type 45 Destroyer
ColinEdm
Associate Editor Alberta, Canada
Joined: October 15, 2013
KitMaker: 1,355 posts
AeroScale: 107 posts
Posted: Sunday, January 12, 2020 - 03:46 AM UTC
The voices are back.....excellent....
England - East Midlands, United Kingdom
Joined: November 06, 2005
KitMaker: 753 posts
AeroScale: 311 posts
Posted: Sunday, January 12, 2020 - 06:35 AM UTC
Cracking job - great model and finish.
Gary
#306
Victoria, Australia
Joined: June 27, 2010
KitMaker: 3,959 posts
AeroScale: 598 posts
Posted: Saturday, January 18, 2020 - 09:51 PM UTC
I've always wanted to expand into WW1 subjects and this is certainly motivation to do so, Colin!
Looking good!
Stay home and build models!
In 1/72
Gloster Gladiator MkII for the Bi-planes Campaign
In 1/350
Airfix 1:350 Type 45 Destroyer
Illinois, United States
Joined: December 08, 2017
KitMaker: 82 posts
AeroScale: 27 posts
Posted: Sunday, February 16, 2020 - 11:31 AM UTC
Connecticut, United States
Joined: October 26, 2009
KitMaker: 424 posts
AeroScale: 389 posts
Posted: Monday, March 09, 2020 - 08:17 AM UTC
the shadowing/counter highlights on the wings are outstanding enough to appear outside, even in a room.
Captn Tommy