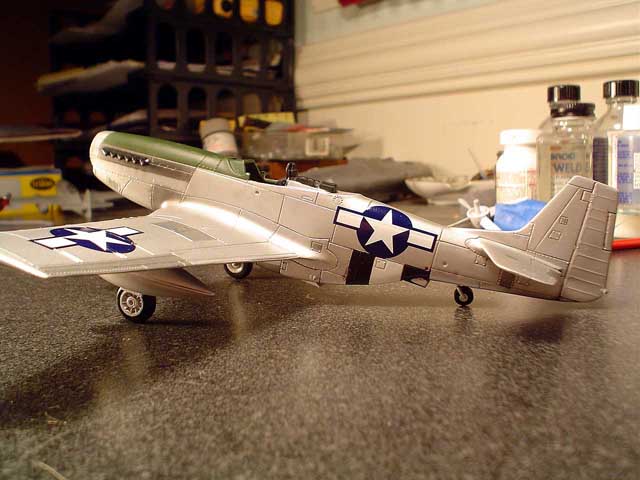
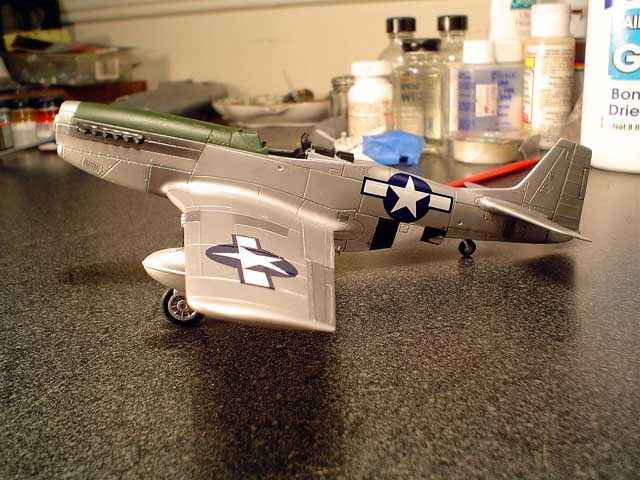
In keeping with the tradition of the forum, I'm going to go ahead and post the current aircraft I'm working on even though it has lots of problems. I picked up this old testors kit for about $2 and it's worth about .50 cents. Lots of accuracy problems (which I haven't fixed), no cockpit, fit problems, etc. I picked this kit up mainly to practice some natural metal finish and invasion markings but due to work it's drug on for months and I'm honestly getting tired with it. At its current stage, a gloss coat is on and decals have just started. I did apply a oil wash to the panel lines but don't like how it turned out. Yes, the tail wheel is crooked. The attachment point is so weak you have to be very careful when setting it down. Anyway, if you guys see anything beyond what I've mentioned or want to comment on something I've mentioned, please feel free to do so.
One thing I do need input on is the pics. Do they look ok? I've really been messing around with my lighting setup and could use some feedback. I can provide more detailed pics if needed.
Pre-Flight Check
Constructive critique of your finished or in-progress photos.
Hosted by Jim Starkweather
P-51D Old Crow
Tin_Can
Florida, United States
Joined: January 26, 2002
KitMaker: 1,560 posts
AeroScale: 750 posts
Joined: January 26, 2002
KitMaker: 1,560 posts
AeroScale: 750 posts
Posted: Sunday, April 04, 2004 - 03:49 PM UTC
Whiskey
Texas, United States
Joined: May 30, 2002
KitMaker: 1,038 posts
AeroScale: 252 posts
Joined: May 30, 2002
KitMaker: 1,038 posts
AeroScale: 252 posts
Posted: Sunday, April 04, 2004 - 06:07 PM UTC
Lighting looks pretty close to perfect I'd say. I have that kit as well TC, 2 in fact, and I have to agree with you that its really not worth all that much. I've only built one of the kits and I think I was going to black out the canopy originally because there was really nothing there to show. Thats why I like the Revell kit, even though it has a lot of accuracy problems as well, its a lot better than the Testors kit especially for the less than $10 price.
One thing on the P-51, the mid fuselage looks a little gray to me insted of aluminum like the rest of the aircraft. Is that because of the lighting or is it just me?
Tin_Can
Florida, United States
Joined: January 26, 2002
KitMaker: 1,560 posts
AeroScale: 750 posts
Joined: January 26, 2002
KitMaker: 1,560 posts
AeroScale: 750 posts
Posted: Monday, April 05, 2004 - 12:12 AM UTC
Quoted Text
One thing on the P-51, the mid fuselage looks a little gray to me insted of aluminum like the rest of the aircraft. Is that because of the lighting or is it just me?
You are correct. I had some areas that neede touch-up and the touch-up didn't come out the same as the rest.
FrankC
Colorado, United States
Joined: March 14, 2004
KitMaker: 26 posts
AeroScale: 26 posts
Joined: March 14, 2004
KitMaker: 26 posts
AeroScale: 26 posts
Posted: Monday, April 05, 2004 - 03:56 AM UTC
Tin,
That's one old kit! The NMF looks OK to me, that's a good finish! Keep up the good work - Some critical things you might wish to consider though:
1. The gear legs are too far back - they need to move forward more near the bottom. Check references this is easy to see.
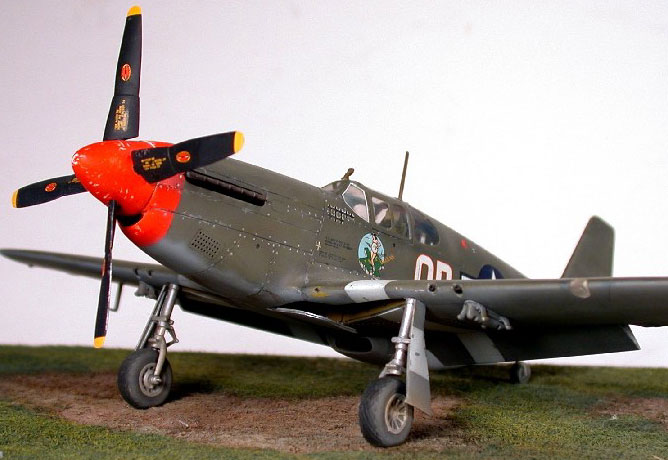
Here is a picture of one I built if this helps
2. The wheels wells should be silver, possibly with a yellow spar ( I have seen photos of P-51Ds with all silver wells including the spar - but never green.
3. The fuselage National Insigna don't go up that high on the fuselage. And the invasion stripes weren't painted under the national insigna. There should be a small gap of silver where they stopped painting the invasion stripes around the insigna and codes (when You put those on) .
4. According to research done by Aviation Artist Wade Meyers - European P-51s didn't carry an antenna wire (that's some good news!).
5. The cockpit should be painted interrior green and it wasn't uncommon for the seat to be painted Dull Dark Green - the fuel cell behind the pilot was a rubber color, but the pit shouldn't be black for a P-51 that has D-Day stripes on it - but they were painted black prior being sent to Korea in the 1950s.
6. As far as photograph - if you are interested I wrote a quick "how to" on how I take photos and put it up on ARC. The only thing I would suggest on the photos is to use blank backgrounds rather than shooting directly off your desktop. This makes it much easier to get more light on the subject, and take clearer pictures. But that is only a suggestion based on what I like - your photos look fine.
http://www.aircraftresourcecenter.com/forums/index.php?act=ST&f=12&t=19065&s=20e43b39a1a5999fbeed905c6a67a41b
Regards,
--Frank
Posted: Monday, April 05, 2004 - 05:37 AM UTC
Hi Bryan
Certainly no problems with your new photo setup - the results look great.
I agree with Frank's remarks, but would add that the style of invasion stipes did vary quite a lot - I've got photo references for the "squared off" type - just as you've painted them.
One thing I'd say is that the anti-glare panel looks rather bright if it's intended to be Olive Drab, and the instrument shroud would more commonly be black.
On the question of natural metal, I've often read that P-51s left the factory with their wings sealed, primed and painted silver. How long this finish survived on operations (or whether it was purposely scrubbed off by groundcrew!...) is something I've never pinned down.
It's a neat idea to use a cheapo kit to sort out new techniques - something I should try for my own experiments.
Hope the comments help
Rowan
mj
Illinois, United States
Joined: March 16, 2002
KitMaker: 1,331 posts
AeroScale: 325 posts
Joined: March 16, 2002
KitMaker: 1,331 posts
AeroScale: 325 posts
Posted: Monday, April 05, 2004 - 09:00 AM UTC
Bryan, the pics look great. I haven’t built that kit, but if you say it’s a dog, I’ll believe you. You did a heck of a job on the NMF, though. The different shades on various panels came out well, I thought. I wouldn’t be too hard on yourself. Overall, I think it looks good, given what you had to work with.
Mike
Mike
Tin_Can
Florida, United States
Joined: January 26, 2002
KitMaker: 1,560 posts
AeroScale: 750 posts
Joined: January 26, 2002
KitMaker: 1,560 posts
AeroScale: 750 posts
Posted: Monday, April 05, 2004 - 09:52 AM UTC
Quoted Text
Tin,
That's one old kit! The NMF looks OK to me, that's a good finish! Keep up the good work - Some critical things you might wish to consider though:
1. The gear legs are too far back - they need to move forward more near the bottom. Check references this is easy to see.
2. The wheels wells should be silver, possibly with a yellow spar ( I have seen photos of P-51Ds with all silver wells including the spar - but never green.
3. The fuselage National Insigna don't go up that high on the fuselage. And the invasion stripes weren't painted under the national insigna. There should be a small gap of silver where they stopped painting the invasion stripes around the insigna and codes (when You put those on) .
4. According to research done by Aviation Artist Wade Meyers - European P-51s didn't carry an antenna wire (that's some good news!).
5. The cockpit should be painted interrior green and it wasn't uncommon for the seat to be painted Dull Dark Green - the fuel cell behind the pilot was a rubber color, but the pit shouldn't be black for a P-51 that has D-Day stripes on it - but they were painted black prior being sent to Korea in the 1950s.
6. As far as photograph - if you are interested I wrote a quick "how to" on how I take photos and put it up on ARC. The only thing I would suggest on the photos is to use blank backgrounds rather than shooting directly off your desktop. This makes it much easier to get more light on the subject, and take clearer pictures. But that is only a suggestion based on what I like - your photos look fine.
http://www.aircraftresourcecenter.com/forums/index.php?act=ST&f=12&t=19065&s=20e43b39a1a5999fbeed905c6a67a41b
Regards,
--Frank
Frank, thanks for the comments. I had fretted over whether or not to post this aircraft because I knew there were problems with it-both physically and research wise. I didn't want anyone to think I was just a critiquer and not beyond critiqueing so I went ahead and posted. I'm kinda dissappointed in myself for not doing something with the cockpit.
The finish was my first attempt at using modelmaster metallizers. The result was ok in my opinion and for my next (1/32 P-47) I may try ALCLAD to see how it works. All of your points are valid and I'll try to fix what I can. The entire cockpit isn't black, though, just the seat. I'll attempt to fix that as well.
I normally use a pre-fab surface and background for "final" photos so these in-progress photos are just sitting on my desk. I'll respost a couple with backgrounds in place to get your opinion of the photos that way as well.
Quoted Text
Bryan, the pics look great. I haven’t built that kit, but if you say it’s a dog, I’ll believe you. You did a heck of a job on the NMF, though. The different shades on various panels came out well, I thought. I wouldn’t be too hard on yourself. Overall, I think it looks good, given what you had to work with.
Mike, thanks for the comments. I think as far as "basics" go the kit is ok but I've failed miserably in the research department and I knew that already. I think I need to refine my research thought process and procedures so I can accurize the kits better.
I'll make some changes tonight and post some pics with a better background and surface.
Tin_Can
Florida, United States
Joined: January 26, 2002
KitMaker: 1,560 posts
AeroScale: 750 posts
Joined: January 26, 2002
KitMaker: 1,560 posts
AeroScale: 750 posts
Posted: Monday, April 05, 2004 - 09:55 AM UTC
Quoted Text
Hi Bryan
Certainly no problems with your new photo setup - the results look great.
I agree with Frank's remarks, but would add that the style of invasion stipes did vary quite a lot - I've got photo references for the "squared off" type - just as you've painted them.
One thing I'd say is that the anti-glare panel looks rather bright if it's intended to be Olive Drab, and the instrument shroud would more commonly be black.
On the question of natural metal, I've often read that P-51s left the factory with their wings sealed, primed and painted silver. How long this finish survived on operations (or whether it was purposely scrubbed off by groundcrew!...) is something I've never pinned down.
It's a neat idea to use a cheapo kit to sort out new techniques - something I should try for my own experiments.
Hope the comments help
Rowan
Rowan, thanks for the comments.. Your comments on the anti-glare panel and instrument panel are noted and will get fixed.
When I try out new techniques (NMF in this case) I don't like to try them on $30 kits so that's why I bought this old kit for next to nothing. I should have researched a little better though.
MikeMaben
Oregon, United States
Joined: March 15, 2004
KitMaker: 12 posts
AeroScale: 0 posts
Joined: March 15, 2004
KitMaker: 12 posts
AeroScale: 0 posts
Posted: Monday, April 05, 2004 - 10:32 AM UTC
Tin_Can
Florida, United States
Joined: January 26, 2002
KitMaker: 1,560 posts
AeroScale: 750 posts
Joined: January 26, 2002
KitMaker: 1,560 posts
AeroScale: 750 posts
Posted: Monday, April 05, 2004 - 11:05 AM UTC
Thanks Mike.
Tin_Can
Florida, United States
Joined: January 26, 2002
KitMaker: 1,560 posts
AeroScale: 750 posts
Joined: January 26, 2002
KitMaker: 1,560 posts
AeroScale: 750 posts
Posted: Monday, April 05, 2004 - 04:26 PM UTC
Ok, I've gone through and made some changes based on your recommendations. I touched up the fuselage under the cockpit on the port side-the gray area should be gone. The wheel wells have been painted silver. The anti-glare panel has been repainted another shade of olive drab. The instrument shroud has been painted matt black. The seat has been painted a shade of green. Took this set of photos with the backgrounds I normally use but tried a blue bottom just to see how it looked. There's too much shadow in the first two pics but I think the last one came out ok.
Thanks for everyones help so far. Here are the pics:
Posted: Monday, April 05, 2004 - 06:02 PM UTC
Hi Bryan
Wow! That's quick work on incorporating the changes!
Using the simple backdrop focuses attention on the subject far better than the workbench photos. One thing occurred to me - how close are you shooting from? I ask because you've got a little "barrel" distortion happening.
Try taking a pic from further away and zooming in to get the framing and compare the results - if the theory's right, it should kill the distortion.
All the best
Rowan
Posted: Monday, April 05, 2004 - 06:03 PM UTC
Hi Bryan
Wow! That's quick work on incorporating the changes!
Using the simple backdrop focuses attention on the subject far better than the workbench photos. One thing occurred to me - how close are you shooting from? I ask because you've got a little "barrel" distortion happening.
Try taking a pic from further away and zooming in to get the framing and compare the results - if the theory's right, it should kill the distortion.
All the best
Rowan
Wow! That's quick work on incorporating the changes!
Using the simple backdrop focuses attention on the subject far better than the workbench photos. One thing occurred to me - how close are you shooting from? I ask because you've got a little "barrel" distortion happening.
Try taking a pic from further away and zooming in to get the framing and compare the results - if the theory's right, it should kill the distortion.
All the best
Rowan
Q376
Arkansas, United States
Joined: March 29, 2004
KitMaker: 4 posts
AeroScale: 0 posts
Joined: March 29, 2004
KitMaker: 4 posts
AeroScale: 0 posts
Posted: Thursday, April 08, 2004 - 05:45 AM UTC
TC, it looks like you've had most things pointed so I thought I would add a little basic P-51 info.
Paint; the wings left the factory with a coat of silver lacquer applied to them. This covered up the primer that was applied after the panel joins had been filled with putty.
The fuselage,flaps and ailerons would be left NMF.
The fuselage fuel cell was made from self sealing rubberized material and had a black matt finish look to it.
Differant fighter groups painted the invasion stripes differently. Some just as you have them painted, two of which were Old Crow and Yeagers Glamorous Glenn III.
The gear legs on a P-51 had/have a 11 degree forward rake from perpendicular to the wing.
Good work on the old kit though, looks like you aced the finish on it, lot's of folks are afraid of trying NMFs on aircraft models.
Cheers
Craig Q