_GOTOBOTTOM
World War II: Japan
Aircraft of Japan in WWII.
Hosted by Rowan Baylis
More Rising Sun
Wad_ware
_VISITCOMMUNITY
Illinois, United States
Joined: September 09, 2002
KitMaker: 537 posts
AeroScale: 437 posts
Posted: Sunday, April 11, 2004 - 01:40 PM UTC
Hi all,
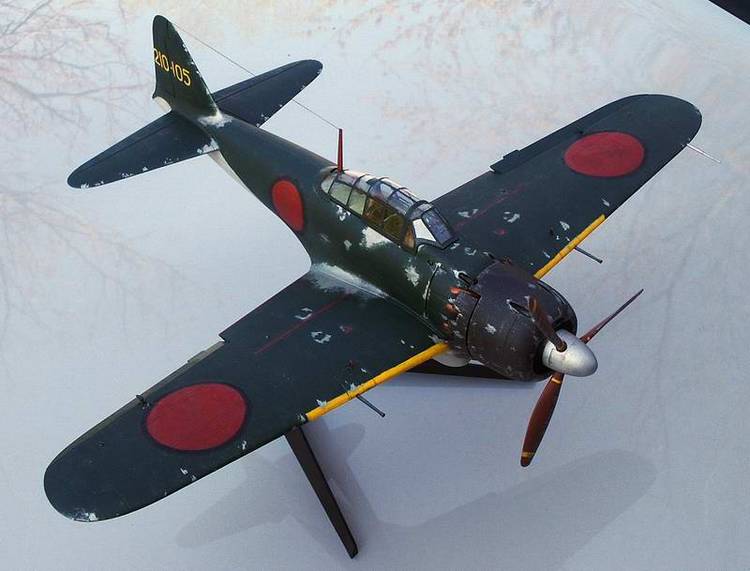
I have redone my weathering on my Zero and pretty much totally changed the look of what I had before, at least on the wings. I think it definately looks better than what I had done before. I almost wished I hadn't done any weathering. Before I started on it I had a beautifully done airbrushed zero. I had things masked off really nice, airbrushed the markings which came out great. I like the way it turned out but as of yet I don't have the modeling skills to really make it look all that realistic yet. I am a little disappointed in the overall product but what the heck - I did have one heck of a lot of fun putting the kit together and wouldn't change that for anything.
So, for better or worse here are some quick shots of my finished Zero. These are kind of quick sloppy shots again but shows things pretty well. I will take and post some better ones in my gallery later on.


Let me know what you think and good modeling,
Wayne
Holdfast
Staff MemberPresident
IPMS-UK KITMAKER BRANCH
#056
_VISITCOMMUNITY
England - South West, United Kingdom
Joined: September 30, 2002
KitMaker: 8,581 posts
AeroScale: 4,913 posts
Posted: Sunday, April 11, 2004 - 07:38 PM UTC
Hi Wayne, Yep, certainly looks better, congratulations on re-doing this Looks like nicely faded paintwork, as well.
I promise to get pics of my Val up soon
Mal
newtothegame
_VISITCOMMUNITY
Washington, United States
Joined: October 05, 2003
KitMaker: 588 posts
AeroScale: 468 posts
Posted: Monday, April 12, 2004 - 02:23 AM UTC
Wayne,

I really like the way the paint looks faded. How did you do that? Nice work on redoing the chipping.

Leon
Wad_ware
_VISITCOMMUNITY
Illinois, United States
Joined: September 09, 2002
KitMaker: 537 posts
AeroScale: 437 posts
Posted: Monday, April 12, 2004 - 12:02 PM UTC
Thanks everyone,
Once I got over the initial shock of what I did to my paint job on the Zero, I am really happy with how it came out. I took the pics right after I got done with the kit and I think at the time I was in just a little state of shock over what I had just done to the nice paint job - mostly due to lack of experience and not knowing if what I had done just ruined my model or not
It was a lot of fun to build and even tho I know it doesn't rank up there with some of the big guns of modelers, I am satisfied with the outcome

I'll try to explain the faded paintwork if I can. It mainly came from inexperience and accident
I originally airbrushed the whole plane and markings which came out excellent. Then I did my first try at weathering which all of you saw and I decided to rework it.
Well, any of you who airbrush probably know, but there is a difference in the look of an airbrushed surface and a paint brushed surface. Airbrushing is like a silky smooth surface and brushing, no matter how good you do it, there is definately a difference in the overall look of the surface. Well.....I dry brushed over my first areas of weathering and about kicked myself in the head because it was like polka dots looking at the difference of the new brushed areas and the original airbrushing. So, I dry brushed over the entire green of the Zero to get the whole thing to look the same.
There were some areas that had a little bit of brush marks and I thought, hmmmmmm, I bet I can take some really fine sand paper and sand those brush marks down. #:-)
Once I took the sandpaper to some of the brush marks there was now a really big difference in the paint surfaces again !!!!!!(have I got you all confused yet) So.......I very lightly sanded over the entire surface of the dark green to get the whole surface of the plane to look consistant again.
Since I sanded very lightly and not very long there were some of the lower areas of the green that didn't get sanded as much as some of the other areas and that is now the paint looks faded.

I hope that's not too confusing. The whole thing came about by accident but I guess if it works in the end ...what the heck Maybe I just invented a new technic. hahahahahahaha :-)

I have put some better pics in my gallery if you want to check them out. I have a couple of the underside ot the Zero too. They are better pics than the last ones but I am still not that satisfied with them as of yet so I will probably update them later on with some really nice pics.

Thanks again everyone and I am looking forward to seeing all the rest of your unfinished projects.
Good modeling to all,
Wayne
penpen
_VISITCOMMUNITY
Hauts-de-Seine, France
Joined: April 11, 2002
KitMaker: 1,757 posts
AeroScale: 0 posts
Posted: Monday, April 12, 2004 - 10:13 PM UTC
Wayne !
It's much better this way ! I'm impressed you had the nerve to try again on a finished kit !
Part-timer
_VISITCOMMUNITY
Georgia, United States
Joined: April 11, 2003
KitMaker: 361 posts
AeroScale: 0 posts
Posted: Tuesday, April 13, 2004 - 04:05 AM UTC
Aww, yeah, that's the way. Much better.

Which kit was that again? I've been meaning to pick up a Zero.
Wad_ware
_VISITCOMMUNITY
Illinois, United States
Joined: September 09, 2002
KitMaker: 537 posts
AeroScale: 437 posts
Posted: Tuesday, April 13, 2004 - 01:19 PM UTC
Thanks again all, all kind words appreciated very much.

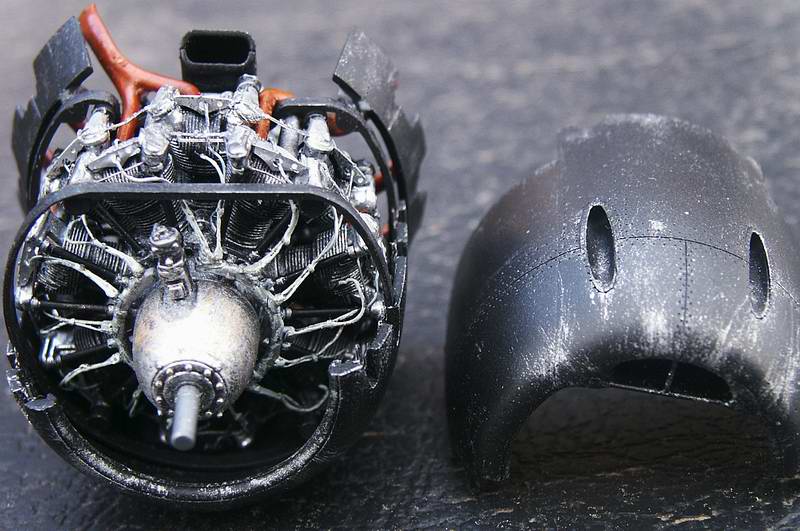
Part-Timer - The kit is the Tamiya 1/32nd A6M5 Zero. I'll warn you it can be an expensive kit if you go for it. If you are interested in it look on ebay. The kit lists and sells in shops anywhere from about $80 to $100. I got one - buy it now - on ebay for right at $65. That is still a little high for a plastic model but I said what the heck and bought it anyway. I do not regret spending the money for it at all. The detailing OOTB plus the fit of this kit cannot be beat. It is one heck of a lot of fun to put it together so it is highly recommended if you want to spend the extra cash on it. Also if you are into super detailing there are three eduard photo etch sets you can get for it too. I used the engine detailing set from eduard and it really makes the engine look fantastic. There is also an exterior and interior set but I didn't really feel the need for those extra details and didn't get those.

If not...Tamiya makes a really good 1/48 scale A6M5 zero that is a lot more normally priced. It is a good detailed and nicely fitting kit also. Check in the earlier 'Rising Sun' threads..Newtothegame built that 1/48th kit if you want to get a good look at it. Also in my gallery is a pic or two of the same kit I built earlier.

Hope that helps and if you choose either one of the two Tamiya kits you won't be disappointed.
Wayne
newtothegame
_VISITCOMMUNITY
Washington, United States
Joined: October 05, 2003
KitMaker: 588 posts
AeroScale: 468 posts
Posted: Wednesday, April 14, 2004 - 02:40 AM UTC
I will second what Wad_ware has to say about the 1/48th tamiya A6M5c kit. It is really nice (especially for about $14 which is what I have seen it for in the LHS). The 1/32 he built seems to have way more detail and be a nicer kit, but if you want/need to spend less the 1/48th is very enjoyable.

Leon
Hoovie
_VISITCOMMUNITY
California, United States
Joined: March 14, 2004
KitMaker: 505 posts
AeroScale: 58 posts
Posted: Sunday, January 30, 2005 - 07:25 AM UTC
pictures??
Can't see them??
Ron
Merlin
Staff MemberSenior Editor
AEROSCALE
#017
_VISITCOMMUNITY
United Kingdom
Joined: June 11, 2003
KitMaker: 17,582 posts
AeroScale: 12,795 posts
Posted: Sunday, January 30, 2005 - 07:20 PM UTC
Hi there Wayne

Like Ron, all I can see is a bunch of dreaded red-Xs.

Did you move or delete the pics?

All the best

Rowan
newtothegame
_VISITCOMMUNITY
Washington, United States
Joined: October 05, 2003
KitMaker: 588 posts
AeroScale: 468 posts
Posted: Monday, January 31, 2005 - 02:48 AM UTC
Well since this thread popped back up to the top...is anyone interested in a Rising Sun Round 2? I have a george I am just starting and would love to have at least one other person to build along side.

Leon
Holdfast
Staff MemberPresident
IPMS-UK KITMAKER BRANCH
#056
_VISITCOMMUNITY
England - South West, United Kingdom
Joined: September 30, 2002
KitMaker: 8,581 posts
AeroScale: 4,913 posts
Posted: Monday, January 31, 2005 - 09:38 AM UTC
Hi Leon I've just started a N1K1 Kyofu float plane, which I'm building for an article on wethering Japanese planes (that's assuming all goes well :-) )
Mal
newtothegame
_VISITCOMMUNITY
Washington, United States
Joined: October 05, 2003
KitMaker: 588 posts
AeroScale: 468 posts
Posted: Monday, January 31, 2005 - 09:46 AM UTC
Very cool Mal. I definately look forward to it. What are you going to do for weathering? I am trying to decide how heavy to go. I picked up some aeromaster decals and they mention the planes being very heavily weathered with large areas of metal showing through, but it almost seems to me (by interpreting online comments from people for the heavily weathered Japanese planes) that it is a cliche and overdone....so I can't decide what to do.

I am probably going to do NMF on the underside, so I may experiment with the use of masking tape to rip off paint method on the upper portions. Who knows...

Leon

Holdfast
Staff MemberPresident
IPMS-UK KITMAKER BRANCH
#056
_VISITCOMMUNITY
England - South West, United Kingdom
Joined: September 30, 2002
KitMaker: 8,581 posts
AeroScale: 4,913 posts
Posted: Tuesday, February 01, 2005 - 08:19 AM UTC
Well for one thing I intend to start with a NMF, then apply the paint including painting the markings. I'm still a little undecided on the weathering but I think I will be going the very fine emery paper route, mainly because it is more controlable. I actually started last week by painting the interior colour but the wash was crap, so I'm going to be re-painting
Mal
Wad_ware
_VISITCOMMUNITY
Illinois, United States
Joined: September 09, 2002
KitMaker: 537 posts
AeroScale: 437 posts
Posted: Tuesday, February 01, 2005 - 10:50 AM UTC
My apologies guys,
This thread was just old enough and needed the space for other pics for internet stuff
I didn't really expect this thread to come back up again

Here are some of the pics reposted for you.
Also, if you want to see some shots of the cockpit those are in my gallery.


My apologies again guys and good modeling,
Wayne
 _GOTOTOP