Howdy folks!!
I got started on my kit at last. Here's what I've completed so far. More detail photos are available at my Gallery link
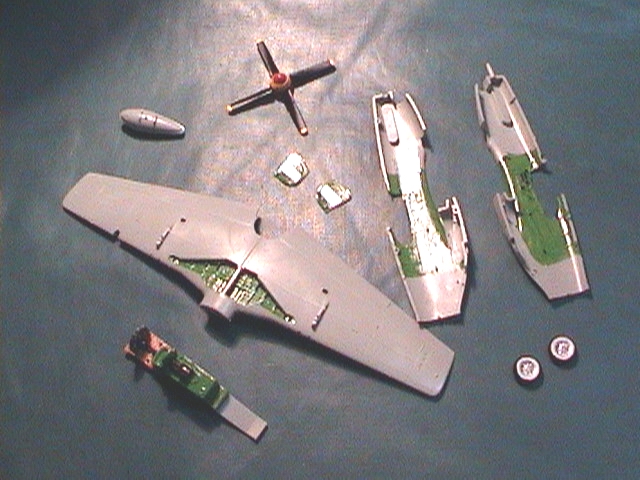
Constructive feedback welcome... !!
Cheers, BP
Air Campaigns
Want to start or join a group build? This is where to start.
Hosted by Frederick Boucher, Michael Satin
Overlord 2004 : Progress on my P-51B Mustang
bytepilot
Karnataka, India / भारत
Joined: June 01, 2002
KitMaker: 381 posts
AeroScale: 0 posts
Joined: June 01, 2002
KitMaker: 381 posts
AeroScale: 0 posts
Posted: Thursday, April 29, 2004 - 04:21 PM UTC
brandydoguk
England - North, United Kingdom
Joined: October 04, 2002
KitMaker: 1,495 posts
AeroScale: 643 posts
Joined: October 04, 2002
KitMaker: 1,495 posts
AeroScale: 643 posts
Posted: Friday, April 30, 2004 - 12:37 AM UTC
Looking good so far BP. It might be a good idea to do a bit of drybrushing on the black radio equipment behind the pilot's seat to make the detail stand out a bit more? Neat painting on the cockpit dials, I wish I had a steady enough hand to paint that neatly.
USArmy2534
Indiana, United States
Joined: January 28, 2004
KitMaker: 2,716 posts
AeroScale: 246 posts
Joined: January 28, 2004
KitMaker: 2,716 posts
AeroScale: 246 posts
Posted: Friday, April 30, 2004 - 04:24 AM UTC
I would also say that drybrushing the wheel wheel with some black and brown (oil, dirt) and maybe some silver for chipped paint. Great start.
bytepilot
Karnataka, India / भारत
Joined: June 01, 2002
KitMaker: 381 posts
AeroScale: 0 posts
Joined: June 01, 2002
KitMaker: 381 posts
AeroScale: 0 posts
Posted: Thursday, May 06, 2004 - 04:24 PM UTC
Hi folks,
thanks for the feedback so far.
Martin, yes, I took your advice and d/b'd the areas behind the seat. It came out quite well. But sadly, it won't be visible, even thru the side windows!
And Jeff, yep, am planning to dirty up the wheels with a wash near the end...
BTW, I have finished the painting of the a/c yesterday. Will put up some pics tonite. Will be giving it a coat of Future for the washes too. Am not very sure if I need to paint the invasion stripes area, so that the decals will not show the underlying paint.
AFAIK, Academy decals are quite thin, and tend to show the under-areas all to well. Otherwise, I'm planning to lay down a strip of white decal below first, and then lay on the kit decals on top. Let's see!
At this rate, I thik I should have my kit finished by the middle of next week. However, the rains have come down pretty early and heavily this year in South India. So it may take some time to dry out..
Cheers,
BP.
bytepilot
Karnataka, India / भारत
Joined: June 01, 2002
KitMaker: 381 posts
AeroScale: 0 posts
Joined: June 01, 2002
KitMaker: 381 posts
AeroScale: 0 posts
Posted: Friday, May 07, 2004 - 02:07 PM UTC
Well, as promised, here are some piccies of my progress. As you can see, quite a lot of decaling has been finished !!
Two more pics are available at my . Gallery link
More laterz. Am going out of station for the next two days. Will complete the decaling by Monday I guess !!
Cheers,
BP.
Two more pics are available at my . Gallery link
More laterz. Am going out of station for the next two days. Will complete the decaling by Monday I guess !!
Cheers,
BP.
brandydoguk
England - North, United Kingdom
Joined: October 04, 2002
KitMaker: 1,495 posts
AeroScale: 643 posts
Joined: October 04, 2002
KitMaker: 1,495 posts
AeroScale: 643 posts
Posted: Saturday, May 08, 2004 - 12:21 AM UTC
You have really made good progress there BP. Looks excellent. Did you put a strip of white decal down before the invasion stripes as you were thinking of doing? I've always avoided doing aircraft with invasion stripes, I'm not good enough to paint them and large decals don't seem to like me, they always wrinkle up on me when I use decal solutions. Yours look perfect.
Posted: Saturday, May 08, 2004 - 08:40 AM UTC
Hi there BP
Nice job! Rains or not, you're way ahead of me!
Check in with Dave - he's keeping a tally of who's still in the Overlord build.
All the best
Rowan
Nice job! Rains or not, you're way ahead of me!
Check in with Dave - he's keeping a tally of who's still in the Overlord build.
All the best
Rowan
bytepilot
Karnataka, India / भारत
Joined: June 01, 2002
KitMaker: 381 posts
AeroScale: 0 posts
Joined: June 01, 2002
KitMaker: 381 posts
AeroScale: 0 posts
Posted: Sunday, May 09, 2004 - 04:12 PM UTC
Quoted Text
You have really made good progress there BP. Looks excellent.
Thank you, thank you !
Quoted Text
Did you put a strip of white decal down before the invasion stripes as you were thinking of doing?
Nope, I didn't.. I thought I'd take a chance, since it would mean using up some of my precious white decal paper(it's pretty expensive to get this stuff imported here ). But the Academy decals are fantastic... The invasion stripes are simply superb.. not a bit of the ground olive drab paint to be seen!
But I do have a gripe against the damned USAF star decals on the sheet . They turned out to be translucent, and so are showing the black strip behind. Oh well, looks like I'll have to have a go at my white decal paper to cover this gaffe up...:-)!
Quoted Text
I've always avoided doing aircraft with invasion stripes, I'm not good enough to paint them and large decals don't seem to like me, they always wrinkle up on me when I use decal solutions. Yours look perfect.
It's not that tough. There's an excellent tut on IPMS Stockholm on how to paint inv stripes on a plane. I tried this out on a dummy kit, and it came out quite well. Try it out if you like:
http://www.ipmsstockholm.org/magazine/1999/09/stuff_eng_tech_stripes.htm
I used a basecoat of Future before I started off on the decal, only on the decal areas. Afterwards, even the decal was given a drag thru a small puddle of Future while still on the backing sheet. This ensured the absolute settling down of the decal, and so it became my slave ;-)! And I don't use decal settling solutions either, altho I'm looking at the use of diluted vinegar in the future. That's for another day!!
Cheers,
BP.
lestweforget
Victoria, Australia
Joined: November 08, 2002
KitMaker: 2,832 posts
AeroScale: 224 posts
Joined: November 08, 2002
KitMaker: 2,832 posts
AeroScale: 224 posts
Posted: Monday, May 10, 2004 - 12:29 AM UTC
Looking nice, cheers