Hi there
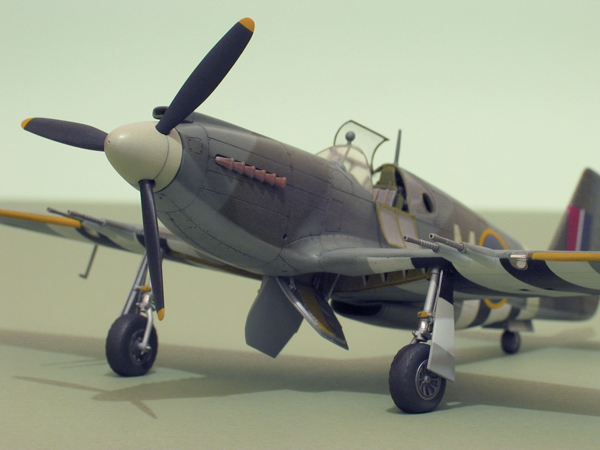
I wouldn't normally post "not quite finished" pics... but I had to make an exception to cross the finishing line for Overlord 2004. Then Brandydog spotted the pics, so I thought I may as well come clean...
There's still a bit to do. I want to add some detail to the inside of the canopy to depict the locking mechanism, and the plane really needs a bit of paint chipping, but I think the basics are there.
Of course, if anyone spots any howlers, I'd appreciate the heads up.
Cheers
Rowan
General Aircraft
This forum is for general aircraft modelling discussions.
Hosted by Jim Starkweather
Mustang 1a in progress...
Posted: Wednesday, June 09, 2004 - 12:00 PM UTC
Bishop
Illinois, United States
Joined: June 07, 2004
KitMaker: 119 posts
AeroScale: 0 posts
Joined: June 07, 2004
KitMaker: 119 posts
AeroScale: 0 posts
Posted: Wednesday, June 09, 2004 - 12:02 PM UTC
Im no expert, but it looks mighty fine too me! The only thing i was even gonna consider mentioning was the chipping, but i see you got that covered, Nice Work!
CRS
California, United States
Joined: July 08, 2003
KitMaker: 1,936 posts
AeroScale: 1,168 posts
Joined: July 08, 2003
KitMaker: 1,936 posts
AeroScale: 1,168 posts
Posted: Thursday, June 10, 2004 - 07:40 AM UTC
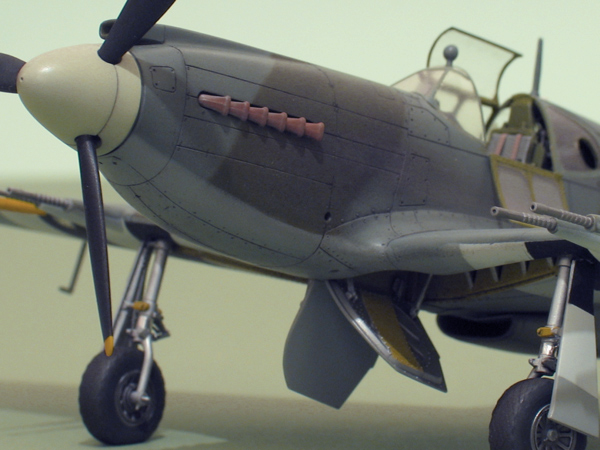
So that's what you've been hiding from us. I normally don't look for panel lines, but I have to admit they look great on this one. Nice work. How is that pink Spit coming ?
Posted: Thursday, June 10, 2004 - 08:09 AM UTC
Quoted Text
So that's what you've been hiding from us. I normally don't look for panel lines, but I have to admit they look great on this one. Nice work. How is that pink Spit coming ?
Thanks Chuck and Bishop.
I'll try to get a bit of chipping done this weekend - it definitely needs a bit of something...
It's odd how things look different in real life compared with photos...even the exhaust stains have disappeared in the pics, and I thought they looked plenty strong enough on the model...
I have to admit the PRU Spit has taken a back seat... I sill haven't been able to find out what the fuselage motto / legend is. I may just have to add a line of illegible "characters".
All the best
Rowan
wingman
Pennsylvania, United States
Joined: December 09, 2003
KitMaker: 880 posts
AeroScale: 654 posts
Joined: December 09, 2003
KitMaker: 880 posts
AeroScale: 654 posts
Posted: Thursday, June 10, 2004 - 10:34 AM UTC
Very nice. I like the look of the spinner, even though it's one color it looks good. What did you use on the gear legs. I'm building 2 P-47's and I used ModelMaster flat aluminum and it looks fantastic. I'm going to try a wash of Future mixed with Sepia Ink.[tip from Hyperscale story]. I'm going to post some pics of the build in my gallery soon. By the way are those aftermarket wheels? Keep up the good work, Wingman out.
Tony_Frey
Missouri, United States
Joined: May 03, 2003
KitMaker: 272 posts
AeroScale: 41 posts
Joined: May 03, 2003
KitMaker: 272 posts
AeroScale: 41 posts
Posted: Thursday, June 10, 2004 - 11:57 AM UTC
She's a beauty! I agree with the comment about the panel lines, they really stand out.
Posted: Friday, June 11, 2004 - 09:48 AM UTC
Hi again
Firstly I must say thanks to Brandydog; Martin encouraged me to check the white balance on the pics, so it's thanks to him they look a bit more presentable! Cheers Martin!
Michael and Tony... I really appreciate your kind words. I'll try to fill in a few of the details;
The spinner is done using a trick I found by accident on my Age of Aces - WW1 build. Although it's one colour, I shaded the panel line with pastel before asssembling it.
The undercarriage was painted with MM Buffing Metalizer Aluminum Plate, with aluminium tape for the exposed oleo.
For a wash in the panel lines and u/c, I followed Scott Murphy's tip in Critics Corner. He recommends "The Detailer" inks... I couldn't find any, so I tried Dr. Ph. Martin's concentrated water colours. I mixed them with a little washing-up liquid and water to help them flow.
The wheels are modified from the kit. The tyres are ready "weighted", but have a bad seam on them. By the time I'd smoothed this, I'd lost most of the tread detail. so I re-scribed it (boring, but worth it).
Thanks again
Rowan
GN
Stockholm, Sweden
Joined: June 29, 2003
KitMaker: 24 posts
AeroScale: 0 posts
Joined: June 29, 2003
KitMaker: 24 posts
AeroScale: 0 posts
Posted: Friday, June 11, 2004 - 02:05 PM UTC
A kit of this very high standard displayed here, doesn't need much further improvement IMHO. In other words, you should be very pleased, with the result.
When it comes to weathering it all boils down to personal preferences (sp?) IMO. Anyhow, I'm not sure if I can detect some subtle exhaust stains or not. Maybe something to reflect upon? That's the only thing I can think off, that's not already been mentioned in this thread.
GN
When it comes to weathering it all boils down to personal preferences (sp?) IMO. Anyhow, I'm not sure if I can detect some subtle exhaust stains or not. Maybe something to reflect upon? That's the only thing I can think off, that's not already been mentioned in this thread.
GN
ave
Klang, Malaysia
Joined: March 24, 2003
KitMaker: 417 posts
AeroScale: 0 posts
Joined: March 24, 2003
KitMaker: 417 posts
AeroScale: 0 posts
Posted: Friday, June 11, 2004 - 03:59 PM UTC
I must say this is an excellent model you've built. Paint job and everything is excellent
Posted: Saturday, June 12, 2004 - 07:06 AM UTC
Wow, excellant job, as usual, Rowan.
I've been studying the pics and it is definately a superb model, the only comment I can make is that the frames on the clear parts look a little lighter than on the fuselage and wings. Were they attached before or after weathering? It's no big deal, just doing a critics corner type thing
Mal
I've been studying the pics and it is definately a superb model, the only comment I can make is that the frames on the clear parts look a little lighter than on the fuselage and wings. Were they attached before or after weathering? It's no big deal, just doing a critics corner type thing
Mal
Posted: Saturday, June 12, 2004 - 07:31 AM UTC
Hi Mal
You're absolutely right about the frames (esp. on the rear windows). It's odd... they've had exactly the same treatment as the rest of the kit, but they're definitely lighter than the other parts.
They're on the list of things to do before I call this one "finished".
All the best
Rowan
You're absolutely right about the frames (esp. on the rear windows). It's odd... they've had exactly the same treatment as the rest of the kit, but they're definitely lighter than the other parts.
They're on the list of things to do before I call this one "finished".
All the best
Rowan