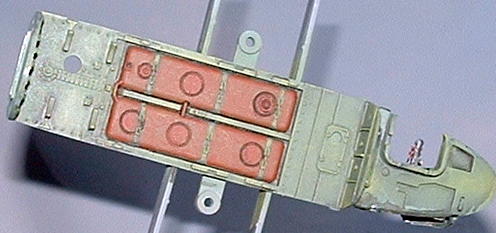
I've made a start on Tamiya's 1/48 Mosquito B Mk IV. The cockpit is a dream if you enjoy drybrushing, loads of small details.
Has anyone built this kit as I have a question? The internal framing of the canopy is provided as decals. Does anyone know if the underside of the decals are the same colour as the upper side, namely cockpit green or are the undersides of the decals white?
General Aircraft
This forum is for general aircraft modelling discussions.
Hosted by Jim Starkweather
Tamiya 1/48 mosquito
brandydoguk
England - North, United Kingdom
Joined: October 04, 2002
KitMaker: 1,495 posts
AeroScale: 643 posts
Joined: October 04, 2002
KitMaker: 1,495 posts
AeroScale: 643 posts
Posted: Saturday, June 26, 2004 - 06:43 PM UTC
brandydoguk
England - North, United Kingdom
Joined: October 04, 2002
KitMaker: 1,495 posts
AeroScale: 643 posts
Joined: October 04, 2002
KitMaker: 1,495 posts
AeroScale: 643 posts
Posted: Saturday, June 26, 2004 - 10:23 PM UTC
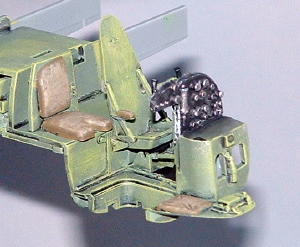
I've done a bit more work on this one, the seatbelts are prepainted ones by Eduard.
stugiiif
Virginia, United States
Joined: December 13, 2002
KitMaker: 1,434 posts
AeroScale: 403 posts
Joined: December 13, 2002
KitMaker: 1,434 posts
AeroScale: 403 posts
Posted: Saturday, June 26, 2004 - 11:13 PM UTC
Martin this looks good. May i suggest some wire fro strached sprue for the guages. Other than that looks nice.On the decals thing I have no clue I don't have this one. But when I do my frames I paint the interior color first the the outside colour over that. HTH STUG
Wad_ware
Illinois, United States
Joined: September 09, 2002
KitMaker: 537 posts
AeroScale: 437 posts
Joined: September 09, 2002
KitMaker: 537 posts
AeroScale: 437 posts
Posted: Sunday, June 27, 2004 - 12:56 AM UTC
The cockpit and interior is looking great
I do the same as Stug. I personally wouldn't use the decals for the interior of the cockpit. Mask off the cockpit and paint the exterior of the cockpit flat black first. Then after that sets up paint your exterior color over the top of the black. The black you painted first will show through to the inside of the cockpit and will give you your interior. It looks a lot more realistic that way and, in my opinion, will always look better than trying to get those decals put inside.
Black may not be the correct color for that craft. Someone else who knows that aircraft really well can probably help you with the right color to use for that
Can't wait to see what you do with the outside of the plane. The insides are looking great.
Good modeling,
Wayne
brandydoguk
England - North, United Kingdom
Joined: October 04, 2002
KitMaker: 1,495 posts
AeroScale: 643 posts
Joined: October 04, 2002
KitMaker: 1,495 posts
AeroScale: 643 posts
Posted: Sunday, June 27, 2004 - 01:00 AM UTC
Hi Stug, thanks for the suggestion abiut the guages, I'll give it a go.
The problem with the canopy framing is that some of the frames are internal only, they are molded on the inside of the canopy. If the decals for them are coloured on both sides this shouldn't be a problem. If they are white on the underside it will be. It would be quite a job to mask the inside of the canopy to paint these frames as the inside curves will make it difficult.
Posted: Sunday, June 27, 2004 - 02:25 AM UTC
Hi Martin
The cockpit's looking really great!
Judging by photos of the original a/c, the interior framing was made of tubing to which the glazed panels were rivetted - there weren't exterior frames on the whole canopy. I presume the exterior frames only covered joins inthe perspex, so painting all the frames from the outside won't really be right.
As far as I can tell, the interior frames were grey-green - there's certainly no sign of white...
Hope this helps
Rowan
brandydoguk
England - North, United Kingdom
Joined: October 04, 2002
KitMaker: 1,495 posts
AeroScale: 643 posts
Joined: October 04, 2002
KitMaker: 1,495 posts
AeroScale: 643 posts
Posted: Sunday, June 27, 2004 - 03:51 AM UTC
Hi Rowan, yes much of the rear of the cockpit framing is internal. I'm thinking if I can get hold of some clear decal and airbrush it the interior colour, then cut it into strips and apply it to the inside that should do it.
Posted: Sunday, June 27, 2004 - 03:55 AM UTC
Hi Martin
I can send you some clear decal sheet if you haven't any in your stash.
All the best
Rowan
I can send you some clear decal sheet if you haven't any in your stash.
All the best
Rowan
brandydoguk
England - North, United Kingdom
Joined: October 04, 2002
KitMaker: 1,495 posts
AeroScale: 643 posts
Joined: October 04, 2002
KitMaker: 1,495 posts
AeroScale: 643 posts
Posted: Sunday, June 27, 2004 - 05:16 AM UTC
Quoted Text
Hi Martin
I can send you some clear decal sheet if you haven't any in your stash.
All the best
Rowan
Cheers Rowan but I think I should have something knocking around that I can use.
19k
Wisconsin, United States
Joined: April 03, 2004
KitMaker: 489 posts
AeroScale: 0 posts
Joined: April 03, 2004
KitMaker: 489 posts
AeroScale: 0 posts
Posted: Sunday, June 27, 2004 - 07:03 AM UTC
That is looking very nice. You inspire me to get back into some of my aircraft models again. Great work.
bilko
Queensland, Australia
Joined: April 22, 2003
KitMaker: 584 posts
AeroScale: 96 posts
Joined: April 22, 2003
KitMaker: 584 posts
AeroScale: 96 posts
Posted: Sunday, June 27, 2004 - 07:36 PM UTC
Martin
I have done the FB VI by Tamiya. The decals foir the interior framing on that are NOT white at the back.
However the colour green that they are may be difficult to match with "interior green" - it appears to me to be more of an emerald green - closer to Humbrol 88 than Humbrol 78.
All of this is assuming that Tamiya used the same base decals for the B IV variant.
Regards
Brian
brandydoguk
England - North, United Kingdom
Joined: October 04, 2002
KitMaker: 1,495 posts
AeroScale: 643 posts
Joined: October 04, 2002
KitMaker: 1,495 posts
AeroScale: 643 posts
Posted: Sunday, June 27, 2004 - 10:45 PM UTC
Quoted Text
However the colour green that they are may be difficult to match with "interior green" - it appears to me to be more of an emerald green - closer to Humbrol 88 than Humbrol 78.
All of this is assuming that Tamiya used the same base decals for the B IV variant.
Regards
Brian
Cheers for that info Brian, that will save a lot of messing about. The colour on the decals isn't an exact match for the interior green I used, but it's close enough for me.
Posted: Wednesday, June 30, 2004 - 04:06 AM UTC
Looking good Martin I'm building the Mk VI at the moment, I was planning on masking off and painting the interior framing. Not that easy but possible, I think.
Mal
Mal
brandydoguk
England - North, United Kingdom
Joined: October 04, 2002
KitMaker: 1,495 posts
AeroScale: 643 posts
Joined: October 04, 2002
KitMaker: 1,495 posts
AeroScale: 643 posts
Posted: Wednesday, June 30, 2004 - 04:17 AM UTC
Quoted Text
I'm building the Mk VI at the moment, I was planning on masking off and painting the interior framing. Not that easy but possible, I think.
Hi Mal, I applied the internal framing decals today. The results are disappointing. The colour didn't look too bad on the decal sheet but once on the canopy it really doesn't look right. I've got the Mk VI in my stash, I think for that one I'll airbrush some clear decal to use inside the canopy. Do you have any of the detailing sets for your Mk VI? I was checking some of them out on Hannants site and they do look impressive.
Posted: Wednesday, June 30, 2004 - 04:52 AM UTC
Quoted Text
Do you have any of the detailing sets for your Mk VI? I was checking some of them out on Hannants site and they do look impressive.
Yes, I have the Aries cockpit set, it's very good. I've almost finished painting it and I am going to do this kit as another online build. I have been trying to get the pics uploaded for a while but I have been having internet problems. Things look sorted now (fingers crossed) so I hope to have them uploaded to the gallery this week end.
I think I'm going to mask and paint the framing, wish me luck
Mal
brandydoguk
England - North, United Kingdom
Joined: October 04, 2002
KitMaker: 1,495 posts
AeroScale: 643 posts
Joined: October 04, 2002
KitMaker: 1,495 posts
AeroScale: 643 posts
Posted: Wednesday, June 30, 2004 - 05:47 AM UTC
Quoted Text
I think I'm going to mask and paint the framing, wish me luck
Mal
I certainly hope you manage it off successfully. I've been looking at the canopy of the Mk VI. It looks even harder to mask the insides than the Mk IV. At least there are a couple of seperate side panels on the bomber version canopy that would help accessing the inner curves.