_GOTOBOTTOM
Pre-Flight Check
Constructive critique of your finished or in-progress photos.
FAA Hellcat Mk. II
Bren
_VISITCOMMUNITY
Cape Province, South Africa
Joined: July 07, 2002
KitMaker: 381 posts
AeroScale: 0 posts
Posted: Saturday, October 16, 2004 - 03:09 PM UTC
Hey,

Just finished my Fleet Air Arm Hellcat Mk.II, the kit was Hasegawa's 1:48 F6F-5 Hellcat (USN). After corresponding with Leon (aka Newtothegame) about his beautiful FAA Hellcat, he kindly offered to send me his leftover decals so I could convert mine. To get aftermarket decals here cost more than the model!

Then I got the Model Master paint for it, but the paint was to thin to apply, so I mixed up a rough copy from various old humbrol paints I had and it worked.
I weathered the plane fairly heavily to simulate life at sea (hope it shows in the pics).

Forgot to take pics of the cockpit before sealing it, and the camera will not focus thru the canopy, Any how I am most proud of the result, not bad for a 17 yr old,

Thanks agian to Leon for being so generous

All thoughts and comment welcome.


zer0_co0l
_VISITCOMMUNITY
Limburg, Netherlands
Joined: January 04, 2003
KitMaker: 1,432 posts
AeroScale: 0 posts
Posted: Saturday, October 16, 2004 - 05:47 PM UTC
hiya mate, you got a cool plane their Im not much of a plane man myself but looking good

I personally would add a few little things,

you have their air outlet? or how ever you call that shouldn't that be blackish?
same as the wings where the machine guns are?

not sure if this is right, but thats what I would add:)
Henk
_VISITCOMMUNITY
England - South West, United Kingdom
Joined: August 07, 2004
KitMaker: 6,391 posts
AeroScale: 69 posts
Posted: Saturday, October 16, 2004 - 08:34 PM UTC
Hi'


Quoted Text

you have their air outlet? or how ever you call that shouldn't that be blackish?
same as the wings where the machine guns are?


I think Juul is refering to the exhaust and exhaust stains. A little staining would add some more definition to a very blue plane. The decalls also seem to show some silvering, but that could be exagurared by the photo's. I would give the engine a dark wash to bring out the detail, but again the flash might have washed out the photo.

I'm not a wing nut either, but I do like your effort. Wath's your next project?

Cheers
Henk

newtothegame
_VISITCOMMUNITY
Washington, United States
Joined: October 05, 2003
KitMaker: 588 posts
AeroScale: 468 posts
Posted: Saturday, October 16, 2004 - 09:54 PM UTC
Looks great Erik! Thanks for letting me know you got it done.

I would agree with the other guys that if you are going for heavily weathered some exhaust staining would add to the effect. On the dark blue hellcats I believe the staining was a mix of many colors, but actually lightened the paint (someone probably knows better).

Anyway, I'm glad you finished and I would be proud if I were you; it looks nice.
Leon
Bren
_VISITCOMMUNITY
Cape Province, South Africa
Joined: July 07, 2002
KitMaker: 381 posts
AeroScale: 0 posts
Posted: Tuesday, October 19, 2004 - 06:19 AM UTC
Hey,

Thanks for the comments, I will add some exhaust stains and some more weathering to the mg's sometime this week, school is keeping me busy as exam time is nearing.

I am making AMT/ERTL 1:48th Boston IV (A-20J Havoc) next . I am building all the models I have had sitting on the shelf for ages (not many).

Regards,

Erik
Holdfast
Staff MemberPresident
IPMS-UK KITMAKER BRANCH
#056
_VISITCOMMUNITY
England - South West, United Kingdom
Joined: September 30, 2002
KitMaker: 8,581 posts
AeroScale: 4,913 posts
Posted: Friday, October 22, 2004 - 07:53 AM UTC
Hi Erik,
A very nice Hellcat, just a couple of things. it looks like the port side roundel fought back sometimes, with a large decal, it can get difficult to move them around. This is because of the greater surface tension on the large ones. If like, on the port side roundel, you push up the edges, and they wont lay back down and leave a ridge, you could remove it by light sanding (when the decal is dry) and touch up with paint. If there is no ridge, but the decal is distorted, simply touch in with paint. The other large roundels look perfect. It's unfurtunate about the silvering on the "145" did you use a gloss coat?
I agree with Henk about a dark wash on the engine, it would make it look more realistic.
Your undercarriage looks a little "toed in", it's not always easy to get the undercarriage lined up, but it is as important as the wings and tail planes. If they don't want to line up then a little trimming of the lugs or slots maybe necessary. It's also important that the wheels are straight, front to rear, as well, there doesn't appear to be a problem on that score, well done.
One thing about tyres, painting them dark grey rather than black is good and the side walls, in general, will be cleaner than the tread. I useually dry brush the tread with 2 or 3 shades of earth colours, or a lighter grey, if the aircraft is used off a hard surface.
I have to agree about the exhaust stains, they were quite prominant on Hellcats. I'll post a couple of pics of my Hellcat, on your post in the aircraft forum, to give you some idea of what it, may have, looked like.
One other thing you might consider is the antenna wire.
A very nice Hellcat, one to be proud of
Good luck with your Boston, do post pics.
Mal
Bren
_VISITCOMMUNITY
Cape Province, South Africa
Joined: July 07, 2002
KitMaker: 381 posts
AeroScale: 0 posts
Posted: Friday, October 22, 2004 - 10:09 PM UTC
HEy Mal,

Damn decal put up quite a fight! I struggled to match the white of the decal with white-ish paint but it looked really odd. As for the undercarriage it was perfect when i glued it. but afterwards I noticed that it was not parallel. I was really not up for ripping it off and sandng it as the bloody school was/is keeping me too busy so I let it be.

i think i will try to fix the decal after the upcoming exams.

Thanks again

Erik
LittleNick
_VISITCOMMUNITY
United States
Joined: September 24, 2003
KitMaker: 147 posts
AeroScale: 0 posts
Posted: Monday, October 25, 2004 - 03:02 AM UTC
Very Nice Work

How did you get those lines to show up on your plane in great detail
Holdfast
Staff MemberPresident
IPMS-UK KITMAKER BRANCH
#056
_VISITCOMMUNITY
England - South West, United Kingdom
Joined: September 30, 2002
KitMaker: 8,581 posts
AeroScale: 4,913 posts
Posted: Monday, October 25, 2004 - 08:43 AM UTC

Quoted Text

Damn decal put up quite a fight! I struggled to match the white of the decal with white-ish paint but it looked really odd.


:-) I thought so, been there :-) Particularly with white on a dark background you have to be patiant. The decal is very thin, so you cant try to add thick paint. With white particularly that wont work anyway. Thin the paint and expect to add multiple coates, possibly as many as 6 or more, letting the paint dry between coates.
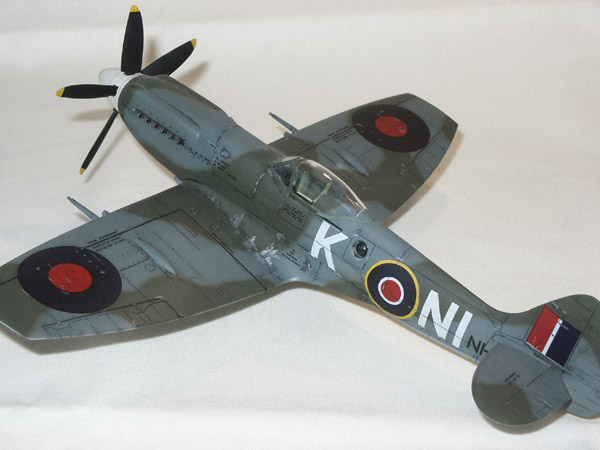
The yellow on the fuselage roundel of this Spitfire Mk XIV was out of register, so I add yellow as outlined above. Not the best pic to show off the roundle, but believe me you have to look really close to spot that anything may have been wrong.


Quoted Text

As for the undercarriage it was perfect when i glued it. but afterwards I noticed that it was not parallel.


Been there too, it's easy to lull yourself into a false sense of security. You test fit the legs and hold them in the correct position, great. Add glue and check position. Great, everything looks perfect, but you have actually been forcing it into position. you leave it to cure and when you get back to it, it ain't straight anymore and the glue has dried. The trick is to know when you are "forcing" something into position. You can only know that by feel. I use super glue (CA) test fit and note any forcing required, remove add the CA into the socket, insert the leg, hold it in position, in no time the glue sets. No worries about returning and finding a problem. It maybe that you are setting the aircraft down on it's undercarriage to soon, before the glue has fully cured. Or if you support the wings and let the wheels hang, they may not be verticle, but that is the natural state they will find..
I wouldn't worry about it, just be aware of it on your next model.
Mal
Bren
_VISITCOMMUNITY
Cape Province, South Africa
Joined: July 07, 2002
KitMaker: 381 posts
AeroScale: 0 posts
Posted: Friday, October 29, 2004 - 08:50 PM UTC
I am going to be so careful with my Boston IV.

Little Nick I use dark brown watercolours paints and let it dry for a minute +/- then rub with moist tissue perpendicular to the panel lines. Works wonders and is quick,cheap and easy.
 _GOTOTOP