_GOTOBOTTOM
General Aircraft
This forum is for general aircraft modelling discussions.
FINISHED Fw-190 D-9
procrazzy
_VISITCOMMUNITY
England - South East, United Kingdom
Joined: November 28, 2004
KitMaker: 359 posts
AeroScale: 0 posts
Posted: Thursday, March 10, 2005 - 10:29 AM UTC
Here are the pics of my ccompleted Fw-190 D-9. Mixture of Hannanys acylcs (for main camo) Tamiya (for washes and cockpit) and humbrol (for red things on wings, tail and tailplane). OOB except for ariel wire.
It you want better pics i sould be able to get some in the next coupple of days.


cheers

Philip
Red4
_VISITCOMMUNITY
California, United States
Joined: April 01, 2002
KitMaker: 4,287 posts
AeroScale: 1,164 posts
Posted: Thursday, March 10, 2005 - 01:47 PM UTC
Philip, not to bad for a 12 year old
Some pointers for you.
1. Your antenna should be tight since the canopy is closed. And its a little thick. Not sure what you used for the antenna, but a good substitute is either 2 pound or 4 pound fishing line. Very thin and easy to glue using super glue.
2. Your decals have what is called silvering. Its air trapped between the decal and the paint. To help avoid this, ensure your model has a nice shiny surface for the decals. They will stick better too. Once they are dry, you can apply a matte coat over them to deaden the finish.
3. It looks like your red/yellow tail band decal cracked on you. An easy fix is to just paint the bands. Mark off and mask the entire band area with masking tape. Spray the yellow and let it dry. Using and additional piece of masking tape, place that over the yellow. Now shoot the red. Let it dry for about 30 minutes or so and then remove all the tape.
4. Looks like you have some frosting on the canopy on the left side. Hard to tell, and it may be the lighting. Make sure if and when you spray any type of matte finishes, to have the clear parts covered or it will fog them. (Also called frost)

Your paint chipping and wear marks look pretty good. Good job on the camo. Did you airbrush this? Also, good job on getting the spinner decal on. I know those can be tricky. Keep at it. You are doing some good work. "Q"
procrazzy
_VISITCOMMUNITY
England - South East, United Kingdom
Joined: November 28, 2004
KitMaker: 359 posts
AeroScale: 0 posts
Posted: Friday, March 11, 2005 - 04:43 AM UTC
The frosting is because the headrest did not fit properly and i had to use some CA (i've got micro crystal clear) and the arial wire (first ever attempt at a wire). The wire is some of my mums 49 strand nylon coated wire for making necklaces (which she does). I did use an airbrush for the camo and varnish. HOw can i get rid of the selvering (i have alleady appled the varnish and i have some micro sol). Thanks for the tip on the defence of the riech band!
What do you think on the canopy masking(which i did using tamiya masking tape, the best in the world) and the wheel bay?

cheers

Philip
Holdfast
Staff MemberPresident
IPMS-UK KITMAKER BRANCH
#056
_VISITCOMMUNITY
England - South West, United Kingdom
Joined: September 30, 2002
KitMaker: 8,581 posts
AeroScale: 4,913 posts
Posted: Friday, March 11, 2005 - 11:03 AM UTC
Red4 has hit on the main points, I'll just expand a little with my own thoughts:
1. The antenna wire. Early model 190's had a tensioning device for the antenna that kept it tought when the canopy was opened. Later marks did not so the antenna became slack when the canopy was opened. Attaching an antenna wire to a scale model is not that easy and takes a little practice. As Red suggests fishing line is suitable but I use smoke coloured invisible mending thread. It's use is described in my Spitfire online build. It was a good attempt Philip, but IMHO, I would remove it (if you can) as it is far to thick and slack and detracts from what is otherwise an excellent model.
2. The decals, overall are pretty good. I've a feeling that you might have the defense bands on back to front or upside down. The edges should be vertical and the decal is shaped to take into account the double compound curve of the fuselage? Probably the most difficult decals to apply are the walkways and you seem to have coped with them pretty well. Red has also explained about silvering. I wouldn't worry to much about it now. There is a fix but can end up looking as bad and that is to paint over the decal, where the silvering occurs. The problem is that you would find it impossible to match the weathering. I had the same problem with the upper wing crosses on my Bf 110G-2 (in features) but I painted over them before weathering. I had put them on over a gloss coat, but they were Revell decals.
3. I would paint the defence bands, not because it is easier but because it looks better. You have to be able to mask straight lines on a double compound curve though. This is quite easy, cut thin strips of Tamiya tape to mask off the outside edges and use the mark one eyeball to check that they are straight.
4. I would never put CA near a clear part. It is possible to get away with it, if you allow the fumes to escape before trapping them. However I would never envisage a situation where CA would be necessary. I have just test fitted the armoured headrest section into the canopy on my 190D-9. I think the problem is that the fit of the 2 pins is to tight. This leaves the armour to low, which would account for your poorly fitting canopy? It is so tight as not to require any form of glue. As it wont sit properly then I would suggest that the solution is to ether drill out the sockets (danger of crcking the canopy) or thinning the pins (preferable if more difficult). I remember when I was young (yes I know a million years ago :-) ) I thought that glue would help a part achieve the correct position? Older and much, much wiser I test fit parts and remady the problem.

Your wash looks quite good, much better than my first attempt at a wash.

The wheel bay looks good, if a little glossy. The cannon loock a good colour. (did you drill them out? [Method coming up in my online build])
The wheel bay pic highlights a wing joint problem. Having test fitted mine I know there is no kit problem, did you use liquid cement? You just require to take a little more care there.

From what can be see the canopy masking looks good, you are to be congratulated. Many modellers really struggle with this aspect. Tamiya tape is very good for this, stick with it, you don't need anything fancy like Parafilm-M, like I use.

Philip, overall a very good first(ish) effort, especially using an airbrush. As I said before, the biggest problem for a 12 year old is lack of patience. I applaud you for what you have achieved, aim to take it forward with each new model. Take head of the advice you are getting and keep asking when you need help and it wont be long before you are building show stoppers
Good on yer cobber.
Mal
procrazzy
_VISITCOMMUNITY
England - South East, United Kingdom
Joined: November 28, 2004
KitMaker: 359 posts
AeroScale: 0 posts
Posted: Friday, March 11, 2005 - 11:40 AM UTC
THANK YOU

So should i remove the wire?
Also, when dooing the invasion stripes on the typhoon, should i use the kit black decals, or paint all the stripes?
I keep on telling myself that i could have done better, but then i think that this is my first 'proper' model that i have done. All you amazing modellers who produce show-stoppers every time have (usually) been modelling for 10+ years, so practice DEFINATLY makes perfect.

cheers

Philip
Holdfast
Staff MemberPresident
IPMS-UK KITMAKER BRANCH
#056
_VISITCOMMUNITY
England - South West, United Kingdom
Joined: September 30, 2002
KitMaker: 8,581 posts
AeroScale: 4,913 posts
Posted: Saturday, March 12, 2005 - 12:41 AM UTC
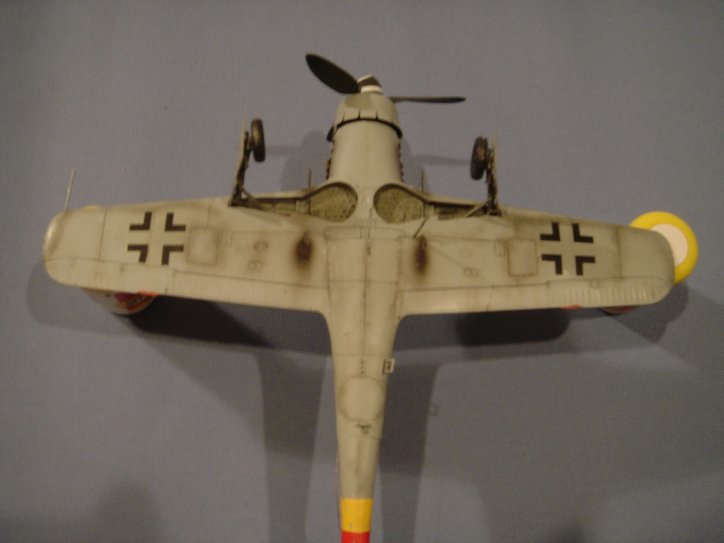
Philip, don't kick yourself you have done very well, seriously all you need to do is to have a lot more patience. I know that is a difficult thing to ask of a 12 year old but it will help to improve your standards. Test fit everything, if it doesn't appear to fit properly find out why and try and fix the problem. It might be the parts need trimming or even the alignment pins can be the problem. There might be no fix and therefor filling after fixing might be the way to go. A good example of this is the starboard wing on the Tamiya Spitfire Mk 1. I added a small piece of sprue at the deepest cord position (cord is the wing front to rear, the airfoil section) to lift the end of the wing. This eliminated a slight step at the wing root joint and meant that no filler was required. The port wing didn't have this problem. Sometimes you can achieve a better wing to fuselage join if you brace out the fuselage to meet the wings. It is just a case of working out the fix. This is one reason why it is better to use liquid cement, you can hold parts together while running in the cement, by capillary action, making for a much neater join.

Quoted Text

I keep on telling myself that i could have done better, but then i think that this is my first 'proper' model that i have done.


You have a lot to learn but you're lucky in having the Internet so, if you stick with it your learning curve will flatten far quicker than mine did. Remember a badly assembled model will ruin a good paint job and well assembled model will be ruined by a bad paint job. There is no easy way out you just have to learn, but above all never loose sight of the fact that this is all about having fun. We'll have you taking top junior prize at Telford in a couple of years

Quoted Text

Also, when doing the invasion stripes on the typhoon, should i use the kit black decals, or paint all the stripes?


I think you will have a difficult time if you use the decals, read my account of how I did this in "Storm Warning" in the features section. I did it as an experiment and it is infinitely easier to mask and paint the stripes. I would paint the ID elements as well, the Sky band and the yellow leading edges.

When masking on compound curves, or any detail masking:
1. Use Tamiya tape (it is the best)
2. Lay a piece on a sheet of glass, or ceramic tile and, using a steel ruler and a sharp knife, cut a thin strip of tape.
3. Using the cut edge as the masking edge (the original edge may have fibres adhering to it) lay the tape in position. Eyeball down it's length to keep it straight as you go around the fuselage. Don't be satisfied with it if it ain’t straight, or doesn't go where it's supposed to.
4. Once the 2 outer edges have been defined this way fill in with wider but much shorter pieces (try wider long pieces and you will see why you use thin pieces for the outside edges )
5. Spray the next colour.
You will always find it easier to paint a colour the mask it out. If for any reason you have to mask then paint the colour you will find it difficult to subsequently mask this colour and paint up to it (you will either not mask to the edges, therefor narrowing the masked area. Or you will over mask and leave an unpainted part when the mask is removed) You can overcome this problem by laying the new masking down before removing the original, butting new to old. One of the skills required for successful airbrushing is the ability to mask well.
You are correct practice makes perfect. There is no easy route.

Quoted Text

So should i remove the wire?


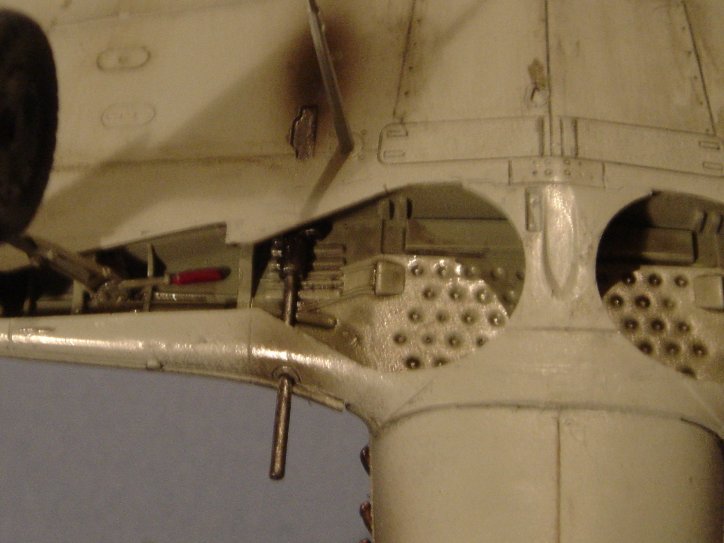
The choice is, of course, yours. I think it is to far out of scale and is not taught so it detracts from what is otherwise a nice model. So, if it's easy to do, I would remove it. You can always add it later, when you have got your head around how to do it with fishing line or mending thread. An antenna wire will always add an air of authenticity but to look right it must be close to scale. On a FW 190 and other aircraft where the wire enters the canopy, there is the added complication of showing the wire on the inside. This is not such a problem if the canopy is shown open but if closed it is something to think about. (We'll see how I cope with this in my online build
Also be assured that probably all those show stopping models encounted a problem or two on the way. It's just that with practice you will find out how to overcome them. Happy Typhooning
Mal
Red4
_VISITCOMMUNITY
California, United States
Joined: April 01, 2002
KitMaker: 4,287 posts
AeroScale: 1,164 posts
Posted: Saturday, March 12, 2005 - 03:28 PM UTC
Philip, As Mal told you, don't beat yourself up. You are a far cry ahead of most 12 year old builders. Patience, patience, patience. The silvering on the decals can be fixed by another means. It takes a light touch to do, but it can be done. Using a new #11 blade, or a sewing needle, poke a small hole or make a small slit where you see the silvering. Touch a small amount of setting solution over this area. You should be able to see it working its way under the decal. Another, more aggressive approach is to use masking tape and remove the decals, and then re-do them. The last is probably the most drastic. A lot of decal problems are due to the decals themselves. Some won't respond to setting solutions others won't release from the carrier paper! . Here's another tip for you for future builds. When it comes time to mask your wheel wells for painting the bottom of the fuselage. Use some Silly Putty. It conforms easily to any shape, and if let alone for a few minutes, will find its way into all the nooks and crannies so no paint will foul anything. It is easy to remove as well, leaving you with a nice crisp demarcation line from one paint color to the next. Your canopy looks pretty good from what I can see. Super glues and clear parts don't mix. If aat possible, use white glue or glues especially designed for attaching clear parts. Future and even Krystal Kleer work great. Keep on building. you're doing great. "Q"
Holdfast
Staff MemberPresident
IPMS-UK KITMAKER BRANCH
#056
_VISITCOMMUNITY
England - South West, United Kingdom
Joined: September 30, 2002
KitMaker: 8,581 posts
AeroScale: 4,913 posts
Posted: Sunday, March 13, 2005 - 01:03 AM UTC
Nice one Red,
Philip, another point about decals and setting solutions. All setting solutions are not compatible with all decals and vica versa. I have found that Gunze Mr Mark Setter (on it's own) works very well on decals in Japanese kits.
Mal
 _GOTOTOP