_GOTOBOTTOM
World War II: Germany
Aircraft of Germany in WWII.
Hosted by Rowan Baylis
Ju 87A
Merlin
Staff MemberSenior Editor
AEROSCALE
#017
_VISITCOMMUNITY
United Kingdom
Joined: June 11, 2003
KitMaker: 17,582 posts
AeroScale: 12,795 posts
Posted: Sunday, April 03, 2005 - 05:04 AM UTC
Hi there

Good grief! Merlin's actually building something!

I decided I need a nice straightforward kit to get me back into the swing of things, so I did the logical thing and completely ignored my stockpile of Tamigawa and Accurate Minitatures kits and chose... Special Hobby's short-run 1/48 scale Ju 87A!

So far things actually look pretty encouraging; the main parts test fit well enough and I've cleaned up the resin cockpit which should look good painted.


At the rate I've been building lately, this one should take a while, but I'll add pics as and when I make progress.

All the best

Rowan
Pixilater
_VISITCOMMUNITY
Massachusetts, United States
Joined: March 16, 2005
KitMaker: 231 posts
AeroScale: 0 posts
Posted: Sunday, April 03, 2005 - 05:50 AM UTC
Looks like a great 'pit, Rowan.
I've been thinking of picking up that Anton. I've never seen the sprues, or one that's been built.

Looking forward to the progress !
Merlin
Staff MemberSenior Editor
AEROSCALE
#017
_VISITCOMMUNITY
United Kingdom
Joined: June 11, 2003
KitMaker: 17,582 posts
AeroScale: 12,795 posts
Posted: Sunday, April 03, 2005 - 07:43 AM UTC
Cheers Bill

Yeas, the resin parts are pretty good. The instructions call out some scratchbuilding... the rear gun-mount for instance, but nothing major.

The parts match up with my refs pretty well, but I think the gunner's chair should be a wire frame, so I may see if I can thin the resin part down enough to depict that.

The one odd omission in the kit is the belly-window. When I first got the kit some years back, I didn't have any Anton refs that showed the undersides, so I couldn't conform whether the kit was right or wrong. When I finally tracked down some pics, there was the window - large as life. So I'll be adding that.

I'm afraid I can't show the sprues - I've already cut most of the parts off, but I'll add more pics to this thread once I make some progress.

All the best

Rowan
wingman
_VISITCOMMUNITY
Pennsylvania, United States
Joined: December 09, 2003
KitMaker: 880 posts
AeroScale: 654 posts
Posted: Sunday, April 03, 2005 - 09:10 AM UTC
Hey Rowan. Like Bill said, the resin looks nice. Looking forward to seeing some progress pics. I looked in my book[Squadrons Ju 87 in action No.73] and it shows an interior drawing of a Ju-87 A-2 that has a wire frame seat for the gunner, hope this helps, Wingman out.
Merlin
Staff MemberSenior Editor
AEROSCALE
#017
_VISITCOMMUNITY
United Kingdom
Joined: June 11, 2003
KitMaker: 17,582 posts
AeroScale: 12,795 posts
Posted: Sunday, April 03, 2005 - 09:21 AM UTC
Cheers Michael

Methinks some extra thinning wil be in order!

All the best

Rowan
Pixilater
_VISITCOMMUNITY
Massachusetts, United States
Joined: March 16, 2005
KitMaker: 231 posts
AeroScale: 0 posts
Posted: Tuesday, April 05, 2005 - 03:52 PM UTC
Rowan - I just found this, and it may be useful to you. It confirms your theory about the rear seat too. It's a zip file, just extract it.
http://www.airwar.ru/other/draw/ju87.html
Hope this helps !
Merlin
Staff MemberSenior Editor
AEROSCALE
#017
_VISITCOMMUNITY
United Kingdom
Joined: June 11, 2003
KitMaker: 17,582 posts
AeroScale: 12,795 posts
Posted: Tuesday, April 05, 2005 - 06:00 PM UTC
Hi Bill

That's fantastic! I've actually got that Russian site on my favourites list and never thought to check for the Anton... Doh!

Those plans will be a big help... the seat and gun mount are really clear - plus more confirmation of the belly window.

I've got no excuses for not getting stuck in now!

Many thanks

Rowan
csch
_VISITCOMMUNITY
Buenos Aires, Argentina
Joined: December 27, 2002
KitMaker: 1,941 posts
AeroScale: 1,040 posts
Posted: Wednesday, April 06, 2005 - 05:40 AM UTC
Great looking cockpit. Please post more pics when you advance in your model.

Cheers.
Holdfast
Staff MemberPresident
IPMS-UK KITMAKER BRANCH
#056
_VISITCOMMUNITY
England - South West, United Kingdom
Joined: September 30, 2002
KitMaker: 8,581 posts
AeroScale: 4,913 posts
Posted: Wednesday, April 06, 2005 - 07:18 AM UTC
Nice one Rowan, I'm looking forward to seeing this develope. Remember there are 24 hours in a day so no excuse for slacking. Work 8 hours edit on Armorama 8 hours build Anton 8 hours. So you see you have plenty of time, 8 hours a day, so you should easily finish in a couple of weeks
Mal
Merlin
Staff MemberSenior Editor
AEROSCALE
#017
_VISITCOMMUNITY
United Kingdom
Joined: June 11, 2003
KitMaker: 17,582 posts
AeroScale: 12,795 posts
Posted: Saturday, April 09, 2005 - 08:11 AM UTC
LOL! :-) Just to stun Mal, I actually DID do a little work on the Junkers last week...

Seeing as this seems to be an unexpectedly rare bird (I'm SURE I found an online build a couple of years ago, but I can't track it down now...), I'll start with an appraisal of the interior parts.

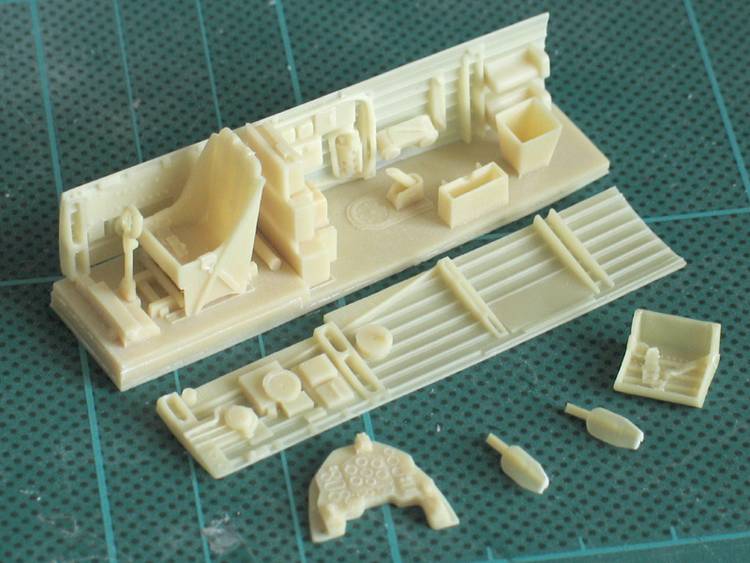
Basically, the resin parts show every sign of being modified from the Hasegawa kit. I spotted this, following the helpful posts about the tubular gunner's seat. I was doubtful about how my efforts to thin the resin item would work, so I pulled the Hasegawa kit down from the shelf ready to copy the dimensions of the seat for a scratchbuilt item.

Anyway... I found one similarity after another... unfortunately including the instrument panel - which should be different for the Anton. LOL! I don't believe it! On the last kit I built (Accurate Miniature's Mustang 1) I had to scratchbuild the instrument panel... oh well, here we go again!

So... back to the build. I did thin out the gunner's seat. As cast in resin, it includes a "back-plate" and partial "bum-rest" - I can't confirm them, but they look neat. My gunner will ride in semi-comfort! I hollowed out the seat and added cross-tubes. The result's not too bad - and certainly quicker than the scratchbuild I'd resigned myself to!


I attached the sidewalls to the fuselage sides (Superglued (CA) at the top only - to allow them to flex). I've added a basic structure inside the rear fuselage - no claims for accuracy (i.e. it isn't! ) as a "just in case" something's visible beyond the resin parts.


I've primed everything and will try to do some painting tomorrow. I'm still doing battle with the gunner's set-up... conflicting refs! It'll just have to come down to a toss of the coin!

All the best

Rowan
Pixilater
_VISITCOMMUNITY
Massachusetts, United States
Joined: March 16, 2005
KitMaker: 231 posts
AeroScale: 0 posts
Posted: Saturday, April 09, 2005 - 12:29 PM UTC
Looking good, Rowan !

Always a good idea to add a little extra detail. If it will be seen, and you don't add it, it will be too late to go back (at least that's the way it always happens to me !).

Nice job with the cutout around the belts ! It can be easy to break resin parts when you're working in confined areas like that. The rear seat's back plate is probably a kidney protector for travelling over those rough grass airfields !

Looking forward to some paint !
 _GOTOTOP