_GOTOBOTTOM
World War II: Germany
Aircraft of Germany in WWII.
Hosted by Rowan Baylis
Luftwaffe winter camouflage?
Emeritus
_VISITCOMMUNITY
Uusimaa, Finland
Joined: March 30, 2004
KitMaker: 2,845 posts
AeroScale: 1,564 posts
Posted: Sunday, April 03, 2005 - 11:45 PM UTC
I have started my dragon Fw190 A-4 and I think I'm going to make this butcher bird with the markings for the commander of JG54, Hannes Trautloft. The main reason for this choice is that it has white winter paint-job. (no soft-edged camo)
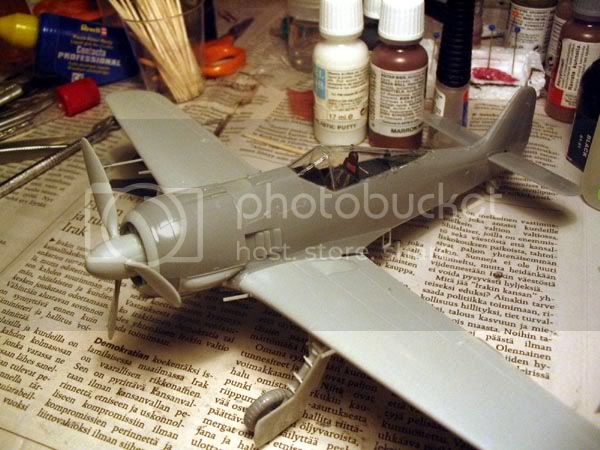
I'm building this as a fun quick project before the annual finnish model expo later this month (22.-24.4) so I'll experiment with panel line washes and maybe a little with weathering.
One thing I can't work out is that how should I paint my bird. The instructions show a scheme of white on the upper surfaces + some patches of light grey and light grey in the lower surfaces.

But after searching for info on the internet I found out that the winter camouflage was all-over white. Also, the osprey's book "Focke Wulf Fw190 Aces of the Russian front" has a drawing of this particular fighter and the text says it had a white winter camouflage.
Am I doing something wrong if I just paint the whole thing white plus the yellow eastern front bands?
I don't have an airbrush so I don't try painting the normal camouflage scheme underneath the white paint. Additionally, I'll make this a clean one with little weathering.
I'll be grateful if you luftwaffe expert can help me out.
lordQ
_VISITCOMMUNITY
Oost-Vlaanderen, Belgium
Joined: June 21, 2004
KitMaker: 530 posts
AeroScale: 0 posts
Posted: Monday, April 04, 2005 - 12:15 AM UTC
winter washes were not clean!
they were applied in the field with a mixture with white chalk. After a few flights the white would almost disappear.
Paint the underlying camo-pattern with enamel and paint the white-wash with diluted water-based paint.
You can simulate the wear en tear by rubbing on the white paint on some places with a moist Q-tip.
(Try following the airflow)
I hope it works without the airbrush.

cheerz Q.

Emeritus
_VISITCOMMUNITY
Uusimaa, Finland
Joined: March 30, 2004
KitMaker: 2,845 posts
AeroScale: 1,564 posts
Posted: Monday, April 04, 2005 - 01:16 AM UTC
Okay. Now I just need to know the camo pattern that was used underneath the white wash. On the Osprey book there was a couple of pics of Focke Wulfs from JG54 that had a two-color camo. Light green and dark green. Would this kind of a camo be okay?
While seaching the web, I found this page: http://modelingmadness.com/others/features/cleaverwintercamo1.htm
The model there had the camo painted underneath the white wash. (it's actually the same as mine) That seems to be a heavily applied wash (or a new one) so I thought it would probably be easier to paint the whole model white and the weather it. The original camo can hardly be seen there. I think that by skipping the original camo I minimize the chances that my painting fills up the engraved details.

I had in mind to paint the white with a spray can, so I can get a gloss decal-ready surface right away. I could then put on the decals and seal them and then start adding dirt and paint wearing effects.
lordQ
_VISITCOMMUNITY
Oost-Vlaanderen, Belgium
Joined: June 21, 2004
KitMaker: 530 posts
AeroScale: 0 posts
Posted: Monday, April 04, 2005 - 03:08 AM UTC
linkname

I wouldn't paint the model completly white...sorry if i say but it's a little boring
The picture in the link above shows a more intresting subject and i think this one is also easy to recreate with rattlecans.
If you use rattlecans beware not to paint too thik!
I used those (very expensive ) cans before i had an airbrush. Believe me ..buy an airbrush.Those spraycans cost 5-7 euro. I bought an airbrush (H S evolution for 110 euro and use my garagecompressor.) It's a little expensive ..but it's really worth it!

cheerz Q. I'd love to see the final result.
Emeritus
_VISITCOMMUNITY
Uusimaa, Finland
Joined: March 30, 2004
KitMaker: 2,845 posts
AeroScale: 1,564 posts
Posted: Monday, April 04, 2005 - 05:29 AM UTC
The real problem with those really attractive colour schemes is finding spray cans of right colors.. Tamiya probably has those but you can't find those anywhere in Finland.
I think I'll just do a winter camo on this one and use this to experiment with weathering.
Btw. What color should I use with landing gear and wheel wells? The instructions only refer to gunze sangyo paints unavailable in Finland. I use mainly Humbrol and vallejos.
BigTon
_VISITCOMMUNITY
District of Columbia, United States
Joined: February 12, 2005
KitMaker: 102 posts
AeroScale: 0 posts
Posted: Monday, April 04, 2005 - 01:58 PM UTC
Hey Emeritus-

I'm sorry you're having trouble locating the right paint color...
maybe this will help- It's a listing of RLM colors from most every major manufacturer... Just scroll down the page and you should see the color listing for enamel and acrylic paints...


Good luck!

http://cybermodeler.com/color/rlm_ww2.shtml

-Scott
Holdfast
Staff MemberPresident
IPMS-UK KITMAKER BRANCH
#056
_VISITCOMMUNITY
England - South West, United Kingdom
Joined: September 30, 2002
KitMaker: 8,581 posts
AeroScale: 4,913 posts
Posted: Monday, April 04, 2005 - 10:49 PM UTC
Hi Eetu,
If you only have rattle cans then you could just spray the model uppersurfaces white, the undersurfaces would not be painted with the winter camo and would remain RLM 76 Lichtblau (light blue) a light blue grey colour.
The underlying camo according to your Osprey book sound like it would have been RLM 82 Dunklegrun (dark green) and RLM 83 Lichtgrun (light green). I think this was the camo used by JG54 on the Russian front?
I think that if you simply paint your 190 white it will look like a white painted aircraft. I would suggest that you consider hand painting the uppersurface camo. Because you are going to cover it you might get away with just painting a green colour (however the effect is better when the camo is done more accurately, but it won't need to be to accurate.) Because the winter scheme is a whitewash and, although possibly applied by spraygun, complete coverage probably wasn't even attempted and therefor it would be thin in places. It would weather quickly and not be white for very long, if at all. So if you then just mist on the white, over the green, allowing the green to show through in varying amounts it will look better. Then do as Quinten suggests and use a q-tip to remove a little of the whitewash, in the direction of the airflow.
Here is a link to my article on a winter whitewash scheme applied to a Hs 129, you will note that I didn't use white. Henschel in the snow
If you still feel you would like to just spray a single colour then that's cool, you model will have just come from the painters
Mal
EDIT: Sorry, I forgot to mention that the undercarriage, legs, wheel bays and inside main gear doors was RLM 02 Grau (Grey) actually a light greenish grey. The wheels themselves are gloss black. Same as my Hs 129.
Emeritus
_VISITCOMMUNITY
Uusimaa, Finland
Joined: March 30, 2004
KitMaker: 2,845 posts
AeroScale: 1,564 posts
Posted: Tuesday, April 05, 2005 - 01:23 AM UTC
Thanks for the pointers
Doing the basic camo first doesn't seem so difficult. Maybe I'll give it a try.
now I need to go and buy some paints so I can finish my bird. I'm now almost ready to install the cockpit and the wings. This dragon kit seems to be a nice one. Except for some of the PE parts. The thicker ones are 0.3mm thick and the beam between the headrest is impossible to bend! It's a narrow beam with a slot in the end and "wings" in one end were the slot is. These "wings" are then supposed to be bent down. I've broken the part so now I'll have to scratch it somehow.

It seems like the markings on white-washed aircraft were protected before applying the white. So I first paint the camo, put on the decals, protect the whole thing with and then mask the markings and lower surface and star shooting on the white.
Holdfast
Staff MemberPresident
IPMS-UK KITMAKER BRANCH
#056
_VISITCOMMUNITY
England - South West, United Kingdom
Joined: September 30, 2002
KitMaker: 8,581 posts
AeroScale: 4,913 posts
Posted: Tuesday, April 05, 2005 - 04:18 AM UTC
Yes Eetu, sorry forgot to mention. If you are going to apply the camo colours then I would suggest applying a closs coat then the decals. I use johnsons Klear (Future in the US) and I brush it on explained here The Future is Klear I would then apply another couple of coats. This will protect the paint and the decals so if you mess up the application of your whitewash you can remove it (well it depends on what paint you use I use enamels and would use white spirit to remove it) White spirit will not attack the acrylic Klear coats.
I would imagine that the markings could also be sprayed around but if you are using a rattle can then Blue Tac, or similar would be good. Have fun
Mal
Emeritus
_VISITCOMMUNITY
Uusimaa, Finland
Joined: March 30, 2004
KitMaker: 2,845 posts
AeroScale: 1,564 posts
Posted: Tuesday, April 05, 2005 - 05:48 AM UTC
I was thinking about applying the white wash with a spray can. I could get a proper sprayed-on look by spraying the white on with an uneven pattern and then add additional washing with white acrylic. I can then wipe off the excess acrylic as the spray white I'm going to use is gloss.
On this site: http://modelingmadness.com/others/features/cleaverwintercamo1.htm the white coat seems pretty fresh, green only shows well on the leading edges. Strangely the guy applied the decals after the white coat.

Btw, are those props black? The instructions in the kit tell to paint them black green.
Merlin
Staff MemberSenior Editor
AEROSCALE
#017
_VISITCOMMUNITY
United Kingdom
Joined: June 11, 2003
KitMaker: 17,582 posts
AeroScale: 12,795 posts
Posted: Tuesday, April 05, 2005 - 07:50 AM UTC
Hi Eetu

You'd need to check the references for the particular machine, but I think it was more likely to be be a VDM metal propeller on an A-4. Most of my reference pics of "pranged" A-4s show bent (i.e. metal) blades.

Hope this helps

Rowan
csch
_VISITCOMMUNITY
Buenos Aires, Argentina
Joined: December 27, 2002
KitMaker: 1,941 posts
AeroScale: 1,040 posts
Posted: Tuesday, April 05, 2005 - 09:28 AM UTC
Hi Emeritus:

I think I can help you in this one.
I have the Aeromaster decal Set for the JG 54 Green Hearts and it contains a description of the winter camo used by Kommodore Hannes Trautloff in 1943 in the Rusian front. The aircraft is a FW 190 A4.
It says:

"Scheme is crude white wash over camouflage of RLM 74/75/76. No white on upper cowling. Spinner is white. RLM 04 Gelb wingtips, fuselage band and lower cowling."

In another picture that I have of this aircraft it seems that the white wash is oversprayed the standard camo for that period that shows through very slightly in some places.

In my article published here in Armorama in the Features section about German Camouflage in WW2 you will find some help about the RLM colours and eq. in diferent paint brands.

Bye.
Emeritus
_VISITCOMMUNITY
Uusimaa, Finland
Joined: March 30, 2004
KitMaker: 2,845 posts
AeroScale: 1,564 posts
Posted: Tuesday, April 05, 2005 - 08:48 PM UTC
Thank you guys for these tips!
The kit propeller looks like this: Image hosted by Photobucket.com 
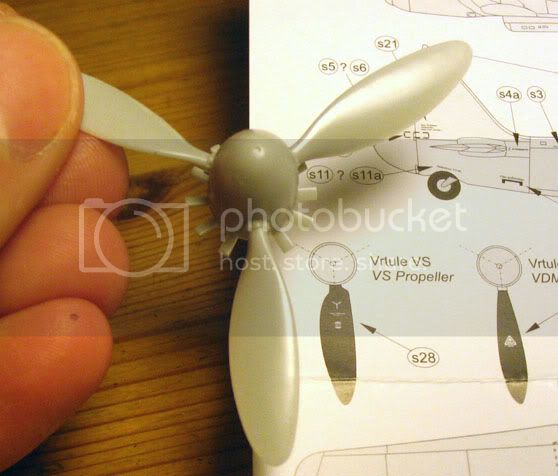
The background shows the instructions of a Tallyho! Decals stencil set. What type is this prop? Looks like a VS prop to me.

I'll go and buy some paints today. I think I'll do a single-color green camo on the upper surfaces, if the white coat didn't show much of the original multi-color camo scheme.
Holdfast
Staff MemberPresident
IPMS-UK KITMAKER BRANCH
#056
_VISITCOMMUNITY
England - South West, United Kingdom
Joined: September 30, 2002
KitMaker: 8,581 posts
AeroScale: 4,913 posts
Posted: Wednesday, April 06, 2005 - 07:10 AM UTC

Quoted Text

Btw, are those props black? The instructions in the kit tell to paint them black green.


The kit instructions are correct, Luftwaffe prop blades were painted RLM 70 Schwartzgrun (Black Green). Metal blades will always show some loss of paint, even if only on the leading edge. They are moving so fast friction with the air would account for this. Add dusty or other harsh conditions and more removal of paint would take place. For the life of me I can't imagine what the mail has to do with it?
Mal
CRS
_VISITCOMMUNITY
California, United States
Joined: July 08, 2003
KitMaker: 1,936 posts
AeroScale: 1,168 posts
Posted: Wednesday, April 06, 2005 - 07:40 AM UTC
Well I hate to disagree with individuals with as much knowledge as Merlin and Holdfast, but my research has shown that there was a great variety of props used on the 190 variants. Both wood and metal depending on engine fitted. Much experimentation as illustrated by the photo provided by Eetu.

The kit prop in the photo appears to be the constant speed, broad cord, wooden prop, the two in the instructions appear to be the metal variants.

Depending on the time frame wooden props were either RLM71 Dunkelgrun or RLM70 Schwarzgrun, both are pretty close to one another RLM70 being the darker color. As Holdfast says all metal props for the 190 would have been Schwarzgrun RLM70.

For some reason, I could not clarify, aircraft designated for Fighter-bomber roles were built with wooden props while Fighter aircraft carried metal ?
Merlin
Staff MemberSenior Editor
AEROSCALE
#017
_VISITCOMMUNITY
United Kingdom
Joined: June 11, 2003
KitMaker: 17,582 posts
AeroScale: 12,795 posts
Posted: Wednesday, April 06, 2005 - 08:04 AM UTC
Hi again

I had a look at an old TriMaster 'A-8 and it has the same prop. It's really quite weird... it has a broad-blade look similar to the VS wooden propeller in your drawing, , but lacks the distinctive "notch" on the leading edge.

It's vaguely similar to a wooden 9-12176A propeller (not very...), but the profile's really just more like an extremely fat, standard 9-12067 metal prop... LOL! :-)

So I don't know what it is... but, in looking for it in my refs, I haven't managed to find an A-4 with a propeller anything like it...

That's probably not much help at all!

All the best

Rowan
CRS
_VISITCOMMUNITY
California, United States
Joined: July 08, 2003
KitMaker: 1,936 posts
AeroScale: 1,168 posts
Posted: Wednesday, April 06, 2005 - 08:18 AM UTC
I think this is your prop.
http://www.philsaeronauticalstuff.com/oddsnends/fw-190a8/images/Fw-190A-01.jpg
Not and A4 but an A8.
Merlin
Staff MemberSenior Editor
AEROSCALE
#017
_VISITCOMMUNITY
United Kingdom
Joined: June 11, 2003
KitMaker: 17,582 posts
AeroScale: 12,795 posts
Posted: Friday, April 08, 2005 - 08:51 AM UTC

Quoted Text

Do I hear a DUUUUUUH in the background?


LOL Tom!

Why ever should I impersonate Homer Simpson at the prospect of fresh info? You know me better than that!

That's fantastic! The only pics I've got of thw 190 V1 show metal props - the prospect of wooden ones too is really exciting!

I've always said it's a shame we can't sit down over a beer with our reference books. The slight problem of the Atlantic is the only thing that makes me do a Homer!

All the best as ever

Rowan
Emeritus
_VISITCOMMUNITY
Uusimaa, Finland
Joined: March 30, 2004
KitMaker: 2,845 posts
AeroScale: 1,564 posts
Posted: Friday, April 08, 2005 - 07:34 PM UTC
Now I've finished building this bird. Here's a quick sneak & peek pic: Image hosted by Photobucket.com

The kit went together smoothly. The only problems were with the fit of engine cowling to the wings' lower surfaces, there was a gap I had to fill with thin sheet styrene and super glue. I'm pretty happy with it, except that some dust got trapped to the inside of the canopy. I'm sure I've checked the canopy and cockpit before gluing the canopy, and there's still some on the inside. You just can't beat dust. It's cunning and always two steps ahead of you! :-)

And one more question before I start painting. Stencils were overpainted when white wash was applied, right? And only larger markings were masked?
Merlin
Staff MemberSenior Editor
AEROSCALE
#017
_VISITCOMMUNITY
United Kingdom
Joined: June 11, 2003
KitMaker: 17,582 posts
AeroScale: 12,795 posts
Posted: Friday, April 08, 2005 - 08:10 PM UTC
Hi Eetu

Nice job!

You've hit the two sticky points with TriMaster / Dragon 190As... the cowling and the wing-roots. I don't think anyone's found a foolproof way of tackling the multi-part cowling; it just takes care and patience. The wing-root can be made a much better fit by adding spreader bars inside the fuselage. Fitting them is a bit trial and error, but it avoids using so much filler later.

Tough luck with the canopy - trapped dust is always a danger if it's fixed on. I usually attach it very late in the build to try to minimise the chances of dust inside, but it can still happen.

Stencils? Yes, they were mostly painted over. Because the temporary white finish was applied at unit-level, there was a lot of variation in how it appeared. The serial number was often left visible on a rectangular patch of original camouflage, as were the "hier aufbocken" ("jack here") markings for the fuselage jacking-point. I imagine the fuel-type triangles would be left unpainted too.

Hope this helps.

Rowan
Emeritus
_VISITCOMMUNITY
Uusimaa, Finland
Joined: March 30, 2004
KitMaker: 2,845 posts
AeroScale: 1,564 posts
Posted: Friday, April 08, 2005 - 10:13 PM UTC
I think I've got a goog (if not fool-proof) way to assemble the cowling. First I glued the upper cowling to the engine-front part, then the lower cowling to the nose-upper part. Finally, I could fit the separate side panels with ease. They required just a little filing, but fit fine after some work.

Thanks for the tips. I've started priming now. I first painted the canopy black, so I get dark insides for the framing. Black grey would have been proper, but acrylics just don't stick to bare plastic. So black it is then. Next I'll prime the rest of the plane with grey and start on the main colors.
Cheers
lordQ
_VISITCOMMUNITY
Oost-Vlaanderen, Belgium
Joined: June 21, 2004
KitMaker: 530 posts
AeroScale: 0 posts
Posted: Friday, April 08, 2005 - 11:27 PM UTC
....nice build. Now paint the thing!

succes
 _GOTOTOP