_GOTOBOTTOM
General Aircraft
This forum is for general aircraft modelling discussions.
Wacky decals
Emeritus
_VISITCOMMUNITY
Uusimaa, Finland
Joined: March 30, 2004
KitMaker: 2,845 posts
AeroScale: 1,564 posts
Posted: Saturday, April 16, 2005 - 11:23 PM UTC
Mates, prepare to see some decal gone wrong!

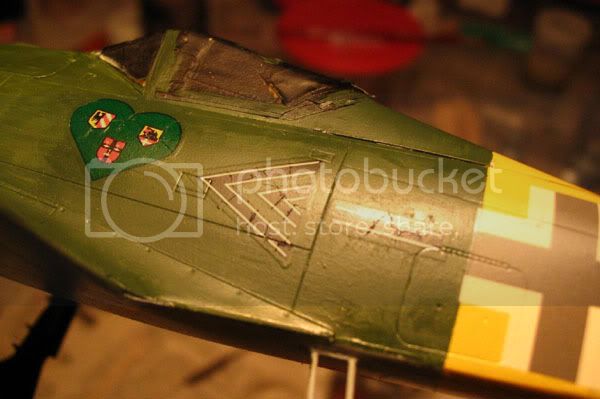
I have been working on my dragon's Focke Wulf and the project had gone (almost too) smoothly, until I started applying the decals. They were quite thick and I thought they would benefit from micro sol. So on they went. This is how they looked some minutes after applying micro sol:
Image hosted by Photobucket.com
The plane is painted first with vallejos primer. Then I painted it with a suitable green (it's now white, for a winter camo), brushed on a coat of floor wax (same as future). I haven't had this kind of problem ever before. What's even more strange, the cross on the yellow eastern-front band didn't wrinkle. That one is applied straight over humbroll gloss yellow. Zero wrinkling. Also, microscale swastikas on tail went on perfectly.
There were no air bubbles trapped under the decals and the paint and floor wax were both properly dried.

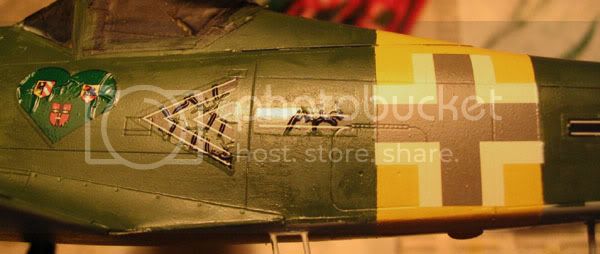
I thought that the decals would level overnight. No changes for the better after some time,so I punctured each wrinkle and applied more micro sol. This is how the decals looked the next morning:
Image hosted by Photobucket.com
They still show ugly crack-like wrinkles. How can this be possible? Some smaller decals, like stencils, worked perfectly with micro sol, while the largest ones got ruined like these ones. Wing crosses got ruined as well, when I only applied micro sol on them, no puncturing. And still they got wrinkled. Strange!
Wiser, I didn't use any solutions on the crosses on wing undersides, and they worked okay.

Can aged decal get this ruined? The kit was from 1995 (or '94). Next time I'll definitely try left-over decal first to test them before I ruin my model with them.

Cheers
Merlin
Staff MemberSenior Editor
AEROSCALE
#017
_VISITCOMMUNITY
United Kingdom
Joined: June 11, 2003
KitMaker: 17,582 posts
AeroScale: 12,795 posts
Posted: Sunday, April 17, 2005 - 06:49 AM UTC
Hi Eetu

Thanks for the heads-up. That's really weird - I know Holdfast says Mr Decal Softener works best on some of the decals from the Far East, but I've never come across a kit where different items on the same decal sheet react so differently to Micro Sol.

The advice is always to try a spare decal first, but I must admit I'm guilty of ignoring that as often as not. Anyway - in this case, as you say, some of the decals worked fine... so you might still have been caught out.

All the best

Rowan
CRS
_VISITCOMMUNITY
California, United States
Joined: July 08, 2003
KitMaker: 1,936 posts
AeroScale: 1,168 posts
Posted: Sunday, April 17, 2005 - 06:59 AM UTC
Truely strange reaction, I've never seen that before and I work with alot of old decals, but I don't have a Dragon kit in my stash. Looks like some kind of contamination ? I feel your pain !
BigTon
_VISITCOMMUNITY
District of Columbia, United States
Joined: February 12, 2005
KitMaker: 102 posts
AeroScale: 0 posts
Posted: Sunday, April 17, 2005 - 07:08 AM UTC
That's a real bummer Eetu-
Sorry you had some bad luck! I've never seen anything like that happen before... hopfully I won't ever have that experience first hand! But I do kind of feel your pain....

On my Hellcat Mk1 I accidentally handled the kit before the decals had set up... totally unaware of what I had done I sealed on the decals with my dull coat only to notice that the national ensignia on the right side of the fuselage was egg-shaped! :-) :-) :-) oh well! That's why all my pic's are of the left side

I'm excited to see your winter cammo scheme!

-Scott
procrazzy
_VISITCOMMUNITY
England - South East, United Kingdom
Joined: November 28, 2004
KitMaker: 359 posts
AeroScale: 0 posts
Posted: Sunday, April 17, 2005 - 07:33 AM UTC
Did you try to orrect the decals before the micro set had dried? If you did, than that is probbably the problem. Also, the fusalage cross looks fine. Is it from a diffrent decal sheet (ie were there more than one decal sheets on the kit). what brand paint did you use for the green? Mabye the floor wax reacted with the mocro sol before it could evaporate?

cheers

Philip
Holdfast
Staff MemberPresident
IPMS-UK KITMAKER BRANCH
#056
_VISITCOMMUNITY
England - South West, United Kingdom
Joined: September 30, 2002
KitMaker: 8,581 posts
AeroScale: 4,913 posts
Posted: Sunday, April 17, 2005 - 09:54 AM UTC
Weird?
I can only imagine that the smoothness of the paint, or lack of? has stopped the decals from settling down. Just a stab in the dark. I don't think there is a fix, apart from removing them and trying different decals. You could try sanding the offending bumps, then touching up. Sand with 1000 grade or finer and go gently with just a corner op the emery paper. If you haven't got such fine emery paper, take a piece of your finest, tare in half and rub these 2 halves together, this will half the grit. A drastic way out but............
Mal
brandydoguk
_VISITCOMMUNITY
England - North, United Kingdom
Joined: October 04, 2002
KitMaker: 1,495 posts
AeroScale: 643 posts
Posted: Sunday, April 17, 2005 - 03:18 PM UTC
Hi Eetu,

I once had the same thing happen with some Tamiya decals on a Bf109E. Every decal went on perfectly with microsol and microset except one wing cross which wrinkled badly like the ones on yours.

I managed to smoothe some of them out by dipping some cotton wool in some VERY HOT water and pressing it firmly on the decal. After a couple of times it did improve the problem, they weren't as noticeable.

I wonder if it is the fact that the decals in the kit were so thick that caused the problem?
Emeritus
_VISITCOMMUNITY
Uusimaa, Finland
Joined: March 30, 2004
KitMaker: 2,845 posts
AeroScale: 1,564 posts
Posted: Monday, April 18, 2005 - 01:58 AM UTC
The green part of the plane are painted with vallejo's Luftwaffe camo green and then coated with floor wax similar to future. The yellow band is humbroll 69. And the cross on the band is from the same sheet that came with the kit! No problems there. (there was only one sheet)

The decals on the other side reacted the same way, and I tried correcting them by caregully brushing them with a soft brush. This corrected the problem.Then I apllied the upper-wing crosses. They wrinkled, but not so badly. Then I noticed that the other cross was misplaced! I then removed the decal with micro set and used one of the lower-wing crosses. I noticed then that the upper- and lower-wing crosses were different! So I masked and painted the upper cross to match the other one. For the missing cross on the lower wing, I just masked and painted it on.

I tried correcting the other wing cross, and it deformed sightly, nothing serious, but noticable if you look carefully.

Those pics show how the decals after applying micro sol and after about 12 hours. I didn't try to correct them, intimidated by the deformed wing cross.

Now I've applied a gloss coat over them and masked and sprayed on the white coat. Here's a couple of pics:
Image hosted by Photobucket.com
I think the plane became a little too white, I intended to do a misted-on look. Now I'll just have to do some serious weathering. Bring on the dirt & grime! (I also have to fix that swastika. A part of it lifted up when removed the white tac I used for masking the markings.

I think I should start a brand-new thread and put the coming in-progress pics there. This was sort of a warning/rant-topic about my goofing with bad decals.


Of course, post any comments about those pics here. I'll just start a dedicated thread when I start the weathering process and have some more pics to show.
Merlin
Staff MemberSenior Editor
AEROSCALE
#017
_VISITCOMMUNITY
United Kingdom
Joined: June 11, 2003
KitMaker: 17,582 posts
AeroScale: 12,795 posts
Posted: Monday, April 18, 2005 - 05:26 AM UTC

Quoted Text

The green part of the plane are painted with vallejo's Luftwaffe camo green and then coated with floor wax similar to future.


Hi again Eetu

Is that Johnson's Kleer - or another brand? Klear/Future is actually an acrylic varnish - not a wax, so, if you've used something else, that might be the culprit.

The new pics are looking good - I'm looking forward to seeing the weathering stage.

All the best

Rowan
Emeritus
_VISITCOMMUNITY
Uusimaa, Finland
Joined: March 30, 2004
KitMaker: 2,845 posts
AeroScale: 1,564 posts
Posted: Monday, April 18, 2005 - 06:24 AM UTC
The wax I use is Johnson's "kiiltävä muovivaha" ("gloss plastic-wax" in english). To my knowledge this is exactly same stuff as future/kleer. I have used this stuff before with great results. This the first time I have trouble with it. I think it was the decals that were aged or otherwise defective.

I'll try to remove the wrinkles by sanding or with knife. The good thing is that it doesn't matter if I make scratches or other mistakes. In fact I want to have them in a winter camo!
Merlin
Staff MemberSenior Editor
AEROSCALE
#017
_VISITCOMMUNITY
United Kingdom
Joined: June 11, 2003
KitMaker: 17,582 posts
AeroScale: 12,795 posts
Posted: Monday, April 18, 2005 - 06:53 AM UTC
Hi again

Yes, it sounds like it must be the same stuff as Future/Klear. Oh well... another bright idea down the drain.

It's interesting that only the decals applied to the gloss Humbrol yellow worked OK - it sounds like there was something odd about the varnish you applied on the rest of the model. Was it definitely fully dry?

Running out of ideas rapidly...

Rowan
Emeritus
_VISITCOMMUNITY
Uusimaa, Finland
Joined: March 30, 2004
KitMaker: 2,845 posts
AeroScale: 1,564 posts
Posted: Monday, April 18, 2005 - 11:39 PM UTC
I remember letting the varnish dry for 2 days before applying the decals. Anyway, I'll try to remove the wrinkles and hide what I can with weathering.
lordQ
_VISITCOMMUNITY
Oost-Vlaanderen, Belgium
Joined: June 21, 2004
KitMaker: 530 posts
AeroScale: 0 posts
Posted: Tuesday, April 19, 2005 - 04:28 AM UTC
mmmm i have the same decal problem with my Tamiya Dewoitine
Emeritus
_VISITCOMMUNITY
Uusimaa, Finland
Joined: March 30, 2004
KitMaker: 2,845 posts
AeroScale: 1,564 posts
Posted: Wednesday, April 20, 2005 - 06:54 AM UTC
Sorry to hear you're having problems too, LordQ.

Now I'm making some progress. The weathering is done and I've appliad a mix of Tamiya flat agent and future over the whole model. When I removed the masking on the canopy, everything went fine, except for the dust-looking whitish stuff stuck to the inside of the canopy are still there. Additionally, I noticed there's a couple of smudges that look like adhesive residue from the masking tape. But the smudges are hard and resemble dried styrene cement. And I did absolutely no mistakes gluing the canopy on.

It seems like I can't build a model I'm fully happy with. There's always something little that I'm disappointed with.
But the good thing is that I'm actually quite happy with the weathered winter camo. I'll take some pics of the model and show you guys.


Ps. I'll start an own thread for them.
almonkey
_VISITCOMMUNITY
England - East Midlands, United Kingdom
Joined: March 23, 2003
KitMaker: 2,124 posts
AeroScale: 788 posts
Posted: Thursday, April 21, 2005 - 04:09 AM UTC
heres a thought, i am a painter by trade and when you mentioned your product was called gloss plastic wax and seeing your pics, it reminded me of a process called "crackle glaze" where a coat of wax is put on an item of furniture, then its painted over,as this paint dries it slides on the wax cracking apart, this is possibly whats happened to your decals, and the fact that only certain ones gave you problems and not others could be due to the wax coat being thicker in some places than others, and it hasnt dried 100% ( its possible it formed a skin that is dry while underneath theres a pocket of tacky polish) hope this helps
phil
 _GOTOTOP