Folder MOM-June
Please vote as per these instructions to make the counting easier
1. You may vote for 3 entries
2. Your first vote is for your favourite, the second for your second favourite and the third for your third favourite
3. Do not add any comments (they go in the thread for the MOM)
4. Only put your votes in your reply, nothing else. Do not post again with comments on other votes
5. Votes will be counted: 3 points for first choice, 2 points for second choice and 1 point for third choice
The above is to try and keep the voting simple to count I don't want to have to trawl through loads of posts to get the tally. If these simple rules are not adhered to I may have to ignore the ones that do not comply
Mal

Her are the thumbnails for those that have a dial up connection, or do not want to go to the Gallery.
wingman
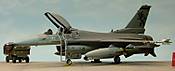
This is the first model I used photo-etch parts on. I used Verlindens Aces II ejection seat along with their cockpit detail parts. I plumbed the wheel wells with 34 guage wire to represent hoses and pipes. I added detail to the nose gear with bits of plastic sheet and that same wire that is in the wheel wells.
I used Hasegawas Aircraft Weapons Set B for the weapons load. I used ModelMaster Paints overall. The landing gear, interior of gear doors, wheel wells and wheels were painted with gloss white.
SuperScale decals were used, thanks for looking, Wingman out.
CPTKelley
I used Hasegawas excellent Bf109G-6 kit, with a few minor modifications. I added a fuel line in the cockpit made from fine solder, including an observation port made from stretched, clear sprue. The seat harness was made from lead foil, and Waldron buckles were attached. I also added some hydraulic lines on the main gear for the brakes, made from fine gauge wire. These were secured with a few brackets cut from the same sheet of lead foil. After I was finished with the sanding and filling of the fuselage seams, I rescribed the line along the dorsal and ventral fuselage. The corrected propeller spinner was the Eagle Editions resin replacement. I also added a length of fine solder on the ventral fuselage to replicate the small antennae, and 6-0 nylon suture was used for the radio antennae wire. Finally, the gun barrels and exhausts were drilled out.
Markings
The daylight camouflage scheme of 74/75/76 was airbrushed with Gunze-Sangyo acrylics using an Iwata HP-C. I preshaded the model with Testors Aircraft Interior Black. I was not able to find any reference material that spoke to the issue of Post-War Finnish Air Force wheel well colors, so I went with RLM 02. A friend of mine suggested that they may have been the same color as the underside color, which would make them RLM 76 . The decals used were from the Aeromaster 48-352: Augsburg Eagles, Pt. III sheet.
TedMarmere
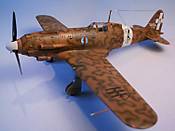
I build this kit last year in the sole purpose to test the Aztek Airbrush I bought! It was the first time I used a double-action airbrush and... Wow! It was a major improvement over the single-action airbrush I used before! I choosed the Italian plane for it's typical camouflage and because I like the beautiful lines of the aircraft.
The kit was build out of the box and I used the kit decals. The only addition was to use two needles to simulate the wing guns. About the decals, I have to say that they silvered very much and I had to make some touch-up's to have a satisfaying result! The Kit was a "Cartograf" special edition, so be carefull if you have one in your stash!
almonkey
hello guys! im back from the internet void! heres my contribution to the model of the month, its a heller 1/72 bf 108, with an airwaves etch set, the underside was pre shaded dark blue,as i was wondering how a darker version of the finish colour would turn uot as opposed to using black as i have been, and i think it turned out a nice subtle effect.
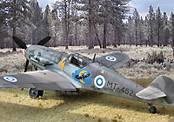
rudel72

me-109 is mt entry for the mom.tts almost bob.i haveadded only the break hoses to the landing gear and the camo is the classical fromthe afrika front.
bf443
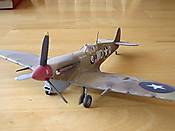
built this kit some time ago it's a Yank Spitfire Mk.Vc of the 4 FS, 52 FG, USAAF November of 1942 in North Africa. Model is 1/48th Airfix kit and painted with Model Master British desert colors. Decals are from Third Group.
JPTRR
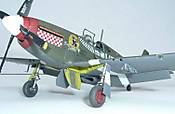
Tamiya's 1/48 P-51B, Capt. Don Gentile's "Shangri-La".
Built out-of-box, with Polly Scale, Pactra and Tamiya paints. No filler was used.
Gentile is known for keeping his steed "immaculate", so weathering is kept to a minimum. Tamiya has a formula to match the red paint on the cowl and spinner with the red of the checkerboard; I don't have either Tamiya reds so mixed-n-matched.
Holdfast
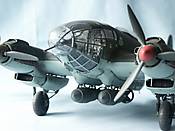
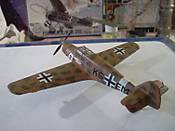
1. Kit is the Revell 1/48 Heinkel He 111 H-4/H-6.
2. Built Out Of the Box (OOB), except for wing tip nav lights from clear sprue, trim surface control rods from copper wire and antenna wire from invisible mending thread with white glue insulators. Guns are drilled out.
3. Painted with Xtracolor enamel paints, panel lines and detail given a wash with artist oil colour and white spirit. Paint chips done with a silver pencil.
4. Decals are from the kit.
Voting will end at midnight (GMT) 30th June.
Start thinking about July's entries, lets go..................................
Mal