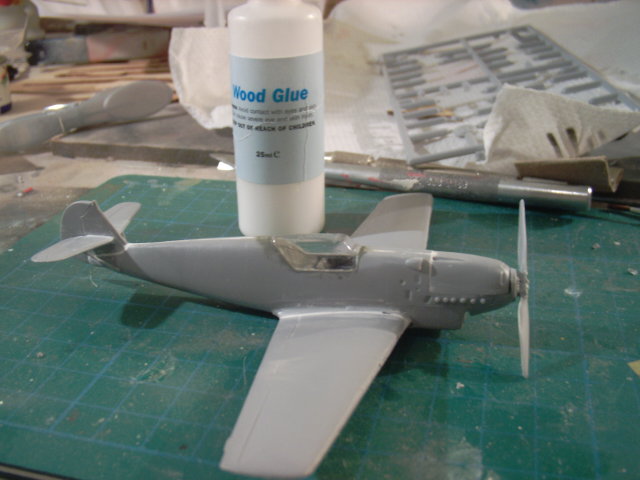
if any one has been following the duel over spain thread, you know im building a 109D against ted mameres rata, this kit came with vacformed canopies (theres one spare so i have a little leeway) and i could do with advice on painting (before or after its cut out) and the best way to cut it out
cheers, phil, aka baron freiherr von almonkstein II
General Aircraft
This forum is for general aircraft modelling discussions.
This forum is for general aircraft modelling discussions.
Hosted by Jim Starkweather
vac formed canopy help
Posted: Saturday, August 13, 2005 - 02:17 AM UTC
Posted: Saturday, August 13, 2005 - 04:28 AM UTC
Guten Tag Baron!
I see you are everywhere! But you can't escape me! :-)
For the canopy I would make the following:
1 - Mask it first or protect it with masking tape outside AND inside!
2 - Put some Blu-Tac inside to strengthen the canopy.
3- Cut with scissors if you want, but not nearer than 1 cm of the canopy! Some are brittle!
4 - Cut with X-acto knife but leave 1mm on the outline of the canopy.
5 - Dry fit!
6 - Carefully sand the excess away...
7 - Dry fit!
8 - Carefully sand the excess away...
9 - Dry fit!
10 - Carefully sand the excess away...
11 -Dry fit!
12 - Carefully sand the excess away...
13 - Attach with white glue (PVA) and NEVER with Cyanoacrylate or the canopy WILL fog (see below what happened to me with my first vacuformed canopy!)

Hope this helps!
Jean-Luc
P.S. I only do this to have the privilege to destroy your beautiful Messer with me Rata once in the air!
I see you are everywhere! But you can't escape me! :-)
For the canopy I would make the following:
1 - Mask it first or protect it with masking tape outside AND inside!
2 - Put some Blu-Tac inside to strengthen the canopy.
3- Cut with scissors if you want, but not nearer than 1 cm of the canopy! Some are brittle!
4 - Cut with X-acto knife but leave 1mm on the outline of the canopy.
5 - Dry fit!
6 - Carefully sand the excess away...
7 - Dry fit!
8 - Carefully sand the excess away...
9 - Dry fit!
10 - Carefully sand the excess away...
11 -Dry fit!
12 - Carefully sand the excess away...
13 - Attach with white glue (PVA) and NEVER with Cyanoacrylate or the canopy WILL fog (see below what happened to me with my first vacuformed canopy!)

Hope this helps!
Jean-Luc

P.S. I only do this to have the privilege to destroy your beautiful Messer with me Rata once in the air!

Posted: Saturday, August 13, 2005 - 09:43 AM UTC
i followed your steps except i used a dremel cutting disc to shave the excess off, and used wood glue to stick it (the stuff in the pic)


Posted: Saturday, August 13, 2005 - 10:35 AM UTC
Hi Phil
You're a brave man taking a motor tool to a canopy!
But nice job - the fit looks great! BTW... that "wood glue" probably is PVA as Jean-Luc suggested.
As regards using cyano... if you dip a clear part in Future / Klear prior to attaching it, you shouldn't have a problem with fogging. Carnauba wax is also good at preventing this.
All the best
Rowan
You're a brave man taking a motor tool to a canopy!

But nice job - the fit looks great! BTW... that "wood glue" probably is PVA as Jean-Luc suggested.
As regards using cyano... if you dip a clear part in Future / Klear prior to attaching it, you shouldn't have a problem with fogging. Carnauba wax is also good at preventing this.
All the best
Rowan

Posted: Saturday, August 13, 2005 - 06:24 PM UTC
Quoted Text
Hi Phil
You're a brave man taking a motor tool to a canopy!
]
not that brave, there were two provided so i had a bit of a safety net! and i now have a spare 109 canopy. i forgot to say i did dip it in kleer before it went on, i now have a little more confidence with these, so i can use the replacement canopies on the he 177 kit i have.......
when i eventually work up the bottle to start it!
 |


