_GOTOBOTTOM
World War II: USA
Aircraft of the United States in WWII.
Hosted by Rowan Baylis
P-40 Update
wingman
_VISITCOMMUNITY
Pennsylvania, United States
Joined: December 09, 2003
KitMaker: 880 posts
AeroScale: 654 posts
Posted: Sunday, August 14, 2005 - 05:58 AM UTC
Hi guys. Just wanted to post some updated pics of the P-40 build. I primed the entire plane with ModelMaster primer and sanded any seams that needed redone. I apllied ModelMaster Neutral Grey to the lower portion of the plane. I then masked the lower portions of the plane and applied ModelMaster[acryllic] Dark Earth to the top side. After that dried for a couple of days, I decided to try something new in the way of masking. I tried Glads Press and Seal wrap that you would use for the tops of bowls.. This stuff is hard to cut with a pair of scissors, I used a small pair of scissors and that seemed to work better. When you lay it down on the area you want to mask, flatten it out by pushing stright down. I then took a fine felt tipped pen and drew out where I wanted to cut, a pencil does not work. Before proceeding to cut, make sure it is nice and tight, otherwise it will bunch up on you. This is the first time I cut a mask out while it was on the model. I didn't like doing it. When I was done applying the ModelMaster[acryllic] Dark Earth I noticed that in some areas the mask lifted a little. I'll have to do some retouching later on. I think I'll stick with good old Tamiya tape for future masking projects.. Hasesgawa gives you the option of shaving off the molded on lights on the wings and tail and replacing them with clear parts. I'll probably do that last. It doesn't look too bad, I probably won't be entering this one in a contest. So if anyone else ou there has tried this kind of mask, let us know how you faired, thanks for looking, Wingman out.
crockett
_VISITCOMMUNITY
Ohio, United States
Joined: February 04, 2005
KitMaker: 370 posts
AeroScale: 60 posts
Posted: Sunday, August 14, 2005 - 06:12 AM UTC
Although you've done a nice job, the problem with using press & seal has manifested itself on your model. The pronounced "ridge" of paint at the boundary between the two colors is clearly evident.
Secondly, the demarcation lines between the colors is not as smooth as it should be. I would practice with the airbrush and try to go freehand, giving a more realistic finish. These issues will probably hurt you in a contest.


Good luck finishing your P-40!

Regards,

Steve
Merlin
Staff MemberSenior Editor
AEROSCALE
#017
_VISITCOMMUNITY
United Kingdom
Joined: June 11, 2003
KitMaker: 17,582 posts
AeroScale: 12,795 posts
Posted: Sunday, August 14, 2005 - 08:26 AM UTC
Hi Michael

Many thanks for your input on Press'n Seal. I'm sure there's an equivalent in the UK... but, from what you say, maybe I'll give it a miss!

Curtiss used masks to apply their paint schemes, so a pretty tight-edged look is correct - even the best freehand airbrushing risks having too much overspray for scale. I guess the paper mask / blu-tack method offers a good compromise.

All the best

Rowan
wingman
_VISITCOMMUNITY
Pennsylvania, United States
Joined: December 09, 2003
KitMaker: 880 posts
AeroScale: 654 posts
Posted: Sunday, August 14, 2005 - 09:31 AM UTC
Hi guys. Thanks for the input. I took a sanding pad of 8000 grit over the entire model to smooth out the demarcation lines, seems to have worked pretty good. I'll keep you updated, thanks for looking,Wingman out.
Merlin
Staff MemberSenior Editor
AEROSCALE
#017
_VISITCOMMUNITY
United Kingdom
Joined: June 11, 2003
KitMaker: 17,582 posts
AeroScale: 12,795 posts
Posted: Sunday, August 14, 2005 - 09:55 AM UTC
Hi again

Here's how the real thing was done:


The pic is from Detail & Scale Vol. 62 and used with kind permission of Squadron/Signal Publications.

All the best

Rowan
archerwin
_VISITCOMMUNITY
Luzon, Philippines
Joined: January 05, 2004
KitMaker: 106 posts
AeroScale: 0 posts
Posted: Sunday, August 14, 2005 - 12:34 PM UTC
Merlin,
thanks for the photo... another new thing learned today... I thought those camos were really applied freehand... now i know better.
-archerwin
lestweforget
_VISITCOMMUNITY
Victoria, Australia
Joined: November 08, 2002
KitMaker: 2,832 posts
AeroScale: 224 posts
Posted: Sunday, August 14, 2005 - 01:58 PM UTC
Crockett, what your saying about the camo needing to be smooth edged and not sharp is incorrect.
I presume Wingman is doing an AVG flying tiger, well even if not, many planes used this same camo, and it was infact sharp edged as he has done, his is correct.


Cheers
wingman
_VISITCOMMUNITY
Pennsylvania, United States
Joined: December 09, 2003
KitMaker: 880 posts
AeroScale: 654 posts
Posted: Sunday, August 14, 2005 - 02:48 PM UTC
Wow. Thanks guys for the great pics. The one that you posted Rowan is great. Just like the way we do our models but only much bigger. It's king of strange seeing that pic of them doing it that way after we been doing it the same way for so long. Thanks for looking guys, Wingman out.
JPTRR
Staff MemberManaging Editor
RAILROAD MODELING
#051
_VISITCOMMUNITY
Tennessee, United States
Joined: December 21, 2002
KitMaker: 7,772 posts
AeroScale: 3,175 posts
Posted: Monday, August 15, 2005 - 05:33 PM UTC
Wingman, Merlin, et al.,

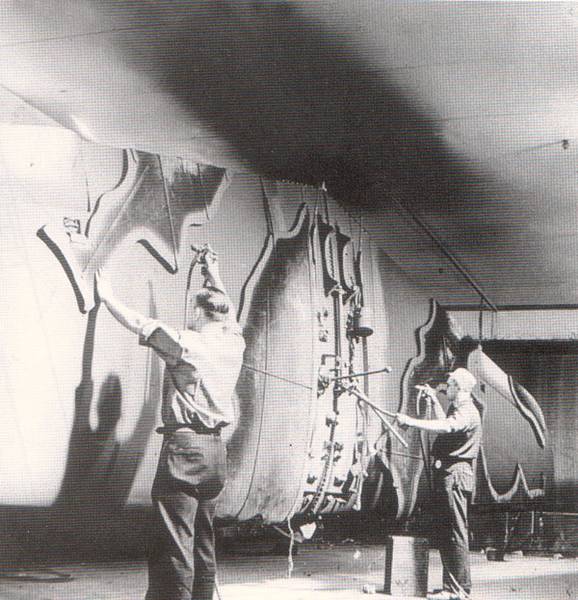
Well done proving that masks were used. Dana Bell documents this in some of his work.

That said, USAAC/USAAF regs were for feathered edge, though often a tight spray. The RAF used the masks, though sometimes RAF allowed soft-edge. RAF had these standard patterns--appears the same be it on a Spitfire, a P-40, Hurricane, etc., THAT said, the RAF had "mirror" and "reverse" schemes--green where brown would be, or reversing the masks. You RAF experts, do I recall this correctly?

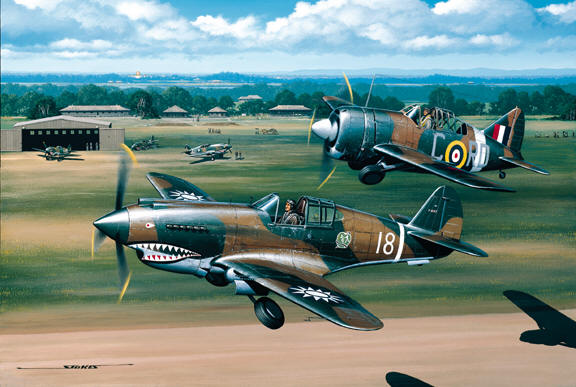
THAT said, do not always trust artists' works. Nowadays, many do a great deal of research, but sometimes they mess up. The AVG P-40Bs, so far as I've found, were hard-edged.

If you use the clear lenes, I suggest you work with them in a deep box. Those small, slippery lil' will drive you nuts! Ask me how I know?
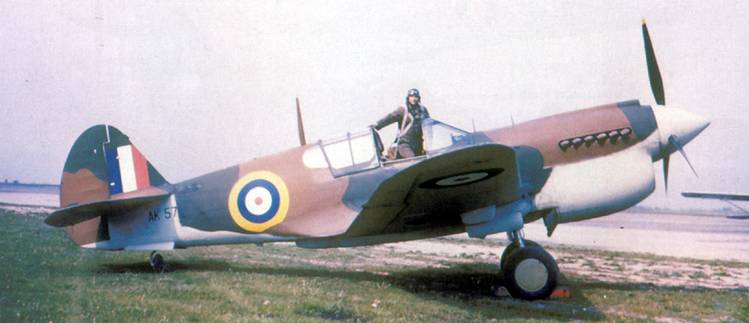
Holdfast
Staff MemberPresident
IPMS-UK KITMAKER BRANCH
#056
_VISITCOMMUNITY
England - South West, United Kingdom
Joined: September 30, 2002
KitMaker: 8,581 posts
AeroScale: 4,913 posts
Posted: Tuesday, August 16, 2005 - 07:35 AM UTC
Mmmmm, actually if this is the method used then you would get both hard and soft edged camo. look at the guy on the left, along the lower edge of that mask he is working on he will get a tight edge, but he aint tall enough to reach the top edge. Spraying from that angle will produce a feathered edge. When spraying over the mask to the right the bottom half will be hard edgeand has he gets further up the angle will change and it will become feathered. The guy on the right looks like he has a box to stand on, so maybe this is the solution. All looks a bit iffy to me, such an impractical way of doing massed produced aircraft, look how the masks are attatched. Sorry I had a run in with an "expert" over this on another site and can find fault with this method at every turn. Harry (Jetprovost), whom I work with and who used to paint aircraft for the RAF said to me, "if this was the method employed during WWII, to such great effect, why is it not used now"
Me I will always spray freehand so much easier.
Mal
Merlin
Staff MemberSenior Editor
AEROSCALE
#017
_VISITCOMMUNITY
United Kingdom
Joined: June 11, 2003
KitMaker: 17,582 posts
AeroScale: 12,795 posts
Posted: Tuesday, August 16, 2005 - 08:30 AM UTC

Quoted Text

Me I will always spray freehand so much easier.
Mal


Hi Mal,

Like you, I spray freehand - where appropriate. But Curtiss were famous (and unusual) in using masks. To give an idea of just how tight their patterns could be, here's a well-known photo:


All the best

Rowan
Holdfast
Staff MemberPresident
IPMS-UK KITMAKER BRANCH
#056
_VISITCOMMUNITY
England - South West, United Kingdom
Joined: September 30, 2002
KitMaker: 8,581 posts
AeroScale: 4,913 posts
Posted: Tuesday, August 16, 2005 - 08:51 AM UTC
Yep, but you must admit that the way it looks like it's being applied just would work? Or am I nuts...................Yeah I know I'm nuts
Sorry wingman didn't meen to highjack you thread. You have a very, very nice P-40 there, with up until midnight GMT to get it in the August MOM
Mal
Rowan I just don't have all them books, got any pics showing this method being used on Lancasters, no one seems to be able to produce that one
wingman
_VISITCOMMUNITY
Pennsylvania, United States
Joined: December 09, 2003
KitMaker: 880 posts
AeroScale: 654 posts
Posted: Tuesday, August 16, 2005 - 10:14 AM UTC
Hi Mal. No need to apologize. That's what this web site is all about. I won't be able to get it done in time for the August MOM. I might be able to enter it in the September issue though. Thanks everyone for your thoughts and research,Wingman out.
wingman
_VISITCOMMUNITY
Pennsylvania, United States
Joined: December 09, 2003
KitMaker: 880 posts
AeroScale: 654 posts
Posted: Tuesday, August 16, 2005 - 10:16 AM UTC
Hi Fred. I take it you lost some of those clear parts to the carpet monster. What happened? Wingman out.
JPTRR
Staff MemberManaging Editor
RAILROAD MODELING
#051
_VISITCOMMUNITY
Tennessee, United States
Joined: December 21, 2002
KitMaker: 7,772 posts
AeroScale: 3,175 posts
Posted: Tuesday, August 16, 2005 - 11:00 AM UTC

Quoted Text

Yep, but you must admit that the way it looks like it's being applied just would work? Or am I nuts...................Yeah I know I'm nuts


Mal, no, not any nuttier than any of us who use our free time to build models! :-)

I am dubious about scale-effect, but I do think of scale-effect this way: if the Curtiss painters sprayed away from the mask edge like modelers do to get a feathered edge, then they will get a slight feather edge. But reduced to scale, it would probabaly be imperceivible. Consider that in 1/48, a 3" overspray would only be 1/16", and a 3" overspray in 1/1 is pretty significant! At airshows and museums, I estimate that a gross overspray is only about 1-1 1/2" wide, or 1/64". That's hard-mask for me!

My tightest freehand is my MS-406 (only one edge on one wing was masked) MS-406
JPTRR
Staff MemberManaging Editor
RAILROAD MODELING
#051
_VISITCOMMUNITY
Tennessee, United States
Joined: December 21, 2002
KitMaker: 7,772 posts
AeroScale: 3,175 posts
Posted: Tuesday, August 16, 2005 - 11:02 AM UTC

Quoted Text

Hi Fred. I take it you lost some of those clear parts to the carpet monster. What happened? Wingman out.


Six parts, several popped away. Found all except one. I spread a black plastic bag under me. Then I could hear them hit.

These lil' parts are just very smooth, round = splippery. No convienient way to grip them.
blindspot
_VISITCOMMUNITY
Ohio, United States
Joined: September 13, 2003
KitMaker: 52 posts
AeroScale: 12 posts
Posted: Tuesday, August 16, 2005 - 01:03 PM UTC

Quoted Text

the RAF had "mirror" and "reverse" schemes--green where brown would be, or reversing the masks. You RAF experts, do I recall this correctly?


I'm not an expert, but I have seen a couple of pictures of the A&B patterns being sprayed on Hurricanes. They had big rubber mats that they arranged over the plane for either pattern. The resulting scheme was sharply separated between colors.
 _GOTOTOP