_GOTOBOTTOM
Early Aviation
Discuss World War I and the early years of aviation thru 1934.
Eduard's Fokker D.VII
Merlin
Staff MemberSenior Editor
AEROSCALE
#017
_VISITCOMMUNITY
United Kingdom
Joined: June 11, 2003
KitMaker: 17,582 posts
AeroScale: 12,795 posts
Posted: Wednesday, September 14, 2005 - 10:40 AM UTC
Hi there

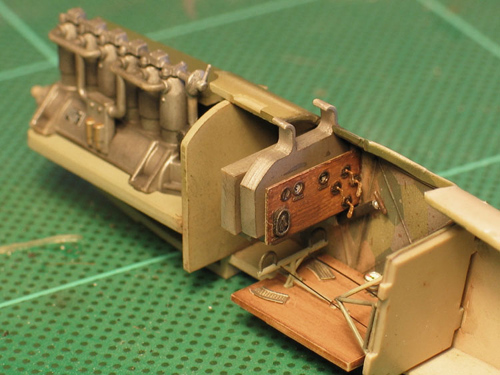
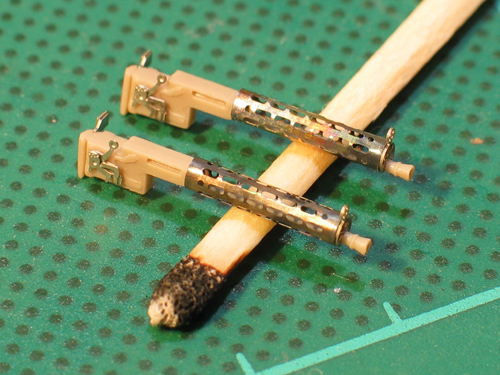
I've made a start on Eduard's latest WW1 kit...

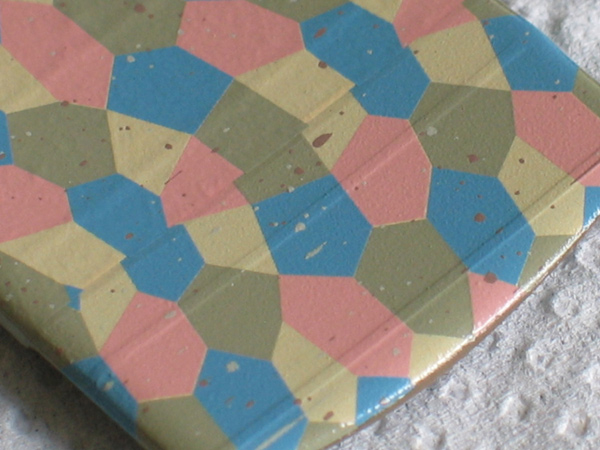
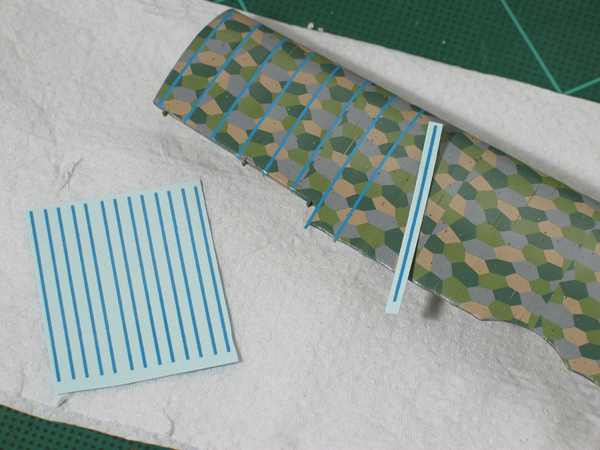
Not a lot to show at the moment, but I was prompted to post by adverse comments I've received in the past about Eduard decals. Well, the D.VII calls for lozenge decals to be applied over the moulded interior detail - which is a pretty extreme way to test them...

I don't trust any decals long-term on an un-painted surface, so I mixed up a "linen colour" from Humbrol gloss 10 & 4 - plus a drop or two of Rustin's Driers (Terebene) to speed up the curing process. The result was laughably close to Eduard's actual plastic colour...

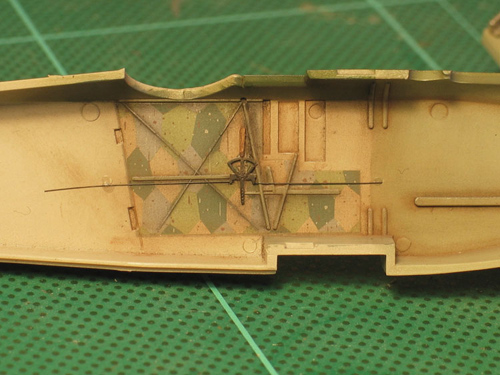
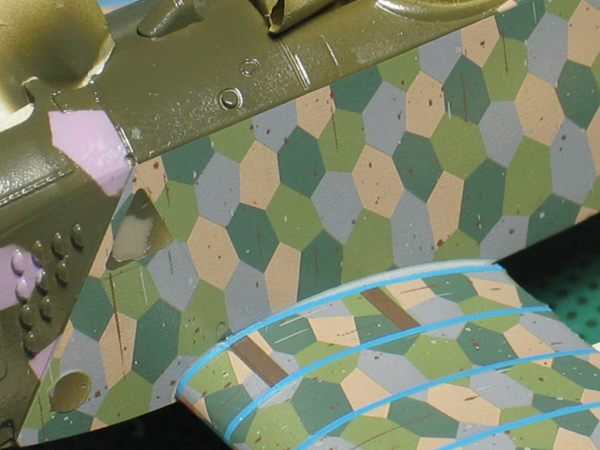
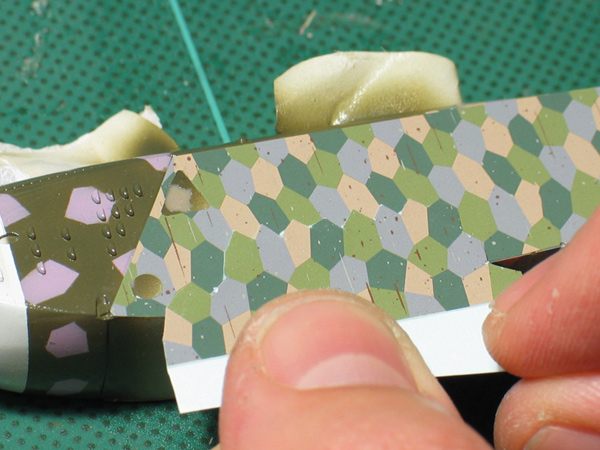
I applied Micro Set on the area to be decalled and floated the designs into place:


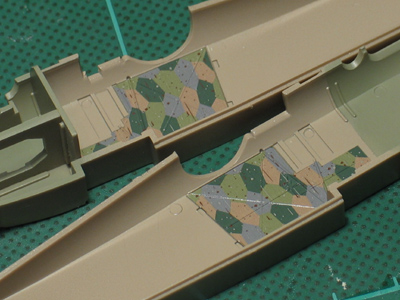
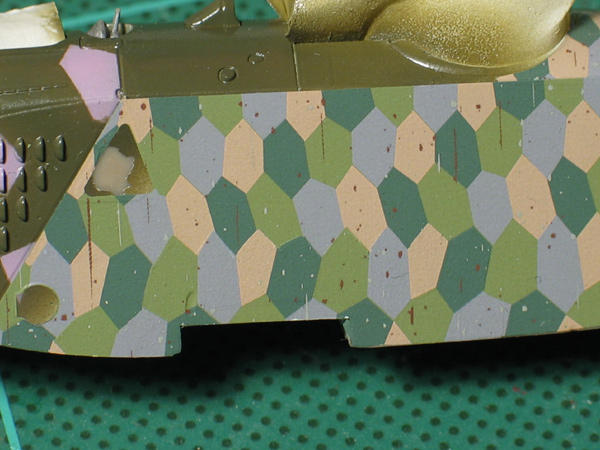
After a few minutes, I applied a coat of Micro Sol and, as you can see, the decals snuggled down precisely over the raised details.

Of course this isn't the end of the story! Just to get things really back to front, I'll be adding an In-Box Review in the next day or so.

I'd like to take this opportunity to thank Stephen Lawson for all his help in getting facts straight for my build (there will be a few surprises in store) - but, suffice it to say - if there are any mistakes, it's totally "mea culpa" time...

All the best

Rowan
TedMamere
_VISITCOMMUNITY
Moselle, France
Joined: May 15, 2005
KitMaker: 5,653 posts
AeroScale: 4,347 posts
Posted: Wednesday, September 14, 2005 - 11:01 AM UTC
Hi Rowan!

I'm really looking forward to see this build finished! Do you realize that since I joined here at Armorama, I never had the chance to see one of your models finished! I'm really excited about this thread! :-)
By the way, do you build it for the Two Wings and a Prayer Campaign?

Jean-Luc
Merlin
Staff MemberSenior Editor
AEROSCALE
#017
_VISITCOMMUNITY
United Kingdom
Joined: June 11, 2003
KitMaker: 17,582 posts
AeroScale: 12,795 posts
Posted: Wednesday, September 14, 2005 - 11:57 AM UTC

Quoted Text

Do you realize that since I joined here at Armorama, I never had the chance to see one of your models finished!


Hi Jean-Luc

Actually finish a model? Moi? That is a very strange concept! :-)

But I'll do my best with this one and, yes, I realise I do owe a biplane for the "Two Wings..." campaign... eek! :-)

My new resolution is to try to join in more with some builds - they might not be the greatest, but the joy is in the building. I'd feel a bit of a fraud as a "staff member" if I never contributed any of my own models for everyone to laugh at.

All the best

Rowan
Merlin
Staff MemberSenior Editor
AEROSCALE
#017
_VISITCOMMUNITY
United Kingdom
Joined: June 11, 2003
KitMaker: 17,582 posts
AeroScale: 12,795 posts
Posted: Monday, October 03, 2005 - 06:11 AM UTC
Hi again

My dodgy back has limited me to working in short sessions, but I've still made a bit of progress over the last seek or so. I've pretty much built things OOB, with just the addition of a few things like control and instrument cables in the cockpit. I didn't bother wiring up the engine... I made that mistake with my earlier Albatros, only to find all the work was hidden as soon as I closed the fuselage halves!


I ended up using Eduard's etched instrument panel. I had assumed the plastic and metal versions were interchangeable and I actually prefer the plastic one. Anyway, after having painted and "wood-grained" it, I compared the result with the metal one - only to find they have different instrument layouts! Checking the Schiffer's "German Aircraft Cockpits, 1911-1970" I found an illustration of an OAW panel and - you've guessed it - it matches the etched item! Doh! :-) I didn't like the simple "wood-grain" as printed by Eduard, so I spent a while trying my usual watercolour technique on it to try to make it more subtle. I didn't have much luck - the paint wouldn't take very well, so I finally lost patience, repainted the whole thing and then "wood-grained" it like the floor.


I used the kit's nice etched cooling jackets - I added a barrel from plastic rod to prevent a totally "see-through" effect and to give the etched jackets a firmer foundation.


I've been applying the lozenge decals to the wings - a bit of an adventure for me, as I've never used any until this kit. So far, so good... still a way to go and then the rib-tapes. The fuselage is closed, so the next job will be to gloss-coat it for it's own lozenge panels.

I'll add more pics as and when I get the chance.

All the best

Rowan
CRS
_VISITCOMMUNITY
California, United States
Joined: July 08, 2003
KitMaker: 1,936 posts
AeroScale: 1,168 posts
Posted: Monday, October 03, 2005 - 06:24 AM UTC
WOW Rowan that's fantastic work, I don't get that kind of detail done on my best day, and you doing it with a "dodgy back", makes me look really bad. :-)
TedMamere
_VISITCOMMUNITY
Moselle, France
Joined: May 15, 2005
KitMaker: 5,653 posts
AeroScale: 4,347 posts
Posted: Monday, October 03, 2005 - 06:45 AM UTC
Hi Rowan!

You made an amazing job so far. I like the way the lozenge fabric pattern came out inside the cockpit! Good luck for the wing's lozenge... I never used lozenge decals neither and I'm curious to see how they will look like!

Don't push to hard on your spine! If you want some ideas for acrobatic figures, take a look at the "circus" Storch pictures I submitted for the "On Display" feature...

Jean-Luc
Holdfast
Staff MemberPresident
IPMS-UK KITMAKER BRANCH
#056
_VISITCOMMUNITY
England - South West, United Kingdom
Joined: September 30, 2002
KitMaker: 8,581 posts
AeroScale: 4,913 posts
Posted: Monday, October 03, 2005 - 07:14 AM UTC
Nice Job Rowan, looking good. We really do need to see more of your stuff, when it comes it is always an inspiration.

Quoted Text

I'd feel a bit of a fraud as a "staff member" if I never contributed any of my own models for everyone to laugh at.


You do yourself an injustice, mate your models at least the ones we get to see are excellant.
Mal
Merlin
Staff MemberSenior Editor
AEROSCALE
#017
_VISITCOMMUNITY
United Kingdom
Joined: June 11, 2003
KitMaker: 17,582 posts
AeroScale: 12,795 posts
Posted: Monday, October 03, 2005 - 07:16 AM UTC
Cheers everyone - you're very kind and I really appreciate it!

But, just to put my efforts in perspective, here's some news for all WW1 fans to look forward to... I've got some absolutely STUNNING work from JackFlash lined up to publish! I'm hoping to add his first item tomorrow...

All the best

Rowan
JackFlash
_VISITCOMMUNITY
Colorado, United States
Joined: January 25, 2004
KitMaker: 11,669 posts
AeroScale: 11,011 posts
Posted: Monday, October 03, 2005 - 07:53 AM UTC
JackFlash to Armorama Air Wing Base...

Merlin ; Thanks for the kind words and just take care of yourself please. Daily, I look forward to your fine work on the OOB build of the Eduard Fokker D.VII OAW.
mpalao
_VISITCOMMUNITY
Madrid, Spain / España
Joined: June 19, 2005
KitMaker: 243 posts
AeroScale: 70 posts
Posted: Monday, October 03, 2005 - 08:25 AM UTC
Merlin. Is fantastic, wonderfully, I would like to know more on this wonderful panel of instruments. I see wood and other details, but ... I would like to know that added with regard to kit you have included in this kit. Who are the added ones that you have introduced and since you have done it. For me simply it is wonderful.
Thanks
Merlin
Staff MemberSenior Editor
AEROSCALE
#017
_VISITCOMMUNITY
United Kingdom
Joined: June 11, 2003
KitMaker: 17,582 posts
AeroScale: 12,795 posts
Posted: Monday, October 03, 2005 - 09:31 AM UTC
Hi Miguel

I really do appreciate your generous comments! I've got such a bad reputation for not finishing kits, it's great to have the bit between my teeth on this one!

The wood effect? - it's a really simple technique... but I can't illustrate the effect very well without more pictures, so I'll try to get a little demo-feature organised next weekend to describe it.

All the best and thanks again

Rowan
almonkey
_VISITCOMMUNITY
England - East Midlands, United Kingdom
Joined: March 23, 2003
KitMaker: 2,124 posts
AeroScale: 788 posts
Posted: Tuesday, October 04, 2005 - 04:26 AM UTC
rowan is that a profipack kit or did you get the extras separately? and is it 1/48? i normally build 1/72 myself but seeing this its certainly tempting to me to try some "big" scale kits (for me!) ive had half an eye on the bristol fighter for a while, and with xmas coming along...............
Merlin
Staff MemberSenior Editor
AEROSCALE
#017
_VISITCOMMUNITY
United Kingdom
Joined: June 11, 2003
KitMaker: 17,582 posts
AeroScale: 12,795 posts
Posted: Tuesday, October 04, 2005 - 07:03 AM UTC
Hi Phil

The D.VII is "in effect" a profi-pack" - but Eduard are doing away with the distinction from this release onwards - apparently, there will no longer be the old "basic" versions of their kits - every release will come with all the goodies as standard.

You can read more of the story in the D.VII review .

All the best

Rowan
mpalao
_VISITCOMMUNITY
Madrid, Spain / España
Joined: June 19, 2005
KitMaker: 243 posts
AeroScale: 70 posts
Posted: Tuesday, October 04, 2005 - 08:07 AM UTC
Thanks Merlin, I'm waiting these photos and your explanation about the cockpit. You know that I'm interesting to build WWI aircraft models. I have 2 box, the NI-11 and the Bristol fighter (both of eduard's models). hope to begin these planes when I ended with my u-boat revell.

I'm very interesting to know your great work. Thank you very mauch.
Merlin
Staff MemberSenior Editor
AEROSCALE
#017
_VISITCOMMUNITY
United Kingdom
Joined: June 11, 2003
KitMaker: 17,582 posts
AeroScale: 12,795 posts
Posted: Tuesday, October 18, 2005 - 09:22 AM UTC
Hi again

Seeing Fred's pics of his Pfalz reminded me it was about time I proved I'd haven't been entirely idle myself.

I've been working in fits and starts to add the lozenge decals and rib-tapes to the D.VII:

I painted the wings in a gloss tan - my home-mix for the fuselage was so close the the colour of the plastic, it made it hard to see where I'd sprayed - so I darkened it a bit this time.

I followed Eduard's instructions for adding the lozenge decals... a word of caution; Eduard have been really skimpy in how they've measured the decals. Those for the lower wing were a tight fit, those for the upper wing were too small. Luckily, the kit has ample spare for patching, but next time I'll simply work out from the centre, patch by patch...

The decals snuggled down perfectly over the ribs with some Micro Sol and Set. You can see the speckles and streaks that Eduard have printed on the lozenges - it's love or hate time with these...

And, finally, adding the rib-tapes is underway and these have all fitted with some excess to trim off. Eduard also supply a few spares in case of accidents.

The next instalment will cover painting and decalling the fuselage.

All the best

Rowan
TedMamere
_VISITCOMMUNITY
Moselle, France
Joined: May 15, 2005
KitMaker: 5,653 posts
AeroScale: 4,347 posts
Posted: Tuesday, October 18, 2005 - 05:03 PM UTC
Hii Rowan!

Looks very good so far!

The decals seems to have worked perfectly... but what are these "speckles and streaks" supposed to represente in reality. Poor paintjob when manufacturing the lozenge printed fabric or mud projection during operational use? I think It would have been better from Eduard not to add them... so I would fall in the "hate them" category. It's not difficult for a modeler to add them if he wants... but more difficult to get them away if he wants something clean! Just my opinion...

Jean-Luc
JackFlash
_VISITCOMMUNITY
Colorado, United States
Joined: January 25, 2004
KitMaker: 11,669 posts
AeroScale: 11,011 posts
Posted: Wednesday, October 19, 2005 - 10:38 AM UTC

Quoted Text

"... but what are these "speckles and streaks" supposed to represente in reality. Poor paintjob when manufacturing the lozenge printed fabric or mud projection during operational use? I think It would have been better from Eduard not to add them... so I would fall in the "hate them" category. It's not difficult for a modeler to add them if he wants... but more difficult to get them away if he wants something clean! Just my opinion... Jean-Luc


Greetings Jean-Luc, The lozenge has intermittent black, dull red and tan microdots unevenly spaced over the all surfaces to attempt weathering...not convincing. Note also that the lozenge has two colours assigned to the wrong lozenge shapes. But this new four colour lozenge camouflage has its strong points and prove that Eduard is finally moving in the right direction. Though I like my version of weathering better than theirs, they are trying to improve. If Eagle Strike is an A+++ then Eduard's is a B -.
mpalao
_VISITCOMMUNITY
Madrid, Spain / España
Joined: June 19, 2005
KitMaker: 243 posts
AeroScale: 70 posts
Posted: Thursday, October 20, 2005 - 08:30 AM UTC
Merlin, is fantastic, good model. I hope too (when you can) any explanations about the wood into de cockpit. Your work is very good.
Thanks and happy day
Merlin
Staff MemberSenior Editor
AEROSCALE
#017
_VISITCOMMUNITY
United Kingdom
Joined: June 11, 2003
KitMaker: 17,582 posts
AeroScale: 12,795 posts
Posted: Saturday, October 22, 2005 - 09:41 PM UTC
Hi Miguel

Sorry - I forgot all about it.

I've just added a short Feature to explain how I do wood grain effects. I hope it helps - let me know if anything's unclear.

All the best

Rowan
Grumpyoldman
Staff Member_ADVISOR
KITMAKER NETWORK
_VISITCOMMUNITY
Florida, United States
Joined: October 17, 2003
KitMaker: 15,338 posts
AeroScale: 836 posts
Posted: Saturday, October 22, 2005 - 10:27 PM UTC
Looks really good so far Rowan
mpalao
_VISITCOMMUNITY
Madrid, Spain / España
Joined: June 19, 2005
KitMaker: 243 posts
AeroScale: 70 posts
Posted: Tuesday, October 25, 2005 - 05:19 AM UTC
Rowan, fantastic, Thank you very much for your explanation. Too later I'm writen but I?m very busy with my u-boay model proyect. I forget my question 3 or 4 weeks ago.
Thanks. When I will finish my work , if you like I will ask another questions, Ok?

Thanks, friends.

Happy day.
Merlin
Staff MemberSenior Editor
AEROSCALE
#017
_VISITCOMMUNITY
United Kingdom
Joined: June 11, 2003
KitMaker: 17,582 posts
AeroScale: 12,795 posts
Posted: Saturday, October 29, 2005 - 08:52 PM UTC
Hi again

It's time for another update - and to report that I've hit an unexpected glitch.

I added the lozenge decals to the fuselage and they went on fine:


I was really pleased - they lined up on the top longeron and matched the lower contour - so I was confident about everything until I test fitted the lower wing... :


Ooops! Eduard have been a bit skimpy around the cutout! Maybe I shouldn't have been so surprised - they under-measured slightly on the wings too. To get 'round the problem, I cut patches from spare bits of lozenge decal, avoiding a straight edge which would be easier to spot:


The result isn't bad - the light highlights the edge slightly, but this will go under a coat of varnish:


So problem solved? Well, not really; although I found a suitable patch for the port side, matching the pattern meant robbing a piece from an unused section meant for the tail. If I'd been covering the entire a/c as called for in some of the colour schemes, I'd have been stuffed.

Matching the starboard side proved impossible. Try as I might, I just couldn't find an identical area of lozenge - if the pattern matched, Eduard's controversial "weathering" only made matters worse by running in the wrong direction! Doh! So, eventually I went for the last resort and robbed a second kit; I figured I'll used aftermarket lozenge decals for it anyway, so it's no loss.

So that's OK for me - but, of course, most modellers won't have 2 kits... Eduard really should have made the decals fit in the first place.

All the best

Rowan
almonkey
_VISITCOMMUNITY
England - East Midlands, United Kingdom
Joined: March 23, 2003
KitMaker: 2,124 posts
AeroScale: 788 posts
Posted: Sunday, October 30, 2005 - 02:11 AM UTC
i had a similar problem with lozenges, when i damaged some on a fokker Dviii, what i did was to cut out individual lozenges and put them on one at a time, this means i could use offcuts a bit more, although i was using aftermarket ones cos the kit ones were diabolical, i still have enough for at least two more "lozzed" machines, its my favourite scheme of all time. your fokkers looking good btw, and i can feel another WW1 build coming on!
JackFlash
_VISITCOMMUNITY
Colorado, United States
Joined: January 25, 2004
KitMaker: 11,669 posts
AeroScale: 11,011 posts
Posted: Sunday, October 30, 2005 - 10:07 AM UTC
JackFlash to Armorama Air Wing Base...

Merlin; Nice save on the lozenge application. As you know one of my derelicts for my EOW (end of war) diorama is this same scheme. I used a damaged Jager resin fuselage for the build and had to do the same thing as you did in your repair. Mine will probably be wingless in the diorama. I really like the spotted OAW nose that you replicated. I gave my lozenge an overall dark blue wash with a ragged brush, nose to tail. Then I sprayed a dull coat and let it dry. Next I did the same thing only longeron to longeron. This tends to leave dark minute streaks criss crossing like the fabric. Then a final dull coat after everything is aldded. It also tends to mute the colours like the original types under varnish. Model On!

JackFlash outbound at Angels Seven
JackFlash
_VISITCOMMUNITY
Colorado, United States
Joined: January 25, 2004
KitMaker: 11,669 posts
AeroScale: 11,011 posts
Posted: Wednesday, November 09, 2005 - 03:31 PM UTC
Greetings all; Special note concerning Eduard's recent reissue of their 1/48 Fokker D.VII the intermittent red brown, black and tan microdots unevenly spaced over the all surfaces to attempt weathering are Gone!!!!
 _GOTOTOP