_GOTOBOTTOM
Early Aviation
Discuss World War I and the early years of aviation thru 1934.
Sopwith Camel finished
Emeritus
_VISITCOMMUNITY
Uusimaa, Finland
Joined: March 30, 2004
KitMaker: 2,845 posts
AeroScale: 1,564 posts
Posted: Tuesday, September 20, 2005 - 04:13 AM UTC
Here's my latest build. Eduard's 1:48 Sopwith Camel. Built OOTB, this is my entry for the two wings and a prayer campaing, it's also the first ww1 aircraft model I've built. I decided to show it here too, because I only posted it to the "official" thread and is quite easily missed. Here it is:
Image hosted by Photobucket.com
Next time I'll use metal wire for the controll cables because it's difficult to make sharp bend with it. Otherwise I'm pretty happy with the model. What do you think?
TedMamere
_VISITCOMMUNITY
Moselle, France
Joined: May 15, 2005
KitMaker: 5,653 posts
AeroScale: 4,347 posts
Posted: Tuesday, September 20, 2005 - 07:33 AM UTC
Hi Eetu!

I have only one word to say: SUPERBE!

Don't worry too much about the rigging... it's almost not noticable! I have a question about this: are the holes for rigging already in the plastic parts or do you have to drill them?

Jean-Luc
kbm
_VISITCOMMUNITY
Texas, United States
Joined: June 16, 2003
KitMaker: 678 posts
AeroScale: 0 posts
Posted: Tuesday, September 20, 2005 - 08:33 AM UTC
Eetu:

While I am no WWI airplane modeller, I think your Sopwith Camel looks great. I would love some further explanation on both your building and painting/finishing techniques as, one day, I would like to delve into WWI model plane building.

Keith
JPTRR
Staff MemberManaging Editor
RAILROAD MODELING
#051
_VISITCOMMUNITY
Tennessee, United States
Joined: December 21, 2002
KitMaker: 7,772 posts
AeroScale: 3,175 posts
Posted: Tuesday, September 20, 2005 - 09:12 AM UTC

Quoted Text

Hi Eetu!

I have only one word to say: SUPERBE!


Jean-Luc took the words right out of my mouth (or should it be, took the type right off my e-mail? :-) )

Great looking Sopwith. Who's markings?
mpalao
_VISITCOMMUNITY
Madrid, Spain / España
Joined: June 19, 2005
KitMaker: 243 posts
AeroScale: 70 posts
Posted: Tuesday, September 20, 2005 - 09:34 AM UTC
fantastic, "maravilloso", Please if it is possible you can send me one explanation about your work (paints, procedure, steps)...I?m very interesting to know your work. Very , very ,very good.
Thanks.
You cand send me one private message if you like
Thanks
Teacher
_VISITCOMMUNITY
England - North West, United Kingdom
Joined: April 05, 2003
KitMaker: 4,924 posts
AeroScale: 0 posts
Posted: Tuesday, September 20, 2005 - 09:37 AM UTC
Eetu,............Wow!
Although I no longer make wingy thingies, me and Biggles of 226 squadron were very close when I was around 10. I can almost see him in the cockpit shouting at 'Ginger'.
Brilliant work.

Vinnie
Merlin
Staff MemberSenior Editor
AEROSCALE
#017
_VISITCOMMUNITY
United Kingdom
Joined: June 11, 2003
KitMaker: 17,582 posts
AeroScale: 12,795 posts
Posted: Tuesday, September 20, 2005 - 10:43 AM UTC
Hi Eetu

That's very nice indeed! I really rated Eduard's Camel when I reviewed it, but I'm just glad I didn't pick it to enter in the campaign, because I doubt that mine would look that good.

All the best

Rowan
JackFlash
_VISITCOMMUNITY
Colorado, United States
Joined: January 25, 2004
KitMaker: 11,669 posts
AeroScale: 11,011 posts
Posted: Tuesday, September 20, 2005 - 01:57 PM UTC
Nice job sir.
Darson
_VISITCOMMUNITY
Victoria, Australia
Joined: June 14, 2005
KitMaker: 247 posts
AeroScale: 60 posts
Posted: Tuesday, September 20, 2005 - 04:11 PM UTC
Eetu,

What can I say that the others haven't said already but that's a superb looking bird you've got there, congratulations.

One question though, how did you achieve that great wood finish on the prop?

Cheers
Darren
spooky6
_VISITCOMMUNITY
Sri Lanka
Joined: May 05, 2005
KitMaker: 2,174 posts
AeroScale: 0 posts
Posted: Tuesday, September 20, 2005 - 04:54 PM UTC
Wow, Eetu! That looks red hot, mate. The nose looks particularly good. I don't do aircraft much (just choppers now), but WW1 birds were my passion as a kid. The rotary engine, wooden prop, and twin Vickers look like they're just waiting for James Bigglesworth!
Emeritus
_VISITCOMMUNITY
Uusimaa, Finland
Joined: March 30, 2004
KitMaker: 2,845 posts
AeroScale: 1,564 posts
Posted: Tuesday, September 20, 2005 - 10:07 PM UTC
Thanks for the compliments.

The parts didn't have any holes, I had to drill them. Fortunately almost all holes were marked with small rivet-liket dots. Some reference pictures come in handy, because the rigging diagram in the instructions is a little vague.

I'll now try to describe the building process as accurately as I can remember.
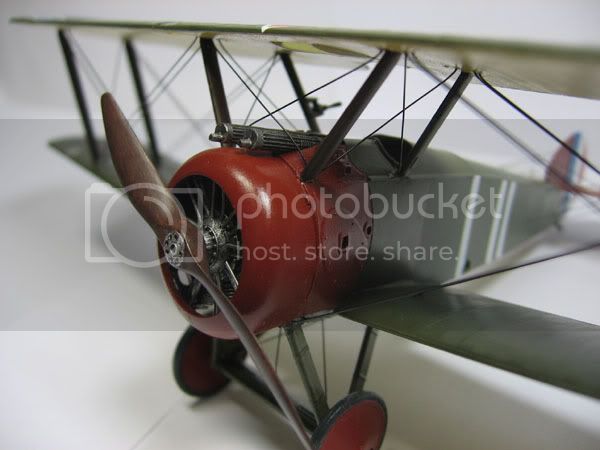
I startered the build as the instrcuctions suggested, with the engine, it's mounting, and the cockpit. The engine came together nicely, but the pushrods are molded together with the two front parts of the engine. They were pretty fragile, and I broke off most rods from the front part. Fortunately it was easy to replace the broken rods with copper wire.
Next I tackled the instrument panel and mg mount. Dial faces came as decals. They snuggled down nicely with micro sol.

The cockpit interior was easily built. Just be careful with the wicker decals that go to the seat, especially with the one that goes to the inner curve. Prepainted seatbelts came on the PE fret, I coated them with matt clear to protect them while handling.
Then it was time to close up the fuselage. I had to widen the rear-most cockpit mounts with styrene strip. I didn't add the tailskid at this point, as it looked fragile.

Next came the lower wing, to which I glued the seperate flaps, cockpit floor and control stick. Then I attached the lower wing to the fuselage. To get the wing to sit properly, I had to cut the firewall mounts which were in the way. I just used clippers (the result doesn't have to be pretty), it's impossible to see in the finished model anyway. At this point the instructions tell you to attach the rear parts of the machine guns before glueing on the upper fuselage. Don't do this! It's much easier to glue on the completed mg's, and you get the two parts aligned properly, too. I then assembled the mg's and painted them. Take care to sand the mating surfaces flat so the mg's will be straight.
The vertical and horizontal stabilizers were also attached at this point. Again, I glued the control surfaces in place before attaching to the fuselage.

The instructions then tell you to attach the upper wing, which I didn't do yet. I assembled and glued on the landing gear, but left off the wheels for now. Here I made a mistake. I thought that the steps at the end of the landing gear legs are because of mold misaligment and sanded them away. Don't do that, they're actually connectors which fit to small holes in the fuselage bottom. I had to glue small bits of styryne to help fixing them.

Next came the top wing. I glued the fuselage struts to the upper, and outer struts to the lower wing. I fixed the wing in place with masking tape to get the struts aligned properly. (I recommend making attachment pins from metal wire for the outer struts, as the bonding area is small and weak and I eventually broke off three of the struts while working)

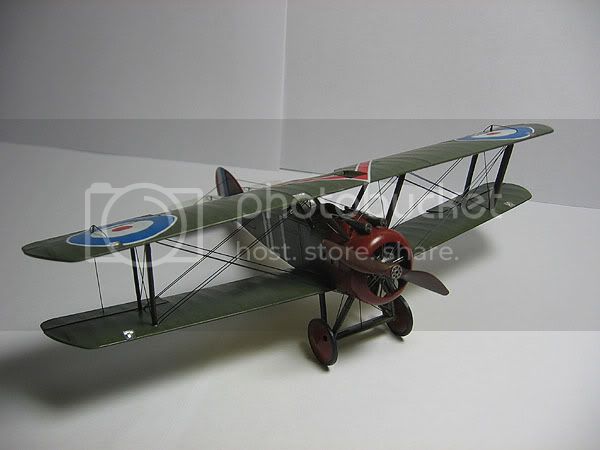
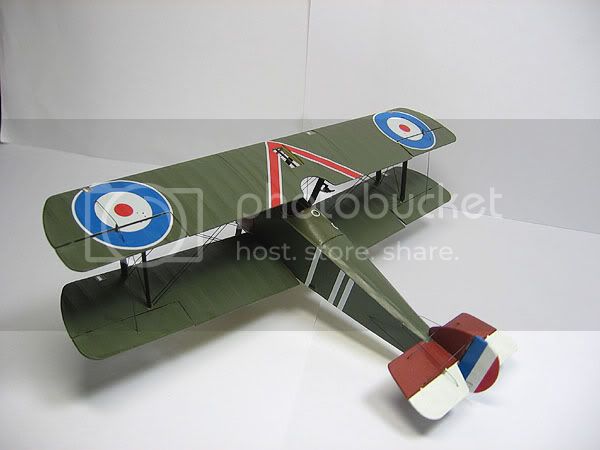
Then It was time to start painting. The upper wing was painted and decaled separately. For the paint scheme, I chose the classic green overall with red engine cowling and fron fuselage. The markings were for Capt. Roy Brown's plane. (The instruction tell it was Sopwith Camel F.1 B7270, Capt. Roy Brown, NO 209 sqn, Berfangles, France, April 1918) The model was first primed with vallejo's grey primer. Model color paints from the same manufacturer were used for the other colors as well. The red cowling, wheel hubs, and horizontal stabiliser were painted with cavalry brown (no. 982). The green is dark green (no. 893). The instructions told to paint the fuselage around the cockpit and the langing gear with a 5:1 mix of dark green and wood brown, which I did. For the brown I used beige brown (no. 875). I don't think it's absolutely necessary, as the difference is hardly noticable. For the linen parts, I used yellow ochre (no. 913). Masks are included in the kit, but I only used them for the wheels.

I coated the model with johnson's floor wax prior to applying the decals. Speaking of the decals, they were great, as usuall with eduard. They snuggled right into the details with a little micro sol. Then I applied a couple of coats of a mix of floor wax and tamiya flat agent, which produced a nice sating sheen. I left the cowling glossy, though. Next came attaching the upper wing. I used two-part epoxy for this. I had to mix up a couple of batches of it before I got the wing and all the struts aligned and attached. Again, masking tape held the wing in place while the epoxy cured. Then it was time for rigging. I carefully re-opened any holes that had paint in them. I used black fishing line for all the wires, attached with superglue. After the glue dried, I trimmed the extra off and shaved off any extra glue on the upper and lower wing surfaces. After a little touch-up, I was almost done. I wasn't sure how to touch up the holes on the roundels. I tried to touch-up with white, but that looked awfull, so I wiped it off. But I was able to touch-up the blue areas with citadel's enchanted blue, as it matched the blue on the decals almost perfectly.

The propeller was first painted with citadel's scorched brown, then drybrushed with a lighter brown and then came a black wash (I used lifecolor's "oil" wash). The woodgrains were then done by drybrushing with a really coarse plastic brush (actually, the first brush I ever got. It came with a revell kit with two tins of paint. Those were the days...).
Then I attached the tailskid, wheels, machine guns, and the propeller, and the model was finished.

I hope this was helpful and didn't bore you to death.
Grumpyoldman
Staff Member_ADVISOR
KITMAKER NETWORK
_VISITCOMMUNITY
Florida, United States
Joined: October 17, 2003
KitMaker: 15,338 posts
AeroScale: 836 posts
Posted: Tuesday, September 20, 2005 - 10:17 PM UTC
Nice job Eetu,
also a nice explanation.
Why don't you submit it for a short feature, so future readers can refer to it. Here in a thread, it will be lost in a few days.
betheyn
Staff MemberSenior Editor
AEROSCALE
#019
_VISITCOMMUNITY
England - South East, United Kingdom
Joined: October 14, 2004
KitMaker: 4,560 posts
AeroScale: 2,225 posts
Posted: Tuesday, September 20, 2005 - 10:29 PM UTC
Stunning model Eetu. I will definitly be trying your technique for the wooden prop. Thanks for posting the pics and guide.
Thanks Andy
Emeritus
_VISITCOMMUNITY
Uusimaa, Finland
Joined: March 30, 2004
KitMaker: 2,845 posts
AeroScale: 1,564 posts
Posted: Tuesday, September 20, 2005 - 11:04 PM UTC

Quoted Text

Nice job Eetu,
also a nice explanation.
Why don't you submit it for a short feature, so future readers can refer to it. Here in a thread, it will be lost in a few days.


Yeah, I'll do that. Seems easy to do. I'll look at other peoples' feature to get the general idea of what to do. I have a few in-progress pics I could include as well.
Is this what I should do? A text-file with the placement of pictures marked, then compress the txt-file and pictures into a zip-archive and send it over. Seems simple.
TedMamere
_VISITCOMMUNITY
Moselle, France
Joined: May 15, 2005
KitMaker: 5,653 posts
AeroScale: 4,347 posts
Posted: Tuesday, September 20, 2005 - 11:29 PM UTC
Hi Eetu!

As Dave said... that would make a great article to refer to! Not boring at all!!!


Quoted Text

Is this what I should do? A text-file with the placement of pictures marked, then compress the txt-file and pictures into a zip-archive and send it over. Seems simple.


Yes! A magician (translation: editor) will do the rest!

Jean-Luc
propboy44256
_VISITCOMMUNITY
Ohio, United States
Joined: November 20, 2002
KitMaker: 1,038 posts
AeroScale: 285 posts
Posted: Wednesday, September 21, 2005 - 03:16 AM UTC
I lke it to..How much ($) was the kit?
Emeritus
_VISITCOMMUNITY
Uusimaa, Finland
Joined: March 30, 2004
KitMaker: 2,845 posts
AeroScale: 1,564 posts
Posted: Wednesday, September 21, 2005 - 04:08 AM UTC

Quoted Text

I lke it to..How much ($) was the kit?


It was 25€ in my LSH. Squadron sells this kit for 26.96 Here's the same kit I built.
Here's other Sopwith Camel kits by eduard
kbm
_VISITCOMMUNITY
Texas, United States
Joined: June 16, 2003
KitMaker: 678 posts
AeroScale: 0 posts
Posted: Wednesday, September 21, 2005 - 05:11 AM UTC
Hi Eetu:

Thanks for the explanations of your methods. I look forward to seeing that article soon!

Keith
Holdfast
Staff MemberPresident
IPMS-UK KITMAKER BRANCH
#056
_VISITCOMMUNITY
England - South West, United Kingdom
Joined: September 30, 2002
KitMaker: 8,581 posts
AeroScale: 4,913 posts
Posted: Wednesday, September 21, 2005 - 07:07 AM UTC
Eetu, love it and I look forward to the article
Mal
almonkey
_VISITCOMMUNITY
England - East Midlands, United Kingdom
Joined: March 23, 2003
KitMaker: 2,124 posts
AeroScale: 788 posts
Posted: Thursday, September 22, 2005 - 04:01 AM UTC
guess whos back from cyprus! (boo!) just having a look round to see whats happening, and i take my hat off to you eetu! everything about your camel is really nicely done, especally that prop. have to get my tiger moth sorted now these beers are KEO's
mpalao
_VISITCOMMUNITY
Madrid, Spain / España
Joined: June 19, 2005
KitMaker: 243 posts
AeroScale: 70 posts
Posted: Thursday, September 22, 2005 - 08:03 AM UTC
Thnaks your very much for your explain. One question. You paint the upper wing with green colour, but You has used some special techniques, for example, pre-sharing, in order to obtain any clear or black zones? or You not employed any special techniques?
Thanks
Emeritus
_VISITCOMMUNITY
Uusimaa, Finland
Joined: March 30, 2004
KitMaker: 2,845 posts
AeroScale: 1,564 posts
Posted: Friday, September 23, 2005 - 08:03 AM UTC
I didn't use any other special techniques than those described in my earlier post. I built my camel as a preserved/fresh off the factory example, with minimal weathering. Natural light highlights that wing texture quite nicely, I think.
mpalao
_VISITCOMMUNITY
Madrid, Spain / España
Joined: June 19, 2005
KitMaker: 243 posts
AeroScale: 70 posts
Posted: Friday, September 23, 2005 - 08:27 AM UTC
Thanks Emeritus, Ok very good and thanks for this aircraft and for yours comments about it.
I have the Eduard Bristol profipack, I see it is very difficult to build for the joint between fuselage and wings but I'm trying to make it.
Thanks
Emeritus
_VISITCOMMUNITY
Uusimaa, Finland
Joined: March 30, 2004
KitMaker: 2,845 posts
AeroScale: 1,564 posts
Posted: Friday, September 23, 2005 - 07:04 PM UTC

Quoted Text

I have the Eduard Bristol profipack, I see it is very difficult to build for the joint between fuselage and wings but I'm trying to make it.


Was that the plane with the lower wing held in place with short struts instead of being attached directly to the fuselage? Is it possible to make a jig to help assembly?
mpalao
_VISITCOMMUNITY
Madrid, Spain / España
Joined: June 19, 2005
KitMaker: 243 posts
AeroScale: 70 posts
Posted: Tuesday, September 27, 2005 - 09:48 AM UTC
Thank you Emeritus, and congratulation for your review. Your aircraft is very good. When I start the Bristol Eduard profipack aircraft , is possible I will have some questions about the building and painting process. If you like I ask you any questions about this aircraft. OK?
Thanks
 _GOTOTOP