Hello!!
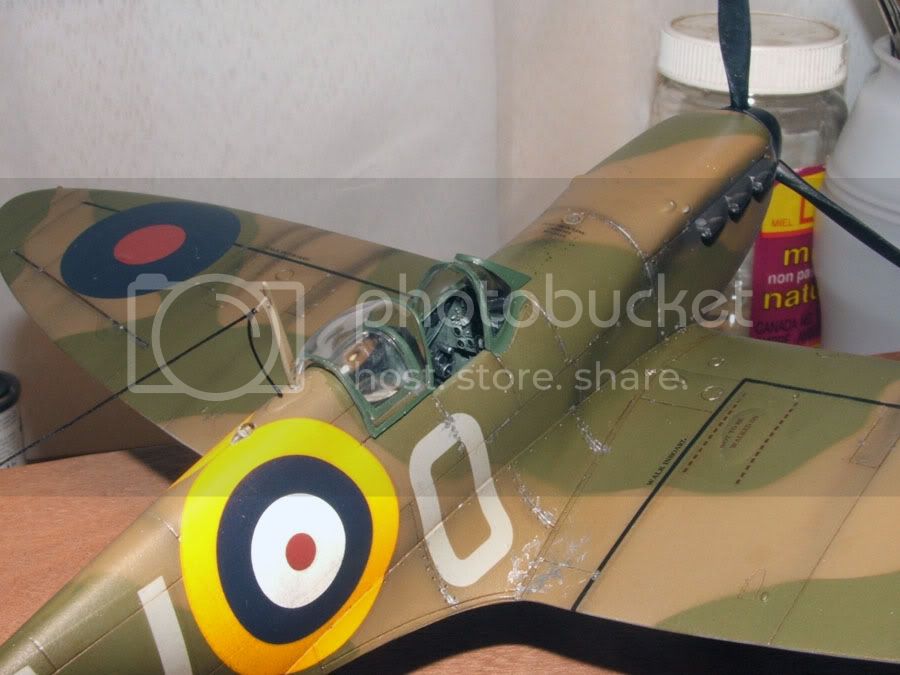
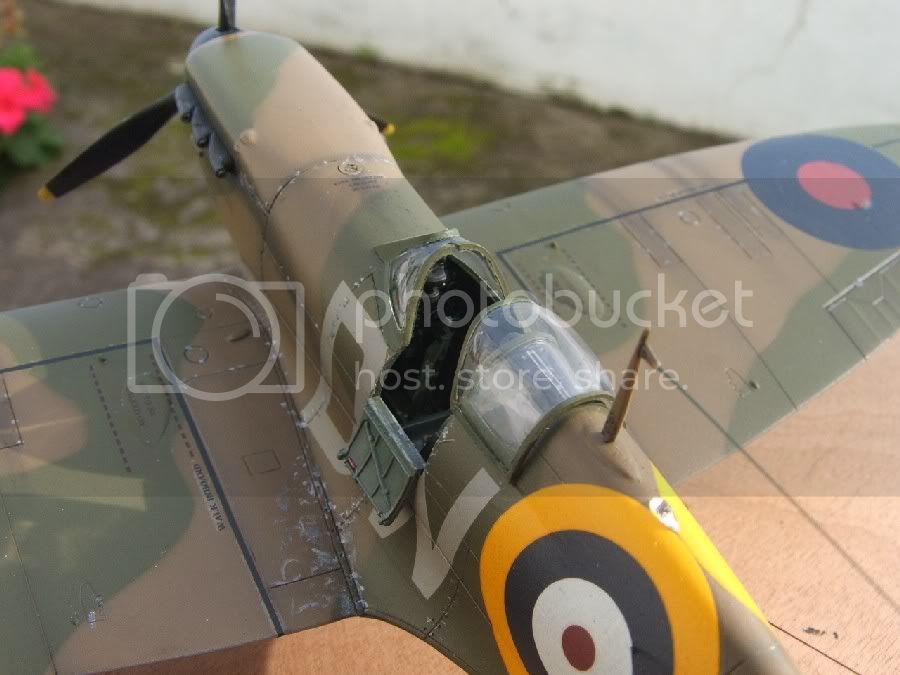
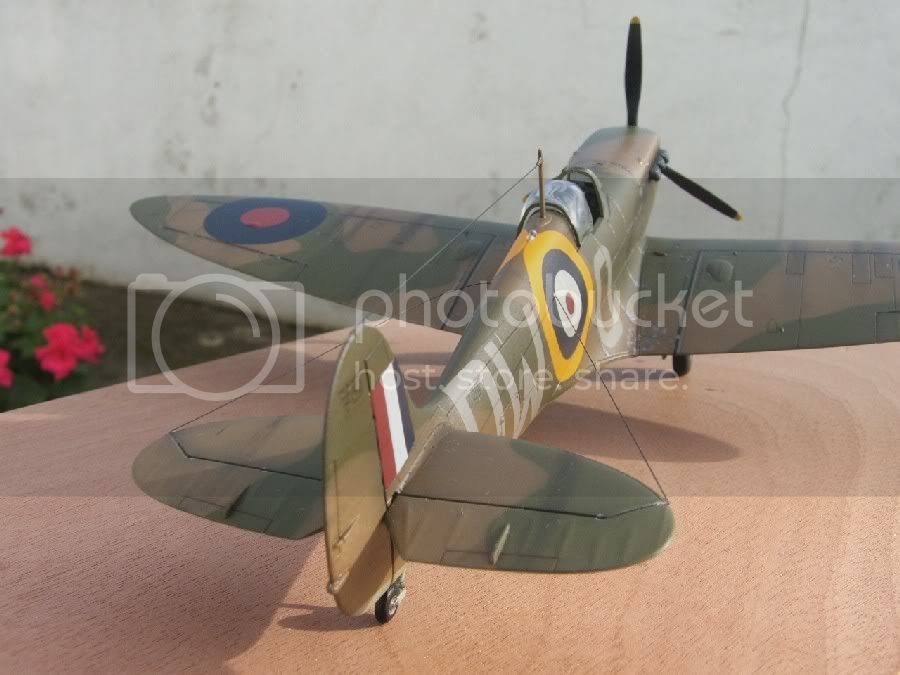
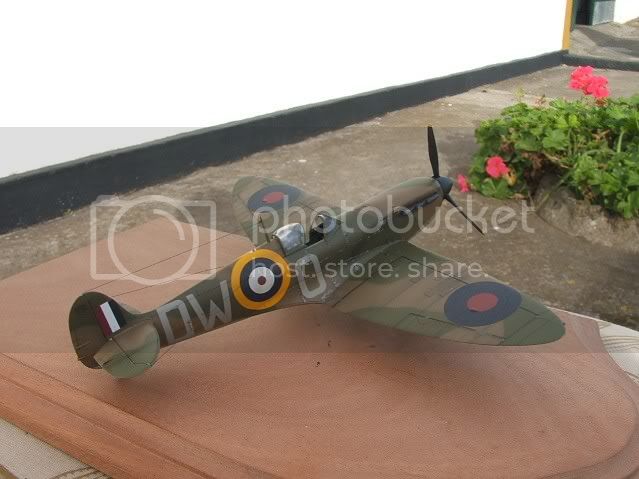
Here are some pics of my finished Spit, after two tears of disasters ( broken LG, Frosting on the clear coat, wrong decals etc.)
The kit is Tamiya´s 1/48.
Hope you enjoy it, and send feedback!
Hosted by Rowan Baylis
Spitfire MK I Finished
josepedro
Portugal
Joined: June 15, 2005
KitMaker: 172 posts
AeroScale: 168 posts
Joined: June 15, 2005
KitMaker: 172 posts
AeroScale: 168 posts
Posted: Monday, November 21, 2005 - 01:21 PM UTC
Tommy_Guns
Illinois, United States
Joined: December 19, 2003
KitMaker: 191 posts
AeroScale: 0 posts
Joined: December 19, 2003
KitMaker: 191 posts
AeroScale: 0 posts
Posted: Monday, November 21, 2005 - 01:28 PM UTC
GREAT JOB!!! You certainly beat me out of the water with my measly attempt at an MkI... I love the work.
The only two areas to me ( and mind you I am no expert on airplane modeling ) are the exhaust stains and the canopy.
The stains look a little too controled and the canopy edge is clear. But to be honest these are extremely minute items.
I really, really, really like the paint chipping/wear on the wing root. The visible interior detail is excellent and the undersurface weathering looks extremely good.
Once again GREAT JOB!!!!!
mossieramm
Gelderland, Netherlands
Joined: September 17, 2003
KitMaker: 253 posts
AeroScale: 81 posts
Joined: September 17, 2003
KitMaker: 253 posts
AeroScale: 81 posts
Posted: Monday, November 21, 2005 - 08:11 PM UTC
Nice job you've done there, I agree with what Tommy Guns has said.
Just a remark/question though, I see that you've done the canopy interioir green ?? Shouldn't the canopy be painted in the camouflage colours ??
Darson
Victoria, Australia
Joined: June 14, 2005
KitMaker: 247 posts
AeroScale: 60 posts
Joined: June 14, 2005
KitMaker: 247 posts
AeroScale: 60 posts
Posted: Monday, November 21, 2005 - 09:45 PM UTC
Great job José you've really nailed a nice looking Spit. The painting and weathering look especially nice.
My only feedback would be the same thing that mossieramm pointed out, shouldn't the canopy frame be painted RAF Dark Green, the same as the exterior camo?
Cheers
My only feedback would be the same thing that mossieramm pointed out, shouldn't the canopy frame be painted RAF Dark Green, the same as the exterior camo?
Cheers
Posted: Monday, November 21, 2005 - 10:23 PM UTC
Hi José!
Your Spitfire looks very good! The paintjob is very well done. Apart from the Canopy color mentionned above, I would also use a thinner aerial wire as yours seems to be too thick and therefore out of scale...
But these are only details... the overall work is excellent (weathering and paint shipping)
Jean-Luc
Posted: Tuesday, November 22, 2005 - 08:41 AM UTC
josé, a very nice Spitfire I have one in the same markings in the gallery, in aircraft/workbench models.
I'll just point out a few minor things, but there is nothing wrong with your model, I just happen to know the Spitfire a little (I am not an expert).
The exterior canopy framing, as already pointed out, should be the camo colour. Should be quite easy to fix.
Although you have a nice taught antenna wire, I also like to see them a bit thinner on models (your choice of course) I use Invisible mending thread (unpainted). You have got the connection point, on the aerial mast, about right, but it actually goes over a pully and is taught.
British aircraft at the time of the battle of Britain had IFF (Identification Friend or Foe) antenna which went from the tailplane to the fuselage (in the case of the Spitfire entering through a circular insulation disc, in line with the tailplane and behind the radio hatch, on the port side. There is actually a small indent for it on the Tamiya kit.
The arc of the exhaust stain is caused by the air flow over the wing so it would curve slightly above the exhaust pipes then curves down to about the middile of the door, by which time it was almost none evident.
The diagonally moulded thing on the inside of the entrance door is a crowbar. It was quite often painted the flight colour, but black if not. I usually paint it red, 'cos I can
The guns on the Tamiya Spitfire actually represent a pre or early production mark. The 1a didn't have the flash hiders protruding from the leading edge of the wings.
These are very miner details and I have only listed them so you are aware. If I were you I would only change the canopy colour. Oh, there is one other thing, the elevators on Spitfires were usually seen down when the aircraft was at rest, you can see how I did this in my build. Again not something to worry about, just letting you know.
The finishing, decals and weathering are well done, all in all a very nice Spitfire, you should enterit into next months Model of the Month (MOM)
Mal
Remember, "you just can't have too many Spitfires"
russ
Christchurch, New Zealand
Joined: May 01, 2002
KitMaker: 432 posts
AeroScale: 0 posts
Joined: May 01, 2002
KitMaker: 432 posts
AeroScale: 0 posts
Posted: Tuesday, November 22, 2005 - 11:55 AM UTC
Nice work', looks great to me, wish I could come up with the same standard in aircraft.
Posted: Wednesday, November 23, 2005 - 06:55 AM UTC
now you've done it! ive had it in the back of my mind to get an early mark spitfire kit for a while now, and seeing a nicely built model like this one makes me itch to get down to my lhs with my pocket money!
josepedro
Portugal
Joined: June 15, 2005
KitMaker: 172 posts
AeroScale: 168 posts
Joined: June 15, 2005
KitMaker: 172 posts
AeroScale: 168 posts
Posted: Wednesday, November 23, 2005 - 08:06 AM UTC
Hello all, and thanks to those who have replied!!!
I thank all the feedback that as came into discussion, cause it sure helps one to develop!
I´ll try to get a fix on those points that have been refered, so is back to the workshop!!!
I thank all the feedback that as came into discussion, cause it sure helps one to develop!
I´ll try to get a fix on those points that have been refered, so is back to the workshop!!!
josepedro
Portugal
Joined: June 15, 2005
KitMaker: 172 posts
AeroScale: 168 posts
Joined: June 15, 2005
KitMaker: 172 posts
AeroScale: 168 posts
Posted: Friday, November 25, 2005 - 05:04 AM UTC
Hello!!!
I think i fixed it!!!
Thanks again for helping!
PS The piece of antenna lacking is actually there, but i had to give the camera back to it´s owner so i don´t have pics...
I think i fixed it!!!
Thanks again for helping!
PS The piece of antenna lacking is actually there, but i had to give the camera back to it´s owner so i don´t have pics...
aufweiss
Leiria, Portugal
Joined: September 21, 2004
KitMaker: 49 posts
AeroScale: 0 posts
Joined: September 21, 2004
KitMaker: 49 posts
AeroScale: 0 posts
Posted: Friday, November 25, 2005 - 07:50 AM UTC
Olá José Pedro
Excelente trabalho, parabéns.
Alberto
Excelente trabalho, parabéns.
Alberto
josepedro
Portugal
Joined: June 15, 2005
KitMaker: 172 posts
AeroScale: 168 posts
Joined: June 15, 2005
KitMaker: 172 posts
AeroScale: 168 posts
Posted: Sunday, November 27, 2005 - 01:06 AM UTC
Olá Alberto e obrigado pela resposta!
è fixe encontrar alguém aqui que fala a lingua de camões!
José Pedro
è fixe encontrar alguém aqui que fala a lingua de camões!
José Pedro
ArmouredSprue
South Australia, Australia
Joined: January 09, 2002
KitMaker: 1,958 posts
AeroScale: 116 posts
Joined: January 09, 2002
KitMaker: 1,958 posts
AeroScale: 116 posts
Posted: Friday, June 14, 2013 - 08:29 AM UTC
Very nicely done model!
Parabéns pelo modelo, ficou muito bom!
Peterpools
New York, United States
Joined: June 08, 2013
KitMaker: 197 posts
AeroScale: 193 posts
Joined: June 08, 2013
KitMaker: 197 posts
AeroScale: 193 posts
Posted: Friday, June 14, 2013 - 10:15 AM UTC
Awesome work on the Spit. Fit and finish are right on the money
Antoni
England - East Midlands, United Kingdom
Joined: June 03, 2006
KitMaker: 574 posts
AeroScale: 573 posts
Joined: June 03, 2006
KitMaker: 574 posts
AeroScale: 573 posts
Posted: Saturday, June 15, 2013 - 05:14 AM UTC
An excellent effort, you have not got much wrong. The usual way to paint the outside of the canopy is first Grey Green followed by the camouflage colour so that you see Grey Green inside.
The lead from the mast to tail was for the HF TR 9 radio. This was replaced by the VHF TR 1133 radio which had its antenna in the mast and no lead. A small batch of Mk Is were fitted with them in May 1940 and I think all Mk IIs were fitted with them. At the end of September 1940 an effort was made to replace the HF sets with VHF and by the end of the year all Spitfires will have had the VHF radio. So not all Spitfires had the aerial leads during the BoB but the do not show up well in photographs so it is difficult to tell which one did. Smoke coloured invisible mending thread is what I use for aerial leads.
IIF and the Bob is something of a myth. It was late September 1940 when IIF started to be fitted so there could not have been all that many Spitfires with it during the BoB. The leads for it also do not show up well in photographs but sometimes the small dark insulators where the lead enters the fuselage can be seen on the border of the red and white of the roundel. During the BoB Fighter Command used a system called Pipsqueak to track fighter aircraft.
Crowbars were not painted in flight colours.
Mostly they were bare metal (steel) on the left, sometimes Grey Green on the right. Occasionally black.
They were only painted red after the war. This may have been in accordance with international treaties on safety that stipulated that safety equipment was to be painted red. The purpose of the crowbar was to help the pilot escape if the canopy was jammed and so it was deemed a piece of safety equipment. However, as far as you are concerned colour is irrelevant as you should have removed the crowbar. The crowbar first appeared on Mk Vs.
Mk Is and Mk II had no crowbar.
Joel_W
Associate Editor
New York, United States
Joined: December 04, 2010
KitMaker: 11,666 posts
AeroScale: 7,410 posts
Joined: December 04, 2010
KitMaker: 11,666 posts
AeroScale: 7,410 posts
Posted: Saturday, June 15, 2013 - 05:59 AM UTC
Jose, Just an outstanding build. Camo paint and weathering have that used but not abused look. In the 1st set of pictures the canopy interior green color just jumps right out at you, as well as the clear canopy frame sides. What really surprised & impressed me is that you went back to your workbench, popped off the canopy & windshield, and repainted them with the correct Camo Green color. You don't see that very often.
Joel
Joel
Posted: Saturday, June 15, 2013 - 07:12 PM UTC
Hi josé,
I'm very impressed that you went and fixed those few minor issues, very well done
golfermd
Maryland, United States
Joined: March 01, 2013
KitMaker: 152 posts
AeroScale: 98 posts
Joined: March 01, 2013
KitMaker: 152 posts
AeroScale: 98 posts
Posted: Sunday, June 16, 2013 - 11:38 AM UTC
Great job, Jose.