

Hi all, i'm building up a 1/24 trumpeter A6M2 Zero at the moment, cockpit is done and the body is being done at present.
I'm preshading all the panel lines etc, then painting white, looks good so far, nice and weathered. The cowling however is presenting me with a problem of sorts.
Its done in flat black, and will have some silver paintchips etc added, but even so it won't look as "old" as the rest of the plane.
Any advice on how to age a black part to get a similar feel to preshaded panel lines elsewhere? I was toying the idea of a very thin (1:20 paint:thinner) silver wash just to pick out all the rivets etc, which should add a little "age" to it, but i'm stumped on what else to do.
Suggestions?
Hosted by Jim Starkweather
Aircraft Weathering

canison

Joined: January 02, 2006
KitMaker: 2 posts
AeroScale: 0 posts
Posted: Monday, January 02, 2006 - 10:52 AM UTC

TedMamere

Joined: May 15, 2005
KitMaker: 5,653 posts
AeroScale: 4,347 posts

Posted: Monday, January 02, 2006 - 12:42 PM UTC
Hi Rob!
First, let me Welcome You to Armorama!
I also have a question: did you already paint the cowling?
If not, I would do the following:
1 - Paint it with an aluminium paint first.
2 - Add a coat of Black mixed with Dark Blue and lightened with white color. The ratio would be 80 % of Black, 15% of Blue and 5% of White (but test before).
3 - Add post shading in pure Black on the panel lines (there are some) and on the edges.
4 - Make paint shipping by carefully scratching the black coat to reveal the Aluminium paint where the cowling was worn out.Use an X-acto knife or a toothpick for that.
5 - Coat your cowling with Future.
6 - Add a wash of grey in the panel lines to reveal them.
7 - Add Dark Brown pastel powder for weathering. You can also spray the same color. But the paint must be diluted and almost transparent.
Hope this helps!
Jean-Luc

Holdfast

#056

Joined: September 30, 2002
KitMaker: 8,581 posts
AeroScale: 4,913 posts

Posted: Monday, January 02, 2006 - 12:55 PM UTC
Hi Rob, welcome to Armorama 
I'm slightly confused about the preshading that you have done so far. Is the final colour of your Zero white? Forgive my ignorance but I haven't heard of a white Zero, unless it was part of the surrender party? I know they used a white painted Betty bomber, with green crosses.
If you have already painted the cowling, you could try over painting in very dark grey, leaving the panel line areas darker, with just minimal over spraying. If you haven't already painted it pre-shade as normal, using the dark grey as the main colour. Basically you will be just filling in the areas between panel lines (with the dark grey) and only letting a slight over spray blend into the black.
Japanese aircraft cowlings:
Japanese aircraft cowlings were actually blue black, or very dark blue (you can find this colour in some paint ranges, colourcoats and xtracolor are 2 that I know of). So you could pre-shade in black then paint the cowling blue as suggested for the dark grey.
Further to weathering the cowling, cover with an acrylic gloss varnish (I use Klear (Future in the US) floor polish) then use a wash of Turpentine (pure Turps not substitute) and dark brown oil paint. You can use model paint or artist oils. If you use artist oil paint try Burnt Umber. If you want the cowling to look faded then use a medium grey for the wash. This medium grey could be used on the main body of the aircraft (don't forget the Klear coat). I never use black for a wash, unless the article is black, when I would paint the article very dark grey and give it a black wash. This would work on your cowling, giving another different look. You really need to experiment to get the look you want.
I hope this has been of some help. Do get back if you need any more help or advice. We would love to see your Zero

Mal


Clanky44

Joined: September 15, 2005
KitMaker: 1,901 posts
AeroScale: 133 posts

Posted: Monday, January 02, 2006 - 09:12 PM UTC
Hi Rob,
Pre, and Post shading is a lot more dificult with lighter tones, I'm assuming that you are painting the A6M2 in the light grey. The cowling is not black but a very, very dark blueish purple. Aeromaster acrylics made a wonderful colour which might still be available in your neck of the woods... 1087 Japan Mitsubishi Cowl Blue/Black NA3558. Failing this, just mix your darkest blue half and half with black paint. Start off with a dark gray paint, spray all of your cowling, then airbrush black paint on the panel lines. Finally, spray a thinned out (60% thinner) coat over the whole cowling with the blue/black mix, blending in the priveous two coats of dark gray and black. When you are done, you should still be able to pick out the black panel lines.
As far as weathering, try using Humbrol Metal Cote 27002, use your finest tipped paint brush and apply tiny specks close to rivets, and screws (being a Trumpeter kit, you won't have any shortage of those :-) ) Thin out the Humbrol paint with the Humbrol bottle thinner, do not use the crap that is inside the tins, for whatever reason, it is not the same. And lastly, I give a wash over the whole thing with a mix of Burnt Umber and Ivory Black, dulls out the brightness of the metal chips somewhat, a nice blending touch......
Goog luck, feel free to ask further questions, and lets see some photos!!!
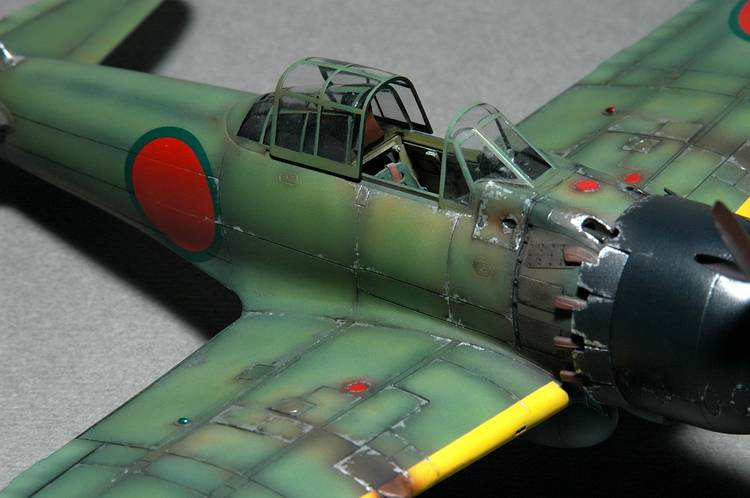
Here is the same technique done on my 48th scale A6M5

Pre, and Post shading is a lot more dificult with lighter tones, I'm assuming that you are painting the A6M2 in the light grey. The cowling is not black but a very, very dark blueish purple. Aeromaster acrylics made a wonderful colour which might still be available in your neck of the woods... 1087 Japan Mitsubishi Cowl Blue/Black NA3558. Failing this, just mix your darkest blue half and half with black paint. Start off with a dark gray paint, spray all of your cowling, then airbrush black paint on the panel lines. Finally, spray a thinned out (60% thinner) coat over the whole cowling with the blue/black mix, blending in the priveous two coats of dark gray and black. When you are done, you should still be able to pick out the black panel lines.
As far as weathering, try using Humbrol Metal Cote 27002, use your finest tipped paint brush and apply tiny specks close to rivets, and screws (being a Trumpeter kit, you won't have any shortage of those :-) ) Thin out the Humbrol paint with the Humbrol bottle thinner, do not use the crap that is inside the tins, for whatever reason, it is not the same. And lastly, I give a wash over the whole thing with a mix of Burnt Umber and Ivory Black, dulls out the brightness of the metal chips somewhat, a nice blending touch......
Goog luck, feel free to ask further questions, and lets see some photos!!!
Here is the same technique done on my 48th scale A6M5
Clanky44
Joined: September 15, 2005
KitMaker: 1,901 posts
AeroScale: 133 posts
Posted: Monday, January 02, 2006 - 09:26 PM UTC
Hi Rob,
One thing I forgot in the above thread, is the type of wash to use. While I have to utmost respect for peoples choices in techniques, I'm still baffled at the use of gloss coat over paint for washes. A much easier method is to leave the model flat, apply the Artists' Water Colour tube paint ( I use both Winsor & Newton and Grumbacher) thinned out with tap water to the consistency of coffee, and apply. ( It has to be done over a flat paint surface) The benefits of this technique are many, You forgo the whole trouble or spraying the model with an added coat, and the Artists' water colours, once dried, can be removed by just taking a moistened brush and removing any excess paint you want off, should make those rivet holes stand out nicely...
good luck, Rob
Frank
Holdfast
#056
Joined: September 30, 2002
KitMaker: 8,581 posts
AeroScale: 4,913 posts
Posted: Tuesday, January 03, 2006 - 01:09 AM UTC
Look at the time on my post I usually leave for work at 07.50 we must have been replying around the same time Jean-Luc :-) Quoted Text
One thing I forgot in the above thread, is the type of wash to use. While I have to utmost respect for peoples choices in techniques, I'm still baffled at the use of gloss coat over paint for washes.
The reason for the acrylic gloss coat is to protect the paint from the mineral spirit and artist oil paint,which I prefer for washes. It also helps the wash flow along the panel lines. Also a gloss coat would already have been applied, for the decals, I then use another couple of coats of Klear over the decals to "level" them out and protect them, from the mineral spirit. This method allows washes to be used over decals as well. This is the thing that I don't understand, washing panel lines and detail but not including the decals. Once the wash is dry a matt coat is added, which will dull down everything. I have tried water based artist paints, over both gloss and matt coats but I didn't like the effects, or I couldn't get on with the technique.
Rob, note that there are many ways to achieve the aim, you have to find the one that suites you.
Mal
TedMamere
Joined: May 15, 2005
KitMaker: 5,653 posts
AeroScale: 4,347 posts
Posted: Tuesday, January 03, 2006 - 01:19 AM UTC
Quoted Text
Hi all!
Whatever technique was used on that Zero is a great one! I like it VERY much!
 In fact I'm Jealous! :-)
 Jean-Luc

Part-timer

Joined: April 11, 2003
KitMaker: 361 posts
AeroScale: 0 posts
Posted: Tuesday, January 03, 2006 - 03:39 AM UTC
God, that Zero is GORGEOUS!
OK, back on topic. One way to make the cowling look older might be to slightly lighten the blue-black color and spray a thin coat of it on top, to simulate a little sun-bleaching.
OK, back on topic. One way to make the cowling look older might be to slightly lighten the blue-black color and spray a thin coat of it on top, to simulate a little sun-bleaching.
canison
Joined: January 02, 2006
KitMaker: 2 posts
AeroScale: 0 posts
Posted: Tuesday, January 03, 2006 - 08:48 AM UTC
Thanks for the welcome and the tips guys. I'm usually an armour modeller but am starting to move over to the darkside and start aircraft. I have a Tamiya 1/32 A6M5 to do after this, with 3 Eduard etch sets going into it, so the trumpeter is basically practice.
I have already painted the cowling flat black, but thinking about what you've all suggested I may mix up a blue/black, and perhaps a blue/grey and post shade various places on it to simulate fading.
The box actually shows a white/light grey paintjob to the rest of the aircraft, and I like that a little more than green, more opportunities to paint it creatively i think. I've seen a few others painted white, and i'm sure i've seen reference photos somewhere as well. With grey styrene and black preshading, the flat white does come out lightly greyish, but when i go over it with a wash, it'll darken slightly more and should give the effect i'm after. I shall try and post some pics in the next couple of days.
Anyone have a comment on the idea of a VERY thin silver wash to pick out all the rivets on the cowling?
Again thanks for the advice.
Clanky44
Joined: September 15, 2005
KitMaker: 1,901 posts
AeroScale: 133 posts
Posted: Tuesday, January 03, 2006 - 08:53 AM UTC
Silver paint is made up of fine flakes of metal, regardless of how much thinner you use, the flakes will still pop-up and be very noticeable, where ever your paint brush touches. This might not give you the effect you are looking for. A possible solution is to try it out on the bottom of the cowling, just to be safe. If it works, continue upwards!
Let us know how it works out for you.
Frank
Let us know how it works out for you.
Frank
 |

WEB HOSTING BY


Copyright ©2021 AeroScale and Kitmaker Network, a subsidiary of Silver Star Enterprises
All Rights Reserved. Please read our Conditions of Use and Privacy Policy.
All Rights Reserved. Please read our Conditions of Use and Privacy Policy.