_GOTOBOTTOM
General Aircraft
This forum is for general aircraft modelling discussions.
Finished P-47
newtothegame
_VISITCOMMUNITY
Washington, United States
Joined: October 05, 2003
KitMaker: 588 posts
AeroScale: 468 posts
Posted: Friday, January 20, 2006 - 01:29 AM UTC
Wanted to post this here a couple of days ago, but couldn't get it to take. Anyway...

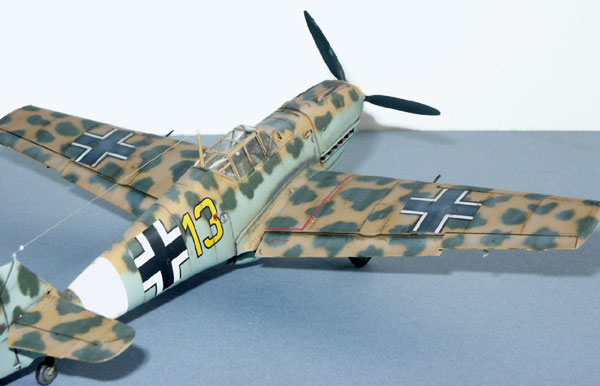
Captain George Rarey was not only a great pilot, but also a great cartoonist. A few years ago aeromaster did a special decal sheet of some of his nose art for nationals. A friend of mine did a p-47 in Rarey’s markings (Damon’s Demon), and I instantly fell in love with it. Luckily, that same friend found a set of the decals for sale at a show and picked it up for me, so I could do Rarey’s markings too.

There is a wonderful site on Rarey and his art. The overall site is www.rareybird.com and there is a specific page, that gives a great, short account of Rarey himself, who was sadly shot down on June 27, 1944. That page is www.rareybird.com/demon.html

Originally I had planned on doing his marking in 1/48 scale, but decided to do another of his markings (Dudge) on the 1/48 for a p-47 group build on another site. This, then, was meant to be a practice build to try out some weathering techniques (some successful and some not so much…) As stated above, I really love the markings and tried to take a good amount of time to make the plane look good. If, however, you see anything at all that I could have done better, please let me know. I am still trying to soak up as much knowledge from these forums as I can.

Anyway, I hope you do check out the Rarey site, and now, on to the pictures…


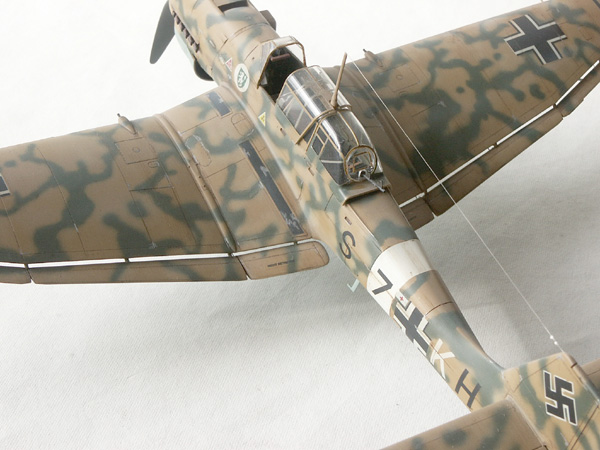
PS. I noticed after taking the pictures, I forgot to do a couple of things on the bottom, and one of the rear gear doors is missing :-( (Must have fallen off – Hope I can find it…)

Hope all is well, and I look forward to any comments – good or bad. Thanks,
Leon
Tigerbait
_VISITCOMMUNITY
North Carolina, United States
Joined: September 28, 2005
KitMaker: 347 posts
AeroScale: 179 posts
Posted: Friday, January 20, 2006 - 01:48 AM UTC
That is smokin hot! Very nice work!!!
Part-timer
_VISITCOMMUNITY
Georgia, United States
Joined: April 11, 2003
KitMaker: 361 posts
AeroScale: 0 posts
Posted: Friday, January 20, 2006 - 01:57 AM UTC
That is gorgeous! I love the little variations in color - very eye-fooling and -appealing. Looks like a super clean build, as well. I like the "scale sheen" effect, too. I usually like them dead flat, but that semi-matte finish is starting to really attract me.

What paint did you use for the green?

wingman
_VISITCOMMUNITY
Pennsylvania, United States
Joined: December 09, 2003
KitMaker: 880 posts
AeroScale: 654 posts
Posted: Friday, January 20, 2006 - 02:19 AM UTC
Outstanding Captain. Very nice build. The build itself, paint, weathering all look great. Is that from Tamiya? Your picture taking is very nice also, good lighting. I really like pic #2. What type of camera did you use? Well done, Wingman out.
Holdfast
Staff MemberPresident
IPMS-UK KITMAKER BRANCH
#056
_VISITCOMMUNITY
England - South West, United Kingdom
Joined: September 30, 2002
KitMaker: 8,581 posts
AeroScale: 4,913 posts
Posted: Friday, January 20, 2006 - 02:44 AM UTC
Hi Leon, a wonderful looking P-47, I like the pre-shading, or is it post shading? I know from personal experience how difficult it is to get pre-shading to show up under dark uppersurface colours.
Now this is not a criticism in anyway and just my opinion. Like I say I do like the pre?shading, I do like it just a tad, and I mean a tad, more subtle. This is the difficult part (asuming pre-shading) another pass with the airbrush may have toned it down just that tad, on the otherhand it might have obliterated it. That was difficult for me to say without it sounding like I'm slagging off your wonderful painting, I'm not and I guess the lighting for the photo doesn't do it justice. It is also the reason I don't use black for pre-shading. I hope to have some pics, soon, so I can do my follow up article, so I won't try and explain it here.
The only thing I would consider is to wether the markings, in a similar manner to the rest of the aircraft. This is where it gets really difficult, because although I can see that you have weathered the decals (Many modellers apply the decals after weathering) they aren't faded as the rest of the aircraft is. It can be done, see my Corsair in the MOM, it has decals faded by differing amounts, over metal and fabric surfaces. However this is time consuming and I'm heading in the direction of actually painting on the markings. This would allow more realistic weathering.
None of the above is criticism of any kind, as I would be very pleased if I produced a model like this, I'm really voicing the direction in which I am personally heading.
A wonderful Jug Leon, I'm looking forward to seeing the pair
Mal
newtothegame
_VISITCOMMUNITY
Washington, United States
Joined: October 05, 2003
KitMaker: 588 posts
AeroScale: 468 posts
Posted: Friday, January 20, 2006 - 05:05 AM UTC
Thanks guys for the comments. I really appreciate it.

To answer some questions...

Part-timer, the main paint I used was Tamiya Olive Drab, but it has a mix of preshading, some lightened OD randomly mottled, and some post shading with highly diluted black-brown mix. In otherwords, it is an experimental hodge-podge, but mostly Olive Drab.

Wingman, Yes the kit is the Tamiya 1/72. It is a beautiful kit. Yes, it is a little more expensive, and yes, it works out to be a fairly simple build, but the cockpit alone makes me feel it is a great choice - no need for aftermarket (seatbelts aside), and a very enjoyable build.

Mal, great constructive criticism. It is a mix of pre- and post- shading. The pre was indeed pretty much covered up, and I discovered that I have a pretty heavy hand when it comes to post shading. In fact I went over many areas after the post shading to try to tone it down again. This was one of the first times I didn't do something and then think "oh well, what's done is done" but actually went back and tried to fix things. As for weathering the decals, I'm glad you said something. I did do the panel lines, but never thought to fade the colors of them. Help me (I'm color blind and have a little trouble with coming up with colors), do you think a very diluted white over the blue would work, or would I need to mix a blue similar, but different to the blue and then put it over very diluted. Again great comment

:-H Thanks again all.
Leon
3442
_VISITCOMMUNITY
Quebec, Canada
Joined: March 23, 2004
KitMaker: 2,412 posts
AeroScale: 0 posts
Posted: Friday, January 20, 2006 - 05:14 AM UTC
Amazing work

Frank
jlmurc
_VISITCOMMUNITY
England - East Anglia, United Kingdom
Joined: August 29, 2005
KitMaker: 1,267 posts
AeroScale: 49 posts
Posted: Friday, January 20, 2006 - 05:17 AM UTC
Great job, its looks like you could jump in and take off.

John
VonCuda
_VISITCOMMUNITY
North Carolina, United States
Joined: November 28, 2005
KitMaker: 2,216 posts
AeroScale: 1,080 posts
Posted: Friday, January 20, 2006 - 07:08 AM UTC
That is a 1/72 kit? Are you kidding?
Awsome job! I can't wait until my painting skills get to your.
Exactly what kind of finish coat did you use? Flat, semi-matte?
Beautiful!

Hermon
Hoss
_VISITCOMMUNITY
Georgia, United States
Joined: January 05, 2006
KitMaker: 96 posts
AeroScale: 61 posts
Posted: Friday, January 20, 2006 - 07:20 AM UTC
Wow! That is a fine job, indeed. I echo the earlier comment...it looks like you should be able to walk out to the flight line and saddle-up, and off you go into the wild blue yonder! Can hardly wait to see some more of your work.

Hoss
newtothegame
_VISITCOMMUNITY
Washington, United States
Joined: October 05, 2003
KitMaker: 588 posts
AeroScale: 468 posts
Posted: Friday, January 20, 2006 - 07:55 AM UTC
Thanks Frank, John, Hermon & Hoss. I really appreciate it!

Wingman, forgot to mention the camera I used is a PowerShot A85. I have really gone back and forth trying to get settings to where I think the pictures come out pretty well. It is still a work in process, but I think the photos are improving.

Hermon, I'm pretty sure it was Testors flat laquer. I say this because I am also in the stage of experimenting with Polly Scale finishes and it might have been their flat, but I'm pretty sure it was the testors. It is funny because it looks more semi gloss in the photos. Which actually I am starting to lean towards as a prefered finish too.

Anyway thanks again all.
Leon
Holdfast
Staff MemberPresident
IPMS-UK KITMAKER BRANCH
#056
_VISITCOMMUNITY
England - South West, United Kingdom
Joined: September 30, 2002
KitMaker: 8,581 posts
AeroScale: 4,913 posts
Posted: Friday, January 20, 2006 - 03:23 PM UTC
Leon,

Quoted Text

The pre was indeed pretty much covered up, and I discovered that I have a pretty heavy hand when it comes to post shading. In fact I went over many areas after the post shading to try to tone it down again. This was one of the first times I didn't do something and then think "oh well, what's done is done" but actually went back and tried to fix things. As for weathering the decals, I'm glad you said something. I did do the panel lines, but never thought to fade the colors of them. Help me (I'm color blind and have a little trouble with coming up with colors), do you think a very diluted white over the blue would work, or would I need to mix a blue similar, but different to the blue and then put it over very diluted. Again great comment


I'm smiling 'cos I've been there Stick with it you will overcome. Work at controling your airbrush and getting the results you want. I am just getting there since changing to a gravity fed brush. Take a look at my articalPacific Corsair which explains how I did the decal fading. Basically I use Medium Sea Grey, highly diluted, it works well on all areas that need fading. Here's some examples:


The Henschel, last pic, was actually done by lightening the paint but I think using Medium Sea Grey works better as the lightened paint looks just like that, lightend paint. The medium sea grey fading looks more like faded paint, if you get my meaning? The MSG, fading is built up gradually and only on the upper surfaces. You could fade the sides as well but then you don't get the slight contrast which helps give that faded look. Thinking about it though it might be worth giving fuselage side decals a quick fading pass, something I haven't done on these models.
Mal
newtothegame
_VISITCOMMUNITY
Washington, United States
Joined: October 05, 2003
KitMaker: 588 posts
AeroScale: 468 posts
Posted: Saturday, January 21, 2006 - 05:18 AM UTC
Thanks Mal. I'll play around with it (probably on a practice quickie build like I said the light touch isn't quite there yet...) Anyway thanks for the tips and the good pictures to help explain. I will admit, it is yet another thing that would slow me down, but idealy, I would like to move towards painting on markings too - which would probably allow for more control of the whole process.

Hope all is well.
Leon
 _GOTOTOP