General Aircraft
This forum is for general aircraft modelling discussions.
This forum is for general aircraft modelling discussions.
Hosted by Jim Starkweather
chipped paint method?
bottlerocket

Joined: November 23, 2005
KitMaker: 66 posts
AeroScale: 0 posts
Posted: Friday, January 20, 2006 - 09:26 PM UTC
When depicting chipped/ worn areas of paint do you first start with an under coat of aluminum color then pull/ scratch the top color off...or brush the chipped-bare metal color as a final step in weathering?
thanks, N
Posted: Friday, January 20, 2006 - 10:41 PM UTC
I undercoat it with Alclad 2 aluminium, put a couple of clear coats over the top to protect it, then the top coat and finally have fun scraping, peeling and scratching the paint off (usually with a scalpel ).
Andy (++)
(++)
Andy
 (++)
(++) Posted: Friday, January 20, 2006 - 10:45 PM UTC
I generally use a silver pencil, it works well but it does have it's disadvantages. It won't go on gloss surfaces so you have to mat coat before applying it. This means that it is not protected, unless you spary another matt coat, then you lose the metallic effect. Idealy you should put your wash on after any paint chipping effects, but you can't with this method, as you will wash it off. If you apply it carefully though none of thes things becomes an issue.

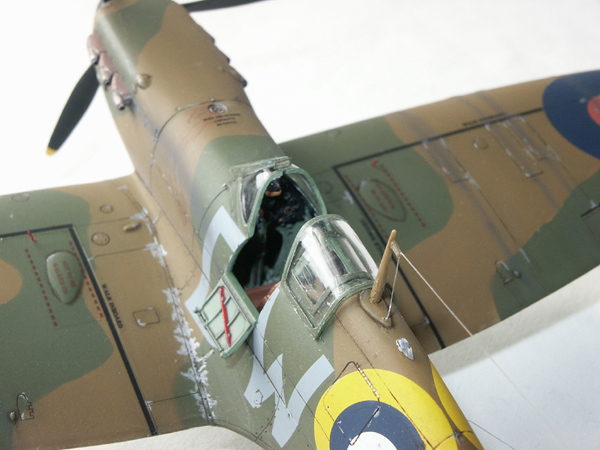
This is my Spitfire MkI done using this method. Just do it where the paint would get removed, there will be a couple of chips on the leading edge of the wings, the fastenings around the engine and gun and ammunition access will lose some paint (they are opened with a screwdriver. The edges of some of these panels will get chipped as they are lifted and put down. Corners and edeges of panels will get chipped, from ammo boxes, boots, flexing when walked on and the like. Some aircraft develop particular paint chipping, the Spitfire loses paint along the port wing to fuselage fairing from the boots of the pilot and ground crew (imaging standing close to the fuselage to work on the engine or to strap the pilot in) you would be standing on the fairing and because it's curved your boots would damage the paint. The starboard wing gets a little, but towards the leading edge, not around the cockpit
I am considering using a silver/natural metal colour as a primer on all my (metal skinned) aircraft to weather back to it. At the moment I will probably use this method on Japanese aircraft, that lost alot of paint.
If you are looking for a simple and easy way to simulate paint chipping then consider using a silver pencil
Mal

This is my Spitfire MkI done using this method. Just do it where the paint would get removed, there will be a couple of chips on the leading edge of the wings, the fastenings around the engine and gun and ammunition access will lose some paint (they are opened with a screwdriver. The edges of some of these panels will get chipped as they are lifted and put down. Corners and edeges of panels will get chipped, from ammo boxes, boots, flexing when walked on and the like. Some aircraft develop particular paint chipping, the Spitfire loses paint along the port wing to fuselage fairing from the boots of the pilot and ground crew (imaging standing close to the fuselage to work on the engine or to strap the pilot in) you would be standing on the fairing and because it's curved your boots would damage the paint. The starboard wing gets a little, but towards the leading edge, not around the cockpit

I am considering using a silver/natural metal colour as a primer on all my (metal skinned) aircraft to weather back to it. At the moment I will probably use this method on Japanese aircraft, that lost alot of paint.
If you are looking for a simple and easy way to simulate paint chipping then consider using a silver pencil

Mal


VonCuda

Joined: November 28, 2005
KitMaker: 2,216 posts
AeroScale: 1,080 posts

Posted: Saturday, January 21, 2006 - 11:30 AM UTC
Hey bottlerocket,
I use the silver pencil as well. The P-40 I'm working on now had a couple of places that needed "chipping" but I realized this only after I'd applyed a coat of future polish so I used a new toothpick and carefully dab on some aluminum paint.
Hope this helps
Hermon
I use the silver pencil as well. The P-40 I'm working on now had a couple of places that needed "chipping" but I realized this only after I'd applyed a coat of future polish so I used a new toothpick and carefully dab on some aluminum paint.
Hope this helps
Hermon
Probuilder

Joined: January 10, 2005
KitMaker: 193 posts
AeroScale: 0 posts

Posted: Sunday, January 22, 2006 - 02:47 AM UTC
I suppose it depends on how technical or accurate you want to be?? Me, I use buffing metelizer paints and spray the whole plane. Then I buff the areas of "High Wear" until they shine because areas such as canopy frames/access panels and certain leading edge parts become very shiny with constant use and wear. I apply whatever panel weather I will use later on the plane and seal it with clear coat. i then use liquid mask applied to the areas I want to chip and paint and weather the plane as usual after this I pull off some of the paint chips with tape and shoot a dull or flat coat to show oxidized aluminum and then I pull up the liquid mask from the rest and get very nice shiny paint chips already weathered!! the result is very nice.
 |


