Hi Guys:
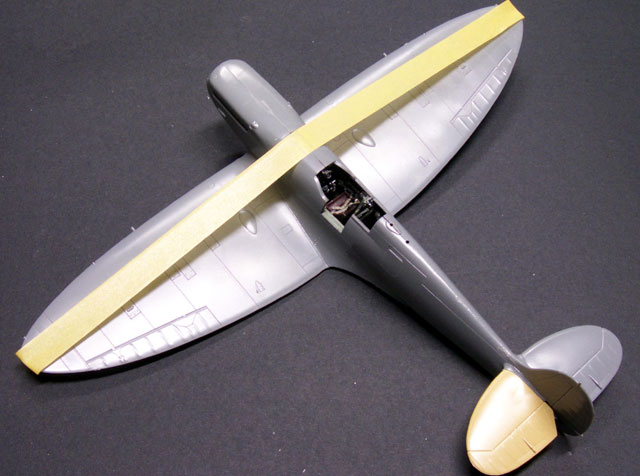
This is one of the kits in wich Iīm working. Itīs a Tamiya Spitfire Mk Vb Trop in 1/48. Itīs resting to finish: the decaling in the undersides of the wings, some minor details, the canopy and the mate coat with some weathering.
Decals are from a Hasegawa Mk Vb Trop kit and paints are Model Master enamels. The shiny coat is a similar Future product.
Coments will be appreciated.
Hosted by Rowan Baylis
Spitfire Mk Vb Trop in progress
csch
Buenos Aires, Argentina
Joined: December 27, 2002
KitMaker: 1,941 posts
AeroScale: 1,040 posts
Joined: December 27, 2002
KitMaker: 1,941 posts
AeroScale: 1,040 posts
Posted: Sunday, February 05, 2006 - 07:55 AM UTC
capnjock
United States
Joined: May 19, 2003
KitMaker: 860 posts
AeroScale: 75 posts
Joined: May 19, 2003
KitMaker: 860 posts
AeroScale: 75 posts
Posted: Sunday, February 05, 2006 - 08:50 AM UTC
Like it!!!!!!!!
capnjock
capnjock
VonCuda
North Carolina, United States
Joined: November 28, 2005
KitMaker: 2,216 posts
AeroScale: 1,080 posts
Joined: November 28, 2005
KitMaker: 2,216 posts
AeroScale: 1,080 posts
Posted: Sunday, February 05, 2006 - 08:56 AM UTC
Looking very nice Carlos!
I was trying to find any seams but you have blended them beautifully. Can't wait to see the finished product.
Hermon
I was trying to find any seams but you have blended them beautifully. Can't wait to see the finished product.
Hermon
csch
Buenos Aires, Argentina
Joined: December 27, 2002
KitMaker: 1,941 posts
AeroScale: 1,040 posts
Joined: December 27, 2002
KitMaker: 1,941 posts
AeroScale: 1,040 posts
Posted: Tuesday, February 07, 2006 - 07:26 AM UTC
Thanks guys.
Hermon: to eliminate the seams is a must. I know that with some kits this is difficult and take a lot of work, but with this Tamiya kit itīs very easy, just sanding smooth and work carefully. I even didnīt needed any filler in the construction.
Posted: Tuesday, February 07, 2006 - 03:19 PM UTC
Hi Carlos.
Thats one good looking Spit youve got there.
Looking forward to seeing it finished!
Yep,seam lines are a pain.A kit with no filler???,,
I am now looking forward to building my Tamiya Spit even more!
Its always nice to see your work
Thats one good looking Spit youve got there.
Looking forward to seeing it finished!
Yep,seam lines are a pain.A kit with no filler???,,
I am now looking forward to building my Tamiya Spit even more!
Its always nice to see your work
csch
Buenos Aires, Argentina
Joined: December 27, 2002
KitMaker: 1,941 posts
AeroScale: 1,040 posts
Joined: December 27, 2002
KitMaker: 1,941 posts
AeroScale: 1,040 posts
Posted: Tuesday, February 07, 2006 - 05:26 PM UTC
Thank you Niguel.
I believe this is one if not the most easiest kit to build and yes, if you go with care youīll need no filler at all
Build yourself one of these, youīll be very happy with it.
I believe this is one if not the most easiest kit to build and yes, if you go with care youīll need no filler at all
Build yourself one of these, youīll be very happy with it.
csch
Buenos Aires, Argentina
Joined: December 27, 2002
KitMaker: 1,941 posts
AeroScale: 1,040 posts
Joined: December 27, 2002
KitMaker: 1,941 posts
AeroScale: 1,040 posts
Posted: Tuesday, February 07, 2006 - 07:13 PM UTC
Hi Nigel:
This is how I attach the wings to the fuselage (this Mk I picture isnīt mine) in Spitfire kits. Before gluing you dry fit until youīre sure of the propper alignmnet of the parts and then you do this with the tape after appling the glue and let dry for severall hours. In the Tamiya Spits this will ensure you not to use filler in the wings to fuselage joint.
Posted: Wednesday, February 08, 2006 - 09:59 PM UTC
Hi Carlos.
Thanks,,thats a great tip.
My only reservation about that method would be the possibility of pulling the wings up out of line.
Minor gaps such as wing root joins hold no fear for me since I discovered the sanding without filling tip a few weeks ago.
Looking forward to seeing your Spit finished.
Great work your doing over there.
Thanks,,thats a great tip.
My only reservation about that method would be the possibility of pulling the wings up out of line.
Minor gaps such as wing root joins hold no fear for me since I discovered the sanding without filling tip a few weeks ago.
Looking forward to seeing your Spit finished.
Great work your doing over there.
Posted: Wednesday, February 08, 2006 - 11:58 PM UTC
Nice looking Spitfire Carlos (that goes without saying, all Spitfires look good )
Mal
Mal
csch
Buenos Aires, Argentina
Joined: December 27, 2002
KitMaker: 1,941 posts
AeroScale: 1,040 posts
Joined: December 27, 2002
KitMaker: 1,941 posts
AeroScale: 1,040 posts
Posted: Thursday, February 09, 2006 - 10:47 PM UTC
Thanks Nigel and Mal.
Nigel:
With Tamiya Spits (I used it succesfully also in Hasegawa kits) you donīt have to be afraid of the dihedral if you use this method. Just donīt give excesive tension to the tape. If you look at the aircraft from the front youīll be able to see the correct angle of the wings. If I can avoid sanding, better. Sanding always delete some of the fine details.
How is that Tip about sanding the wing to fuselage join without flling Can you tell me about it ?
Posted: Thursday, February 09, 2006 - 11:38 PM UTC
Hi Carlos.
Ive had a look but cant find the thread.It was about 6 weeks ago.
Mask around the area to be filled and slap on the filler.Then using a cotton bud dipped in nail varnish remover wipe the excess away.
Result,,a perfectly filled gap,smooth,blended and no loss of detail.
Very easy to do and only takes a few minutes.
csch
Buenos Aires, Argentina
Joined: December 27, 2002
KitMaker: 1,941 posts
AeroScale: 1,040 posts
Joined: December 27, 2002
KitMaker: 1,941 posts
AeroScale: 1,040 posts
Posted: Saturday, February 11, 2006 - 05:42 AM UTC
Got it Nigel. Now I remember it.
Thanks.
Thanks.
Darson
Victoria, Australia
Joined: June 14, 2005
KitMaker: 247 posts
AeroScale: 60 posts
Joined: June 14, 2005
KitMaker: 247 posts
AeroScale: 60 posts
Posted: Saturday, February 11, 2006 - 05:31 PM UTC
Hi Carlos,
Great looking Spit you've got yourself there. The upper half of the aircraft looks spot on but remember when you weather the lower half, especially the belly that the Spitfire was a notorious leaker of oil and from the engine cover. These oil leaks streaks stain (heavily) all the way back to the rear edge of the wings and possibly further.
Looking forward to seeing the finished product.
Cheers
Darren
csch
Buenos Aires, Argentina
Joined: December 27, 2002
KitMaker: 1,941 posts
AeroScale: 1,040 posts
Joined: December 27, 2002
KitMaker: 1,941 posts
AeroScale: 1,040 posts
Posted: Saturday, February 11, 2006 - 06:51 PM UTC
Thanks Darren.
Iīll keep that in mind in the weathering process.
Posted: Sunday, February 12, 2006 - 12:12 AM UTC
Hi Carlos.
The Tamiya Mk1 Spit in 1/72 has been sitting on my shelf now for a few weeks whispering "build me build me"
Im working on my 5th model at the moment and after that Im going to decide if I feel up to tackling something with all the interior detail.
I get the feeling Im going to really enjoy putting it together