_GOTOBOTTOM
General Aircraft
This forum is for general aircraft modelling discussions.
vacucrap..er...vacuformed canopy
VonCuda
_VISITCOMMUNITY
North Carolina, United States
Joined: November 28, 2005
KitMaker: 2,216 posts
AeroScale: 1,080 posts
Posted: Wednesday, March 15, 2006 - 07:39 AM UTC
Just got my order in today from Squadron. One of the kits is a Bloch MB155 C1 in 1/48 by F.M of France. This kit includes metal parts, PE, resin, and...............(drum roll)......................a vacuformed canopy.....................

Ok, up till now I have only heard about vacuformed canopies and thought they were something really cool and realistic. I was wrong. This is a piece of plastic that looks somewhat like a canopy but belongs on a snap together kit for kids. Is this a joke? Is this piece of crap really what I have to work with? What the heck do I do to it in order to make it match the rest of the kit for realism?
Jean-Luc, you're French............tell me what to do. At this stage I'm really considering making this kit into a dio of a French plane that has been blown up on the ground in an air strike so I don't have to mess with this "vacucrap" canopy.

Hermon
TedMamere
_VISITCOMMUNITY
Moselle, France
Joined: May 15, 2005
KitMaker: 5,653 posts
AeroScale: 4,347 posts
Posted: Wednesday, March 15, 2006 - 01:17 PM UTC

Quoted Text

Jean-Luc, you're French............tell me what to do.


Hi Hermon!

Welcome to the fantastic world of short run! But I don't think the fact that I'm French will help you a lot with your vacuform canopy! :-)
I don't like vacuform canopies that much neither and in general prefer the injected ones. I looked at the canopies (vacform) in my FM Breguet 693 and must say they look Ok, even if only one set is provided. Usually there are two (one spare) and I hope it's the case with your kit.
Anyway, my suggestion would be to dip your canopy in future to achieve more transparency. Another way to get "rid off" your problem is to represent the canopy in open position. The imperfection are less noticable... but you have to cut the clear vacform parts in pieces! That's why I asked if your kit comes with a spare.
There is one thing you have to remember: for every problem, there is a solution! And by that, I don't mean the one you used on your Vindicator! :-)

Jean-Luc
lampie
#029
_VISITCOMMUNITY
England - East Midlands, United Kingdom
Joined: December 23, 2005
KitMaker: 6,249 posts
AeroScale: 3,270 posts
Posted: Wednesday, March 15, 2006 - 08:08 PM UTC
Hi Hermon.
Vacuform :-)
I used one for the first time on my 109 a couple of months ago.I was expecting something similar to an injected one and was surprised when this chunk of clear plastic arrived with a canopy shape in the middle of it
I found it worked well if you cut (very carefully,,dont slip there boy!) around the canopy shape,leaving a couple of mm around it.Then the fun starts. It was,for me anyway,a case of continual sanding and testfitting until it nestled in quite nicely.Took almost a whole day if I remember correctly.
One advantage of these canopies is that you can make sure it fits all around the cockpit opening snugly.
The model Im working on at the moment is my first short run kit,no pins to line up the parts,flash all over the various sprues etc.When I first opened the box I thought "how am I going to manage this,where do I start?"
So far,the only advice I can give is to test fit everything,then test fit it all again before you go anywhere near it with the glue,and be prepared to sand and scrape away at a lot of the parts to get them to fit.
Helluva challenge and its coming together nicely,albeit very slowly,and I know that the satisfaction Im going to feel when its done is going to be immense.
Have fun and dont get mad and send it to "Vindicator Land"
Nige
Grumpyoldman
Staff Member_ADVISOR
KITMAKER NETWORK
_VISITCOMMUNITY
Florida, United States
Joined: October 17, 2003
KitMaker: 15,338 posts
AeroScale: 836 posts
Posted: Wednesday, March 15, 2006 - 08:46 PM UTC
Man...I must be getting old..... I remember when modelers cried for vacuformed canopies, and would tried to trade their first born sons for a good working Mattel Vac-u-former to make them.......
a few simple tips, and some careful trimming will be all you need to learn.
Tip 1.
Due to the thinness of the plastic it is very flimsy once trimmed from the backing sheet.....the deeper the draw, the thinner the top areas are going to be, this can be easily over come by filling the canopy before you cut it out from the backing sheet. Simple Plaster of Paris works well for this. Some use clay, but this leaves a residue sometimes depending on what clay you use. The plaster filling works well for a new buck, in case you screw up, and need to make a new one.

Tip2.
Before you cut it out, take a nice fine line Sharpie, and mark the outline. This will make it easier to cut out.
Tip 3.
Trim as much of the backing sheet away as you safely can. (With the plaster buck inside) Using small sharp cuticle scissors is fine. Just go slowly, and take off small pieces, other wise you run the chance of splitting the plastic. Once you have most of the backing away, you can now start to trim to size.
Tip 4.
Take a NEW scalpel blade and lightly follow your black sharpie outline. Score lightly on each pass, eventually you will cut cleanly through. Test fit to model, mark again where it needs a little trimming. and score through again, or a little bit of sanding, maybe all that is needed. Do all your trimming only when it is in the plaster buck. Otherwise you probably will collapse it. The entire key is going slowly and trimming only a little at a time. You can remove, but you can't add. Also remember if you use those little cuticle scissors to take off only tiny little peces at a time, or you will surely split the plastic.
Tip5.
Depending on who made your canopy, you will find varying quality. Falcon's are great, as are Aero-Clubs. They are well formed, and have decently marked frame lines others are so hot, and many will have no frame lines at all. If you have one of these, don't fret, the frames can easily be made after the canopy is cut and fitted, using either tape, or painted decal film cut to size.
Tip 6
If your canpoy is of the sliding type, it is easy to display open. Once again after it fits the model, put back in Plaster buck, and again lighly score along the line when the windscreen and canopy meet, go lightly and slowly, and you'll have a nice thin opened canopy.
Tip7.
Dip in Future.
VonCuda
_VISITCOMMUNITY
North Carolina, United States
Joined: November 28, 2005
KitMaker: 2,216 posts
AeroScale: 1,080 posts
Posted: Wednesday, March 15, 2006 - 08:58 PM UTC
Hey thanks for those instructions Dave. I have printed them out so I can slip them in the box with the kit. I think I'll wait a loooooooooong while before I build this kit.

Jean-Luc, no, the fact that you're French won't help me with my canopy........but you could at least read the directions for me since I don't speak French. :-)

Nigel, I won't send this kit to Vindicator land.....I'll just put it up high on the shelf and not let it mingle with the other kits for a while.

Hermon
Grumpyoldman
Staff Member_ADVISOR
KITMAKER NETWORK
_VISITCOMMUNITY
Florida, United States
Joined: October 17, 2003
KitMaker: 15,338 posts
AeroScale: 836 posts
Posted: Wednesday, March 15, 2006 - 09:05 PM UTC
Hermon,
Years ago, there were guys that use to use two canopies, on one, they would cut out the glass sections, leaving just the frames, and then layer the frames onto the other canopy. Of course they did this in the larger 1/48 and 1/32 scales.

Buy a few squadron canopies to practice on, they are cheap enough, and once you get the hang of it, you'll be ready to tackle that kit with only one canopy with out fear of screwing it up.
grimreaper
_VISITCOMMUNITY
Kansas, United States
Joined: April 11, 2005
KitMaker: 417 posts
AeroScale: 6 posts
Posted: Wednesday, March 15, 2006 - 09:07 PM UTC
Man...I must be getting old..... I remember when modelers cried for vacuformed canopies, and would tried to trade their first born sons for a good working Mattel Vac-u-former to make them.......

Dave,
My son never has forgiven me for doing that. LOL :-)
Oh, the Mattel Vac-u-form still works too.
Gary
Grumpyoldman
Staff Member_ADVISOR
KITMAKER NETWORK
_VISITCOMMUNITY
Florida, United States
Joined: October 17, 2003
KitMaker: 15,338 posts
AeroScale: 836 posts
Posted: Wednesday, March 15, 2006 - 09:12 PM UTC
Mine went in the flood........ :-(
md72
#439
_VISITCOMMUNITY
Washington, United States
Joined: November 05, 2005
KitMaker: 4,950 posts
AeroScale: 3,192 posts
Posted: Wednesday, March 15, 2006 - 10:24 PM UTC

Quoted Text

Mine went in the flood........ :-(


So, Dave, since you were there, why did Noah bring those two @#$%^& mosquitos? :-)

On a less mocking note, my son lost most of his stuff in New Orleans.
Grumpyoldman
Staff Member_ADVISOR
KITMAKER NETWORK
_VISITCOMMUNITY
Florida, United States
Joined: October 17, 2003
KitMaker: 15,338 posts
AeroScale: 836 posts
Posted: Thursday, March 16, 2006 - 12:10 AM UTC
Sorry to hear that Mark, I know the feeling..... mine was when Floyd came through a few years ago. I watched my basement become an indoor swimming pool as the Passaic River came in.
VonCuda
_VISITCOMMUNITY
North Carolina, United States
Joined: November 28, 2005
KitMaker: 2,216 posts
AeroScale: 1,080 posts
Posted: Thursday, March 16, 2006 - 08:17 AM UTC
Hey Dave,
small world ain't it? Floyd flooded my basement also, and I live on top of a freakin' mountain. He distroyed the big screen TV, computer, carpet, lower 3 shelves of my book collection, and on and on.

BTW, that suggestion of yours about cutting out the frame on one canopy and overlaying it onto the other sounds like the shizzy (shizzy means cool according to the kids on my baseball team).

Hermon
Grumpyoldman
Staff Member_ADVISOR
KITMAKER NETWORK
_VISITCOMMUNITY
Florida, United States
Joined: October 17, 2003
KitMaker: 15,338 posts
AeroScale: 836 posts
Posted: Thursday, March 16, 2006 - 09:40 AM UTC
Hermon, being and old flatus' doesn't mean we ain't shizzy...... ya know.... we did all kinds of phat things back then, like scratch build multi-layer instrument panels with bezels, switches, levers, and gages before Eduard ever was born, much less pumping out photo etch. Why we even scratch-built "god forbid" entire cockpits before the battle cry of "when is Black Box releasing a cockpit for this 1919 Farley Fruitbat?" And yes we did sell our souls to get a good working Vac-u-former.
propboy44256
_VISITCOMMUNITY
Ohio, United States
Joined: November 20, 2002
KitMaker: 1,038 posts
AeroScale: 285 posts
Posted: Thursday, March 16, 2006 - 06:03 PM UTC
A little off topic, but Squadron sells sheet plastic to make your own vacuum formed canopies from existing canopies. Heat and stretch over..Seems like that might not work well at all..Id be interested if anaybody has tried it.
Littorio
_VISITCOMMUNITY
England - South East, United Kingdom
Joined: September 15, 2004
KitMaker: 4,728 posts
AeroScale: 1,351 posts
Posted: Sunday, March 19, 2006 - 08:12 PM UTC
Hi Hermon,

I feel for you but you want to see what I got this weekend, three yep 3, 1/144 scale kits all with vacform canopies...yippes.

But on a more positive note at least the company 'Aeroclub' supply a metal former to place under the canopies to help cut them out.

Metal former + vacform canopy = cheaper than injection canopy?

Ciao
Luciano
lampie
#029
_VISITCOMMUNITY
England - East Midlands, United Kingdom
Joined: December 23, 2005
KitMaker: 6,249 posts
AeroScale: 3,270 posts
Posted: Sunday, March 19, 2006 - 09:23 PM UTC
Last week I spent a whole day sanding and scraping away at the vacuform canopy for my Spit.
After all that it still needed a drop of filler to sit properly.
They are a real challenge and Im pretty sure at the moment I prefer injection canopies :-)
Same as everything though,,take your time and dry fit again and again before you go anywhere near it with the glue
Holdfast
Staff MemberPresident
IPMS-UK KITMAKER BRANCH
#056
_VISITCOMMUNITY
England - South West, United Kingdom
Joined: September 30, 2002
KitMaker: 8,581 posts
AeroScale: 4,913 posts
Posted: Monday, March 20, 2006 - 12:51 AM UTC
Vac formed canopy on the Airfix 1/48 Spitfire Mk 22 a vast improvement over the kit injection canopy, which is much too small.

Mal
VonCuda
_VISITCOMMUNITY
North Carolina, United States
Joined: November 28, 2005
KitMaker: 2,216 posts
AeroScale: 1,080 posts
Posted: Monday, March 20, 2006 - 03:18 AM UTC
Mal,
Great looking Spitfire, as usual
How exactly did you get the tiny scratches out of your vac canopy? Mine is so thin that I'm afraid to sand on it and was thinking perhaps a coat of Future would do the trick.

Hermon
Holdfast
Staff MemberPresident
IPMS-UK KITMAKER BRANCH
#056
_VISITCOMMUNITY
England - South West, United Kingdom
Joined: September 30, 2002
KitMaker: 8,581 posts
AeroScale: 4,913 posts
Posted: Monday, March 20, 2006 - 03:37 PM UTC
If necessary I would sand out any scratches before removal from the backing, but scratches that deep would leave you with a very thin area on your canopy, so I guess they are minor scratches fom movement around the box? Dipping in Future should do the trick, just clean it first to get rid of any release agent.
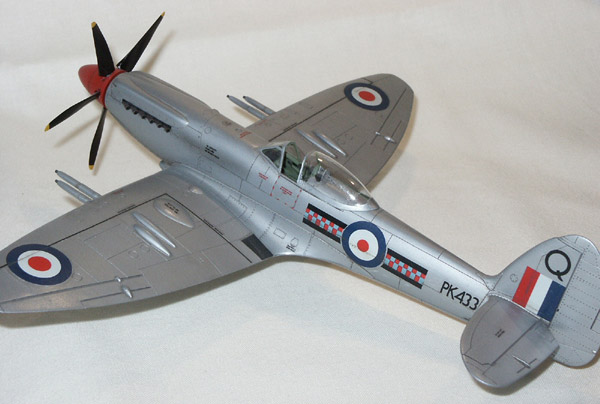
The canopy was cut out using multiple, light, passes around the part line using a new No. 11 (pointy) scalpel blade, no sanding necessary
Mal
 _GOTOTOP