World War II: USA
Aircraft of the United States in WWII.
Hosted by Rowan Baylis
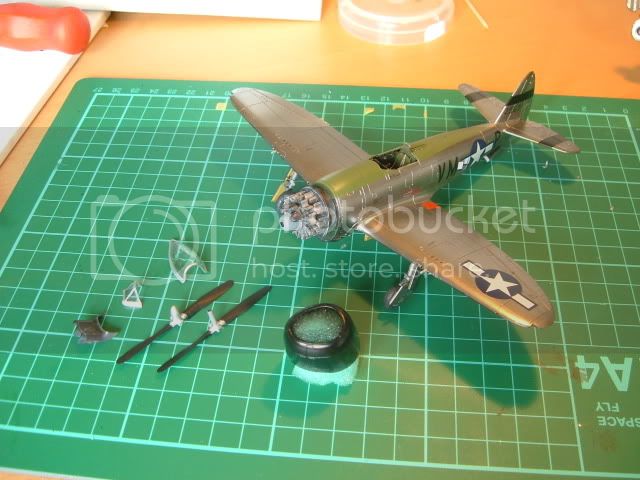
Tamiya P47-D in progress
lampie
#029
_VISITCOMMUNITY
England - East Midlands, United Kingdom
Joined: December 23, 2005
KitMaker: 6,249 posts
AeroScale: 3,270 posts
Posted: Tuesday, April 25, 2006 - 06:18 PM UTC
More progress!
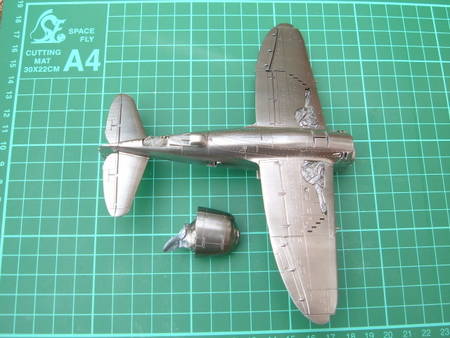
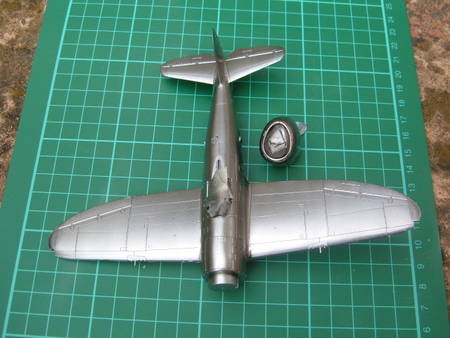
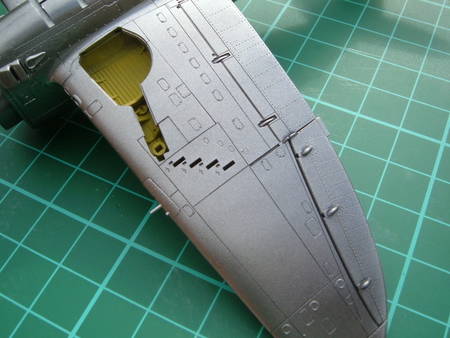
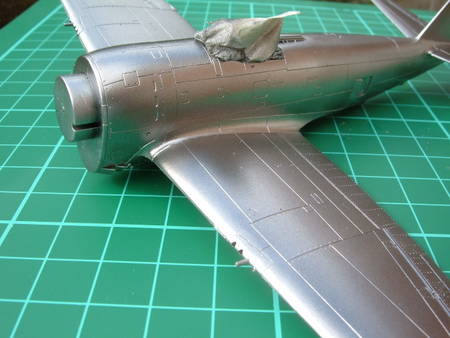
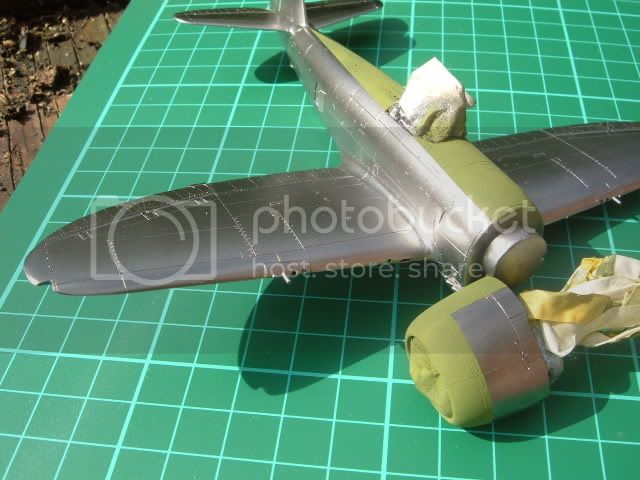
I picked up some Alclad polished alluminium at the Hinkley show last weekend.This is the first time Ive used it and I have to say I like it.Sprays really easily but you have to be a bit careful as it can be a bit fiesty.
I found a strength of spray I liked and wound the screw in on my Badger 150 to get a constant flow.Seemed to work well.After a couple of close up coats I misted on a further 2 coats from further away and its turned out rather nice.
Heres the pics,,comments and advice welcome as always.
Nige


newtothegame
_VISITCOMMUNITY
Washington, United States
Joined: October 05, 2003
KitMaker: 588 posts
AeroScale: 468 posts
Posted: Tuesday, April 25, 2006 - 07:05 PM UTC
Looks great Nigel! What do you mean the alclad can be fiesty? I haven't used it yet either and would love to hear things to look out for.
Leon
lampie
#029
_VISITCOMMUNITY
England - East Midlands, United Kingdom
Joined: December 23, 2005
KitMaker: 6,249 posts
AeroScale: 3,270 posts
Posted: Tuesday, April 25, 2006 - 08:17 PM UTC
Hi Leon and thanks.
Fiesty Alclad...it seems to spray a lot quicker than enamels or acrylics so you have to be really careful adjusting the piant flow.I practiced on a piece of plastic first and found an output I was comfortable with and set the airbrush to that,ie turned it into a single action almost.
Its also a little hard to see at first against the black primer and you are actually putting more paint on than you realise.I found it best to work further away from the model than normal and just mist it on.
It will show up any blemishes though,so be really meticulous after priming.
Have to say its great stuff though,the photos dont do the finish justice at all.
Im really pleased with how its turned out. I have a dark aluminium as well so Im going to do the drop tank in that for a bit of contrast.
A couple of better photos now the lights improved.


Watch this space
Nige
lampie
#029
_VISITCOMMUNITY
England - East Midlands, United Kingdom
Joined: December 23, 2005
KitMaker: 6,249 posts
AeroScale: 3,270 posts
Posted: Wednesday, April 26, 2006 - 07:49 PM UTC
Making the most of a few days off before work calls again and today Ive managed to get the anti-glare panels sprayed on.Next stage will be getting the engine attached and hopefully I'll get the decals on over the next couple of days as well.
Ive made a start on the undercarriage and will post some progress shots soon.
Heres how it stands at present.
betheyn
Staff MemberSenior Editor
AEROSCALE
#019
_VISITCOMMUNITY
England - South East, United Kingdom
Joined: October 14, 2004
KitMaker: 4,560 posts
AeroScale: 2,225 posts
Posted: Wednesday, April 26, 2006 - 08:26 PM UTC
That's coming along really nicely Nige.
So is this the start of a nmf build frenzy. Once you start with the shiny planes its hard to stop :-) .
keep posting the pics.
Andy (++)
Merlin
Staff MemberSenior Editor
AEROSCALE
#017
_VISITCOMMUNITY
United Kingdom
Joined: June 11, 2003
KitMaker: 17,582 posts
AeroScale: 12,795 posts
Posted: Wednesday, April 26, 2006 - 09:21 PM UTC
Hi Nigel

That's looking really good! I just tried Alclad II today too for parts of my Yak 1 - very nice indeed! This was following something of a disaster using Vallejo's acrylic aluminium - so, as you can imagine, it was a relief to find the Alclad worked so well.

All the best

Rowan
newtothegame
_VISITCOMMUNITY
Washington, United States
Joined: October 05, 2003
KitMaker: 588 posts
AeroScale: 468 posts
Posted: Wednesday, April 26, 2006 - 09:53 PM UTC
It looks great! Wow! I have to get the guts to try the stuff. Thanks for the extra tips.

Leon
Flyinghigh
_VISITCOMMUNITY
Michigan, United States
Joined: April 26, 2006
KitMaker: 2 posts
AeroScale: 0 posts
Posted: Wednesday, April 26, 2006 - 11:51 PM UTC
Hey Nigel: I didn't through as much detail on the seat because I put the piolet in my P47 thunder Bolt. I also made mine with my 9 year old son watching my every move. My son wants to be a model builder like me. He has not mastered the skill to make it look good yet but he is a quick study and ask a lot of questions thats a good thing. I told him when we move to our new house in a year or so we will be setting up and making a diorama that will be at least as large as a sheet of standard plywood 4Ft wide by 7Ft.long.

Well I have to fly.

I will check back for your update and progress on your P47.

Steve(Wing Commander)
csch
_VISITCOMMUNITY
Buenos Aires, Argentina
Joined: December 27, 2002
KitMaker: 1,941 posts
AeroScale: 1,040 posts
Posted: Thursday, April 27, 2006 - 12:01 AM UTC
Hi Nigel
That´s going on very well. Nice job.
Have you planed to paint some panels with another metalizer shade ? That gives a realistic look to the kit.
Keep on posting.
:-H
lampie
#029
_VISITCOMMUNITY
England - East Midlands, United Kingdom
Joined: December 23, 2005
KitMaker: 6,249 posts
AeroScale: 3,270 posts
Posted: Thursday, April 27, 2006 - 12:15 AM UTC
Hi guys.
Thanks for the comments and advice.Its what makes this site so good IMHO.
Work is progressing slowly as Im trying to finish my entry for Move It Again as Im away for a few weeks after Monday. The undercarriage is coming together. Almost a minor catastrophy earlier as one of the tiny red decals for the stars on the main wheels made a dive for the carpet monsters cave but I grabbed it from its jaws,after a half hour struggle and its now in place.
Im going to do the drop tank in a dark alluminium for contrast but Im trying to resist doing a few panels darker because, A,,Im terrified of messing it up,and B I just love that polished finished. Not being a rivet counter it doesnt really bother me and I will try it in future on a cheaper kit.


Quoted Text

So is this the start of a nmf build frenzy. Once you start with the shiny planes its hard to stop .


Hmm,,well,,,,theres another P47 on its way from Ebay,(the Heller P47M),and I havent got a Mustang in my stash,and then theres always the English Electric Lighting which NMF could almost have been designed for, and a late model Spitfre...who knows?
Nige
almonkey
_VISITCOMMUNITY
England - East Midlands, United Kingdom
Joined: March 23, 2003
KitMaker: 2,124 posts
AeroScale: 788 posts
Posted: Thursday, April 27, 2006 - 12:55 AM UTC
nigel, i've not used alclad for a whole plane just sections here and there, feisty is exactly right, and slowly misting coats on is the only way to spray this stuff. but don't it look good!
your going to have to stop this guys! after seeing andy's nmf gloster e31 and now your thunderbolt, plus the fact i have some alclad is giving me ideas........
OF COURSE! i have a matchbox gladiator kit in my stash, alclad plus a little rigging, that'll do for me!
lampie
#029
_VISITCOMMUNITY
England - East Midlands, United Kingdom
Joined: December 23, 2005
KitMaker: 6,249 posts
AeroScale: 3,270 posts
Posted: Sunday, April 30, 2006 - 03:31 PM UTC
Progress and a problem
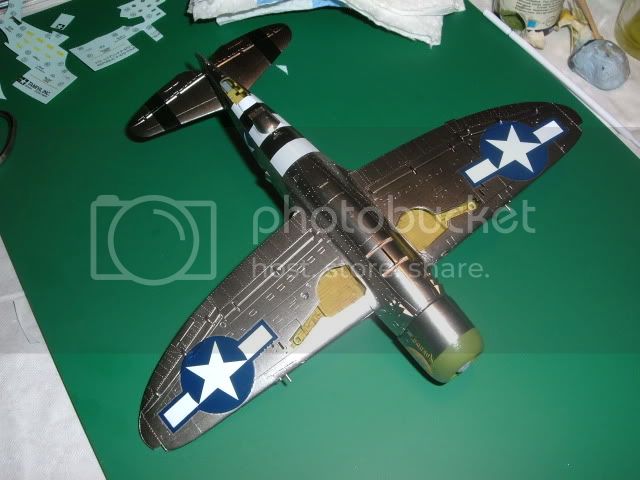
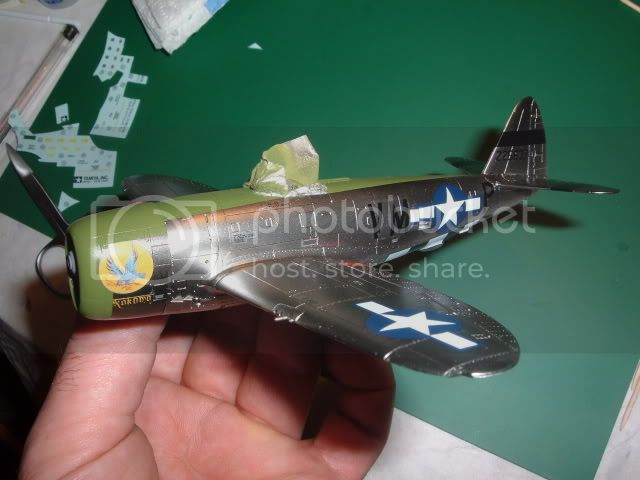
After a prolonged decal session over the last 3 days they are finally on.The decals are top quality and went on really well with microset and microsol.
However,when I fitted the cowling guess what?,,as Im sure you'll all pickup straight away the antiglare panel is too low on the cowling. I decided after a couple of days pondering that I cant live with it.So armed with some Tamiya masking tape and a "Plan B" I got stuck in to try and solve it.
Despite a couple of coats of Klear,while masking part of the starboard decal came away
So,,Plan B it is.I had decided early on in the build that I was going to buy the same kit again and finish it in the "checkerboard" scheme with a full array of ordnance.This will give me a set of spare cowling decals so I can strip this one and repaint.
Moral of the story?,Think twice,paint once!
Here the pics,complete with cowling so you can decide for yourselves if Ive made the right decision.


This will be the last in progress post for a while as Im away working for the next 7 weeks.
Nige
TedMamere
_VISITCOMMUNITY
Moselle, France
Joined: May 15, 2005
KitMaker: 5,653 posts
AeroScale: 4,347 posts
Posted: Sunday, April 30, 2006 - 05:01 PM UTC
Hi Nigel!

Looks very good!
The fact that the plane has two stars on the underside is unusual! I suppose it was that way on the real one... Anyway, this is a great Aluminium finish, congratulations!

Jean-Luc
Merlin
Staff MemberSenior Editor
AEROSCALE
#017
_VISITCOMMUNITY
United Kingdom
Joined: June 11, 2003
KitMaker: 17,582 posts
AeroScale: 12,795 posts
Posted: Sunday, April 30, 2006 - 05:26 PM UTC
Hi Nigel

That is a beautiful n/m finish! Being new to Alclad II myself, I've got a question - when you say "despite a couple of coats of Klear", did you apply it over all the Alclad, and did it effect the finish?

All the best

Rowan
newtothegame
_VISITCOMMUNITY
Washington, United States
Joined: October 05, 2003
KitMaker: 588 posts
AeroScale: 468 posts
Posted: Sunday, April 30, 2006 - 07:26 PM UTC
That is a great finish Nigel. The alclad does look really nice.

I agree with your choice to try to fix the cowling anti-glare. Hopefully, it will all come out ok in the end, but attempting to fix it will always sit better with you than trying nothing.

Overall, the build looks really good!
Leon
lampie
#029
_VISITCOMMUNITY
England - East Midlands, United Kingdom
Joined: December 23, 2005
KitMaker: 6,249 posts
AeroScale: 3,270 posts
Posted: Sunday, April 30, 2006 - 09:12 PM UTC
Hi all.
Thanks for the comments and advice.
Jean Luc.

Quoted Text

The fact that the plane has two stars on the underside is unusual! I suppose it was that way on the real one...


I guess so.I just followed the instructions with the kit.Maybe a dedicated P47 rivet counter would disagree but Im not one so I'll go with Tamiyas recomendation.
Rowan.

Quoted Text

Being new to Alclad II myself, I've got a question - when you say "despite a couple of coats of Klear", did you apply it over all the Alclad, and did it effect the finish?


I felt I had to apply Klear to the cowling as the "eagle" decal sits over Alclad and the acrylic anti glare.If anything,there is a very slight darkening of the NMF but it hasnt done anything to detract from the shine.I believe Mal coated his P47 after decalling with minimal if no adverse effects.The whole plane will need some sort of protection before I get to the wash stage anyway and unless anyone can suggest otherwise I reckon Klear is the way to go.
Leon

Quoted Text

I agree with your choice to try to fix the cowling anti-glare. Hopefully, it will all come out ok in the end, but attempting to fix it will always sit better with you than trying nothing.


I totally agree.The cowling came away no problem so I wont have to worry about masking off anything else.I had ummed and aaahed for a couple of days about trying to redo it and Im glad Ive decided to in the end.
It would have been the first thing anybody commented on in the future and I know I would have regretted it if I hadnt decided to do something about it.
Besides,,I cant think of a better excuse to build this excellent kit more than once
Thanks for the comments on the NMF guys.For a first Alclad experience Im extremely impressed and the extra care and work you have to put in when using it has more than justified itself.

Just a thought,if anyone reading this has built the "bubbletop" in the checkerboard markings and has the cowling decals for my version in their spares box and fancys making a donation?,,, :-)
Nige
newtothegame
_VISITCOMMUNITY
Washington, United States
Joined: October 05, 2003
KitMaker: 588 posts
AeroScale: 468 posts
Posted: Sunday, April 30, 2006 - 10:11 PM UTC

Quoted Text

Just a thought,if anyone reading this has built the "bubbletop" in the checkerboard markings and has the cowling decals for this version in their spares box and fancys making a donation?,,, :-)
Nige


Let me check tonight, but since I did the bubbletop in a what if scheme, I might have the whole decal sheet I can send your way. This is unless I tossed it.

Leon
csch
_VISITCOMMUNITY
Buenos Aires, Argentina
Joined: December 27, 2002
KitMaker: 1,941 posts
AeroScale: 1,040 posts
Posted: Sunday, April 30, 2006 - 11:14 PM UTC
Hi Nigel:
Your P 47 is becoming a real beatuy. Very nice paint job.
I got the checkerboard decals for the cowling ("Eileen" 78 th Fighter Group), but they are from an Academy P 47 D (1/72). I´ll not use them. If you want them I can send them to you.
Just let me know.
newtothegame
_VISITCOMMUNITY
Washington, United States
Joined: October 05, 2003
KitMaker: 588 posts
AeroScale: 468 posts
Posted: Monday, May 01, 2006 - 03:53 AM UTC
Yep looks like I have the whole decal sheet minus decals #55. I think those were for the prop and probably used on my bubbletop. If you are interested in them, I would be happy to send them your way; let me know.
Leon
lampie
#029
_VISITCOMMUNITY
England - East Midlands, United Kingdom
Joined: December 23, 2005
KitMaker: 6,249 posts
AeroScale: 3,270 posts
Posted: Monday, May 01, 2006 - 04:06 AM UTC
Leon,,you are a star!..Youve got mail!
Yet another example of the friendship and generosity which makes this site so special.
Thankyou!
Nige
lampie
#029
_VISITCOMMUNITY
England - East Midlands, United Kingdom
Joined: December 23, 2005
KitMaker: 6,249 posts
AeroScale: 3,270 posts
Posted: Sunday, June 18, 2006 - 11:06 PM UTC
Hi all.
Its been a long few weeks.A few more thousand miles under the belt and some more grey hairs but the tours are all done and dusted and its time to get back to the P47.I have a week off before I head out on the road again so Im going to see how much I can get done.
The cowling has been stripped back ready for repainting.The main undercarriage is together and test fitted.Many thanks to Leon for sending me his spare decals.
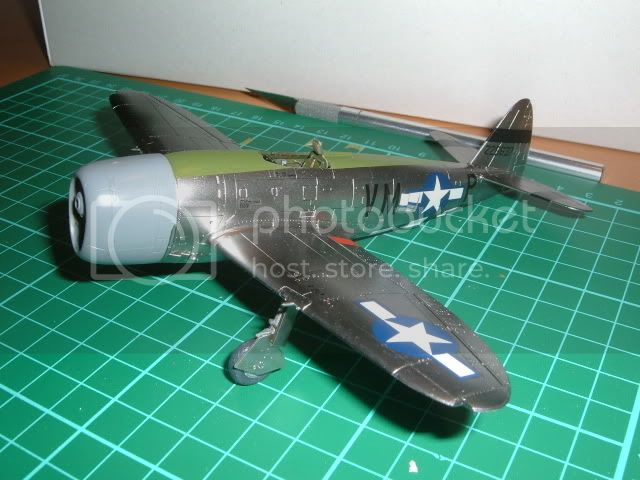
Heres the Jug sitting on its wheels for the first time (almost).
With luck I should get her finished this week.

Nige
newtothegame
_VISITCOMMUNITY
Washington, United States
Joined: October 05, 2003
KitMaker: 588 posts
AeroScale: 468 posts
Posted: Monday, June 19, 2006 - 07:36 AM UTC
I'm glad to see you are back at it Nige. I look forward to your continued progress. Hopefully your time out on the road was enjoyable.
Leon
lampie
#029
_VISITCOMMUNITY
England - East Midlands, United Kingdom
Joined: December 23, 2005
KitMaker: 6,249 posts
AeroScale: 3,270 posts
Posted: Monday, June 19, 2006 - 07:46 PM UTC
The finishing post is finally in sight.
All undercarriage is now fitted.Canopy has been masked and painted.First time Ive used Parafilm M and Im an instant convert.The cowling is primed ready for a coat of Alclad and finishing off.The prop is ready for decals and yellow tips.
All that remains is to add the last minute bits and pieces.Machine guns,landing lights etc.
Heres how she sits at the moment.


Next photos will be the finished project
TedMamere
_VISITCOMMUNITY
Moselle, France
Joined: May 15, 2005
KitMaker: 5,653 posts
AeroScale: 4,347 posts
Posted: Monday, June 19, 2006 - 09:56 PM UTC
Hi Nigel!

Your P-47 looks very good so far! The paint job is superb!
Will you add a wash in the panel lines?

Jean-Luc
lampie
#029
_VISITCOMMUNITY
England - East Midlands, United Kingdom
Joined: December 23, 2005
KitMaker: 6,249 posts
AeroScale: 3,270 posts
Posted: Monday, June 19, 2006 - 10:26 PM UTC
Hi Jean Luc!
Im still undecided about a panel line wash on this.
Normally I would say yes,but Ive noticed that the panel lines are standing out very well due to the black primer under the Alclad.Maybe you can see this on the wings?
Once the cowling is attached I will be giving the whole plane a couple of coats of Klear to blend the decals in and I will decide then.
I must say Im erring more towards leaving the wash at this point in time.Its not the strongest part of my skills at the moment and this build is going so well so far Im terrified of messing it up.
Its something that I can do after Ive lived with the "finished" P47 for a couple of weeks,if I decide to do so.What colour would you recommend for a panel line wash if I decided to do one?
The cowling has now been painted with Alclad and I shall be adding the antiglare panel tomorrow.
Nige