_GOTOBOTTOM
Early Aviation
Discuss World War I and the early years of aviation thru 1934.
Eduard 1/48 RFC Personnel Figures #8505
JackFlash
_VISITCOMMUNITY
Colorado, United States
Joined: January 25, 2004
KitMaker: 11,669 posts
AeroScale: 11,011 posts
Posted: Saturday, April 29, 2006 - 09:06 AM UTC


Greetings all; Recently I picked up Eduard's RFC personnel kit. Six figures, two pulling propellers (or working with arms above their heads), three officers standing (one in daily uniform, one in a daily uniform and flying helmet and one in a sidcot flying suit) and one figure pulling on the lid of a box crate. Also included are four scale maps of differing colours. $11.46 USD each set. Not bad. Hannants may have them but I know you can order them direct from Eduard.
TedMamere
_VISITCOMMUNITY
Moselle, France
Joined: May 15, 2005
KitMaker: 5,653 posts
AeroScale: 4,347 posts
Posted: Saturday, April 29, 2006 - 10:09 AM UTC
Hi Stephen!

I already have mine and also bought the German WW1 set. I plan to use some figures for the Fokker D.VII build. I simply can't resist to those small boxes!

Jean-Luc
Merlin
Staff MemberSenior Editor
AEROSCALE
#017
_VISITCOMMUNITY
United Kingdom
Joined: June 11, 2003
KitMaker: 17,582 posts
AeroScale: 12,795 posts
Posted: Saturday, April 29, 2006 - 12:40 PM UTC
Hi Stephen

I've got the German figures (they came included with my Roland CII special edition), but not these RFC personnel. They look nice - I might try to use one or two and make a little vignette of my Camel.

All the best

Rowan
JackFlash
_VISITCOMMUNITY
Colorado, United States
Joined: January 25, 2004
KitMaker: 11,669 posts
AeroScale: 11,011 posts
Posted: Saturday, April 29, 2006 - 02:37 PM UTC
The British 'eads r a bit nicer that the German ones. I had to swap a couple of the German 'eads with some spare resin ones. All a bit grizzly don't cha know.
gallego
_VISITCOMMUNITY
Florida, United States
Joined: February 20, 2006
KitMaker: 20 posts
AeroScale: 0 posts
Posted: Thursday, May 18, 2006 - 11:30 AM UTC

Quoted Text

The British 'eads r a bit nicer that the German ones. I had to swap a couple of the German 'eads with some spare resin ones. All a bit grizzly don't cha know.


If you don't ming asking,where did you find 1/48 resin heads? are the WWI or just plain ones?
JackFlash
_VISITCOMMUNITY
Colorado, United States
Joined: January 25, 2004
KitMaker: 11,669 posts
AeroScale: 11,011 posts
Posted: Thursday, May 18, 2006 - 04:09 PM UTC

Quoted Text


Quoted Text

The British 'eads r a bit nicer that the German ones. I had to swap a couple of the German 'eads with some spare resin ones. All a bit grizzly don't cha know.


If you don't ming asking,where did you find 1/48 resin heads? are the WWI or just plain ones?


Greetings gallego (phonetic guy-ayg-go)
I seem to do a lot of building and I buy multiples of figure kits and recently a small company (Microsculpt) sent me some spare resin heads of famous aces to evaluate them. (They are great by the way.) More later on them. The one I swapped on the German sets were from Jaguar, Jager Miniature (out of business now) Copper State Models (still in business and selling these.) Here is the modified Eduard German set.
Removed by original poster on 01/08/07 - 07:51:14 (GMT).
Removed by original poster on 01/08/07 - 07:50:42 (GMT).
JackFlash
_VISITCOMMUNITY
Colorado, United States
Joined: January 25, 2004
KitMaker: 11,669 posts
AeroScale: 11,011 posts
Posted: Thursday, May 18, 2006 - 07:42 PM UTC
Here is a summary from another fellow modeler.

"...The kit consists of 33 tan styrene parts on two sprues, plus a nice set of scale color paper maps. Other than the human figures, there is a crate, maybe 60 x 18 x 10 in. in scale, with separate lid.

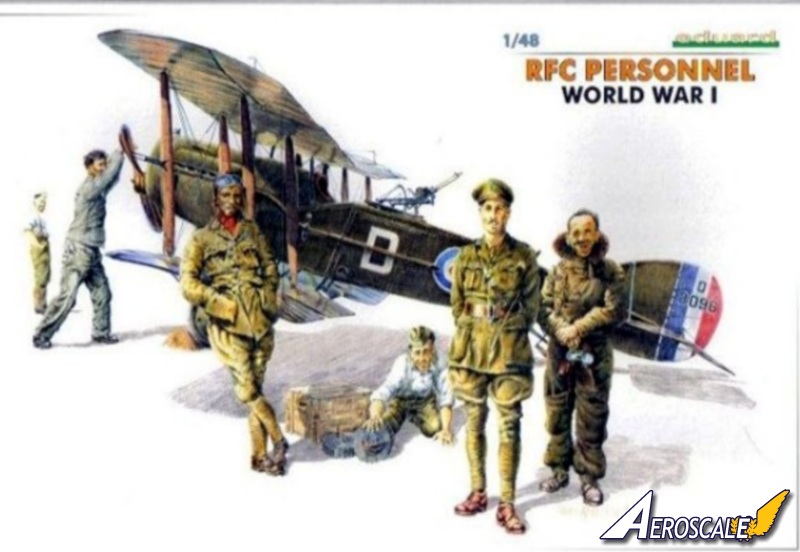
There are six men in this set. All their arms and all their heads are separate pieces, and thus positionable. Three of the figures are whole bodies, and three come with separate legs and torsos, again positionable. There were a couple of small sinkholes in the smalls of their backs, easily filled. Surface detail and casting crispness were very nice, typical of other recent Eduard kits.

There are two men in Class A uniforms, one wearing a flight helmet and one in a combination cover and Sam Browne belt. One figure is in a heavy flight suit. There are three mechanics, working hatless and coatless. One is stooping to lift off the crate lid, and it's not clear what the other two were designed to do, but again, you can set their arms to different purposes.

I glued together two of the figures and found their shoulders a bit boxy, but nothing that can't be fixed with a few swipes of a sharp blade. Reducible shoulders will be a plus when you get into custom- positioning of limbs anyway.

If you are interested in repositioning body parts, be aware that the core technique involves wedging in some shims of styrene, either of sheet stock or sprue. Armor diorama modelers and miniaturists have been doing this for years, and a quick glance at some of their articles will show you how a wedge fills a bent waist, knee or shoulder.

This level of figure modeling exercises your creativity and at the same time poses low risk: you can easily recover from any assembly that didn't suit you. Just cut it apart and glue it together again at a slightly different angle.

I thought the mechanic I assembled had a small head in proportion to his body, but it may be that a shim to raise his chin a few thousandths above his collar will fix that. Also, I may add hats, too, an easy thing to accomplish with a bit of sheet styrene.

You get a fairly complete and helpful set of instructions with this kit, and the important guidance is the colors. Sometimes in novels written in by Brits, you’ll hear soldiers called “our brothers in brown” …when sailors, policemen or intelligence types are doing the talking. Interestingly, the color schemes for these RFC fellows bear out this image.

There is a paint grid that will cross-reference you into Model Master and Humbrol from most of the Gunze/Mr. Color numbers called out on the drawings. You can then embark on your own inquiry as to the appropriate shade of brown for WWI British uniform wool. The officers’ pants, tunics and the fabric part of their hats should all be that color, whatever it is. Uniform shirts and neckties should be a different olive from the outer uniform parts, but the shirt and tie seem to be the same color.

I plan to use the color guidance as a point of departure, not an absolute authority. For example, the instructions want you to use black on all the uniform footwear, commissioned and enlisted. But the Czechs say the Sam Browne belt should be brown leather. Honestly, these are British officers. Most guys I know who went to ordinary land grant colleges in the U.S. know better than to wear a brown belt with black shoes.

The instructions suggest some variety in the color of the mechanics’ shirts. These men have shed their uniform blouses after morning muster, and their shirts can be a variety of light grays or muted tans or greens.

This is one of four ground crew sets made by Eduard. The others are WWII USAAF, Luftwaffe, and WWI German. I haven't seen inside any of the others yet. They're available thru your LHS or at Squadron or Great Models online. Price is about $10..."

IMHO, leather brown is the best colour to use in all cases here folks.
JackFlash
_VISITCOMMUNITY
Colorado, United States
Joined: January 25, 2004
KitMaker: 11,669 posts
AeroScale: 11,011 posts
Posted: Sunday, December 31, 2006 - 12:36 PM UTC
I have made a start on these British figures and will give a short run down here, as I go.
Mahross
_VISITCOMMUNITY
Queensland, Australia
Joined: March 12, 2002
KitMaker: 837 posts
AeroScale: 89 posts
Posted: Sunday, December 31, 2006 - 06:14 PM UTC
Stephen - What are those Microsculpt figure like? Is the sculpter Tom Sollers?

Ross
JackFlash
_VISITCOMMUNITY
Colorado, United States
Joined: January 25, 2004
KitMaker: 11,669 posts
AeroScale: 11,011 posts
Posted: Sunday, December 31, 2006 - 10:29 PM UTC
Greetings Ross;

Yes, Tom Sollers is the man behind Microsculpt. Over all the figures I have seen are finely detailed. So far I have only been able to acquire some of his sculpted heads.
JackFlash
_VISITCOMMUNITY
Colorado, United States
Joined: January 25, 2004
KitMaker: 11,669 posts
AeroScale: 11,011 posts
Posted: Tuesday, January 02, 2007 - 06:55 AM UTC
To strengthen the joints on figures I use a pinning method. I drill corresponding holes in surfaces that will have glue. Then I cut short sections of brass rod / wire and insert the pin ends into the predrilled holes.

This means
1 pin for the neck and head area.
1 long pin through the shoulders for both arms.
1 pin in the bottom of the torso to connect to the hips & leg assembly. (If needed.)
1 pin to connect both hips (if needed)
1 pin in either foot / leg where the weight appears to be supported. (You can use two pins one for each foot but usually this is over kill.

Once glued and pinned together let dry thoroughly. When working with figures always try to envision what that figure is upto. Working, posing for the camera even just observing another situation. Each figure is for a purpose. Then primer. Even plastic figures should be primed for painting. I used white or buff (like clear doped linen) in all cases.
JackFlash
_VISITCOMMUNITY
Colorado, United States
Joined: January 25, 2004
KitMaker: 11,669 posts
AeroScale: 11,011 posts
Posted: Wednesday, January 03, 2007 - 02:36 AM UTC
Greetings all this image will serve to illustrate the visual locations where the brass pins are usually located.
JackFlash
_VISITCOMMUNITY
Colorado, United States
Joined: January 25, 2004
KitMaker: 11,669 posts
AeroScale: 11,011 posts
Posted: Sunday, January 07, 2007 - 04:42 PM UTC
Greetings all; The figures are going together well and I am halfway through paint application. One consideration for figures is try to do the tunics / shirts in a slightly different variation of the uniform trousers.
JackFlash
_VISITCOMMUNITY
Colorado, United States
Joined: January 25, 2004
KitMaker: 11,669 posts
AeroScale: 11,011 posts
Posted: Tuesday, January 09, 2007 - 03:40 AM UTC
Greetings all;

Photos completed images in a few days. Originally I purchased 2 sets of the figures. One set i built per the kit instructions. The other set I built swapping some arms and heads. All a bit grizzly don't-cha know.
JackFlash
_VISITCOMMUNITY
Colorado, United States
Joined: January 25, 2004
KitMaker: 11,669 posts
AeroScale: 11,011 posts
Posted: Thursday, January 11, 2007 - 08:35 AM UTC

Quoted Text

Greetings all;

Photos completed images in a few days. Originally I purchased 2 sets of the figures. One set i built per the kit instructions. The other set I built swapping some arms and heads. All a bit grizzly don't-cha know.


Here are the figures depicted as wearing the Sidcot flying combination suit. At left is the standard kit item at right is one slightly modified.
JackFlash
_VISITCOMMUNITY
Colorado, United States
Joined: January 25, 2004
KitMaker: 11,669 posts
AeroScale: 11,011 posts
Posted: Thursday, January 11, 2007 - 08:38 AM UTC
At right is the standard kit item at left is one slightly modified.
JackFlash
_VISITCOMMUNITY
Colorado, United States
Joined: January 25, 2004
KitMaker: 11,669 posts
AeroScale: 11,011 posts
Posted: Thursday, January 11, 2007 - 08:40 AM UTC
Both figures slightly modified.
JackFlash
_VISITCOMMUNITY
Colorado, United States
Joined: January 25, 2004
KitMaker: 11,669 posts
AeroScale: 11,011 posts
Posted: Thursday, January 11, 2007 - 08:43 AM UTC
At left is the standard kit item at right is one slightly modified.
JackFlash
_VISITCOMMUNITY
Colorado, United States
Joined: January 25, 2004
KitMaker: 11,669 posts
AeroScale: 11,011 posts
Posted: Thursday, January 11, 2007 - 08:51 AM UTC
At right is the standard kit item at left is one slightly modified.
JackFlash
_VISITCOMMUNITY
Colorado, United States
Joined: January 25, 2004
KitMaker: 11,669 posts
AeroScale: 11,011 posts
Posted: Thursday, January 11, 2007 - 08:55 AM UTC
And finally a right is the standard kit item at left is one slightly modified.
JackFlash
_VISITCOMMUNITY
Colorado, United States
Joined: January 25, 2004
KitMaker: 11,669 posts
AeroScale: 11,011 posts
Posted: Saturday, January 13, 2007 - 03:21 PM UTC
Normally I would take figures like this and counter sink the exposed arms and hands into the sleeves by detaching them and drilling a hole in the empty socket then rettach the appendage in the slightly deeper hole. As you can see the shoulders on some of these figures need to be shaved down even in the unaltered pose the kit suggests.

Basic colour has been applied but no detailing. Rank pips, shoulder boards and cheverons... chicken guts on the sleeves, etc can all be added at the end. The next step for me would be to do some highlighting by dry brushing a lighter colour of the base onto the riased portions.

You may ask why didn't I grind or cut some of the flash out of the hand areas? The answer is that when I choose to put an item (tool or map?) in a specific figure's grasp I'll cut away the the flash then. That will automatically give me a bare section of plastic to apply the glue to without having to go back and rescrape the hand for a second time.
 _GOTOTOP