_GOTOBOTTOM
Early Aviation
Discuss World War I and the early years of aviation thru 1934.
Texturing lozenge decals 101
JackFlash
_VISITCOMMUNITY
Colorado, United States
Joined: January 25, 2004
KitMaker: 11,669 posts
AeroScale: 11,011 posts
Posted: Thursday, May 11, 2006 - 03:48 PM UTC
Greetings all;

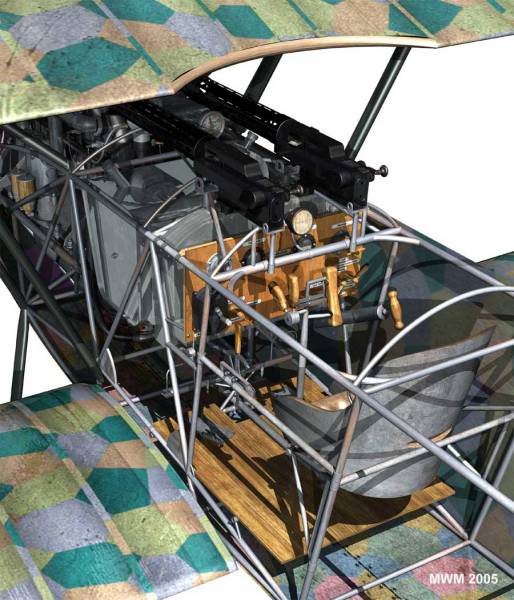
I have had a couple of inquiries concerning lozenge decals and how to make them look more like doped fabric after application. Before I get started here I have to give proper respect to the fellow I have learned a great deal from. Mr. Mark Miller. His virtual images of cut away aircraft have been an inspiration to me. In modern terms making a virtual (computer) image look like fabric, wood or metal is the essence of modern cinematography. You will see in my Albatros and Fokker D.VII kit reviews on my website that Mr. Miller has graciously allowed me to use some of his fabulous artwork.

More famous today as Eduard had chosen to illutrate their recent Fokker D.VII box cover art and initial issue instructions with his fine images.
Repainted
_VISITCOMMUNITY
Östergötland, Sweden
Joined: April 04, 2006
KitMaker: 1,058 posts
AeroScale: 1,004 posts
Posted: Thursday, May 11, 2006 - 04:08 PM UTC
Hi Stephen
I agree, mostly the lozengedecals just look too new on the models. They just lack of personality in my eyes. One tip could be to gently “shade” them with some dry pastels (chalk sticks). Mix black, grey and brown on a fin sanding paper. Apply the ribbed effect with a brush, seal it up with some varnish to protect.
Don’t know if it’s the best way to achieve the worn looked lozenge, but it’s worth a try out.
The other way would be to ask the decal manufactures to print a dirty lozenge set.
Cheers
Lars
JackFlash
_VISITCOMMUNITY
Colorado, United States
Joined: January 25, 2004
KitMaker: 11,669 posts
AeroScale: 11,011 posts
Posted: Thursday, May 11, 2006 - 04:24 PM UTC
Hi Repainted!

When I say texturing for me its not so much about a worn look as it is a fabric look. You see lozenge fabric was printed at the textile mills and the high lights and shadows of the fabric weave were not pronounced but did have an over-all effect. Here is a recent effort of mine. I invite comments.

JackFlash
_VISITCOMMUNITY
Colorado, United States
Joined: January 25, 2004
KitMaker: 11,669 posts
AeroScale: 11,011 posts
Posted: Thursday, May 11, 2006 - 04:29 PM UTC
Believe me some decal sets are very fragile even after applications and you may have to use acrylics to accomplish this. Note the right side is treated a little heavier than the left so give me your honest impressions.
Repainted
_VISITCOMMUNITY
Östergötland, Sweden
Joined: April 04, 2006
KitMaker: 1,058 posts
AeroScale: 1,004 posts
Posted: Thursday, May 11, 2006 - 04:41 PM UTC
Hi Stephen
To get that kind fabric look is more difficult. On your pics it’s looking real nice to me. I’ve guess you have drybrushed up it?
How about drybrushing in different angels, does this method give the woven fabriclook?

Yes you would handle my tips with care, and yes an acrylic varnish is the safest way.
Lars
JackFlash
_VISITCOMMUNITY
Colorado, United States
Joined: January 25, 2004
KitMaker: 11,669 posts
AeroScale: 11,011 posts
Posted: Thursday, May 11, 2006 - 04:50 PM UTC
Yes Repainted I tend to agree. The method I used was starting with clear thinner and just a drop of slate grey (almost black) paint but I did not mix it completely.

To all reading this....Warning! if you try this do it on a scrap piec of plastic or old model kit you don't mind experimenting on.
gaborka
_VISITCOMMUNITY
Borsod-Abauj-Zemblen, Hungary
Joined: October 09, 2005
KitMaker: 626 posts
AeroScale: 264 posts
Posted: Thursday, May 11, 2006 - 07:03 PM UTC
Hi!

Considering applying pastels, my favourite method is to scrape off some dust from a normal and cheap school-used aquarel paint button. If you need a lot of pastel you can crush one button with mortar and pestle.

This makes a very fine powder, that is inexpensive. If you are not satisfied with the result you can simply wash it off with water. Apply it with a soft big brush.

Its advantage over pastel powder is, that it is finer, cheaper, and since it lacks the slightly greasy property of pastel, it is more easily controllable to apply. Its main disadvantage is (if any) that it has a dull colour compared to pastel.

airwarrior
_VISITCOMMUNITY
New Jersey, United States
Joined: November 21, 2002
KitMaker: 2,085 posts
AeroScale: 217 posts
Posted: Thursday, May 11, 2006 - 08:04 PM UTC
Would it be possible to replicate that using oils? Could you put dots of oil all over the lozenged surface and then with a brush lightly wettened with thinner, streak the oils up and down? I think I may try it when I get home...
Repainted
_VISITCOMMUNITY
Östergötland, Sweden
Joined: April 04, 2006
KitMaker: 1,058 posts
AeroScale: 1,004 posts
Posted: Thursday, May 11, 2006 - 08:47 PM UTC
Hi
The method works, but is a slow one. Pure oilcolour takes weeks to dry.
I go for the pastell
Lars
JackFlash
_VISITCOMMUNITY
Colorado, United States
Joined: January 25, 2004
KitMaker: 11,669 posts
AeroScale: 11,011 posts
Posted: Friday, May 12, 2006 - 02:12 PM UTC
While I would use enamels or acrylics, oils can be used. There is a compound called "Jap drier" that if used can dry oils out in a faster time.
JackFlash
_VISITCOMMUNITY
Colorado, United States
Joined: January 25, 2004
KitMaker: 11,669 posts
AeroScale: 11,011 posts
Posted: Thursday, October 05, 2006 - 04:56 PM UTC
Looks Like Eduard is coming out with Four Colour Lozenge camouflage in 1/48 scale. I have usually been critical of their efforts in the past. They better get it right!

D48005 BOTTOM Lozenge 4 color 1/48 $6.95
D48004 TOP Lozenge 4 color 1/48 $6.95
JackFlash
_VISITCOMMUNITY
Colorado, United States
Joined: January 25, 2004
KitMaker: 11,669 posts
AeroScale: 11,011 posts
Posted: Sunday, October 08, 2006 - 04:23 PM UTC
Have had a visual folks. It is definately the same 4 colour lozenge as that comes in the Fokker D.VII kits but here it is laid out in strips instead of the cookie cutter cutouts.


The same decals I used on the above posted Fokker D.VII fuselage.
JackFlash
_VISITCOMMUNITY
Colorado, United States
Joined: January 25, 2004
KitMaker: 11,669 posts
AeroScale: 11,011 posts
Posted: Thursday, October 26, 2006 - 04:42 AM UTC
The decals have arrived. Just as the images have shown. These are in the typical and better strip layout. The advantage to this type of layout is that if you do several kits the lozenge decal placement (like the factory originals) is not identical to the others. Cookie cutter types give you identical lozenge placement. I will be adding these to a spare wing and will get back to you with images later.
JackFlash
_VISITCOMMUNITY
Colorado, United States
Joined: January 25, 2004
KitMaker: 11,669 posts
AeroScale: 11,011 posts
Posted: Wednesday, November 01, 2006 - 04:31 PM UTC
I have begun on these. (In between the Pfalz E.I , Nieuport 17 from the Flyboys issue and repairing a leak in my hangar basement....the joys of ownership!) They go on well if used in a typical application. When you dip them in warm water they will come away quickly. Dip them in and then set aside to lift up from the paper backing. I use Micro Set and Sol. "Set" is used first on the wing surface. Don't let the decal separate in water or you will discover the joy of untangling decals.

Slide them in place and when satisfied apply the Sol. Then move on to the next panel.
Merlin
Staff MemberSenior Editor
AEROSCALE
#017
_VISITCOMMUNITY
United Kingdom
Joined: June 11, 2003
KitMaker: 17,582 posts
AeroScale: 12,795 posts
Posted: Thursday, November 02, 2006 - 02:08 AM UTC
Hi Stephen

Thanks for the update. They sound a lot more useful than Eduard's "cookie-cutter" variety of lozenge decals - the one's in my D.VII were designed a bit undersize in places. Do the colours and pattern seem accurate?

All the best

Rowan
JackFlash
_VISITCOMMUNITY
Colorado, United States
Joined: January 25, 2004
KitMaker: 11,669 posts
AeroScale: 11,011 posts
Posted: Thursday, November 02, 2006 - 03:23 AM UTC

Quoted Text

Hi Stephen
Thanks for the update. They sound a lot more useful than Eduard's "cookie-cutter" variety of lozenge decals - the one's in my D.VII were designed a bit undersize in places. Do the colours and pattern seem accurate? All the best Rowan


Greetings Rowan;

These Eduard colours are very close to the original 2nd and 3rd issues without the "weathering" (as seen in the Eduard first issue set.) As to its accuaracy Here is a comparison. Eagle Strike is the closest to the original fabric colours at this time.

Eduard has moved steadily to improve their lozenge decals from the psychodelic early versions from 1992. In this version of the Eduard lozenge the purple and mid green should be switched in their locations.
Merlin
Staff MemberSenior Editor
AEROSCALE
#017
_VISITCOMMUNITY
United Kingdom
Joined: June 11, 2003
KitMaker: 17,582 posts
AeroScale: 12,795 posts
Posted: Friday, November 03, 2006 - 04:46 AM UTC
Hi Stephen

I wonder if Eduard are aware that they've got the sequence of colours wrong... that's a simple note to the decal printers to correct. I can run the idea past Aeroscale's contact at Eduard... you never know...

All the best

Rowan
JackFlash
_VISITCOMMUNITY
Colorado, United States
Joined: January 25, 2004
KitMaker: 11,669 posts
AeroScale: 11,011 posts
Posted: Friday, November 03, 2006 - 07:53 AM UTC
Greetings Rowan!
I do know that several of the Eduard employees are ...uh assigned to check certain websites concerning comments on their products. I have been espousing the modifications of their lozenge for about 10 years. While they do listen to us they have their own consultants that they pay to research these items. If you think it might help to contact them feel free.

Historically speaking these people lurk on websites rather than participate. Everytime I have seen a company rep get on a free forum, modelers tend to get carried away with gripes. The reps get tons of e-mails and we grind the mill on a kit they spent two years producing.

Most model companies have these consultants and I have seen some pretty amazing fixes to molds and decals, when they find out we are dis-satisfied. BUT Eduard and other companies have a marketing stratigum that says only about 5-7% of all modelers are rivet counters. While they want to get it right usually they have to look at the cost concerns.

In this case I am betting that once it comes to their attention it will be fixed. By the way folks let me take this time to honour one of the greats in model building and critiquing.

The late Mr. Ian Huntley was one of the very first modelers to research the colours of the different lozenge camouflage patterns on original airframes...back in the 1950's and early 1960's.

Merlin
Staff MemberSenior Editor
AEROSCALE
#017
_VISITCOMMUNITY
United Kingdom
Joined: June 11, 2003
KitMaker: 17,582 posts
AeroScale: 12,795 posts
Posted: Friday, November 03, 2006 - 09:19 PM UTC
Hi Stephen

Well, it's worth mentioning next time I'm in touch with Eduard.

I miss Ian Huntley's articles - he was a regular contributor to the modelling mags I grew up with (Scale Models etc.) and was one of the first writers in the UK to really take the question of colour accuracy (and accuracy in general) seriously. His background in UK aviation and involvement with preservation projects placed him ideally to open up the subject to a generation of modellers brought up on the old bottles of ghastly Airfix enamels (I still have a couple for nostalgia's sake!). We all owe Ian a debt of gratitude for the generally more accurate and better-researched kits we are lucky enough to buy these days.

All the best

Rowan
JackFlash
_VISITCOMMUNITY
Colorado, United States
Joined: January 25, 2004
KitMaker: 11,669 posts
AeroScale: 11,011 posts
Posted: Sunday, November 05, 2006 - 03:22 PM UTC
Greetings all I have had a request from a couple of newer members. I take it seriously as they went to the trouble of going to my website (see the banner under my entries) and e-mailing me from there.

It seems there is some need for a "How to on lozenge application?" If anyone thinks this would benefit members here please speak up.


Lucky13
_VISITCOMMUNITY
Scotland, United Kingdom
Joined: June 01, 2006
KitMaker: 1,707 posts
AeroScale: 1,119 posts
Posted: Sunday, November 05, 2006 - 04:57 PM UTC
That would be great Stephen! I know that it would help me in the future...
Merlin
Staff MemberSenior Editor
AEROSCALE
#017
_VISITCOMMUNITY
United Kingdom
Joined: June 11, 2003
KitMaker: 17,582 posts
AeroScale: 12,795 posts
Posted: Sunday, November 05, 2006 - 07:32 PM UTC

Quoted Text

It seems there is some need for a "How to on lozenge application?"


Hi Stephen

Definitely! It'd a be a huge help for anyone new to WW1 modelling. Go for it!

All the best

Rowan
JackFlash
_VISITCOMMUNITY
Colorado, United States
Joined: January 25, 2004
KitMaker: 11,669 posts
AeroScale: 11,011 posts
Posted: Sunday, November 19, 2006 - 02:25 AM UTC
Your wish is my command...poof!
Lozenge application 101
BradCancian
_VISITCOMMUNITY
Queensland, Australia
Joined: August 30, 2006
KitMaker: 285 posts
AeroScale: 281 posts
Posted: Sunday, November 19, 2006 - 07:15 AM UTC
Hi all,

Stephen has very kindly asked that I describe a technique that I use on my lozenge decals. I use a number of oversprays to dull down the overall contrast between the different colours, to provide some tonal variation, and to assist in blending the decals together to give an overall scale appearance.

My method is very simple three step process. After laying the lozenge and rib tape decals, and any other markings (national or personal), I do the following:

Step 1: mist some light coats of thinned down white or grey (usually around 20% paint, 80% thinner) evenly over the decals. This is the step in which you determine how “blended” you want the different colours to be (heavier over spray for more weathered, faded fabric).

Step 2: Mix up some Tamyia “smoke” with a little bit of brown, and thin it around 30% paint, 80% thinner. Then spray this mix along the ribs, panels and control surface hinge lines. This gives some tonal variation to the faded lozenge and helps to subtlety pop out the soft rib detail. Build up the colour gradually until you get the effect you like.

Step 3: Coat the whole surface with a clear flat or semi-gloss depending on how you like your finishes. This will ensure a nice even sheen over the whole wing surface.

That’s it! This method may not be for everyone so I suggest you have a play with it before commiting it to a model. Here are some pics of this method used on some of my models.


JackFlash
_VISITCOMMUNITY
Colorado, United States
Joined: January 25, 2004
KitMaker: 11,669 posts
AeroScale: 11,011 posts
Posted: Sunday, November 19, 2006 - 09:59 AM UTC
Brad as always, highly impressive.
 _GOTOTOP