This may have been requested before, but I will try my luck.
Does anyone have a suggestion on how to make the cone-shaped insulators found on Bf-109's. This is for 1/48th scale aircraft. I believe I have seen this detail on several postings, but have yet to see an explanation on how it is done.
Please help if you can. If this is a trade secret, please share and I will help keep it a secret (!!!)
Hosted by Rowan Baylis
Antenna Insulators
Steelheader
Michigan, United States
Joined: June 07, 2005
KitMaker: 46 posts
AeroScale: 29 posts
Joined: June 07, 2005
KitMaker: 46 posts
AeroScale: 29 posts
Posted: Wednesday, June 14, 2006 - 11:14 PM UTC
Posted: Thursday, June 15, 2006 - 02:31 AM UTC
Hi Michael,
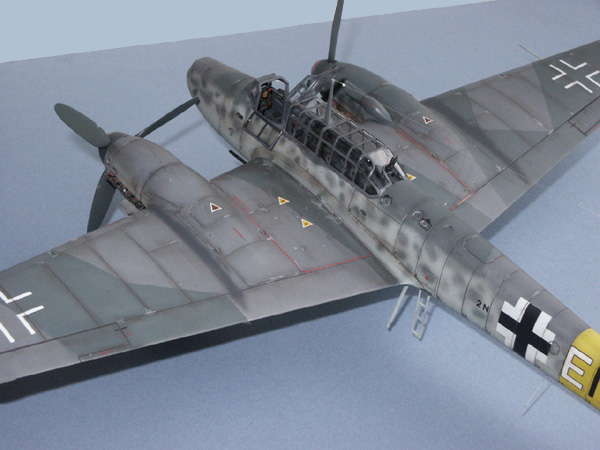
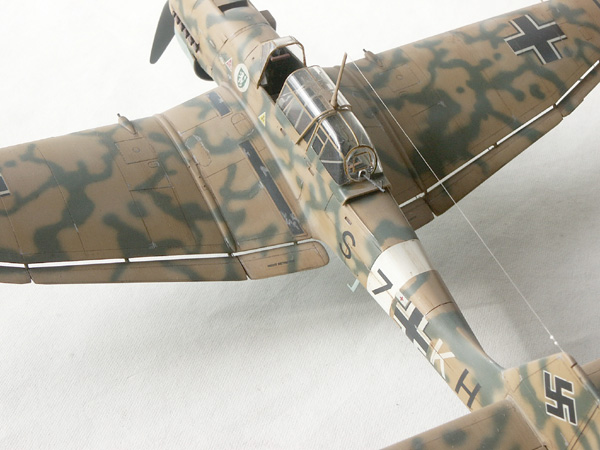
nothing is a trade secret here I don't know how to make them cone shaped but I apply a small blob of PVA glue, using a tooth pick, to where I want the insulator. Whan it is dry I paint it matt white.
Here's one on a Bf 110G-2
And twin ones at the tail of this Ju 87
If you wanted them to be cone shaped it may be possible to "tease" them into shape as the glue dries?
HTH
Mal
Steelheader
Michigan, United States
Joined: June 07, 2005
KitMaker: 46 posts
AeroScale: 29 posts
Joined: June 07, 2005
KitMaker: 46 posts
AeroScale: 29 posts
Posted: Thursday, June 15, 2006 - 07:01 AM UTC
Thanks for the response, Mal.
I have used the white glue blobs painted white, and also have tried the sludge from the bottom of the white paint bottle, and both have been satisfactory, Now I am trying to raise the bar for myself.
I know I have seen this done, but remain mystified on how they did it.
Thanks again.
I have used the white glue blobs painted white, and also have tried the sludge from the bottom of the white paint bottle, and both have been satisfactory, Now I am trying to raise the bar for myself.
I know I have seen this done, but remain mystified on how they did it.
Thanks again.
bilko
Queensland, Australia
Joined: April 22, 2003
KitMaker: 584 posts
AeroScale: 96 posts
Joined: April 22, 2003
KitMaker: 584 posts
AeroScale: 96 posts
Posted: Thursday, June 15, 2006 - 08:53 AM UTC
Michael
I second Mal's method - and his photos are better than mine so I won't supply any :-) . The way your reply to Mal reads you have alreacdy used this method but want to try something else. I am unaware of another means of representing the insulators in 1/48 scale.
I do recall an article in a magazine quite some time ago (and senility won't let me remember which magazine ) that was for a larger scale plane - in fact I think it was a 1/24 Stuka where I'm sure that really small craft beads had been used for the insulators (there wwas some sanding and shaping involved). So in quarter scale they would then have to be REALLY REALLY small craft beads .
Good luc k with your search and if you find or try anything new please let us know.
Brian
Steelheader
Michigan, United States
Joined: June 07, 2005
KitMaker: 46 posts
AeroScale: 29 posts
Joined: June 07, 2005
KitMaker: 46 posts
AeroScale: 29 posts
Posted: Thursday, June 15, 2006 - 11:57 PM UTC
Brian and Mal, I posted the same question to one of our local club members who specializes in Bf-109's. I just received his response and I am completely blown away by his method and solution. I have requested his approval to post his response, and if he concurs I will pass it on to you.
Just a teaser: it is a solution that is semi-fantastic and may cause one to apply the palm of his hand to his forehead vigorously and often, muttering phases such as "why didn't I think of that?". I did ask him to show how he discovered the solution.
The players in this hobby are just amazing!!
Just a teaser: it is a solution that is semi-fantastic and may cause one to apply the palm of his hand to his forehead vigorously and often, muttering phases such as "why didn't I think of that?". I did ask him to show how he discovered the solution.
The players in this hobby are just amazing!!
Posted: Friday, June 16, 2006 - 12:32 AM UTC
Great, can't wait to see this
Mal
Mal
Steelheader
Michigan, United States
Joined: June 07, 2005
KitMaker: 46 posts
AeroScale: 29 posts
Joined: June 07, 2005
KitMaker: 46 posts
AeroScale: 29 posts
Posted: Friday, June 16, 2006 - 09:39 PM UTC
Here is the response that I received from one of the members of our local club. His 'handle' is Spass Vogel. Spass lives just outside our state capitol and drive a 120 mile round trip once a month to attend our club meetings. He is our resident Luftwaffee gura, but does acknowledge that he obtain this technique from anoth web site. None-the-less, our hats at tipped to the Spass Vogel.
"They are very easy to make...
You need: Plasti-card (sheet styrene) the thinnest you can find, a lit candle, X-acto knife, and a sewing needle or safety pin
Cut the plasti-card into the size of a poker playing card.
Then cut that in half. Take the plasti-card and hold it over a lit candle. Let the plasti-card heat, not burn.
Take the card away from the heat and push the needle into the plasti-card. Try NOT to pierce the card. Notice that the melted card will be cone shaped.
After the card cools, cut the tip off, take the needle point and push it thru the top. Not too much, just a little. That way you will be able to thread a line thru and it will be much easier to handle.
In other words, push the needle thru a small, finished cone that has already been cut and see how many time you hurt yourself!
I strongly recommend that you do not use the middle of the card, try to make 3 or 4 cones on one card. Sometimes you may not make a perfect cone...other times the tip may not be cut just right.
It took me 4 or 5 (cones) times before I got a good one...but after a while, it usually took maybe 2 or 3.
When I was doing this, I stockpiled about eight or nine small 48 scale insulators in my parts drawer.
After you cut the top off, try to the cut the tip less cone again...these will make great looking insulator housings that are mounted on the fuselage on the 109 E to F series.
Even the bad formed cones will be good for this. Just slice the tip off a little smaller and use the lower part to make them."
Again, thanks to Spass Vogel. I have not tried this yet, but in theory is sounds like it will work, and after viewing the Spass Vogel's model I know that it will.
Best wishes to all.
Wad_ware
Illinois, United States
Joined: September 09, 2002
KitMaker: 537 posts
AeroScale: 437 posts
Joined: September 09, 2002
KitMaker: 537 posts
AeroScale: 437 posts
Posted: Saturday, June 17, 2006 - 06:06 AM UTC
I just checked out this thread and am thrilled.
That is a great way to make insulators and can't wait to try it out on the kit I am doing now.
Many thanks to you Michael and pass on my thanks to your source for letting you post this info for us
Good modeling
Wayne
That is a great way to make insulators and can't wait to try it out on the kit I am doing now.
Many thanks to you Michael and pass on my thanks to your source for letting you post this info for us
Good modeling
Wayne
Posted: Saturday, June 17, 2006 - 04:26 PM UTC
What a neat idea, I will be trying this soon. Doh! why didn't I think of that.
Michael, can you ask Spass, when/if, I manage to achieve this I can write a tech tip for Armorama? I will of course credit him with the technique.
Thanks
Mal
Michael, can you ask Spass, when/if, I manage to achieve this I can write a tech tip for Armorama? I will of course credit him with the technique.
Thanks
Mal
Steelheader
Michigan, United States
Joined: June 07, 2005
KitMaker: 46 posts
AeroScale: 29 posts
Joined: June 07, 2005
KitMaker: 46 posts
AeroScale: 29 posts
Posted: Saturday, June 17, 2006 - 04:42 PM UTC
I am glad to see that you share my amazement in this solution. Like I may have noted earlier, I could not believe that I hadn't seen this as a solution. But then again..........
I will contact Spass and see if he agrees with your request to post an article in the future. I am certain that he will agree.
In the meantime back to the bench.
I will contact Spass and see if he agrees with your request to post an article in the future. I am certain that he will agree.
In the meantime back to the bench.
Posted: Monday, June 19, 2006 - 03:01 AM UTC
Thanks Michaell
Mal
Mal
mpalao
Madrid, Spain / Espaņa
Joined: June 19, 2005
KitMaker: 243 posts
AeroScale: 70 posts
Joined: June 19, 2005
KitMaker: 243 posts
AeroScale: 70 posts
Posted: Sunday, July 16, 2006 - 11:38 AM UTC
Hi, Anyone can enclosed any images about this process. It is very interesting. Normaly I ever used the White glue for the antennas but I want to try this method. But....one question about this.
The cone size is very small, I suppose, so there is not problem to cut it with the X-acto Blade ???
Thanks to all crew. regards
The cone size is very small, I suppose, so there is not problem to cut it with the X-acto Blade ???
Thanks to all crew. regards
Steelheader
Michigan, United States
Joined: June 07, 2005
KitMaker: 46 posts
AeroScale: 29 posts
Joined: June 07, 2005
KitMaker: 46 posts
AeroScale: 29 posts
Posted: Sunday, July 23, 2006 - 05:47 AM UTC
First, I must express my apologies for not responding sooner, but I have been preoccupied with, of all things, modeling. In any event Spass would be honored to have this method featured in an article.
Spass did give us a demo of this method at our last meeting where the evening's topic was tips and techniques. Making the insulators does take some amount of patience: it took Spass perhaps three attempts before he made an insulator that he was satisfied with, and he made several on each card. I was quite surprized to see that he was using sheet styrene with groves on the surface (scale siding). So either plain or groved will work, but I personally would use the plain.
He did not cut any insulators, but I would think that a sharp blade, fine scissors or even nail clipper would work. In fact, I think that I would be inclined to insert a round tooth pick into the formed insulator to provide backing and use a #11 blade to cut the insulator free of the main sheet. Just a thought that has not been applied to real life.
One of the other members saw what was being done and without battling an eye blurted out "Hey, what a neat way to make muzzle flash suspressors"!! I feel that I am surrounded by some pretty bright and creative modelers.
Anyway, to the world-wide modeling community please give this a try, and thank the Spass Vogel for his sharing. And again, I apologize for this tardy response.
Now, someone please help me with the Tamiya Putty question in the General Modeling forum.
Thanks.
Posted: Monday, July 24, 2006 - 12:42 AM UTC
Thanks Michael, I'll see if I can find time to give this a go and write an article. Yep this is the solution I was looking for when trying to re-create flash supressors last year Thank Spass for the idea.
Mal
Mal