_GOTOBOTTOM
Air Campaigns
Want to start or join a group build? This is where to start.
FUMS--Buffalo, Classic Airframes
JPTRR
Staff MemberManaging Editor
RAILROAD MODELING
#051
_VISITCOMMUNITY
Tennessee, United States
Joined: December 21, 2002
KitMaker: 7,772 posts
AeroScale: 3,175 posts
Posted: Sunday, June 25, 2006 - 06:04 AM UTC
Hi Everyone,

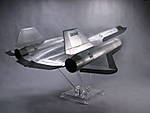
For my campaign Fighters Under The Midnight Sun I am building Classic Airframes' 1/48 Brewster Model 239 Buffalo.

First, the parts sprues (I forgot to shoot these prior to starting the build):

In this photo, I shot both sides of the fuselage and top wing to show internal and external detail. Note that for wheel well detail, C.A. provides resin parts as the spar and stringers. These are a tad long, and require trimming in order to fit the fuselage and bulkhead to the wings.

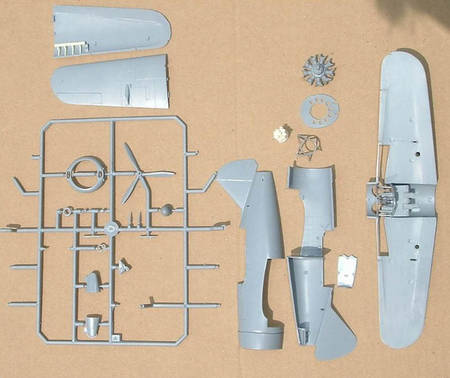
Next we see that C.A. provides two nice seats, one with correct Finnish head armor.


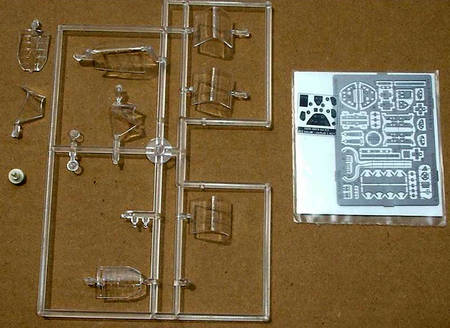
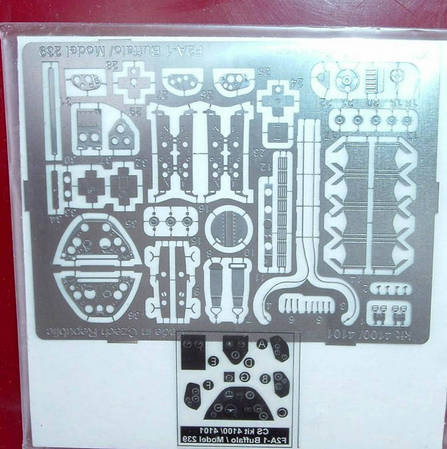
The clear parts feature two windscreens, three sliding canopies, and two cockpit belly glazing. These are not used as the Finnish Buffalos paneled these over. Note the extensive P/E fret and the photo film instrument panels.

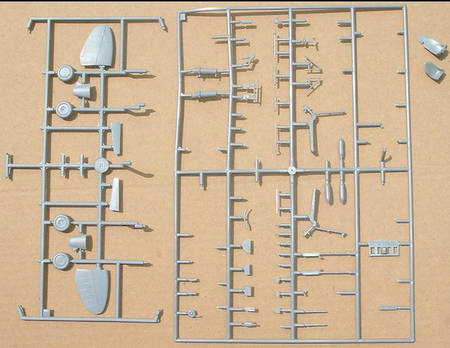
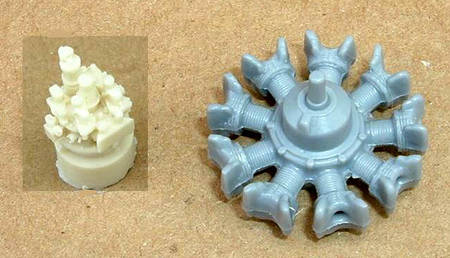
Resin parts include the engine accessory stack. This is remarkably detailed with hair-like bolts sticking out. I dread trying to cut the piece from that big pour-chunk! The engine is acceptable, soft molding and sink holes marring the worthy detail. The fine film and P/E set with parts specific for USN or Ilmavoimat (the Finnish Air Force or FAF).

Bottom wing molded with correct wingtip washout, designed into many pre-war U.S. designs. Very fine recessed lines. That unsightly 'tombstone' in the fuselage is the Finnish panel covering the belly canopy. It fits poorly and needs CA to fill the gaps.


Now the in-progress shots:
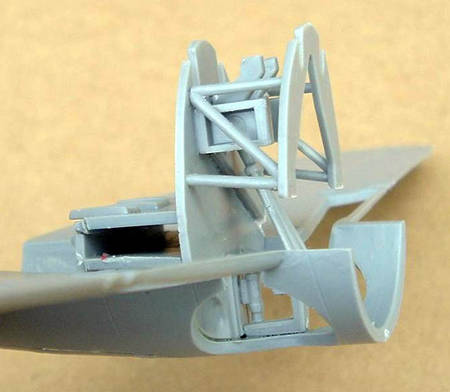
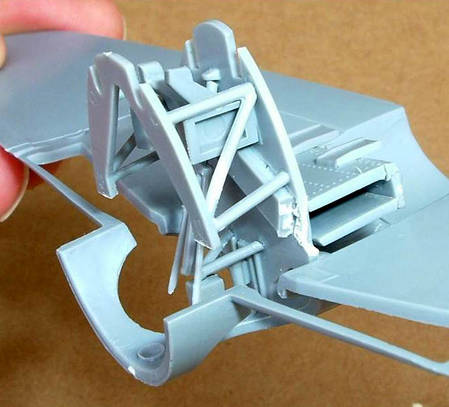
Nineteen pieces make up the firewall, gear retraction apparatus, machinegun feeds and other items that are all to visible through the fuselage wheel wells. This is impressive, and there is more. The engine accessory stack will also be visible, as will the engine mounts. Very busy area. Unfortunately, forgotten is any fuselage structural stringers and brackets cast into the area. The parts lack mounting holes but do have aligning marks cast onto the bulkheads, the main bulkhead which does not fit well.


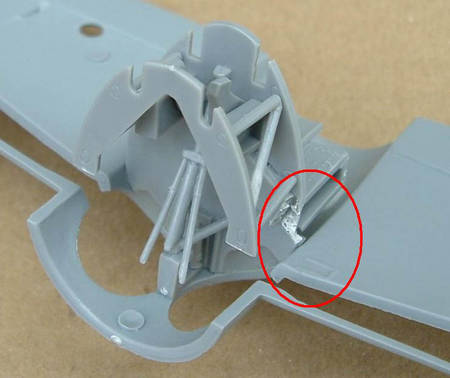
The cockpit forward floor is a five piece affair that has to have a lip cut off to mount properly. The instructions misidentify the lower part number. You can see that while well detailed with rivets, the detail is soft.

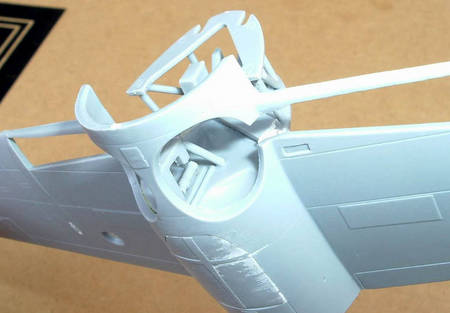
There are fit problems. This piece is meant to fit into a designated area inside the lower wing, but it fouls the fit of the top wing half and I cut it away, as well as a bit of the firewall. The instructions caution me to dry-fit everything during every step--for good reason. C.A. also tried to help us by molding slots into the upper wing parts into which the firewall fits. My test fitting shows these are slightly out of position.


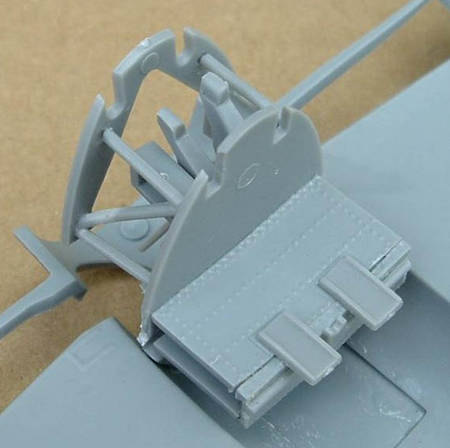
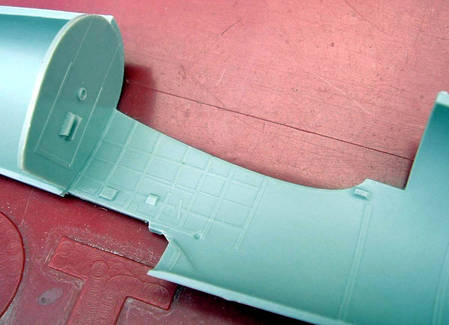
Finally, the interior of the cockpit. I would prefer the structure to be a bit more pronounced, but photos look like these stringers were pretty thin. One also sees that there are some positioning raised areas for the bulkheads. they are shallow, so test-fit!


As I am short on time right now, I will add captions later. Let me say that this is a very detailed model with limited-run fit problems and "soft" detail.

Check back soon,

Enjoy,

Fred
WingTzun
_VISITCOMMUNITY
Illinois, United States
Joined: February 01, 2006
KitMaker: 853 posts
AeroScale: 137 posts
Posted: Sunday, June 25, 2006 - 06:11 AM UTC
Looks like a good start. Looking forward to seeing more. Goodluck with it.
VonCuda
_VISITCOMMUNITY
North Carolina, United States
Joined: November 28, 2005
KitMaker: 2,216 posts
AeroScale: 1,080 posts
Posted: Sunday, June 25, 2006 - 09:27 AM UTC
I know I kid around a lot here but let me just say in all seriousness how much I appreciate you're taking the time to detail this build process Fred. This will not only make my Buffalo build go quicker, but should also make it loads more fun since you will have already pointed out the fit issues and problem areas that need attention.
I will without a doubt be keeping a close eye on your progress with this one.
Thanks
Emeritus
_VISITCOMMUNITY
Uusimaa, Finland
Joined: March 30, 2004
KitMaker: 2,845 posts
AeroScale: 1,564 posts
Posted: Sunday, June 25, 2006 - 06:45 PM UTC
Looking good so far. I agree with Voncuda, it's great to see how the kit comes together before tackling my Bufffalo.

If anyone in the campaign is building either CA's Morane-Saulnier ms.406 or MPM's Mörkö-Morane (a re-issue of the CA kit with a different nose), take a look at my build thread at the campaign section, as the kit requires some TLC.
Pixilater
_VISITCOMMUNITY
Massachusetts, United States
Joined: March 16, 2005
KitMaker: 231 posts
AeroScale: 0 posts
Posted: Sunday, June 25, 2006 - 10:04 PM UTC
Looks to be a sweet little kit, Fred. Classic Airframes kits are famous for having at least one little "glitch" in the assembly process. At least the issues you've found so far only require trimming. It's far more serious when parts are molded undersized. Those "sink caves" in the engine are simply abyssmal! Some of the deepest (and probably trickiest to fill) sinkmarks I've seen.

Models that require more work are worth more, in my opinion. If a kit can be built in your sleep, what's it worth?

Looking forward to some paint !
JPTRR
Staff MemberManaging Editor
RAILROAD MODELING
#051
_VISITCOMMUNITY
Tennessee, United States
Joined: December 21, 2002
KitMaker: 7,772 posts
AeroScale: 3,175 posts
Posted: Monday, June 26, 2006 - 12:25 AM UTC
Hi Everyone,

Thank you for your compliments. I appreciate them. Please, if you find errors and boo-boos, please provide critiques?

I figured out what the diagonal piece on the front of the firewall is, the part I had to snip. I believe it is the spent cartridge chute for the nose guns.

I'll be painting soon. The instructions show the interior aluminum lacquer; I hate the whole area being silver, but accuracy demands it...bummer!
newtothegame
_VISITCOMMUNITY
Washington, United States
Joined: October 05, 2003
KitMaker: 588 posts
AeroScale: 468 posts
Posted: Monday, June 26, 2006 - 08:21 AM UTC
Looks good. This will be a fun build to watch...maybe more fun to watch than actually build (lots of work ) Truthfully, though, I will enjoy seeing you put it together and learning from your experiences with the kit.
Hope all is well.
Leon
hkshooter
_VISITCOMMUNITY
Indiana, United States
Joined: May 04, 2006
KitMaker: 78 posts
AeroScale: 72 posts
Posted: Tuesday, June 27, 2006 - 07:32 AM UTC
Good luck with that kit. I built it and it was my first attempt at a limited run kit and also my first CA kit.
The interior is sweet once together. Pay close attention to the sequence of the cockpit "floor". I read the directions a half dozen times and still messed it up.
Don't worry about detail on the nose guns unless you have AMS. You cant see much of them once the cowls are on. The only way to see them is through the landing gear bay from the bottom.
Ditch the PE brake lines and use your own unless you have plenty of hair to pull.
The biggest and ugliest problem I had with my kit was the fit of the wing and fuse on the belly of the aircraft and also at the leading edge and fuse joint.
And those PE bomb racks and bombs just rock! Makes the whole model worth it! Looking forward to seeing your progress!
Merlin
Staff MemberSenior Editor
AEROSCALE
#017
_VISITCOMMUNITY
United Kingdom
Joined: June 11, 2003
KitMaker: 17,582 posts
AeroScale: 12,795 posts
Posted: Tuesday, June 27, 2006 - 11:59 AM UTC
Great job Fred!

This is set to be a really interesting on-line build, so thank you for all the extra effort you've gone to with the photography.

The CA and Special Hobby Buffalos are largely identical, so I'll be keen to see how your experience matches my predictions in my Preview of the latter. Seeing your work prompted me to have another look at both kits (I know! Any excuse to look at kits rather than build them! :-) ) and I was still struck by the shape of the elevators but, as Bill says, sorting such things is just part of what makes modelling such a joy.

All the best

Rowan
JPTRR
Staff MemberManaging Editor
RAILROAD MODELING
#051
_VISITCOMMUNITY
Tennessee, United States
Joined: December 21, 2002
KitMaker: 7,772 posts
AeroScale: 3,175 posts
Posted: Wednesday, June 28, 2006 - 09:17 AM UTC

Quoted Text

Pay close attention to the sequence of the cockpit "floor". I read the directions a half dozen times and still messed it up.


Hi HKShooter,

Thanks for the encouragement! And yes, I too already messed up the floor! I bet I know exactly what you did

Fred
 _GOTOTOP