Pre-Flight Check
Constructive critique of your finished or in-progress photos.
Constructive critique of your finished or in-progress photos.
Hosted by Jim Starkweather
Tamiya 1/32 F-15C
BigPeteUK

Joined: September 15, 2006
KitMaker: 61 posts
AeroScale: 49 posts

Posted: Friday, October 06, 2006 - 12:03 AM UTC
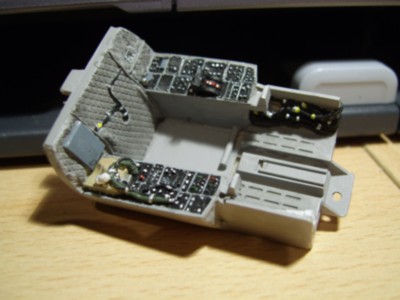
Ok guys, am gonna throw myself to the slaughter. This is my first attempt at using aftermarket detailing sets. In this case the BB resin cockpit for the 'hen' I've never used any washing or drybrushing to bring out details. I'd appreciate any comments u may have good or bad. You'll notice the cockpit floor is clean compared to the rest of the surfaces, i thought id attempt to hilight the wash to see if i have it at the right amount. 

Dirk-Danger

Joined: September 06, 2006
KitMaker: 252 posts
AeroScale: 162 posts

Posted: Friday, October 06, 2006 - 12:56 AM UTC
Pete, that looks pretty damn good to me. I'd be more than happy with it - with the seat and dash it should look way cool.
No slaughter required then!
Lee
No slaughter required then!
Lee
klimmer

Joined: May 16, 2003
KitMaker: 250 posts
AeroScale: 207 posts

Posted: Friday, October 06, 2006 - 07:12 AM UTC
Looks great to me. The detail painting you have done looks very nice.
Do you plan on putting a wash into it?
I look forward to seeing more of your build.
 Ted
Ted
Do you plan on putting a wash into it?
I look forward to seeing more of your build.
 Ted
TedBigPeteUK

Joined: September 15, 2006
KitMaker: 61 posts
AeroScale: 49 posts

Posted: Friday, October 06, 2006 - 11:21 PM UTC
There is a little wash on it, i used raw umber and lamp black oils thinned. perhaps the camera and lighting dont do it much justice
UPDATE NEWS
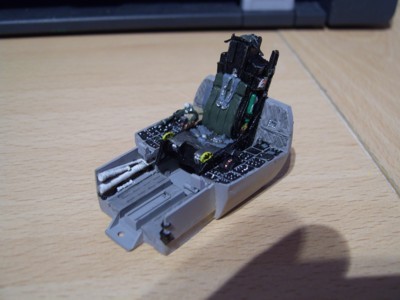
Ejection seat completed and dry fit
UPDATE NEWS
Ejection seat completed and dry fit

klimmer

Joined: May 16, 2003
KitMaker: 250 posts
AeroScale: 207 posts

Posted: Monday, October 09, 2006 - 06:11 PM UTC
Looks great Pete,
It will be nice to see the remainder of the build.
 Ted
Ted
It will be nice to see the remainder of the build.
 Ted
TedBigPeteUK

Joined: September 15, 2006
KitMaker: 61 posts
AeroScale: 49 posts

Posted: Monday, October 09, 2006 - 07:54 PM UTC
Rest assured, there will be regular updates on this build. Like i said at the beginning, It's my first real attempt at doing some detailing and actually taking my time building rather than the OOB jobs i've done in the past. So I'll be picking brains as well as posting piccies fo the work.
Removed by original poster on 11/07/06 - 17:45:22 (GMT).
Removed by original poster on 11/07/06 - 17:47:22 (GMT).
Removed by original poster on 11/07/06 - 17:51:43 (GMT).
BigPeteUK

Joined: September 15, 2006
KitMaker: 61 posts
AeroScale: 49 posts

Posted: Monday, November 06, 2006 - 03:55 PM UTC
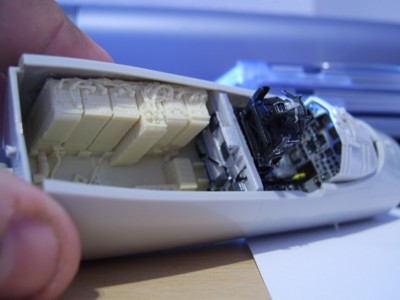
Just finished dry test fitting the two sections of the resin tub. not bad results i think. painting will recommence imminently. The next time i put a piccie on i hope to have the office finished and nose gear attached. This is pending a house move and time to work on the big bird.
klimmer

Joined: May 16, 2003
KitMaker: 250 posts
AeroScale: 207 posts

Posted: Sunday, November 19, 2006 - 07:48 AM UTC
Stunning work to say the least.
I look forward t o seeing her come together.
Ted
I look forward t o seeing her come together.
Ted

stm

Joined: March 07, 2004
KitMaker: 98 posts
AeroScale: 96 posts

Posted: Sunday, November 19, 2006 - 08:44 AM UTC
My only comment is the photos could be larger!
The detail looks outstanding, but the size of the photos don't do the stuff justice!
Dirty up the floor with pastels and then drybrush silver on the rudder tracks to simulate paint wear
The detail looks outstanding, but the size of the photos don't do the stuff justice!
Dirty up the floor with pastels and then drybrush silver on the rudder tracks to simulate paint wear

mother

Joined: January 29, 2004
KitMaker: 3,836 posts
AeroScale: 1,036 posts

Posted: Sunday, November 19, 2006 - 09:15 AM UTC
Looks great Pete, nice job on the cockpit and instrument panels. They look just as they should. As for the wash I'd say you've nailed it, you don't want a dirty/muddy cockpit...really not found in modern cockpits of today. If anything there well be wear marks along the leading edges where the Pilot enters and on the rudder pedals. The ejection seat that to looks great, colors look right on. Over all what is a your opinion on Black Box resin set, were there any problems like air bubbles, broken parts. Looking forward to see more progress photos.
Oh, what markings are you doing.
Joe
Oh, what markings are you doing.
Joe
BigPeteUK

Joined: September 15, 2006
KitMaker: 61 posts
AeroScale: 49 posts

Posted: Tuesday, November 21, 2006 - 02:20 AM UTC
Thanks for the comments guys.
My overall opinion of the Black box set is excellent, there were a few bits of what i assume to be the mould stuck to the resin in tight places. Easily removed with a sharp blade and very steady hand. The detail is nothing short of astonishing when compared to kit parts and after extensive research i also found to be as accurate as it could be. Fitting has been a bit of a stressfull time, sand-test-sand-test etc, but i guess we've all been there.
Only one minor broken part which was attached to the ejection seat, easily rectified by removing the same part from the kit seat.
To close, the markings have yet to be chosen, although there may be a chance i will be donating the finished article to lakenheath. I have 7 jets all in 1/32 scale to build and display room could be a problem given the subjects ( 'flanker, 2X F15- C&E 'fulcrum tomcat to name but a few). I'll be moving in next week or so, progress will be on hold until after, by which time i will have the tub assembled for your perusal.
Thanks again for the kind remarks
BigPeteUK

Joined: September 15, 2006
KitMaker: 61 posts
AeroScale: 49 posts

Posted: Friday, December 15, 2006 - 01:06 AM UTC
well. the house move has been completed, living amongst mountains of boxes and up to my armpits in house painting chores. However, in spite of all that the 'hen' is now back on a temporary bench and in progress, the BB tub is 95% complete, dry fit and ready for glue once the nose undercart is built. photos of the completed nose section will be forthcoming as soon as i can find my digi cam amongst the devestation that is my makeshift workshop.
Some nice work in progess going on from the brief scan of the forums ive seen
Some nice work in progess going on from the brief scan of the forums ive seen

mother

Joined: January 29, 2004
KitMaker: 3,836 posts
AeroScale: 1,036 posts

Posted: Friday, December 15, 2006 - 01:28 AM UTC
Congrats on the big move and new house Pete, will be looking out for the new progress photos. Was there any fit problems, like did you have to carve, shape or sand (like the Verlinden ones) the tub to fit into the fuselage.
Joe
Joe
BigPeteUK

Joined: September 15, 2006
KitMaker: 61 posts
AeroScale: 49 posts

Posted: Friday, December 15, 2006 - 03:45 AM UTC
Hi joe, will pass on your regards to my good lady wife.
with regard the fitting of the cockpit, it has given me a challenge in didnt think possible, To begin with there was the removal of all the existing cockpit detail from the fuselage interiors. The resin parts had a very large amount of excess which had to be cut/carved and finally sanded away. A few bits of mould which i had to remove. The main headache has been the cockpit tub itself and the avionics bay behing the tub, both floors have had to be sanded away to almost paper thickness to get the correct fit. apart from that i can have no complaints.
There will be a few things i'll do differently for my next project. mainly to do with fitting the resin bits (bit more patience, first time excitement has probably not produced great results)
I think next time i will choose a less ambitious project, after all this is my first use of resin and aftermarket bits. Also 1st time using airbrush, washes, decal solutions and flat coats. May have bitten off more than i could chew
Coolaznkid

Joined: August 11, 2006
KitMaker: 74 posts
AeroScale: 25 posts

Posted: Saturday, January 06, 2007 - 09:51 AM UTC
Great work so far Pete. Keep it up!
[quote]My only comment is the photos could be larger!
The detail looks outstanding, but the size of the photos don't do the stuff justice!
/quote]
I like gazing upon beauty too!
*I'm no aviator nor know much about aviation* But what's the yellow/not-yet-painted part? is that the Black Box? Someone enlighten me, plz
Thanks
[quote]My only comment is the photos could be larger!
The detail looks outstanding, but the size of the photos don't do the stuff justice!
/quote]
I like gazing upon beauty too!

*I'm no aviator nor know much about aviation* But what's the yellow/not-yet-painted part? is that the Black Box?
 Someone enlighten me, plz
Thanks
BigPeteUK

Joined: September 15, 2006
KitMaker: 61 posts
AeroScale: 49 posts

Posted: Sunday, January 07, 2007 - 09:12 PM UTC
Its the Tactical Electronic Warfare System. I'm sure I'll be corrected if wrong.
That part of the office has now been painted and weathered, will be building the nose section in the coming days and photos will be posted on completion. There may be inaccuracy with the colouring of the TEWS i could find no photo reference as details of said unit is classified.
That part of the office has now been painted and weathered, will be building the nose section in the coming days and photos will be posted on completion. There may be inaccuracy with the colouring of the TEWS i could find no photo reference as details of said unit is classified.
BigPeteUK

Joined: September 15, 2006
KitMaker: 61 posts
AeroScale: 49 posts

Posted: Sunday, January 14, 2007 - 09:21 PM UTC
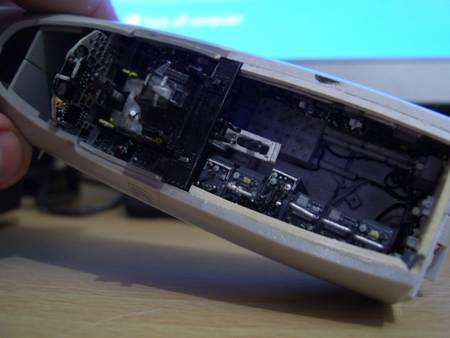
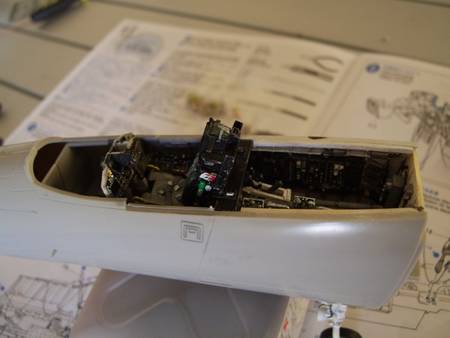
Hi guys, while im still able to use this ssorry exscuse for an internet connection (AOhell), i thought id post a couple of piccies of the built tub which i finished over the weekend. Comments as always welcome, both good and bad. Quality of photos arent up to much im afraid, they are posted in the gallery for extensive viewing critique. Enjoy! it has taken me many hours and headaches to acheive this and for my first attempt at aftermarket detailing, im well chuffed.


Tigerbait

Joined: September 28, 2005
KitMaker: 347 posts
AeroScale: 179 posts

Posted: Sunday, January 14, 2007 - 11:55 PM UTC
Nice work! 

Posted: Monday, January 15, 2007 - 12:39 AM UTC
Very cool work. I am trying to get something acceptable out of my F-4 cockpit. I will be satisfied if it looks half as good as yours. 

trahe

Joined: April 03, 2006
KitMaker: 1,158 posts
AeroScale: 73 posts

Posted: Thursday, January 18, 2007 - 01:10 AM UTC
Looks great. Can't wait for more progress shots!
 |


