_GOTOBOTTOM
Air Campaigns
Want to start or join a group build? This is where to start.
FUMS Buffalo Fit Problems
JPTRR
Staff MemberManaging Editor
RAILROAD MODELING
#051
_VISITCOMMUNITY
Tennessee, United States
Joined: December 21, 2002
KitMaker: 7,772 posts
AeroScale: 3,175 posts
Posted: Monday, October 30, 2006 - 07:17 AM UTC
Hi Guys,

Classic Airframes B.239. Good thing for gap filling superglue! Bad fit all over. All of those beautiful bulkheads are too broad for the fuselage to close around. The cowl ring is a greater diameter than the fuselage. Much gap filling and reshaping to blend it to the fuselage.

The belly. Note where the wing center section joins the bottom of fuselage.


Fuselage to cowl ring. I thought I had that seam filled.


Tail. Halves of cone are different sizes, and fit asymetrical. The stabalizers are basically superglued onto the fuselage, then more gap filling and putty.


Bad cowl and belly fit. You can see how much filling and blending to get the cowl ring around the fuselage. There is a 1/8" plastic shim to fill in the big gap between fuselage gap to cowl ring. You can also see how this displaces the fore lower wing to fuselage joints.
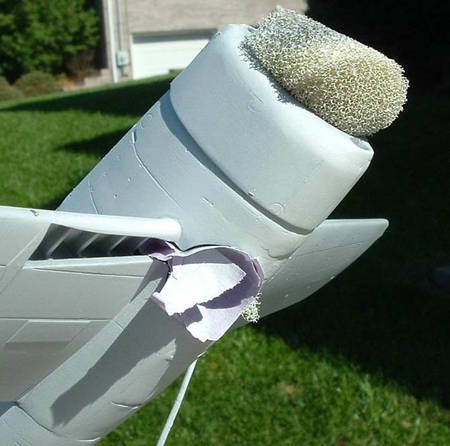

Cowl ring.


Bottom of same.
Emeritus
_VISITCOMMUNITY
Uusimaa, Finland
Joined: March 30, 2004
KitMaker: 2,845 posts
AeroScale: 1,564 posts
Posted: Monday, October 30, 2006 - 07:47 PM UTC
Thanks for the heads-up on the fit issues. Those bulkheads remind me of the CA Morane (MPM's Mörkö variant actually, but the same kit from firewall aft) cockpit assembly with the much too thick fuselage sides and/or resin cockpit walls. Oh, all that sanding and grinding...
And the same with the landing gear wells.
Well, but that's the thing with limited-run kits, they tend to require a little (or a lot, depending on the kit) more TLC than main-stream kits.

If you ask my opinion, I would have another go with some putty to take care of the seams on the instrument panel coaming, near the cowling on the belly, and the tail cones and horizontal stabilizer.

Looks like a good-looking kit when finished. What markings are you planning to use?

Oh, more thing popped in my mind. Remember to fill one of the two landing lights under the wings, as told in the instructions (shouldn't be hard, glue in the clear part, apply a dab of putty and sand smooth). If my memory serves me right, the earlier versions had only one landing light.
JPTRR
Staff MemberManaging Editor
RAILROAD MODELING
#051
_VISITCOMMUNITY
Tennessee, United States
Joined: December 21, 2002
KitMaker: 7,772 posts
AeroScale: 3,175 posts
Posted: Monday, October 30, 2006 - 09:10 PM UTC

Quoted Text


Well, but that's the thing with limited-run kits, they tend to require a little (or a lot, depending on the kit) more TLC than main-stream kits.


Hi Eetu,

Yes, that is why I have avoided them until this kit. My first was a Mierkraft SB2U Vindicator 15 years ago. I could finish it now, and may, but half the plastic needs to be ground away.


Quoted Text

...have another go with some putty to take care of the seams on the instrument panel coaming, near the cowling on the belly, and the tail cones and horizontal stabilizer.


Already done. I wonder if the fuselage fore of the cockpit cracked? It was filled before I primed it. The panel combing--scary. I tried and almost daubbed putty all over the beautiful panel!


Quoted Text

What markings are you planning to use?

BW-364, WO Juutilianen's 'orange 4'. Hmmm, just noted the belly will be aluminum. I wanted blue!
alpha_tango
_VISITCOMMUNITY
Germany
Joined: September 07, 2005
KitMaker: 5,609 posts
AeroScale: 5,231 posts
Posted: Monday, October 30, 2006 - 09:31 PM UTC
Hi Fred

this sounds very discouraging .... I hope you made a mistake and mine will fit like a charme ... Well, I guess that won't be the case, but I need something to motivate myself ... i hope to finish the N1K2-J this week and the Fw 190 A-3 close behind .. so that would be my next project to begin (beside some others that already run ... out of time)

I have a CA F-5B half built for almost 2 years now ... and it is a project for the LW museum collection ... so there was a dead line .. actually I consider the model having a flat line

Honestly, I cannot join the hype about CA models .. most I have are a nightmare ... maybe it is just a lack of abilities, but I have no fun with them

good it is the time of the year when you put firecrackers ... ...

best wishes

Steffen
Emeritus
_VISITCOMMUNITY
Uusimaa, Finland
Joined: March 30, 2004
KitMaker: 2,845 posts
AeroScale: 1,564 posts
Posted: Monday, October 30, 2006 - 11:46 PM UTC

Quoted Text


Quoted Text

What markings are you planning to use?

BW-364, WO Juutilianen's 'orange 4'. Hmmm, just noted the belly will be aluminum. I wanted blue!


The same as on my 1:72 version then.
About that belly color. Hasegawa's marking sheet said light grey, so that's what I did.
I checked the instructions of InScale's Brewster decal sheet. For BW-364, it says black / olive green / light grey.
But then, some references say aluminium, including CA's instructions...

To alpha_tango:
My only experience with CA so far has been the Mörkö-Morane (well, CA's kit with MPM's nose...), and it wasn't that horrible. All components that went between the fuselage halves had to be thinned, I scribed all the panels a little deeper, made new machine gun and cannon barrels & pitot tubes etc.
It took quite lot more effort than those Tamigawa shake'n'bake kits but I think the results were worth it.
A model of quite an esoteric aircraft.
 _GOTOTOP