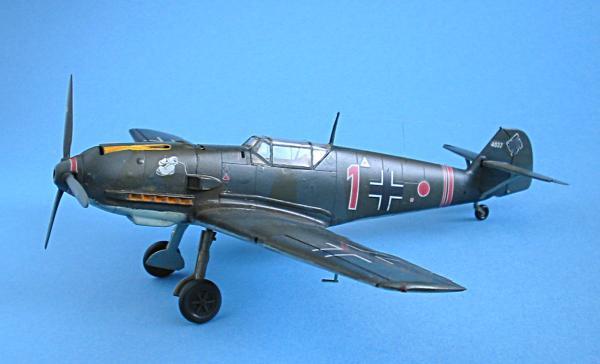
As a new member of the forums, I thought that I woul add some pics of my latest completed works and in progress pics. Comments and critiques are appreciated.
This one came off the bench fairly quickly (about 3 months) considering that this has several "firsts" for me. THis is the first time I ever did hydraulic brake lines, plumbed a drop tank, did insulators on an aerial or made the canopy restraining wire. I use a True Details cockpit and wheels. The tank and ETC 500 rack are from Verlinden with brass wire for lines and supports. The decals are from Cutting Edge. All around I'm pretty pleased with how it all turned out.
I did this paint scheme because it has so many cool differences from the normal RLM 74/75/76 chaeme. Firstly, the number is up on the nose instead of on the fuse, the yellow chin is sprayed with camo colors, (kind defeats the idea of identification markings for the AAA), the yellow gun troughs and the triangles on the spinner are just too cool.
This a/c belonged to Lt. Von Kageneck during 1941 on the Russian front. He racked up 67 kills before being shot down over North Africa on Christmas day 1941. He later died of his wounds.
Thanks for looking and, as always critiques are appreciated,
World War II
Discuss WWII and the era directly before and after the war from 1935-1949.
Hosted by Rowan Baylis
Some of my latest work
thehannaman
New York, United States
Joined: April 04, 2006
KitMaker: 279 posts
AeroScale: 194 posts
Joined: April 04, 2006
KitMaker: 279 posts
AeroScale: 194 posts
Posted: Monday, November 13, 2006 - 04:16 AM UTC
29Foxtrot
Victoria, Australia
Joined: September 19, 2003
KitMaker: 708 posts
AeroScale: 674 posts
Joined: September 19, 2003
KitMaker: 708 posts
AeroScale: 674 posts
Posted: Monday, November 13, 2006 - 08:26 AM UTC
Welcome to the forums.
Excellent workmanship and painting on this build.
Posted: Monday, November 13, 2006 - 12:13 PM UTC
I'll second the welcome! Looks nice, and well done! Great pictures (not an easy task either...)
Only thing I think I would do is to dirty it up a little bit more. It seems to be a bit too clean for a frontline machine. But then again I'm always worried of messing up what I've already accomplished myself, hence I always make most of my armor and aircraft too clean. But this is only my two cents worth...
Cheers!
_H_Dori
England - East Anglia, United Kingdom
Joined: November 09, 2006
KitMaker: 295 posts
AeroScale: 276 posts
Joined: November 09, 2006
KitMaker: 295 posts
AeroScale: 276 posts
Posted: Monday, November 13, 2006 - 01:31 PM UTC
Wow that looks really nice.
I've never tried the brake lines myself, I might give it a go now after seeing that.
Nice work
H
I've never tried the brake lines myself, I might give it a go now after seeing that.
Nice work
H
wizard179
New South Wales, Australia
Joined: January 27, 2006
KitMaker: 251 posts
AeroScale: 179 posts
Joined: January 27, 2006
KitMaker: 251 posts
AeroScale: 179 posts
Posted: Monday, November 13, 2006 - 02:35 PM UTC
Welcome aboard. Very nice work I think it looks brilliant. I really like the mottle effect on the fuselage.
Cheers
Wiz
Cheers
Wiz
newtothegame
Washington, United States
Joined: October 05, 2003
KitMaker: 588 posts
AeroScale: 468 posts
Joined: October 05, 2003
KitMaker: 588 posts
AeroScale: 468 posts
Posted: Monday, November 13, 2006 - 08:08 PM UTC
Looks really nice. What kit/scale is it?
Welcome to the forums.
Leon
Welcome to the forums.
Leon
thehannaman
New York, United States
Joined: April 04, 2006
KitMaker: 279 posts
AeroScale: 194 posts
Joined: April 04, 2006
KitMaker: 279 posts
AeroScale: 194 posts
Posted: Monday, November 13, 2006 - 10:34 PM UTC
Quoted Text
Only thing I think I would do is to dirty it up a little bit more. It seems to be a bit too clean for a frontline machine.
Cheers!
You're the second person to mention that. You are absolutely right. But I, like you mention, am afraid of ruining an otherwise good build with the "muck." I have since built a plank hardstand display for this bird and will probably add appropriate dirt spatter to match the groundwork later.
I didn't even realize that I misssed the vital stats on this. It is the Hasegawa E4/7 in 1/48th. Great kit, especially for the $5 at a swap meet!
Posted: Tuesday, November 14, 2006 - 12:22 AM UTC
Quoted Text
It is the Hasegawa E4/7 in 1/48th. Great kit, especially for the $5 at a swap meet!
Hi Justen!
Maybe it's a kit from the first batch... with the wrong front engine cowling It makes the Bf 109 look a bit strange. It's not your fault of course and Hasegawa did change that later on the mold. Do you have the exact kit number? That would explain why the seller only asked $5 for it.
Anyway, you did an excellent job and I like the paintsheme you choosed, especially the yellow gun openings on the cowling, very unusual. Can someone explain the purpose of them? Steffen?
Jean-Luc
thehannaman
New York, United States
Joined: April 04, 2006
KitMaker: 279 posts
AeroScale: 194 posts
Joined: April 04, 2006
KitMaker: 279 posts
AeroScale: 194 posts
Posted: Tuesday, November 14, 2006 - 01:31 AM UTC
This is the later release (I want to say JT19, but could be wrong.) I know the earlier ones with the bad cowls is # 1 thru 4. That's why I was so happy to get this one for the price. The vendor had two of them that I bought, this one and an "F2." The F2 is currently "on deck." They were so cheap because someone had opened the bags and inspected the sprues. At least that's what he said. It was all there so I grabbed them and ran!
I'm not sure why the thoughs are yellow. Perhaps they are off of a different plane that had the full yellow cowl?
Thanks for all the complements guys!
I'm not sure why the thoughs are yellow. Perhaps they are off of a different plane that had the full yellow cowl?
Thanks for all the complements guys!
Posted: Tuesday, November 14, 2006 - 02:37 AM UTC
Hi Justen!
Never trust a picture! :-)
Maybe it is the pointed spinner then...
Again, great work! I hope to see more in the future! Especially that F-2. Do you have in progress pictures?
Jean-Luc
Never trust a picture! :-)
Maybe it is the pointed spinner then...
Again, great work! I hope to see more in the future! Especially that F-2. Do you have in progress pictures?
Jean-Luc
Posted: Tuesday, November 14, 2006 - 03:33 AM UTC
Quoted Text
Anyway, you did an excellent job and I like the paintsheme you choosed, especially the yellow gun openings on the cowling, very unusual. Can someone explain the purpose of them? Steffen?
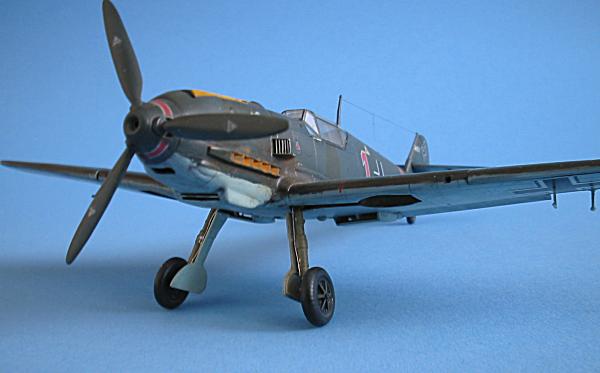
Hi Jean-Luc
unfortunately I have no idea about the light gun channels .... they seem to be quite common on the early 70/71 birds ... noticed I wrote light instead of yellow ..
i know the pic looks weird somehow .. must retake some photos -- but I used yellow too
I recetly came across a colour pic which clearly (!!) shows the colour is not yellow, but light grey ---- maybe light blue grey, read 65 --- but I am not sure about that ... if only I could remember where I've seen it
Ahh and Justen, I like the your Bf 109 too ...
cheers
Steffen
thehannaman
New York, United States
Joined: April 04, 2006
KitMaker: 279 posts
AeroScale: 194 posts
Joined: April 04, 2006
KitMaker: 279 posts
AeroScale: 194 posts
Posted: Tuesday, November 14, 2006 - 03:48 AM UTC
Quoted Text
Never trust a picture! :-)
i just had a thought... what if the reason the sprues were "inspected" were so he could pull a switcheroo? Does the cowl honestly look mis-shapen? I never really measured or anything since I was certain I had one of "the good ones."
Either way, I won't be heart broken, just a little peeved .
I found the kit number Jt9. At least thats the box that got sold to me #:-) .
I haven't actually started the F2 yet. I've been trying to get some older projects off the bench. I'll post pics of my in progress A-24 and P-39 soon.
Thanks again for the kind words.
Steffen, is that a Hasegawa kit? Looks great.
Posted: Tuesday, November 14, 2006 - 04:02 AM UTC
Hi Justen
yes it is the Hasegawa Bf 109 E-1 (one of the "special editions") ...
BTW I do not think your model is misshapen, but it is the photography (as in my pic) when you get to close, the camera will switch to "wide angle" and your picture will be distorted/warped ...
here is another bad example
best wishes
Steffen
csch
Buenos Aires, Argentina
Joined: December 27, 2002
KitMaker: 1,941 posts
AeroScale: 1,040 posts
Joined: December 27, 2002
KitMaker: 1,941 posts
AeroScale: 1,040 posts
Posted: Tuesday, November 14, 2006 - 05:33 AM UTC
Welcome aboard Justen.
Nice work, keep on modelling and posting your jobs.
Regards.
Nice work, keep on modelling and posting your jobs.
Regards.
Posted: Tuesday, November 14, 2006 - 09:45 PM UTC
Quoted Text
BTW I do not think your model is misshapen, but it is the photography (as in my pic) when you get to close, the camera will switch to "wide angle" and your picture will be distorted/warped ...
Hi again!
That's it!
Jean-Luc