This is my entry for the Jan-Mar AMQ. It was finished during the first week of January for the 'Duel in the Sky' Campaign. It 'flew' against Wad_Ware and Bilko. Anyway, first some finished pictures, then some build details will follow.
I'm not sure if I interpret all of the directions correctly, but if I have made any mistakes let me know, and I'll adjust accordingly... I believe this thread is to show multiple pictures, discuss, etc. the build and then one favorite picture (which I haven't decided on yet) goes in the gallery...
Thanks for looking and please feel free (encouraged even) to give any comments good or bad/constructive.
Hope all is well.
Leon
Hosted by Jim Starkweather
Newtothegame's AMQ entry Jan-Mar 07
newtothegame
Washington, United States
Joined: October 05, 2003
KitMaker: 588 posts
AeroScale: 468 posts
Joined: October 05, 2003
KitMaker: 588 posts
AeroScale: 468 posts
Posted: Thursday, January 18, 2007 - 08:33 AM UTC
newtothegame
Washington, United States
Joined: October 05, 2003
KitMaker: 588 posts
AeroScale: 468 posts
Joined: October 05, 2003
KitMaker: 588 posts
AeroScale: 468 posts
Posted: Thursday, January 18, 2007 - 08:46 AM UTC
The kit I used to make my Martlet is the Tamiya 1/48 Wildcat. I found a nice article online which gave a description of the changes that needed to be made to the Tamiya kit to bring it to Martlet specs. I realize I probably misunderstood or missed some details but I tried my best to do what the article said.
The article can be found at:
http://fleetairarmsig.netfirms.com/articles/martlet/scottspencer-martlet/martlet.html
For a martlet ii, it reads:
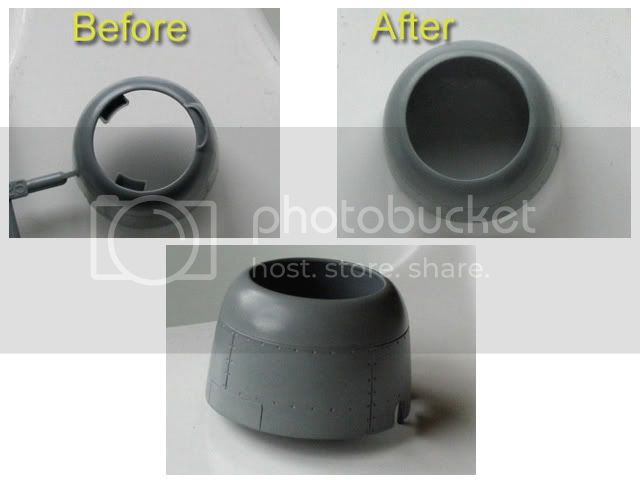
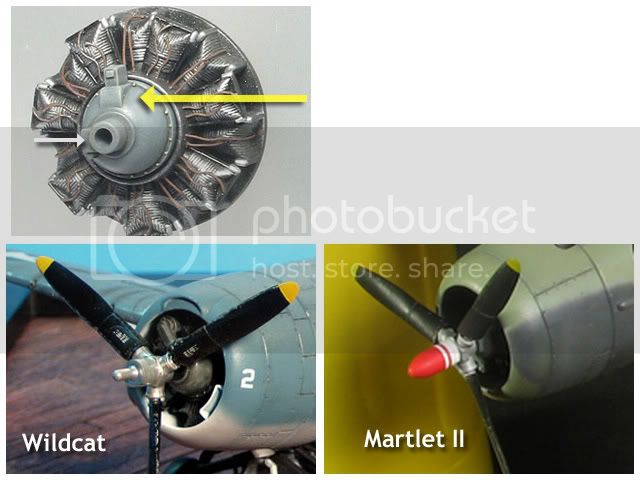
"To build this version, you will need to remove the external carburetor scoop (it sands off easily) and the two internal intercooler scoops. Fill and re-scribe the cowl flaps into a single large flap, or use the KMC FM-2 cowling. Remove the magnetos from the engine crankcase (they were in the rear on this version). For the first ten produced, see the Martlet III below. Otherwise, leave the wings the way they are, and change the prop hub to a rounded type like the Curtis Electric hub on a P-47 (the cuffed prop blades can be used from the kit). Check photos to see if the a/c you intend to model has large or small, belly fairings, both existed. Kit (part B19) has the short version."
So, the changes I made were:
Removed scoops, and rescribed cowling flaps...
Removed magnetos (I think? I removed parts at yellow area, but now think I should have removed detail at white area too) and cut off original wildcat hub and replaced with p-47 rounded hub from a Tamiya p-47 kit.
Other changes made to the kit in general were:
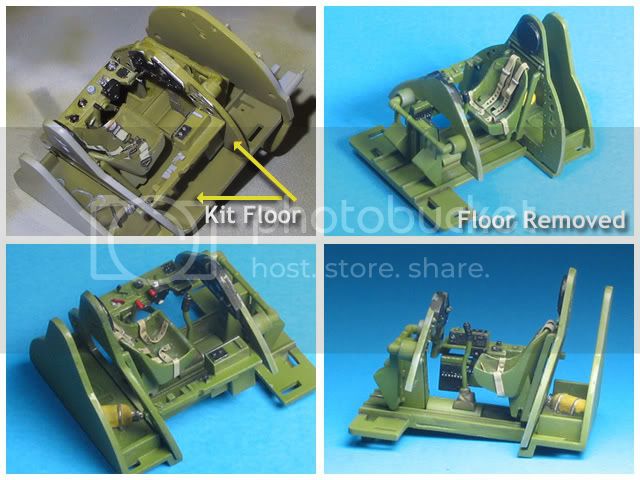
Removed the tamiya kit floor - it is my understanding that this is a mistake in the tamiya wildcat kit. (I included a picture of the floor as it is in the kit from a previous wildcat build, so you can see what changes were made.)
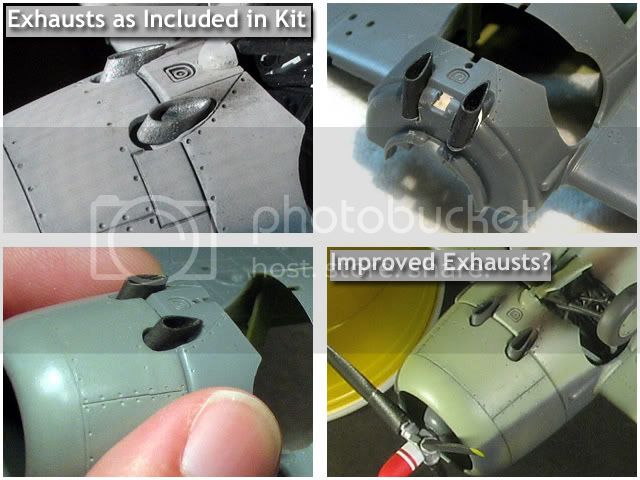
Replaced the kit exhausts which obviously go nowhere with some scratchbuilt 'extended' exhausts to at least appear like they are tubes with depth.
Next up, basic MOM type info...
(PS: An indirect thanks to Jean-Luc for his great way of showing multiple pictures which I have so obviously copied. Great idea Jean-Luc )
newtothegame
Washington, United States
Joined: October 05, 2003
KitMaker: 588 posts
AeroScale: 468 posts
Joined: October 05, 2003
KitMaker: 588 posts
AeroScale: 468 posts
Posted: Thursday, January 18, 2007 - 09:03 AM UTC
Now general build info...
1) Paints used were:
Sky - Tamiya
Dark Slate Gray - Model Master Enamel
Extra Dark Sea Gray - MM Enamel
2) Decals: AeroMaster: #48-548: Grumman Martletts & Wildcats
3) Weathering: Preshading, Postshading (Mix of Tamiya Black & RedBrown), Fading with lightened base coats, Decals knocked down some with overspray of base coat (thanks to those who suggested it to Percheron.
4) Antennae - smoke colored monofilament
5) Seatbelts - Wine bottle foil
6) AM Parts - Eduard Wildcat 'Zoom' PE Set, Squadron vacuum form canopy (kit canopy doesn't sit correctly if opened - too thick)
7) Wash - 'sludge wash' (water, liquid soap, pollyscale grimy black) - actually this was too dark so later gone over with diluted base colors - I think the panel lines are a little big, so really showed the grimy black.
8) Troubles along the way: Tons silvered decals (due to my mistakes not aeromaster), wash too dark, broken mast (couple times), etc. More or less the usually Leon blunders
Anyway, Thanks for looking and letting me blah, blah, blah on about it. It is nice to have a place to share a love of a hobby with others.
Let me know what you think.
Leon
Posted: Thursday, January 18, 2007 - 01:15 PM UTC
Hi Leon!
I think this is great and that it would make a nice "conversion article" for Aeroscale.
You said in another post that you weren't totally happy with your model. But I can only say it looks fantastic on your pictures!
Jean-Luc
I think this is great and that it would make a nice "conversion article" for Aeroscale.
You said in another post that you weren't totally happy with your model. But I can only say it looks fantastic on your pictures!
Jean-Luc
Wad_ware
Illinois, United States
Joined: September 09, 2002
KitMaker: 537 posts
AeroScale: 437 posts
Joined: September 09, 2002
KitMaker: 537 posts
AeroScale: 437 posts
Posted: Friday, January 19, 2007 - 06:22 AM UTC
Hi Leon,
The Martlet really came out great!! And am still glad you were able to get it done for the duel campaign
It is a great first entry for the new MOQ and your thread is really well done with the pics and build info. It is a great format to follow for MOQ entries.
I keep saying it over and over, ;-) but hopefully this weekend I will get some pics of my Thunderbolt and join you in the MOQ.
Very well done and good modeling,
Wayne
caanbash
Ankara, Turkey / Türkçe
Joined: May 30, 2003
KitMaker: 1,093 posts
AeroScale: 50 posts
Joined: May 30, 2003
KitMaker: 1,093 posts
AeroScale: 50 posts
Posted: Friday, January 19, 2007 - 02:24 PM UTC
Wow I love toning and detailing very much! Congratulations!
Cagin
Cagin
newtothegame
Washington, United States
Joined: October 05, 2003
KitMaker: 588 posts
AeroScale: 468 posts
Joined: October 05, 2003
KitMaker: 588 posts
AeroScale: 468 posts
Posted: Friday, January 19, 2007 - 04:48 PM UTC
Thanks guys. I really appreciate the comments!
Jean-Luc, I will try to play around with a conversion article. Do you think it is ok if it is pretty much along the lines of the info I put in this thread? Anyway, I have some ideas, but might do a call out to see if a member can give some more pictures of the original tamiya kit pieces - I wish I had been smart enough to take really good pictures along the way. Anyway, I'll probably work on an article - thanks for the encouragement.
Wayne, I hope to see your t-bolt soon...
Caanbash, Thanks. It's good to hear. I really tried to experiment with the toning and fading on this.
Hope all is well.
Leon