_GOTOBOTTOM
Pre-Flight Check
Constructive critique of your finished or in-progress photos.
instrument panel detailing....knobs, gauges..
bounce19712
Joined: February 21, 2007
KitMaker: 80 posts
AeroScale: 59 posts
Posted: Tuesday, March 06, 2007 - 02:36 PM UTC
dials, lenses, lights, blinking and flashing, BLINKING AND FLASHING aghhhh!!!...errr...Oh, sorry....got carried away....

anyways...help me gentlemen...please...I want to make top notch instrument panels for my 1/32 and 1/35 birds....

I love to get good panels with molded precise dials and graduations....

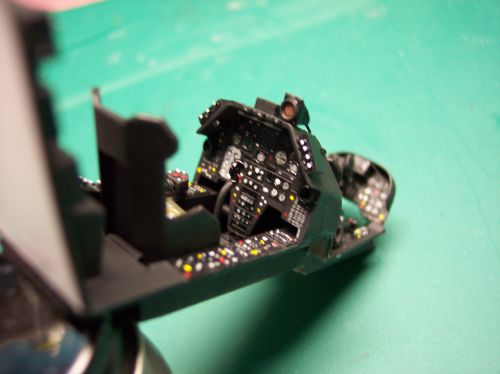
my best panel is below with a Revel 1/32 huey panel...I brushed it years ago when my hand was a bit more steadier than nowadays...added a couple Copier reduced placards on paper...then added some Future acrylic for dial lense glare.....

how to take it to the next level??? can you link me to some of your works??

can you link me to a after market dealer for such detailings??

thanks in advance...Bounce...here's my old huey panel, click on it to get a closer look...


I did it with a testors 3/0 brush for the tiny stuff BTW...

looks alot better with the beer goggles on!!!


bounce19712
Joined: February 21, 2007
KitMaker: 80 posts
AeroScale: 59 posts
Posted: Tuesday, March 06, 2007 - 04:07 PM UTC
I've started two other instrument panels recently....both are Cobra Company panels....for the hh-43 and uh-1d...

they've got great definition as far as relief goes, but the actual dials and graduations on the dials are non-existent or "scratched-in" instead of raised....

for one of the panels I am cutting out the dials on a decal and placing them inside the gauge frames on the panel...the other I'm gonna try to brush it...

started the brushing one tonight...it's all black there...and the huskie panel has a couple decals already in place with one of them having some clear green around the dial...

any suggestions???


As far as installing home-made switches or knobs...I'm open to suggestions....

I've stretched some spue and inserted into pin holes as seen below for some toggle switches....any ideas for some good switches or knobs, latches, handles, fuse buses, circuit breakers....etc,etc???


thanks again men!

Bounce

mother
_VISITCOMMUNITY
New York, United States
Joined: January 29, 2004
KitMaker: 3,836 posts
AeroScale: 1,036 posts
Posted: Tuesday, March 06, 2007 - 11:52 PM UTC
Hey B,
Well here’s what works pretty well for me, for knobs and such I cut slivers from round rod (Evergreen or Platruct) plastics. Then I pour a small puddle of glue out and using my hobby knife to pick up the small knobs I then dip lightly in glue and place on. At time I’ll use a sanding stick to sand and then brush over them with Ten-X to smooth and or round them out.

For dials on kit instrument panels, again using Evergreen Plastic round rod, the diameter of dial, drill through for the right inner diameter. Then cut sliver and sand them down to the right thickness and glue them in place. Now for the dials, well I use a few things. Sometimes I’ll cut them from car parts magazines, model car decal and Archer has a set of 1/35/2 decals that’ll work. They come in black and white face.

At all cost try not to hand paint instrument panel as it’ll just fill in most of the detail. Using an airbrush will leave a smooth and leveled paint job.

For painting knobs and such, well I use a toothpick. Just dap the pick into paint and dap onto knobs and switches. Every so often wipe off pick. Hope this may help some….


Joe
Murdo
_VISITCOMMUNITY
Scotland, United Kingdom
Joined: May 25, 2005
KitMaker: 2,218 posts
AeroScale: 211 posts
Posted: Wednesday, March 07, 2007 - 01:44 AM UTC
Hi Bounce,

The "Clear Green" paint on that dial looks very nice. Good idea, I'll need to try it.

VonCuda
_VISITCOMMUNITY
North Carolina, United States
Joined: November 28, 2005
KitMaker: 2,216 posts
AeroScale: 1,080 posts
Posted: Wednesday, March 07, 2007 - 08:04 AM UTC
HI Bounce,
I can't really add much to this since your instrument panel looks as good as or better than anything I've done yet. However, one tiny thing I like to do after completing a panel is to very lightly go over all the dials and corners, (anything that will see some wear) with an artists silver pencil. I find that it gives a small amount of depth and realism to the piece.
bounce19712
Joined: February 21, 2007
KitMaker: 80 posts
AeroScale: 59 posts
Posted: Wednesday, March 07, 2007 - 01:07 PM UTC

Quoted Text

Hi Bounce,

The "Clear Green" paint on that dial looks very nice. Good idea, I'll need to try it.


http://www.daviator.com/photos/helos2.htm

well the clear green is for two specific dials seen in the above link....EDIT...dang..it wont link right to the photo.....it's a few photos over to the right with the right arrow button.....it's the hh-43 cockpit panel....

29Foxtrot
_VISITCOMMUNITY
Victoria, Australia
Joined: September 19, 2003
KitMaker: 708 posts
AeroScale: 674 posts
Posted: Wednesday, March 07, 2007 - 05:52 PM UTC
G'day,

On a 32 scale F-14 I used a chrome silver base before applying a clear blue, to simulate a screen, same on a 48 Skyray, below pix show the created screens.


As for knobs on control levers, this Mk VInf Beaufighter cockpit has wire levers with drops of white glue to create their knobs, prior to painting with a toot pic, [a fine drill is used to create the holes in the kit cockpit parts, prior to iserting the wire], the [removed detail of the kit] instrument panel, was painted red before the instrumet film was attached.


Hope these tips are of assistance.
 _GOTOTOP