_GOTOBOTTOM
Early Aviation
Discuss World War I and the early years of aviation thru 1934.
Bloody April; Day of the Comet
JackFlash
_VISITCOMMUNITY
Colorado, United States
Joined: January 25, 2004
KitMaker: 11,669 posts
AeroScale: 11,011 posts
Posted: Wednesday, March 07, 2007 - 01:21 AM UTC

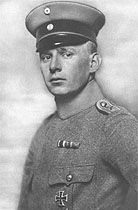
On 6 April 1917, the United States entered the war. It was also the day that Ltn. von Bertrab of Jasta 30, flying his dark purple Albatros D.III with its unique comet insignia, shot down four British aircraft in three hours. His fifth and final victory was achieved a month later. The war ended for Bertrab on 12 August 1917. While attacking a balloon, his Albatros D.V was shot down by a Nieuport piloted by Edward Mannock. Bertrab survived but was captured.

6 April 1917 Ltn. von Bertrab-3 Sopwith 1-1/2 10.30 Obigies
#A.1093, 45 Sqn. RFC, 2/Lt. J.A. Marshall, KIA & 2/Lt. F.G. Truscott,KIA.

6 April 1917 Ltn. von Bertrab-4 Sopwith 1-1/2 10.30 Pecq
#A.2381,45 Sqn. RFC,2/Lt. C. St. G. Campbell, KIA & Capt. D.W. Edwards,KIA.

Lieutenant John Arthur MARSHALL
The Huntingdonshire Cyclist Battalion.
John Arthur Marshall to be Second Lieutenant. Dated 31st December, 1914.

Lieutenant Francis George TRUSCOTT MC
Awarded MC as per London Gazette number 29438, dated 14 January 1916 - Second Lieutenant Francis George Truscott, Suffolk Regiment (Territorial Force); no citation.

Second Lieutenant Colin St George CAMPBELL
nothing to hand

Captain Donald William EDWARDS MC
Gazetted temporary Second Lieutenant in the Infantry wef 13 February 1915 (had previously been, incorrectly, announced as 4 November 1914)
Awarded MC as per London Gazette number 29608, dated 3 June 1916; no citation.

Two of three crews lost in the vicinity of Lille; 2nd Lt James Edward Blake (Kia) and Capt William Stead Brayshay (Kia), were probably lost to Hans Bethge, also of Jasta 30.


JackFlash
_VISITCOMMUNITY
Colorado, United States
Joined: January 25, 2004
KitMaker: 11,669 posts
AeroScale: 11,011 posts
Posted: Wednesday, March 07, 2007 - 01:31 AM UTC
The Albatros D.III kit is of course the Eduard 1/48 scale #8017.
JackFlash
_VISITCOMMUNITY
Colorado, United States
Joined: January 25, 2004
KitMaker: 11,669 posts
AeroScale: 11,011 posts
Posted: Wednesday, March 07, 2007 - 01:35 AM UTC
In January 1917, the German air fighting squadrons were being armed with Albatros D.III types. This new type was a successor of the Albatros D.I and Albatros D.II and had the same engine, but in contrast to them the D.III wings were arranged as a "sesquiplane", similar to the French Nieuport - the narrower bottom wing was joined to the wide top wing by "Vee" interplane struts.

Despite initial problems with warping and stressing of the wing tips, the aircraft was very successful at the front, particularly during "Bloody April" in 1917, and it was also very popular with the pilots. The firm Albatros Werke GmbH in Johannisthal made three series of Albatros D.III. D.1910-2309/16, D.600-649/17 and D.750-799/17. The engine radiator was centrally located and later moved to an off center position at 2201/16.

Licensed production later continued in an East German factory, Ostdeutsche Albatros Werke (OAW) in Schniedemuhl from spring 1917, where 840 aircraft were produced. The Albatros D.III also served in 1917 18 with some of the training squadrons. An Austrian concern of Oeffag built four licenced versions of the Albatros D.III.
JackFlash
_VISITCOMMUNITY
Colorado, United States
Joined: January 25, 2004
KitMaker: 11,669 posts
AeroScale: 11,011 posts
Posted: Wednesday, March 07, 2007 - 01:42 AM UTC
“Feasting on a plastic Do-Do”
Eduard of Czechoslovakia has been blessing us regularly with masterpieces in their 1/48 scale range of World War One aviation kits. Recently they have tried a new approach to issuing kits. They take one aircraft type and their one mold will have early-mid and late production versions and they simply cut away the unwanted parts not applicable to the box art. I will attempt to tell you here what you get for your money in the basic kit #8017.

Strangely a Schneidemuhl rudder is included in all six examples I have of the # 8017. This curved face rudder was a late development and was only on OAW built Alb. D.III type and all later Alb. D.V and D.Va types. Also the kit motor types are generic to the Merc.D.III 160 hp but the Albatros D.III type aircraft had the Merc. D.IIIa 170hp installed.

Step 1.) The firewall (A31), ammunition boxes (A5) and spent belt link collector (A21). Are brought together into one unit. The rudder bar (A14) needs wire half loops over the foot rests. The instrument panel (A13) is too long so cut it and add a triangle wedge at its base to act as a small shelf and the addition of a fuel gauge .to rest on it. The hand pump to pressurize the fuel tank (A17) needs an air line running forward. The control yoke (A12) is a little crude for this fine of a kit I suggest scratchbuilding one or Tom’s Modelworks Brass fret #210 has a fine example that with modification to the control column (A18) head (“C” shaped) will render a beautiful piece. This kit does not have lap or shoulder harness’ and these I added next from spares but again Tom’s has some nice items. I added a tachometer and compass as well using one of the Eduard Alb. D.V sets that come in pairs. The starter magneto (A9) is too thick and needs a lever crank. Again the Eduard Alb.D.V kits have extras The flooring (A23) should be shortened by 2/3 fore to aft and keep the front section with the notch for the control column. The lower step on (A4) can be used to support the fine wire that will simulate the rudder and elevator cables at their aft ends.

Step 2.) The motor needs spark plug wires by adding short sections of .008 brass wire. Forward of the Firewall you need to add a fuel tank built up from .060 and .030 laminated plastic. The cylinders should have their water jacket (cylinder outer shell) painted a dark gun metal as if it were blued metal. I altered the Spandau machine guns (B18) by cutting off the solid plastic jackets and adding etched metal fluted type again from Tom’s Modelworks..

Step 3.) The lower wings (B2&3) had brass pins inserted into predrilled holes in both sides of the fuselage with corresponding holes in the lower wings. This provides a rigid structure to hang the wings from. While in the area there is a vertically scribed line between the forward engine compartment vent and the rear edge of the cowling ring. It needs to be filled and sanded smooth. Lay common masking tape over the details you want to save and then sand and fill with gap filling “Super Glue” cynoacrylate..

Step 4.) After I drill all the appropriate holes to accept the rigging lines (monofilament) I finished the upper surface of the lower wings and then the lower surface of the upper wing then mate the pair using the “V” shaped outer wing struts (A27-28) and a jig constructed from “Lego blocks”. This will allow for you to construct the cabane struts from metal( brass is good) rod and rig as you go.. Alignment is critical to a kit like this.

Reverse the order of Steps 5&6 .) For the control horns I disregarded the kit items and again used Tom’s #210 fret for Albatros fighters. Also when it comes to the landing gear I replaced all kit pieces (A14-15 & 25-26) with metal rod for strength and scale thickness. Remember also that the weakest point of “V” type undercarriages is the side to side twist. This is eliminated with metal rod to the largest degree.. Use nylon thread to loop around the area where the axle meets the undercarriage “U” . This represents the bungee shock absorber cords on the real a/c and also provides contact and stability for the axle. I added a laminated wood propellor that I built and drilled out the exhaust horn opening.


Concerning the markings profiles:
1. The Albatros D.III from production batch 1910-2200/16 represents the one flown by the Red Knight of Germany Manfred von Richthofen while commander of Jasta 11. Used primarily during March & April 1917. It is generally accurate.

2. The Albatros D.III from Production batch 1910-2200/16 represents the one flown by Ltn. des Res. Hermann Frommherz while he served with Jasta (Boelcke) 2. during April - May 1917. It should have a white tail unit ( Horizontal and vertical with a narrow black band around the fuselage at the juncture of these units) This was the Jasta’s unit marking at this time. In all other respects the profile is generally accurate. STL

Listed References
Albatros Aces by Franks, 2000 Osprey #33.
Albatros D.III Feasting on a Do - Do by S.T. Lawson, 2001 Model Aircraft Monthly Vol 1 #1.
Albatros D.III by P. Gray, 1966 Profile Pub Profile # 127
Albatros D.III (OEF) by Peter Grosz, Windsock Datafile #19.
Albatros Scouts Described, by Chas Schaedel, 1971 Kookaburra Tech. Pub.
Albatros Fighters Datafile Special by Ray Rimell, 1991 Albatros Pub. Ltd.
German Fighter Units 1914 - May 1917 by Alex Imrie. Osprey Air war 13, 1978 & 1993.
Lafayette Foundation Archive. Denver CO. USA.
Spandau Machine Gun by David Watts,1998 WWI Aero.
The Last Albatros by Colin Owers 1988 Aviation News Pp.216-221.
JackFlash
_VISITCOMMUNITY
Colorado, United States
Joined: January 25, 2004
KitMaker: 11,669 posts
AeroScale: 11,011 posts
Posted: Wednesday, March 07, 2007 - 02:12 AM UTC
From the Eduard Profipack kit #8035. I used the insignia for Bertrab's machine.


Leutnant Joachim von Bertrab of Jasta 30 was assigned to an Albatros D.III from the first production series (1910-2200/16) in the early spring 1917. He arrived from Flieger Abteilung 71 on 6 March 1917 and on 12 Aug 1917 was brought down behind allied lines and made a POW flying a black coloured Alb. D.V 2191/17. Four of Ltn. von Bertrab’s five victories were acquired on 6 April 1917.

Several versions of the Albatros D.III colour scheme can be considered having the fuselage as black or dark purple. The last version comes from the documents of revered historian A. E. Ferko. We find his hand written notations on an image of this aircraft as “dark purple.” The effects of the orthochromatic black and white film of the day tends to show this color whatever it is, as very dark. At least one British pilot specifically mentions a German pilot as “our man of the mauve.” Another pilot who became Ltn. von Bertrab’s victor is quoted in the weeks before their final fight as having other contacts with the “purple man.” I chose the dark purple for this build.
JackFlash
_VISITCOMMUNITY
Colorado, United States
Joined: January 25, 2004
KitMaker: 11,669 posts
AeroScale: 11,011 posts
Posted: Wednesday, March 07, 2007 - 04:24 AM UTC
Greetings all;
This is the Albatros kit before adding the fuel tank, left side sparkplug wires and closing up the fuselage halves. The figure is from Copper State Models seated German pilot. For this build I only simulated the sparkplug wires for the pilot's left side as they are more readily seen.


JackFlash
_VISITCOMMUNITY
Colorado, United States
Joined: January 25, 2004
KitMaker: 11,669 posts
AeroScale: 11,011 posts
Posted: Wednesday, March 07, 2007 - 04:52 AM UTC
For those interested Ltn. von Bertrab died on July 28, 1922, according to his entry (I assume his) in the Ehren-Rangliste des ehemaligen Deutschen Heeres, pg 506. His regiment was the Niedersächsisces Feldartillerie-Regiment Nr. 46. He was killed in a flying accident near Boitzenburg. He was Ltn. a. D. at the time. His full name was Joachim Lambert Robert Herman von Bertrab.
jRatz
_VISITCOMMUNITY
North Carolina, United States
Joined: March 06, 2004
KitMaker: 1,171 posts
AeroScale: 151 posts
Posted: Wednesday, March 07, 2007 - 07:59 AM UTC
Stephen,

Great !!! You're really setting the bar high for the rest of us.
I know I'll appreciate you build notes on the D.III as I'm unfamiliar with the kit and the aircraft ...

John
JackFlash
_VISITCOMMUNITY
Colorado, United States
Joined: January 25, 2004
KitMaker: 11,669 posts
AeroScale: 11,011 posts
Posted: Thursday, March 08, 2007 - 01:13 AM UTC
Here is the completed fuselage.

JackFlash
_VISITCOMMUNITY
Colorado, United States
Joined: January 25, 2004
KitMaker: 11,669 posts
AeroScale: 11,011 posts
Posted: Thursday, March 08, 2007 - 11:14 AM UTC
Here is the finished build.


JackFlash
_VISITCOMMUNITY
Colorado, United States
Joined: January 25, 2004
KitMaker: 11,669 posts
AeroScale: 11,011 posts
Posted: Thursday, March 08, 2007 - 03:12 PM UTC

Quoted Text

Stephen,
Great !!! You're really setting the bar high for the rest of us. I know I'll appreciate you build notes on the D.III as I'm unfamiliar with the kit and the aircraft ... John


Thanks John, very kind words indeed. The text is one of the first kit reviews I ever did. Since then there have been modifications to subsequent issues and their reviews.

This is a considerably modified build. Still in all a great kit whether you are an experienced modeler or a novice. Though the half the decals come from the Profipack issue it is pretty much a basic kit. The modifications include;

1. a pilot,
2. an extra radiator facade and
3. some instrument switches from Eduard's aftermarket set,
4. a couple of cut and shaped brass rods plumbing to the radiator,
5. some motor wiring,
6. scratchbuilt fuel cell,
7. monofilament rigging,
8. the four control horns for the elevator
9. landing gear legs and axle parts are cut and shaped brass rod.
10. Grandt line hex head nuts for the strut tie - in's onthe top wing,
11. Cabane struts are cut and shaped brass rod, 4 pieces per side,
12. photoetch Spandau machine gun jackets, end caps, gun sights and etc.

I cannot stress enough how the lower wing needs at least one through and through brass rod pinned to the lower wings.
JackFlash
_VISITCOMMUNITY
Colorado, United States
Joined: January 25, 2004
KitMaker: 11,669 posts
AeroScale: 11,011 posts
Posted: Thursday, March 08, 2007 - 03:18 PM UTC


JackFlash
_VISITCOMMUNITY
Colorado, United States
Joined: January 25, 2004
KitMaker: 11,669 posts
AeroScale: 11,011 posts
Posted: Wednesday, March 14, 2007 - 04:49 AM UTC
Man and Machine. Possibly taken after his four victories on 6 April 1917.
JackFlash
_VISITCOMMUNITY
Colorado, United States
Joined: January 25, 2004
KitMaker: 11,669 posts
AeroScale: 11,011 posts
Posted: Saturday, March 17, 2007 - 04:16 PM UTC
Author and historian Greg VanWyngarden of Anthology, Windsock and Osprey fame has provided some interesting footnotes to the symbolism of Comets around the turn of the century.

Max Holtzem of Jasta 16b fame notes that he believed that the comet he had painted on all of his fighters was representative of his mother's spirit. She died when Max was a young boy and he believe it was her spirit that protected him. His guardian angel as it were. Haley's Comet had paid a recent visit and it was a popular belief that a comet was the spirit of a loved one passing to heaven.

We note another WWI French pilot Lt. Santa Maria used an identical comet marking (referring to Bertrab's) on his Nieuport 17 (N1831.) This machine was captured relatively intact. One wonders if Bertrab copied that marking for his. There were several WWI aviation squadrons that used the comet as their unit marking (Belgian and AEF).
Kitboy
_VISITCOMMUNITY
Gelderland, Netherlands
Joined: July 20, 2006
KitMaker: 258 posts
AeroScale: 256 posts
Posted: Saturday, March 17, 2007 - 09:15 PM UTC
Hello Stephen,

Thanks very much for sharing. I have two questions. What machine are you going to build as a victim? Maybe I was looking incorrect, but I cannot find it in this thread.

I have heard that the wheels supplied with the Eduard kit are too small, diameter and thickness. You agree with this?

Greetings, Nico

JackFlash
_VISITCOMMUNITY
Colorado, United States
Joined: January 25, 2004
KitMaker: 11,669 posts
AeroScale: 11,011 posts
Posted: Sunday, March 18, 2007 - 09:13 AM UTC
Hello Nico!
I have started the Sopwith 1 1/2 strutter that will be the companion to the Albatros D.III. The text is complete but the build is only about half completed. I'll be posting it here and keeping them together.
Kitboy
_VISITCOMMUNITY
Gelderland, Netherlands
Joined: July 20, 2006
KitMaker: 258 posts
AeroScale: 256 posts
Posted: Sunday, March 18, 2007 - 05:19 PM UTC
Thanks,

And how about the Albi's wheels?

greetings, Nico
JackFlash
_VISITCOMMUNITY
Colorado, United States
Joined: January 25, 2004
KitMaker: 11,669 posts
AeroScale: 11,011 posts
Posted: Sunday, March 18, 2007 - 07:56 PM UTC
Sorry Nico... I was distracted for a bit. Yes the stock kit wheels do seem a bit too small in diameter and in width according to the ian Stair drawings. I have some resin items I usually use. But the difference is minimal. And strickly up to Mr. Stair's interpretation.
JackFlash
_VISITCOMMUNITY
Colorado, United States
Joined: January 25, 2004
KitMaker: 11,669 posts
AeroScale: 11,011 posts
Posted: Thursday, March 29, 2007 - 04:23 PM UTC
Even though the only Sopwith 1 1/2 Strutter I have had any previous experience with was the Roden Nightfighter I will be discussing the two seater build with some variations I have the Roden PE, Copper State Models PE and Part of Poland PE.
JackFlash
_VISITCOMMUNITY
Colorado, United States
Joined: January 25, 2004
KitMaker: 11,669 posts
AeroScale: 11,011 posts
Posted: Friday, March 30, 2007 - 03:05 PM UTC
Here is the Part of Poland fret #48109.


Here is the #402 Roden kit.


I have many of the same references as JRatz but there are a couple of additional ones.

References;
British Fighter Units 1915-16 by A. Revell, Osprey Pub. Ltd. 1978.
British Fighter Units 1917-18 by A. Revell, Osprey Pub. Ltd. 1978.
Royal Flying Corps in WWI by R. Rimell, Osprey Vintage Warbirds series #1, 1985.
Royal Naval Shipboard Aircraft Developments 1912 to 1931 by Dick Cronin, Air Britain Pub.1991.
Royal Navy Aircraft Serials 1911-1919 by R. Sturtivant & G. Page , Air Britain, 1992.
Sopwith 1 ½ Strutter by J.M. Bruce Windsock Datafile #34, 1992.
Sopwith 1 ½ Strutters by J.M. Bruce Profile Pub. (1962 or 3?)
Sopwith Fighters in WWI by J.M.Bruce, Osprey Vintage Warbirds series. #3, 1986.
JackFlash
_VISITCOMMUNITY
Colorado, United States
Joined: January 25, 2004
KitMaker: 11,669 posts
AeroScale: 11,011 posts
Posted: Tuesday, April 03, 2007 - 06:56 PM UTC
Greetings all;
A fellow enthusiast did indeed provide me with some very informative scans of RFC 45 Sopwith 1 1/2 Strutters. I was looking for A'1093 looks like I got an image of A'1083 very impressive. CDL fuselage (all sides) and PC10 or 12 on the upper surfaces of the wings. The rudder fins are halved vertically in white & black (nose to rudder) from the pilot's right side profile of the fuselage. The serials are in contrasting colours to their backgrounds. Bit of an odd duck there but very interesting. Also Another decent sort in the UK has provided me with more info on RFC 45 mission that day.

". . .Stephen

According to the The Sky Their Battlefield, it was a reconnaissance patrol. The patrol departed 09:10 and the three Sopwiths went down within a period of two minutes - 10:48 to 10:50.

I believe the location for von Bertrab's claims should be "Pecq" since this is in the vicinity of Tournai (to the north and west), where Bethge's claim was made, and I haven't come across "Becq".

Graeme. . . "


The reviews of this book on Amazon:
1. ". . . Trevor Henshaw has done yeoman's work in producing this meticulous study of WWI airpower. WHat I found most useful was his data on the "other" fronts outside of the western front. Excellent data on airpower in the Middle East, Africa and the eastern front. Truly comprehensive work, and I look forward to more from Henshaw. . . "

2. ". . . This book is a researchers delight. The effort that Trevor Henshaw has put into this book is staggering and if your are serious about WWI aviation this book should be sitting in your library. Mind you its not a book you can sit down and read but if you want to find out what happended on a particular day or follow the career of a particular pilot this is the book for you. During the time I researched 2 Australian pilots of WWI fame this book was invaluable. Just too detailed for words but excellent value for money. . ."

JackFlash
_VISITCOMMUNITY
Colorado, United States
Joined: January 25, 2004
KitMaker: 11,669 posts
AeroScale: 11,011 posts
Posted: Tuesday, April 03, 2007 - 11:35 PM UTC

Quoted Text

Greetings all;
A fellow enthusiast did indeed provide me with some very informative scans of RFC 45 Sopwith 1 1/2 Strutters. I was looking for A 1093 looks like I got an image of A 1083 very impressive. CDL fuselage (all sides) and PC10 or 12 on the upper surfaces of the wings. The rudder fins are halved vertically in white & black (nose to rudder) from the pilot's right side profile of the fuselage. The serials are in contrasting colours to their backgrounds. Bit of an odd duck there but very interesting. Also Another decent sort in the UK has provided me with more info on RFC 45 mission that day...


Small addition to this the fuselage was CDL but overpainted white! You can see ther wear an peeling paint in the image of A 1083. Most curious. In another image of 45 RFC we see a line up fo sevral machine and there is even white fuselaged bird there too. Curiouser and curiouser.
JackFlash
_VISITCOMMUNITY
Colorado, United States
Joined: January 25, 2004
KitMaker: 11,669 posts
AeroScale: 11,011 posts
Posted: Friday, April 13, 2007 - 05:40 PM UTC
The production Sopwith type 9400 became known as the 1 ½ Strutter and started out as a two seat aircraft design that was expected to fulfill several rolls. Like an actor in an off Broadway performance having several minor parts in a play production, so the ‘Strutter’ was expected to be a fighter (designated 9400) , bomber (designated the 9700), trainer and reconn platform. Historian J.M. Bruce recorded, “...On April 8, 1916 Harry Hawker the Sopwith Test pilot, visited Hendon in the new aircraft, probably an RNAS machine from the first production batch. The visit was chronicled in the issue of Flight for April 13: “. . .Harry Hawker , with a passenger paid a flying visit to the aerodrome on the new two - seater Sopwith Bullet and showed what this mount could do in the way of speed and slow landing - and it was very good . . .” A photo of this machine was published in the next issue with the caption repeating that it was a Sopwith Bullet...” It was one of the first aircraft types to have “air brakes” located in the lower wing roots. Then with the creation of No. 3 Wing RNAS in early 1916, the first strategic bombing force was formed.

Now to get kit specific, the instructions for Roden 's Strutter kit #402 are divided up like the recent Gavia Pfalz E.I kit. On the Roden kit the first ten steps deal with just the plastic parts. The photoetch (PE) pieces are dealt with at the end of the instructions. So the modeler need to be familar with this.

Step 1.) Begins with the assembly of the Clerget type 9B rotary engine (3 E .) Then add the face plate cover with pushrods (4 E). Check your references. Also, the rear engine shaft (8 I ) is glued into the rear of the rotary while the spindle is inserted into the mounting support tube (17 I .) This then passes through the firewall and a simple retainer (18 I ) is provided to glue to the exposed end of the spindle shaft. I’m not too concerned with having my rotaries free floating or able to turn. For those of you that see this as a viable option try this; Make sure the shaft will pass completely through the tube into the retainer. Add a very small amount of petroleum jelly to the shaft between the firewall and the back of the rotary. Insert the motor/shaft assembly part way through the firewall. Finally add the retainer and then apply a small amount of thick consistency cyano- glue to the tip of the exposed shaft tip with the retainer in place. The plastic is soft and easy to work with. I decided to add an extra ‘Copper State Models’ firewall face plate that I had ( from their Sopwith Strutter kit.) This item has some nice rivet and screw details. While a little large in area it cuts down easily and anneals at the edges nicely.
JackFlash
_VISITCOMMUNITY
Colorado, United States
Joined: January 25, 2004
KitMaker: 11,669 posts
AeroScale: 11,011 posts
Posted: Friday, April 13, 2007 - 05:47 PM UTC
Photoetch Step 1.) Begins with the assembly of the Clerget type 9B rotary engine (3 E.) Attach the PE pushrods (8 P) to the engine first. Note the center hole in the PE will have to be filed to open up the hole more or it won't sit over the engine stub correctly. It has to move freely enough for the whole piece to line up the pushrods for the cylinder head tappets.

Then add the face plate cover (4 E) without the plastic pushrods. Check your references.
JackFlash
_VISITCOMMUNITY
Colorado, United States
Joined: January 25, 2004
KitMaker: 11,669 posts
AeroScale: 11,011 posts
Posted: Saturday, April 14, 2007 - 06:06 AM UTC


Note the revisions I am doing to the seat and its supports. The back has been cut down, the kit support under the seat was deleted and cross members added to the underside , spanning the width of the cockpit. Not also the flooring has been altered and only the front and rear portions added. A criss-cross of wires bewteen them has been added and the crossed wires added to the cockpit sides between the vertical structures. This is just a start as the kit cockpit structure is only minimal in its representation. While the Part of Poland PE set has these represented I am only using it for this build as a guide to add sheet plastic cut and shaped for scratchbuilt details.
 _GOTOTOP