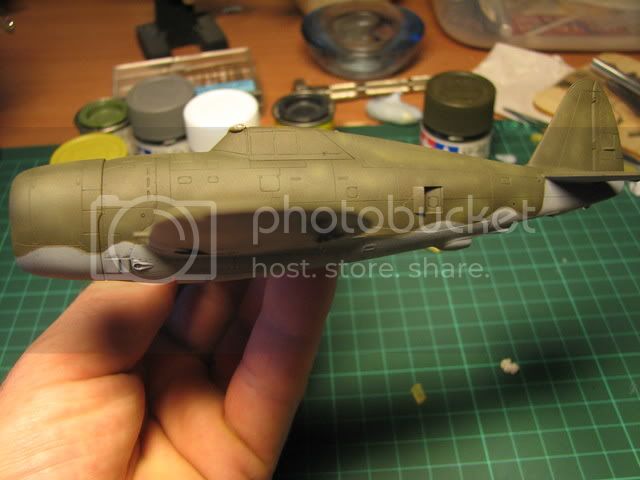
A quick update before I hit the hay
Preshading is complete and Ive masked the canopy using an Eduard precut mask.Its the first time Ive used one of these and they are definately the way forward.Easy to apply and fit perfectly.
Work on the engine is almost done and just a bit of drybrushing and another wash to go.Ive started work on the undercarriage and weaponary as well.
Right,,Im off to bed.Should have been there hours ago,,
Nige
Air Campaigns
Want to start or join a group build? This is where to start.
Hosted by Frederick Boucher, Michael Satin
"Down Low" Tamiyas 1:72 P-47 Razorback.
Posted: Tuesday, May 15, 2007 - 05:32 AM UTC
Blackwulf
Ohio, United States
Joined: April 20, 2004
KitMaker: 215 posts
AeroScale: 120 posts
Joined: April 20, 2004
KitMaker: 215 posts
AeroScale: 120 posts
Posted: Tuesday, May 15, 2007 - 10:11 PM UTC
@Nige I like the Blue Cowling--just my 2 cents. I think the plane will look nice when it is done. It appears that the blue does stand out better on the aluminum finish per the decal sheet you have posted.
Posted: Wednesday, May 16, 2007 - 01:30 AM UTC
Quoted Text
@Nige I like the Blue Cowling--just my 2 cents. I think the plane will look nice when it is done. It appears that the blue does stand out better on the aluminum finish per the decal sheet you have posted.
Hi Patrick
The blue cowling is correct for the nmf P47 N.
Its the cowling colour on the razorback that is incorrect,and thats the version Im building.
I'll be building the other version when I find a kit of the P47 N in 1:72 that I like,,,please Tamiya
Nige
CRS
California, United States
Joined: July 08, 2003
KitMaker: 1,936 posts
AeroScale: 1,168 posts
Joined: July 08, 2003
KitMaker: 1,936 posts
AeroScale: 1,168 posts
Posted: Wednesday, May 16, 2007 - 01:36 AM UTC
That cockpit and engine detail work can really mislead one, as to the scale you are working in (1:72), excellent work Nige
Posted: Thursday, May 17, 2007 - 05:06 AM UTC
Thanks Chuck.
I really enjoy working in 1:72.Despite the small scale I enjoy the challenges it presents and overcoming them hopefully
With every build I like to try something new and push the boundries of my building ability a bit more to try and improve on my finished models.
For this P47,Im trying a technique for recreating faded paintwork using a method I found in Brett Greens Osprey book,Modelling The P47 Thunderbolt.
It involves adding mottles and mists of progressively lighter and thinner tones of the base colour. Tonight Ive sprayed the underside of my Razorback and Im very pleased with the effect so far. Of course,it isnt finished and theres still decals and washes to go over the top of it, but for a "base" Im very happy.
Heres the four stages.
First, the base colour is sprayed.In this case Tamiya XF 53 Neutral Grey.
Second. A 70/30 mix of the grey and white was misted over in random patterns.
Thirdly,I filled in the spaces between the panel lines,,(very roughly given my present airbrush technique) with a 50/50 mix of grey and white.This wasnt intended to be precise and was misted over as opposed to "filling in the gaps"
Finally an very heavily thinned mix of about 95% white and 5% grey was misted over the whole underneath to blend everything together.
Generally quite a subtle effect but one that certainly seems to have been worth the effort and after the usual washes etc it should look quite good I hope.
Tomorrow I'll try the same technique with the olive drab areas.
Nige
Posted: Friday, May 18, 2007 - 12:12 AM UTC
Top surfaces done.
Again,,four pictures using the same ratios as for the underside photos above.
I aimed for a bit more severe weathering effect for the topside as this the area that would have been fully exposed to our wonderfull English weather! Colours used were Tamiya Acrylics XF 62 Olive Drab and XF4 Yellow Green.
Base coat of Olive Drab.
70% Olive Drab/30% Yellow Green misted on randomly.
50/50 mix loosly sprayed in the main panels and randomly mottled on the fusalage.
Streaks of almost pure Yellow Green heavily thinned and misted over.
As with the underside,it still has to recieve a wash and general weathering,but Im very pleased with the faded effect Ive managed to achieve at the first time of trying.
Comments and advice more than welcome.
Nige
Posted: Friday, May 18, 2007 - 01:01 AM UTC
Masking removed.
A couple of small areas (as allways) need addressing but Its looking ok I think.
Nige
A couple of small areas (as allways) need addressing but Its looking ok I think.
Nige
CRS
California, United States
Joined: July 08, 2003
KitMaker: 1,936 posts
AeroScale: 1,168 posts
Joined: July 08, 2003
KitMaker: 1,936 posts
AeroScale: 1,168 posts
Posted: Friday, May 18, 2007 - 01:09 AM UTC
Fantastic work !!! - This is about the stage were I start to hate my models, almost there but not quite. I try to imagine the finishing touches and hope I don't screw them up - But you are doing and excellent job, keep it up. Can't wait to see the finished model, she's a beauty.
Posted: Friday, May 18, 2007 - 11:34 AM UTC
Hi Nigel!
Your P-47 looks very good so far... can't wait to see the decals on it!
Jean-Luc
Your P-47 looks very good so far... can't wait to see the decals on it!
Jean-Luc
csch
Buenos Aires, Argentina
Joined: December 27, 2002
KitMaker: 1,941 posts
AeroScale: 1,040 posts
Joined: December 27, 2002
KitMaker: 1,941 posts
AeroScale: 1,040 posts
Posted: Friday, May 18, 2007 - 06:15 PM UTC
Hi Nigel:
Looking good so far. I like very much the paint work, the faded effect you achieved looks very well. What did you decide about the colour of the cowling ? Keep on posting !!!
Posted: Friday, May 18, 2007 - 08:13 PM UTC
Thanks for the feedback guys.
Im really pleased with how its all coming together.With another tour looming Im not sure when its going to be finished,but its not far off now.
The cowling will be painted in the correct 63FS colour of duck egg green.This was used before the 3 squadrons of 56FG adopted the red cowling as a group identification.
The model has recieved its coats of Klear now and the next step will be to paint the tail stripes and the cowling before I get to the decal stage.
Nige
Posted: Friday, May 18, 2007 - 10:37 PM UTC
Quick update.
The white stripes and the cowling masked and sprayed.The white bands look much better painted on than using decals and are quite easy to do.
Cant wait to get some decals on and really start to bring the Jug to life.Its my favourite part of the build!
Nige
The white stripes and the cowling masked and sprayed.The white bands look much better painted on than using decals and are quite easy to do.
Cant wait to get some decals on and really start to bring the Jug to life.Its my favourite part of the build!
Nige
Posted: Friday, May 18, 2007 - 11:17 PM UTC
That's really is looking good Nige.
I like the faded effect so much my P-47 (if I ever get round to starting it ) is going from NMF to Olive Drab, just so I can try this technique out.
Andy
I like the faded effect so much my P-47 (if I ever get round to starting it ) is going from NMF to Olive Drab, just so I can try this technique out.
Andy
csch
Buenos Aires, Argentina
Joined: December 27, 2002
KitMaker: 1,941 posts
AeroScale: 1,040 posts
Joined: December 27, 2002
KitMaker: 1,941 posts
AeroScale: 1,040 posts
Posted: Saturday, May 19, 2007 - 01:17 AM UTC
Hi Nigel:
Looking good. Now the decals ?
What hapened to the Spitfire on the background. Are you building it too ?
Looking good. Now the decals ?
What hapened to the Spitfire on the background. Are you building it too ?
Posted: Saturday, May 19, 2007 - 01:45 AM UTC
Thanks for the comments guys.
Andy,,Im really impressed with the faded look Ive achieved so far. In the last picture it looks rather blotchy and unnatural but thats because of the reflections caused by the Klear on the photo.When its weathered further and dull coated it should look really nice.Definately the way forward.
Carlos. After further coats of Klear to protect the stripes and an overnight dry I will start the decals.Hopefully tomorrow.Meanwhile,Im slowly working on the undercarriage and ordnance.
The Spit in the background is the Airfix MK IX JE-J. A really horrible kit and the one I use to test out my paint mixes and airbrush techniques.Possibly the best use for it IMHO.
Nige
Posted: Saturday, May 19, 2007 - 02:37 AM UTC
While Im working on the various bits and pieces for this,,does anyone know which would be the correct propellor to use for this version.
There are two supplied with the kit. One with a "pointed" boss and one with a more rounded? Cant remember which make is which at the moment.
Nige
There are two supplied with the kit. One with a "pointed" boss and one with a more rounded? Cant remember which make is which at the moment.
Nige
csch
Buenos Aires, Argentina
Joined: December 27, 2002
KitMaker: 1,941 posts
AeroScale: 1,040 posts
Joined: December 27, 2002
KitMaker: 1,941 posts
AeroScale: 1,040 posts
Posted: Saturday, May 19, 2007 - 04:21 AM UTC
Hi Nige:
I think that the original propeller was the Curtiss Electric but I saw pics of the Razorback with the Hamilton Standard Propeller (not the pointed one). I think that can use one or another.
CRS
California, United States
Joined: July 08, 2003
KitMaker: 1,936 posts
AeroScale: 1,168 posts
Joined: July 08, 2003
KitMaker: 1,936 posts
AeroScale: 1,168 posts
Posted: Saturday, May 19, 2007 - 05:31 AM UTC
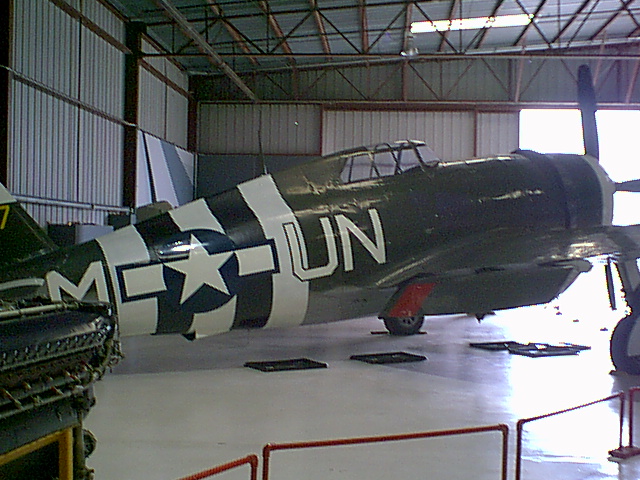
For a Prop reference, I reckon this one is about the same vintage as the one you are building
Posted: Saturday, May 19, 2007 - 03:02 PM UTC
Thanks guys.
I was erring towards the paddle type.
Im hoping to start getting the decals on my Jug today
Shame Ive got to go back to work on Tuesday,so It might still be a few weeks before shes finished.
I must stop these rushed builds,,LOL
Nige
I was erring towards the paddle type.
Im hoping to start getting the decals on my Jug today
Shame Ive got to go back to work on Tuesday,so It might still be a few weeks before shes finished.
I must stop these rushed builds,,LOL
Nige
csch
Buenos Aires, Argentina
Joined: December 27, 2002
KitMaker: 1,941 posts
AeroScale: 1,040 posts
Joined: December 27, 2002
KitMaker: 1,941 posts
AeroScale: 1,040 posts
Posted: Sunday, May 20, 2007 - 02:44 AM UTC
Hi Nigel:
This Jug wears the Curtiss Electric Prop (not the paddle type)
CRS
California, United States
Joined: July 08, 2003
KitMaker: 1,936 posts
AeroScale: 1,168 posts
Joined: July 08, 2003
KitMaker: 1,936 posts
AeroScale: 1,168 posts
Posted: Sunday, May 20, 2007 - 03:08 AM UTC
To make your search for a propeller a little more complicated
"Production batches D-22-RE and D-23-RA, a 13' diameter paddle-bladed propeller (either a Hamilton
Standard Hydromatic 24E50-65 or a Curtiss Electric C542S) was fitted to make full use of the additional
power provided by water injection."
"the Hamilton Standard paddle-blade propeller replaced the standard Curtiss Electric unit, beginning with the D-22-RE, although the Curtiss Electric propeller was reintroduced on later models"
and the search goes on
Posted: Sunday, May 20, 2007 - 04:20 AM UTC
This is fun!,,err,,I think,,LOL.
Ok,,lets narrow it down as much as I can.
My particular P47 came from batch D-20-RA,,which was serial numbers 43-25254/25440.
Decalling was going well until the port fusalage star and bar snagged and ripped.
I have some spare decals so I deal with it later in the week.
Probably take that long to calm down
Oh well,,wouldnt be one of my builds without a little disaster along the way.
Nige
Posted: Sunday, May 20, 2007 - 05:51 PM UTC
Progress report.
After the minor nightmare with the snagged decal everything has worked out well and all the major decals are on.It certainly concentrates the mind applying the pin up decal knowing that if you mess it up its going to cost about £8 for a replacement decal set! Just the stencil decals to go now and we're into the final stages of the build.
Despite the anxiety and concentration I really enjoy the decal stage of a build.Its where the model gains its indentity and starts to come to life.
Im really liking the look of this P47 now!
Ive recieved a couple of PM's over the last few days.I wont name names of course,but Id just like to publically thank you for the very kind words and comments about this build.
Everything Ive learn in the 18 months since returning to the hobby Ive learnt from this site and the people on it.
Oh yeah,,enough rabbiting on,,heres the pics of the build as it stands now.
I thought at first that maybe the leg part of the decal was out of register,but as there is no photographic evidence of this artwork that Ive been able to find so far Im happy with the white border above the leg. I guess thats just how it was,and it looks like a fine set of pins to me!
Nige
csch
Buenos Aires, Argentina
Joined: December 27, 2002
KitMaker: 1,941 posts
AeroScale: 1,040 posts
Joined: December 27, 2002
KitMaker: 1,941 posts
AeroScale: 1,040 posts
Posted: Sunday, May 20, 2007 - 06:57 PM UTC
Hi Nigel:
That´s an authentic jewel. Your build is coming out great. Like it very much.
What now, washes ?
That´s an authentic jewel. Your build is coming out great. Like it very much.
What now, washes ?
Posted: Sunday, May 20, 2007 - 11:38 PM UTC
Hi Carlos.
Ive still got some more decals to apply before I get to the wash stage,and of course there will be a few coats of Klear before I do that.I should be able to get the stencil decals on tonight and that will be all until the weekend as Im away working from tomorrow.
Ive dry fitted the main undercarriage to make it easier to handle while I apply the last decals,and I also dry fitted the propellor from my other P47 just to see what it was going to look like.
Nice pic of the Razorback with the Curtiss prop.Is it one of yours? I think mines going to end up with the Curtiss prop also,but I havent 100% decided yet.
Nige