

Everytime I do a luftwaffe camo job with the standard RLM 74,75 and 76, the splinter effect on the wings never turns out good. I mask with tape, spray the bare plastic wing one color, let dry, mask the newly painting splinter pattern then spray the other color. What happens is either I dont quite get the masking right and miss some of the unpainted portions or worse, when I lift the tamiya tape of the allready painted portion the paint comes off with it. and finally, sometimes you can see a line of heavier paint where the masking tape edge was creating an unslightly effect.
What is the correct way?, im halfway done and it looks bad, can i start over, maybe reprime or remove old botched paint job?
Hosted by Rowan Baylis
Luftwaffe splinter camo technique

propboy44256

Joined: November 20, 2002
KitMaker: 1,038 posts
AeroScale: 285 posts
Posted: Tuesday, May 08, 2007 - 07:10 PM UTC

Ranger74
Joined: April 04, 2002
KitMaker: 1,290 posts
AeroScale: 87 posts
Posted: Tuesday, May 08, 2007 - 07:27 PM UTC
Johnny,
I have two recommendations:
1 - Use a good model primer on the bare plastic. Acrylics often don't stick well to bare plastic. This should solve the lifting problem.
2 - Angle your airbrush/spray can so that you are not spraying directly down onto the tape/plastic edge. Slowly build up the paint to the edge. Hope this makes sense as I can't figure words to use: If looking from side the arrangement should look like this - surface to be painted - tape - airbrush/spray can
Some one else can probably better word this.
Jeff
Holdfast

#056

Joined: September 30, 2002
KitMaker: 8,581 posts
AeroScale: 4,913 posts

Posted: Thursday, May 10, 2007 - 01:17 AM UTC
There are many ways to do this but I think that your main problem is masking for the first colour, don't. The traditional method would be to spray the lighter colour first, over the entire upper fuselage. When this is dry mask this colour off, than spray the second colour.
By masking FOR the first colour you will have to exactly mask off this colour before adding the second.
I would do it slightly differently to the first method that I mentioned, but this is because I do things differently. I would first prime the model, I use white. Next I would pre-shade, but that is not necesary and you need to crack the splinter camo first I would then spray the first, lighter colour, FREEHAND, but extending the area to gust beyond that which it should cover. When dry, use good quality masking tape (Tamiya) and always cut a straight edge (this also ensures a clean edge ie, no fluf or bits). Use thin strips and mask the pattern, burnish down the edges. Fill in with cheaper, low tack tape. Spray the second colour. Don't spray towards the masked edge, as this will cause a build up of paint. You don't need nearly as much paint as you think to cover well.
The lifting paint is probably due to the fact that you haven't cleaned the plastic surface? There will be mould release oil and oil from your fingers all over the bare plastic. Wash in warm soapy water. An old toothbrush works well. I wash all plastic parts in Isopropynol (rubbing alcohol) wich takes no time to dry. If using soapy water make sure that the surface is dry before painting
I'll check to see if I have any pics of masked Luftwaffe splinter camo anyware
Mal
By masking FOR the first colour you will have to exactly mask off this colour before adding the second.
I would do it slightly differently to the first method that I mentioned, but this is because I do things differently. I would first prime the model, I use white. Next I would pre-shade, but that is not necesary and you need to crack the splinter camo first
I would then spray the first, lighter colour, FREEHAND, but extending the area to gust beyond that which it should cover. When dry, use good quality masking tape (Tamiya) and always cut a straight edge (this also ensures a clean edge ie, no fluf or bits). Use thin strips and mask the pattern, burnish down the edges. Fill in with cheaper, low tack tape. Spray the second colour. Don't spray towards the masked edge, as this will cause a build up of paint. You don't need nearly as much paint as you think to cover well.The lifting paint is probably due to the fact that you haven't cleaned the plastic surface? There will be mould release oil and oil from your fingers all over the bare plastic. Wash in warm soapy water. An old toothbrush works well. I wash all plastic parts in Isopropynol (rubbing alcohol) wich takes no time to dry. If using soapy water make sure that the surface is dry before painting
I'll check to see if I have any pics of masked Luftwaffe splinter camo anyware
Mal


wizard179

Joined: January 27, 2006
KitMaker: 251 posts
AeroScale: 179 posts
Posted: Saturday, May 12, 2007 - 05:52 AM UTC
Hi Jonny
As Holdfast said, when you do the first colour allow it to overlap slightly into the 2nd colour's area. This will ensure that there the demarcation line is not left unpainted.
Cheers
Wiz
As Holdfast said, when you do the first colour allow it to overlap slightly into the 2nd colour's area. This will ensure that there the demarcation line is not left unpainted.
Cheers
Wiz
Holdfast
#056
Joined: September 30, 2002
KitMaker: 8,581 posts
AeroScale: 4,913 posts
Posted: Monday, May 14, 2007 - 12:23 AM UTC
Although not a Luftwaffe subject these 2 pics offer a pictorial explanation.

The first one has had a primer coat of white (Auto Plastic primer), pre-shading applied and the underside colour applied and masked. The first of the 2, uppersurface colours has been applied, freehand. Only the areas to be this colour have been painted, but with a little overlap, so that when the second colour is applied it will overlap the first and creat full coverage.
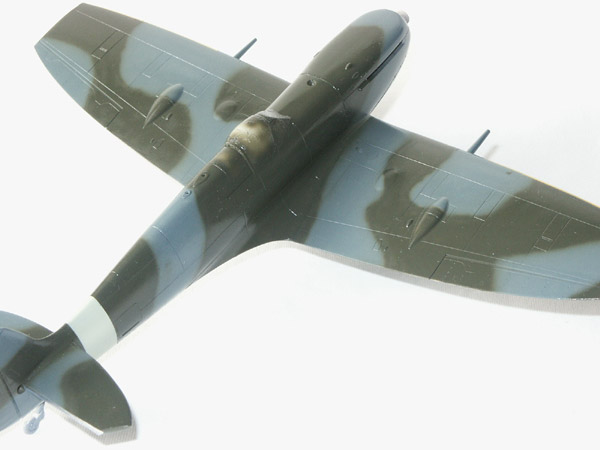
This second image has had the second colour applied, agsin freehand. For Luftwaffe splinter camo the first colour would be masked off and you should just see the first colour around the edge of the tape. The alternative would be to apply the first, lighter, colour all over the uppersurface, then mask. The choice is yours I hope this helps.
I'm sure that I have pictures of Luftwaffe camo masking somewhere, I'll continue to look
Mal
The first one has had a primer coat of white (Auto Plastic primer), pre-shading applied and the underside colour applied and masked. The first of the 2, uppersurface colours has been applied, freehand. Only the areas to be this colour have been painted, but with a little overlap, so that when the second colour is applied it will overlap the first and creat full coverage.
This second image has had the second colour applied, agsin freehand. For Luftwaffe splinter camo the first colour would be masked off and you should just see the first colour around the edge of the tape. The alternative would be to apply the first, lighter, colour all over the uppersurface, then mask. The choice is yours
I hope this helps.I'm sure that I have pictures of Luftwaffe camo masking somewhere, I'll continue to look
Mal
 |

WEB HOSTING BY


Copyright ©2021 AeroScale and Kitmaker Network, a subsidiary of Silver Star Enterprises
All Rights Reserved. Please read our Conditions of Use and Privacy Policy.
All Rights Reserved. Please read our Conditions of Use and Privacy Policy.