_GOTOBOTTOM
Start Here (for Beginners)
This forum is for younger modelers or people just starting out in the hobby.
Filling Gaps Made Easy
lampie
#029
_VISITCOMMUNITY
England - East Midlands, United Kingdom
Joined: December 23, 2005
KitMaker: 6,249 posts
AeroScale: 3,270 posts
Posted: Sunday, May 13, 2007 - 09:44 PM UTC
While working on my latest model Ive come to the primer stage and there are a few small gaps need filling.
Ive noticed in the forums recently a few people asking for advice on how to fill gaps without having to sand away the fine detail around them, so I thought Id take a few photos and describe how I get around this problem.
This is by no means my method alone and Im not going to attempt to take any credit for it,its just the one that works for me.
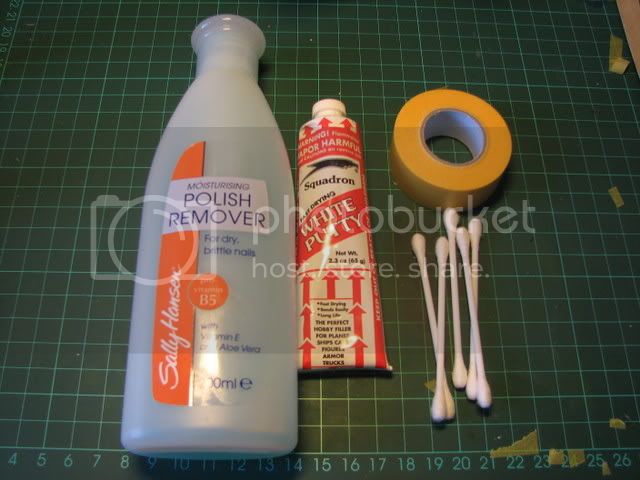
You will need,Q Tips,Putty of your choice,masking tape,and some nail varnish remover,(the type WITH acetone). As with anything,work in a well ventilated area.

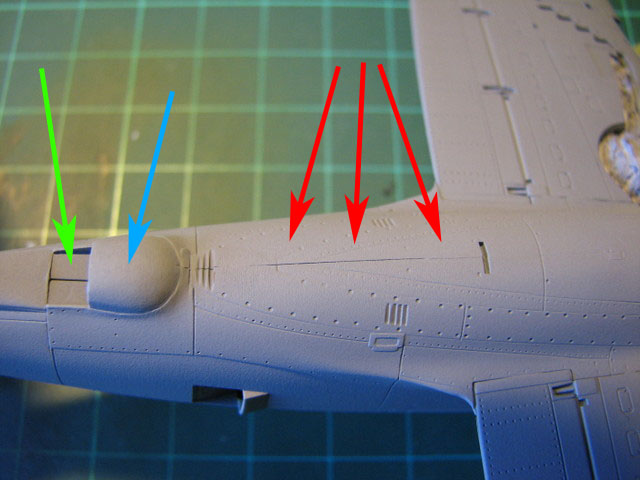
You can see the 2 areas Im going to be addressing.Just behind the supercharger ducting and the gap in the fusalage seam just forward of that. Sorry,Im not able to add the little red arrows that some people do.

The first thing we need to do is isolate the area we are going to be working on,and this is done by masking as close as possible to the gap with masking tape.

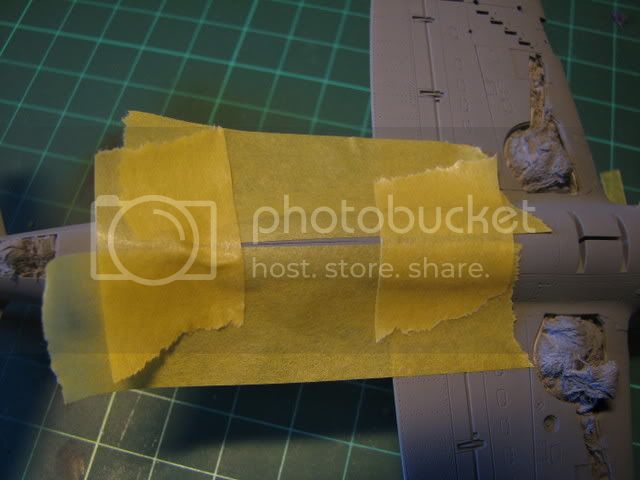
Putty is then applied to the area with a cocktail stick cut in half or something similar.As you can see,because the surrounding area has been masked you dont have to be too precise with the application.

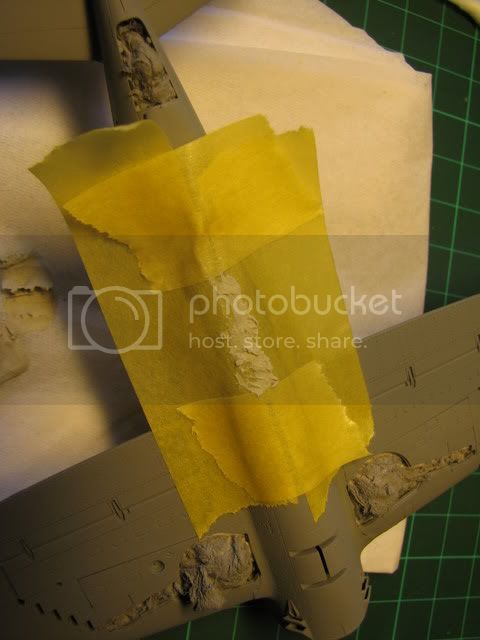
After 5-10 minutes the masking tape is removed.

Using Q Tips dipped in the nail varnish remover wipe away the excess filler.You'll find that you'll get through quite a few Q Tips so make sure you have plenty to hand.

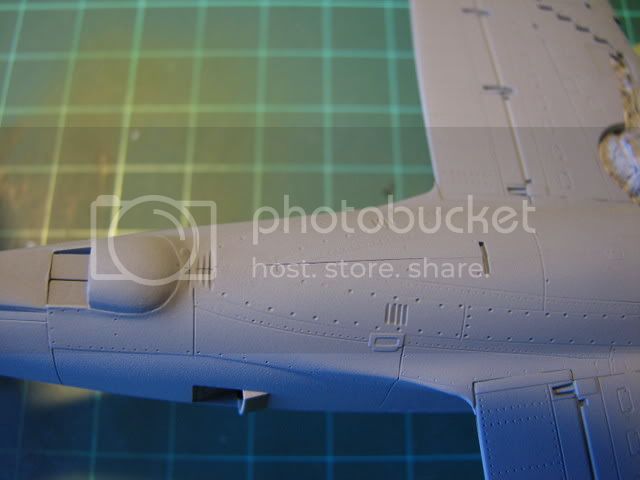
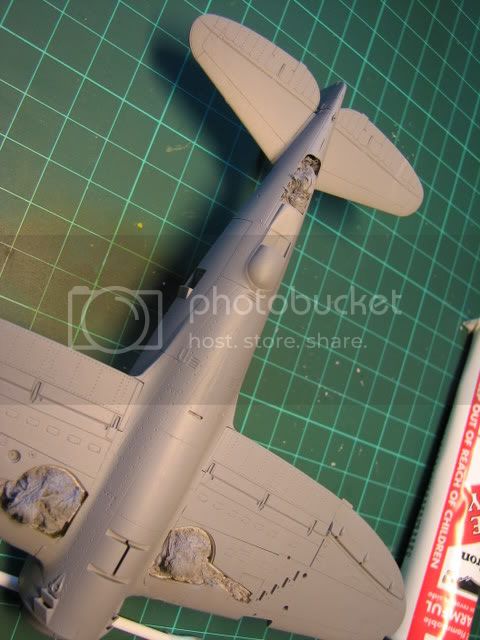
Last picture is the finished job after a dusting of primer. A neatly filled gap with no sanding and no loss of detail involved.

It actually took longer to type this small thread than it did to fill the gaps!
Happy Modelling!
Nige
Kriegshund
_VISITCOMMUNITY
Missouri, United States
Joined: December 12, 2006
KitMaker: 132 posts
AeroScale: 108 posts
Posted: Sunday, May 13, 2007 - 10:20 PM UTC
This is really helpful, thank you for sharing. I am starting on an old Esci Jaguar that is going to require a lot of putty, following your guide will make my life much easier.
Percheron
_VISITCOMMUNITY
Washington, United States
Joined: September 23, 2006
KitMaker: 432 posts
AeroScale: 360 posts
Posted: Sunday, May 13, 2007 - 10:36 PM UTC
NIgel,

Thank you very much for the tip! That will save me a lot of time.

-Derek
TedMamere
_VISITCOMMUNITY
Moselle, France
Joined: May 15, 2005
KitMaker: 5,653 posts
AeroScale: 4,347 posts
Posted: Sunday, May 13, 2007 - 10:48 PM UTC
Hi Nigel!

Very Nice tutorial!

I assume there will be a lot more and you will publish a serie here at Aeroscale...

Now that you managed to eliminate the big seam (see red arrows) and given the fact that the big supercharger exhaust will be in the way (blue arrow) how do you plan to eliminate the smaller seam behind (green arrow)?


Jean-Luc (but some call me "the Arrow Master")
lampie
#029
_VISITCOMMUNITY
England - East Midlands, United Kingdom
Joined: December 23, 2005
KitMaker: 6,249 posts
AeroScale: 3,270 posts
Posted: Sunday, May 13, 2007 - 10:59 PM UTC
Jean Luc
I will be using exactly the same method.The beauty of using nail varnish remover and Q Tips is that you can get underneath supercharger ducts and anywhere that chunky fingers and sand paper cant get to!
On my last Tamiya P47 I didnt fill that gap,and thats probably one of the reasons why it was placed no higher that 3rd in the competitions I entered it in last year.
Alternatively,,I might just stuff it full of coloured little arrows instead.
A series eh?,,I hadnt thought of that. I could call it " How To ****up Plastic Kits The Nige Way"
Glad to see from the comments that this little tip is of some help everyone.
Nige
CRS
_VISITCOMMUNITY
California, United States
Joined: July 08, 2003
KitMaker: 1,936 posts
AeroScale: 1,168 posts
Posted: Sunday, May 13, 2007 - 11:02 PM UTC

Quoted Text

how do you plan to eliminate the smaller seam behind (green arrow)?


That's an excellent example for dry fit testing and some pre-assembly work.

A method I have used in the past, is to cut a piece of very thin sheet styrene to cover such gaps, put in place after the fuselage halves are glued together. Of course any unevenness in the join is removed during the dry fit process. Not a perfect fix as it does alter the depth, but it does avoid a lot of filing and sanding that may damage the surround.
lampie
#029
_VISITCOMMUNITY
England - East Midlands, United Kingdom
Joined: December 23, 2005
KitMaker: 6,249 posts
AeroScale: 3,270 posts
Posted: Sunday, May 13, 2007 - 11:45 PM UTC
I hear you Chuck.
5 minutes work with this method and the unsightly gap is gone.No loss of detail,no sanding,and no need for cutting styrene sheets.

Nige
CRS
_VISITCOMMUNITY
California, United States
Joined: July 08, 2003
KitMaker: 1,936 posts
AeroScale: 1,168 posts
Posted: Sunday, May 13, 2007 - 11:55 PM UTC
Good on Ya Nigel, I've used your method often too

More often, than not, since I learned about it !!!!
csch
_VISITCOMMUNITY
Buenos Aires, Argentina
Joined: December 27, 2002
KitMaker: 1,941 posts
AeroScale: 1,040 posts
Posted: Monday, May 14, 2007 - 07:38 PM UTC
Hi Nigel:

Very good and helpfull article ! The pics are very explicative.
In my 1/72 P 47D I used the same method described by Chuck in the seam behind the supercharger. I think it´s the better one for that inaccesible part. I´ll also use it in the 1/48 Academy P 47.
propwash
_VISITCOMMUNITY
Charente, France
Joined: July 06, 2007
KitMaker: 289 posts
AeroScale: 231 posts
Posted: Friday, July 06, 2007 - 02:30 AM UTC
A very useful thread! Thanks.

This was going to be my first question on this forum.
lampie
#029
_VISITCOMMUNITY
England - East Midlands, United Kingdom
Joined: December 23, 2005
KitMaker: 6,249 posts
AeroScale: 3,270 posts
Posted: Friday, July 06, 2007 - 09:25 AM UTC
Hi Propwash and welcome to Aeroscale
Im glad you found this thread usefull.
Looking forward to seeing some of your work and hopefully some of your aviation art.
Nige
propwash
_VISITCOMMUNITY
Charente, France
Joined: July 06, 2007
KitMaker: 289 posts
AeroScale: 231 posts
Posted: Sunday, July 15, 2007 - 10:23 AM UTC
Tonight I had a bit of spare time, so decided to fill the gaps in on my P-47. I had no nail varnish remover, so used a very fine grade sandpaper. However, once I'd sanded down there were still some gaps showing here and there; looks like I have to do more filling.

Does this normally happen? I used a cocktail stick to apply it, but when sanding faint traces of lines were left, and so I resorted to using my finger and made a right royal mess!

This is my first proper build of a model, as you can probably tell.......lol Can anyone tell me if it normally takes a few sessions with the Tamiya putty?

Cheers
CRS
_VISITCOMMUNITY
California, United States
Joined: July 08, 2003
KitMaker: 1,936 posts
AeroScale: 1,168 posts
Posted: Sunday, July 15, 2007 - 11:24 AM UTC
There is no penalty for having to go back to a previously filled area
I've had to go back more than once, and a couple of times I've had to go back after I painted the model.
It would be nice if putty was guaranteed to work first time, every time but it's not.
lampie
#029
_VISITCOMMUNITY
England - East Midlands, United Kingdom
Joined: December 23, 2005
KitMaker: 6,249 posts
AeroScale: 3,270 posts
Posted: Sunday, July 15, 2007 - 09:46 PM UTC
Just echoing what Chuck says.
A light spray of primer over the filled area will show up any areas that need revisiting.
Do we get to see some photos of your w.i.p P47?
Nige
propwash
_VISITCOMMUNITY
Charente, France
Joined: July 06, 2007
KitMaker: 289 posts
AeroScale: 231 posts
Posted: Sunday, July 15, 2007 - 10:11 PM UTC
Thanks guys, I will try to get some photos later this week, but it won't be pretty!

I don't have an airbrush and will be painting with brushes. I plan to make make a very war weary-looking '47. By the way, the kit is a 1:72 Tamiya Razorback.

More later this week.
Merlin
Staff MemberSenior Editor
AEROSCALE
#017
_VISITCOMMUNITY
United Kingdom
Joined: June 11, 2003
KitMaker: 17,582 posts
AeroScale: 12,795 posts
Posted: Tuesday, July 17, 2007 - 07:35 AM UTC
Hi Propwash

Just to add to what Chuck and Nige said about painting often highlighting areas that need more work, bear in mind that most commercial fillers shrink slightly as they dry. How long this takes can vary (it's often days, depending on temperature etc.) and this continues even after the filler is hard enough to sand. So, if the filler isn't fully cured, you can get a joint filled and smooth, only to find it reappear faintly a few days later.

That's one reason I like to use "supafilla" - cyano acrylate mixed with talcum powder to form a paste - it dries very quickly and doesn't shrink over time.

All the best

Rowan
CRS
_VISITCOMMUNITY
California, United States
Joined: July 08, 2003
KitMaker: 1,936 posts
AeroScale: 1,168 posts
Posted: Tuesday, July 17, 2007 - 07:43 AM UTC

Quoted Text

I don't have an airbrush and will be painting with brushes.


propwash -Not knowing how experienced your are, I just want to remind you to thin your paint even when using a brush. This will avoid covering up detail and help eliminate brush marks, caused by the paint being too thick.
propwash
_VISITCOMMUNITY
Charente, France
Joined: July 06, 2007
KitMaker: 289 posts
AeroScale: 231 posts
Posted: Tuesday, July 17, 2007 - 09:35 AM UTC
Thanks for the further tips, fellas!

I haven't painted a model since I was a very young kid; I'm now 35. So, any tips like this are helpful.

Cheers,
HawkeyeV
_VISITCOMMUNITY
Wisconsin, United States
Joined: September 20, 2006
KitMaker: 319 posts
AeroScale: 129 posts
Posted: Tuesday, July 17, 2007 - 09:45 AM UTC
I hate filling seams. Adds to much work to the project but sometimes is an evil necessity. I like using 3M Acryl-Blu automotive glazing putty. Thin and easy to use. Dries fast and is easy to sand and rescribe lines in. The trick is building with having seams to fill. For some kits that is a major undertaking but a majority of the filling can be eliminated. Check out part I of an article I have written about seams.

http://www.hawkeyeshobbies.com/feature.htm

CaptainA
_VISITCOMMUNITY
Indiana, United States
Joined: May 14, 2007
KitMaker: 3,117 posts
AeroScale: 2,270 posts
Posted: Wednesday, July 18, 2007 - 10:02 AM UTC
That easy. I have still been doing it the hard, and obviously destructive way.
Bungal
_VISITCOMMUNITY
England - South East, United Kingdom
Joined: February 19, 2007
KitMaker: 84 posts
AeroScale: 69 posts
Posted: Thursday, September 06, 2007 - 06:41 AM UTC
Just tried it
WOW and I used none acetone nail varnish remover this seems to work with Squadron White putty
Nice tip
lampie
#029
_VISITCOMMUNITY
England - East Midlands, United Kingdom
Joined: December 23, 2005
KitMaker: 6,249 posts
AeroScale: 3,270 posts
Posted: Thursday, September 06, 2007 - 08:43 AM UTC
Its good to see that this little thread is being so much use to people
Perhaps in hindsight I should have done it as a feature
Nige
TedMamere
_VISITCOMMUNITY
Moselle, France
Joined: May 15, 2005
KitMaker: 5,653 posts
AeroScale: 4,347 posts
Posted: Thursday, September 06, 2007 - 05:18 PM UTC

Quoted Text

Perhaps in hindsight I should have done it as a feature


Hi Nigel!

That's exactely what I thought...

Jean-Luc
Roxter
_VISITCOMMUNITY
Rigas, Latvia
Joined: July 04, 2007
KitMaker: 268 posts
AeroScale: 245 posts
Posted: Friday, September 07, 2007 - 06:14 AM UTC
I guess I have an answer for Jean-Luc Formery question.

In situations like described by Jean-Luc I use self adhesive foil, which after proper measuring and trimming can be nicely used for masking gaps like this - where you can hardly use putty.

I used this method for Tamiya's 1/48 FW-190A-8 wheel wells, which had horrible gaps that would took hours to masking>filling>sanding, but I had managed to solve this problem in 10 minutes.

Hope it helps (will try take some pics of the process tomorrow).

Cheers!
Roxter
_VISITCOMMUNITY
Rigas, Latvia
Joined: July 04, 2007
KitMaker: 268 posts
AeroScale: 245 posts
Posted: Sunday, September 09, 2007 - 12:10 AM UTC
I apologize for taking that pic so long.

Here it's:


All of you, that built Tamiya's 190s know that there's an ugly gap in the wheel well, but with self adhesive foil you can simply hide it.

Hope this one is useful
 _GOTOTOP