It was 2.00pm in the afternoon. Outside, parked neatly, were a line of well-groomed P-51 Mustangs. Ground crew moved among them at intervals checking and re-checking their ponies. Not that they needed it but it was a useful way of passing the time during the closing weeks of the Pacific Theatre war. Things were much quieter now and action was becoming harder to find. A sense of relative calm hung over the airfield.
A hundred yards away, inside a nearby group of single storey buildings, sat the pilots, flight kit on, studying with rapt attention, the arc of light that swept smoothly clockwise around the radar scope. Nothing disturbed the monotony of the scopes perpetual 360 sweep of the surrounding sky.
Without warning their hypnotic gaze was broken by the appearance of a blip moving briskly across the screen. A dozen heartbeats accelerated in an instant in readiness for the order to Scramble! A moment later hearts sank as a voice observed Forget it, its a Frank. The speed of the objects transition from right to left could only mean it was a Ki-84 and a Ki-84 that was well maintained and fitted with a decent example of the Homare radial engine.
The Franks conception came about in spring 1942 when the Japanese Army Air Force (JAAF) was finding victories easy in its new Ki-43 Hayabusa. Forward thinking officers in the JAAF realised that this wouldnt last indefinitely and so initiated a development programme that would lead to what the Allies later christened the best Jap fighter of the war.
Possessed of clean lines and built in the Japanese tradition of incorporating the fuselage centre section as an integral part of the wing structure made the Ki-84 strong and sturdy, particularly as it also benefited from self sealing fuel tanks and a 70mm armoured windscreen with 13mm of floor and back armour for the pilot. Factored in was a hard hitting armament of two 12.7mm machine guns above the engine coupled with two 20mm Type 5 cannon in the wings. The offensive capability was rounded out with racks on both wings for either auxiliary tanks or 550 pound bombs.
The airframe was bolted to a version of the Navys 18 cylinder Homare engine. Fortunately for the allies, this unit was troublesome and unreliable and helped to keep many Franks grounded while the already over-pressured ground teams struggled to make them airworthy. When the engines were on song they combined with the classic airframe to blend into an aircraft that possessed generally easy flying characteristics. There were some sources of accidents however and chief among these were a tendency for the tail to swing to port once the tail was up on take off. Failure to apply starboard rudder meant ploughing a terminal furrow in the ground. Elevators were heavy at all speeds but all in all, most pilots dealt with the few issues and those that did found themselves flying an aeroplane that made a good pilot great and a great pilot exceptional.
The Frank was primarily an offensive penetration aircraft that ended its wartime career as a defensive fighter plagued by production quality issues. As such, fortunately for the allies, it never really realised its full potential but remains the pinnacle of Japanese fighter development in the Second World War.
Whats in it for thee and me then?
Ten sprues plus some poly caps lurk in the box. All are produced to the most modern standard and if youre not seized by a compulsive and irresistible urge to start nailing them together immediately you are guaranteed to be either dead, an armour modeller or my wife (who would rather eat raw slugs, two at a time).
Bringing unity to the disunited: Be cautioned that I can make even Tamiya kits challenging at times (its an innate gift). With that disclaimer protecting me from prosecution from hordes of angry plastic bashers around the globe here are the bits Ill pay more attention to when I hussle the next one together:
The instrument panel Part number A14 has a single decal for the dials. I struggled to get the whole lot to line up and succeeded only after much persistence and a bath tub full of Dacos Strong decal softener. Next time Ill scalpel the upper ten dials from the wider lower section and sort them separately.
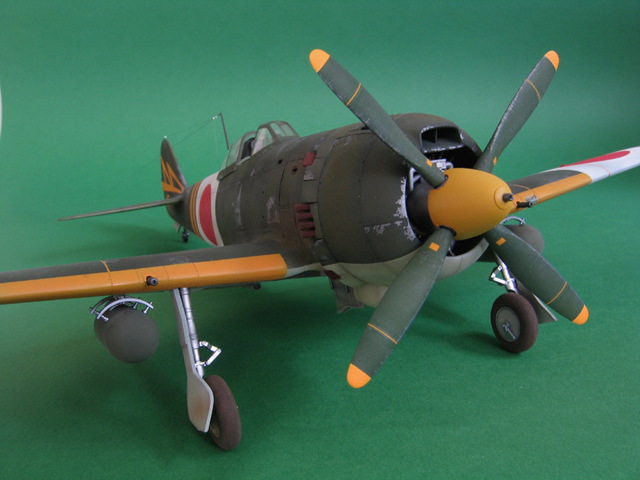
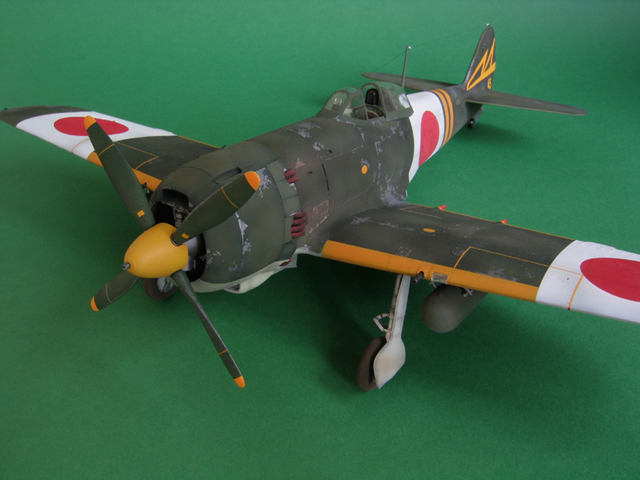
The engine assembly Section 7 of the instructions is the bit that refers. I confidently relied on foolproof engineering to ensure my prop sat square in relation to the cowling when the time came to add it towards the end of the build. It didnt and mocked me ruthlessly with a slight downward attitude that suggested its personality had become decidedly introverted. The only realistic option for removing the engine was via a 2.5 pound club hammer and as use of such a tool was likely to mar the finish I went with the soft alternative of gently bending the prop shaft upwards which restored my expression to that of a Buddhist monk in a perfect state of Nirvana.
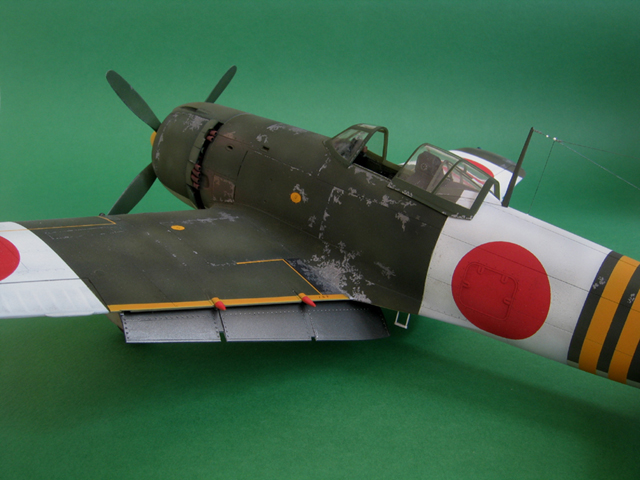
The flaps Parts numbered A23 and A24. These are very lovely but for the ejection pin marks that are (yes, youve guessed it) on the side thats going to need a natural metal finish. Careful photography has concealed my less than perfect achievements in this constructional chapter. Beyond this, the flaps have attachment pins that appear smaller than the pimples on a fleas backside (not that Ive studied many flea butts ) and so need larger and deeper attachment holes on the wings and wire pins on the flaps themselves. With this modification you increase the chances of the flaps surviving any accidental knocks during handling.
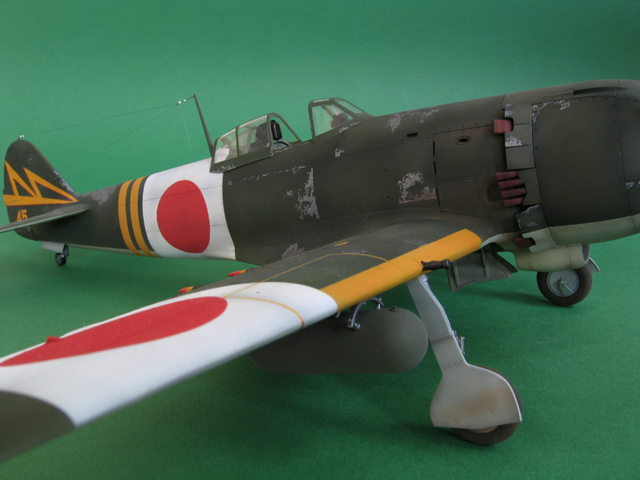
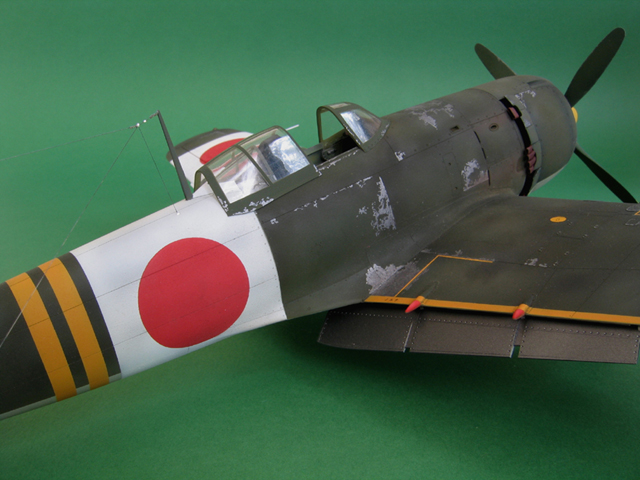
The antenna mast This was left off until the end to make painting the white home defence band more straightforward. I drilled the top (not right through) to accept the one pound fishing line thatd be used for the aerial wire a little later. I carefully applied five minute epoxy inside the mast hole for strength and to provide a little time for aligning the thing before setting up. All seemed well. The wire from the mast to the tail was run in with a little tension to keep it tight. Before joining, a couple of sections of light filament (about 2mm long) were threaded on to represent spring tensioners. The first was super glued immediately behind the mast with the second about 4-5mm back. The second wire adjoins the starboard stabiliser near its tip to a point about 5mm back from the mast (i.e. just in front of the rear tensioner). The tension from this wire pulled the first a little to the right. The third wire routes from the same point behind the mast to an insulator on the fuselage immediately below but to the right. With a third lot of tension now in play the mast was taking on a rather drunken lean and I was (again) amazing myself with a penchant for creating terminal problems on the final lap of nearly every build. Not nearly enough epoxy. Oh dear.
I sat and pondered. My first inclination was to snip the whole lot off, pull out the mast and weld, glue, nail and screw the thing in place. That sadly quieter voice spoke to me from the farther recesses of my consciousness (my wife calls it reason) and suggested I do the unthinkable take hold of the mast and bend it firmly away from the direction of drag so as to stretch but not break the monofilament to the point where it was taught but not tight (if you follow my drift). Remember this was one pound line. Heart in mouth I manipulated the tiny plastic fishing rod in the ridiculous hope this half-baked plan would save me from a mini re-build. Know what it did. I was (and still am) seized with disbelief that it worked but the evidence is in the photographs.
Canopy parts I bought the Eduard kabuki tape pre-cut mask set but found it didnt fit as easily or as well as Id hoped. This was quickly junked for my preferred method of Parafilm M and a sharp scalpel.
The wet stuff
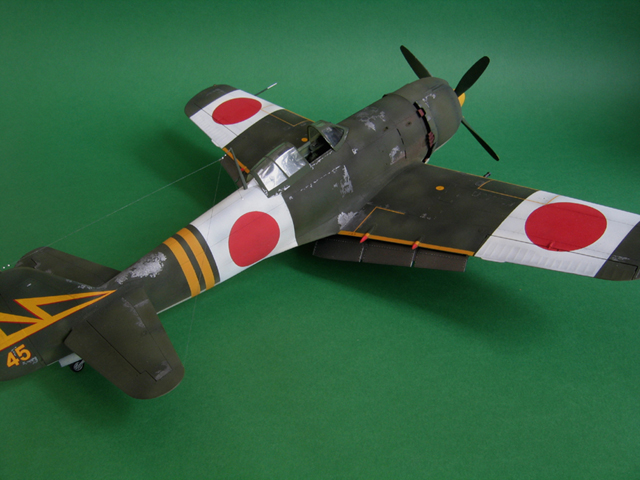
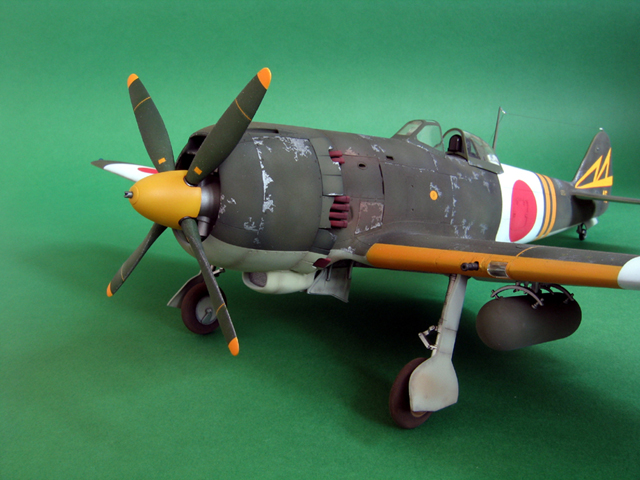
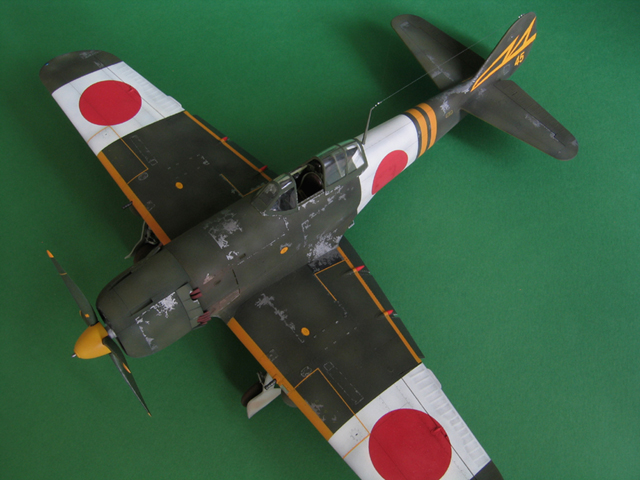
The decal option that lured me was the one on the box exterior a Frank from the 47th Flight Regiment, 3rd Squadron, Narimasu Airfield in February 1945.
Despite assurances from another reviewer elsewhere that the kit decals looked better than previous sheets issued by Hasegawa I figured Id still opt for masks for all the markings bar the tail, wing walkways and fuel caps.
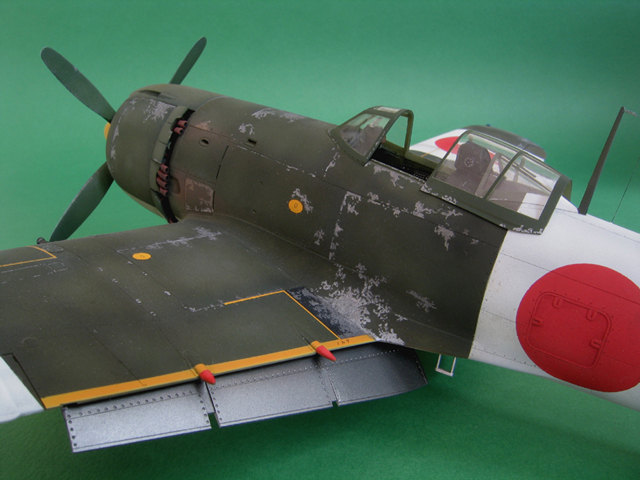
The paint fest began with an overall prime with Tamiya Deck Tan. Build glitches were apparent and sorted with My Surfacer 500. The green camo was next up with a base coat of Tamiya Japanese Army Green. Beyond this I hurled authenticity out of the modelling shed door and accumulated most of my Tamiya green paint shades. These were diluted to around 30% paint to 70% thinner and traced over the base in streaks, patches and other sundry shapes while maintaining a carefree yippee attitude to the whole thing.
I had, over several years, carefully nurtured a bottle of Aero Master Japanese Army Green, which was noticeably lighter than the Tamiya base colour. This was used in a thinned over spray to highlight various parts fairly randomly (rather than a robotic centre of every single panel approach).
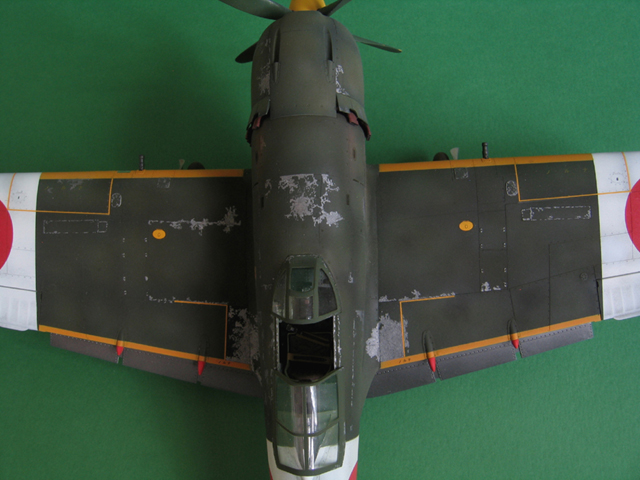
Now happy with the top my Frank performed a perfect roll to starboard to wantonly accept paint on her nether regions. Tamiya Japanese Army Grey was first up followed by Aero Masters enamel version of the same colour, this time misted on to give a toned effect. Post shading was run in via Tamiya acrylic thinner with a few drops of Nato Black and Red Brown in it to give a dirty mix. This was easy to apply and control at only 10psi, so much so that I drew the panel lines in the mix which darkened as the spray collected in the grooves while leaving delicate shading either side. Oh great joy unbounded! My voice, embarrassingly saturated with tired ecstasy, travelled out of the shed and across several neighbouring gardens, doubtless leaving some wondering what the hell was going on inside and whether it involved two or more consenting adults.
The white home defence bands were masked off, first the edges courtesy of 3M plastic tape (about 3mm wide), then with ordinary low tack tape and Parafilm M taking care of the areas further out. The white was misted on and built up in patches leaving the pre-shaded look evident.
The hinomarus were sorted with masks made with a compass cutter. I had a little bleed under which was solved by applying the round section previously cut out of the mask over the red. White was misted on until all was well. However, a solution for avoiding bleed under in the first place was found on the web as so often happens a week after the event! All you do is apply said mask and burnish down the edges. Spray gloss varnish over the exposed portion of the mask and over the edges (while obviously avoiding creating a built up edge). This seals the edges and any bleed under is clear and wont show (after its matted down). Lastly apply colour in the usual way and presto sharp sprayed edges.
The yellow wing ID, trailing edge lines and fuselage bands were masked using the same materials and once in place the existing colour was over sprayed with a Tamiya light grey (cant remember which one) to eliminate the contrast between the upper green and lower grey and give an even base for the yellow. The yellow itself was custom mixed from Tamiya flat yellow with a little red added to bring its tone closer to the decidedly orange yellow hue of the tail decals.
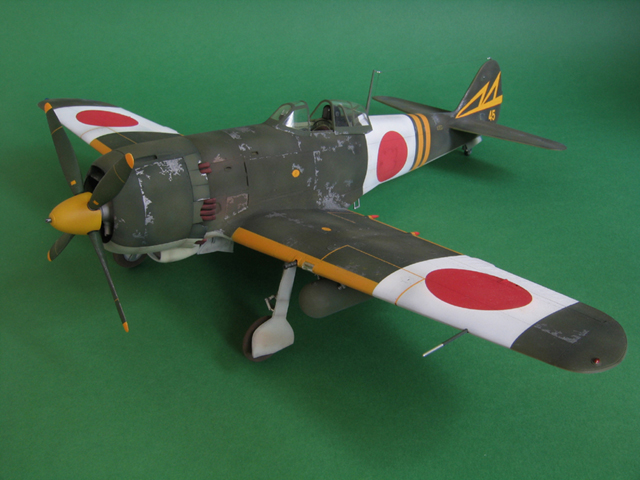
Speaking of tail decals, I kicked off this stage by confidently removing the double triangular marking for the port fin side and promptly folded it over on itself while tearing it for good measure all achieved during a journey of about an inch from backing paper to model. Terminally wrecked I thought No problem Ill retrieve the sheet from my second kit and use the port fin flash from that. Even in the fluorescent loft light it was apparent that the second sheet was a wildly different shade of yellow (recalling my careful efforts at matching the tone of sheet one).
Adapting again to catastrophe I crossed fingers and relied on blind hope that leaving off the white underlay marking on the port side would dull the yellow down enough to pass muster. The tonal issue made use of the port 45 from sheet two compulsory so this was snaffled too. Sundry walk lines were added (and these required very careful application too) and bedded in with more Strong Daco softener.
I was going to go with a satin finish but went matt at the last minute. Paint chips were applied with nothing more complex than Xtracolour Gunmetal and a fine brush. The key here is to build it up slowly over several sessions using the most mystical intuitive feel you can muster while avoiding any even or rhythmic patterns. With this bit sorted it was over sprayed with a little more matt varnish to seal it and the beastie was ready for the flight line.
Looking over my shoulder
I learnt important new lessons from this build. Thats not a criticism of the kit its as perfect as a modern model gets. What I mean is, theres an expression shake n bake that implies there are no pitfalls for the regularly unwary (me). Stay switched on and the potential problems are minor and eminently avoidable.
I loved it and the greatest test lies in the fact that I enjoy looking at it every time Im installed in the shed. Its sheer size gives it presence I hope to get the second one built before God reels me in.
SUMMARY
Steve Budd describes in stunning detail how he built his superb Hasegawa Ki-84 Frank.
About The_Doctor FROM: ENGLAND - SOUTH EAST, UNITED KINGDOM
I've been nailing kits together since I was in single figures and Airfix releases came in plastic bags, with a card header. Now I have the privilege of building for the brand through their in-house mag, Airfix Model World.
Finding myself in an amazing golden age of modelling, with Wingnut Wings an...