Format
Author: Clayton K. S. Chun
Illustrator: Howard Gerrard
Softbound 96 pages, 248mm x 184mm
ISBN: 1-84176-918-5
Contents:
Introduction - setting the historical background to Japanese expansion and the crisis in S.E. Asia and the Pacific.
Chronology - a timeline of significant events leading up to and past the Doolittle Raid
Opposing Commanders
Opposing Forces
Planning The Raid
The Doolittle Raid
Aftermath
Remembering The Raid Today
Bibliography & Index
The book is illustrated with 71 well-chosen photos (all, bar 2, are B&W), plus colour maps and dramatic paintings by Howard Gerrard of key moments from the raid as it unfolded. It's a little sad that these colour plates are each over two pages, because there's inevitably a little distortion due to the fold. Each painting is accompanied by a smaller version keyed to detailed notes describing the scene.
Background and preparation
Clayton Chun does a good job setting the historical significance of the Doolittle Raid. After over 60s years of American dominance in the superpower stakes, it's incredible to realise the domino effect of Japanese victories throughout SE Asia and the Pacific which sent the Western Allies reeling and left the West Coast of America itself fearing attack.
The description of the raid proper begins with two chapters describing the opposing forces. The careers of the American commanders and their Japanese counterparts are covered in some detail. Of course, from the American viewpoint, the raid is synonymous with Lt. Col. James Doolittle, but this was truly a joint operation between the services and the book gives justified coverage to the many individuals who contributed to the planning and execution of the mission. The difference between the opposing forces could hardly be more striking; whereas the American fleet was hastily assembled and trained for the mission, it was expertly commanded with a clearly defined objective. By contrast, the Japanese defences were badly organised and largely unprepared. This latter point is all the more surprising when one considers the prophetic statement by General Tojo Hideki, the Japanese Prime Minister, in November 1941:
"I do not think the enemy could raid Japan proper from the air immediately after the outbreak of hostilities. Some time would elapse before the enemy could attempt such raids. I believe that enemy air attacks against Japan in the early stages of the war would be infrequent and would be carried out by carrier-based planes."
With the seemingly endless string of Japanese victories, Tojo's warning was largely ignored. Thus, at the height of her expansion, the Japanese homeland was virtually unprotected with only 300 fighters (many of which were obsolescent) spread across the whole country - leaving Tokyo a ripe target for the daring raid.
While the book covers the preparations for the attack in adequate detail, it's important to realise that the volume isn't really aimed at modellers. So, although the text mentions the modifications made to the B-25s, there is little detail given which might help modellers wishing to depict the aircraft. Among the most obvious changes was the replacement of the Norden bombsight with a simple "20 cents" sight designed by one of the crew members and christened the Mark Twain. The substitution of broom handles for tail guns has become something of legend, but less well-known are the changes made to the raiders' carburettors and propellers. Sadly, none of these modifications are covered in the kind of detail a modeller needs.
The raid
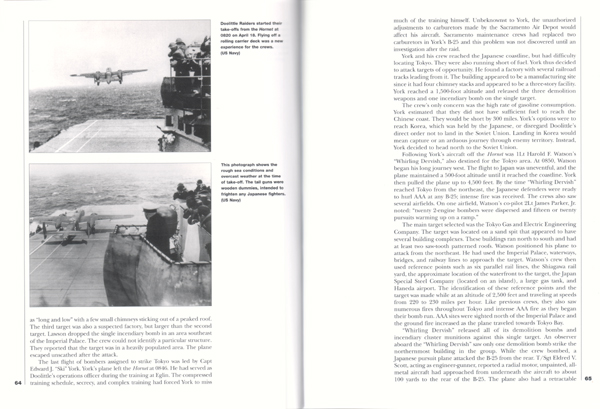
As you'd expect, the bulk of the text is devoted to the raid itself - and the author explains how a number of unfolding errors caused partly by the hasty planning influenced the operation as the fleet began to penetrate the ring of Japanese picket ships. Perhaps the greatest surprise is that Japanese intelligence was already well-aware of the presence of the Americans, due to their having intercepted US transmissions before the fleet went to radio silence. Crucially though, the Japanese could know nothing of the intention to use B-25s, so they based their preparations to trap the Americans on the conclusion that any attack would have to be launched from much closer to the mainland.
The first critical event occurred at 06:30 on April 18th when the Nitto Maru reported to the IJN HQ that it had sighted 3 (sic) US carriers. It wasn't until an hour and quarter later that the American fleet spotted the Japanese ship and ordered Wildcats and Dauntlesses to attack - without any success. Finally, the cruiser USS Nashville managed to sink the Nitto Maru, having fired an unbelievable 928 rounds of 6 inch ammunition and taking almost 30 minutes to sink the small ship. With the task force detected, Admiral Halsey took the decision to launch the B-25s early, despite knowing it left the crews at the very limit of their aircraft's range - but, unknown to Halsey, the forced-decision probably saved the fleet from sailing into a trap.
The raid is described in considerable detail - at least from the American point of view. The progress of each crew is covered individually and their attack plotted on maps of the target areas. These take two forms; the raids on Tokyo and Nagoya are illustrated with the help of what appear to be modern satellite photographs tilted to form an isometric view, with the tracks of the various raiders overlaid in pseudo-3D. Donald Smith's attack on Kobe is shown as a conventional map which, although less eye-catching, is actually more detailed with roads and railways etc. highlighted.
If the American version of events is covered in detail, sadly the same can't be said of the Japanese. This is particularly frustrating because the US crews' accounts raise a number of questions concerning the targets which they bombed and the identity of the Japanese fighters which attempted to intercept them. It is surely just a "typo" when the author identifies a radial engined fighter as a "Zero or Hien" - a Zero quite possibly, but a Hayabusa would be far more likely than the inline-engined Ki 61Hien. What is really intriguing is 2Lt Harry McCool's description of combat with
"two Japanese fighter planes. These planes resembled spitfires (sic), had elliptical wings, sharp noses, single motors." The author raises the interesting possibility that the aircraft were early-production Ki 61s - although the mention of "elliptical wings" goes against this. Another possibility would be the Heinkel He 112. Sadly, we may never know. Despite the earlier overview of Japanese defences, the book doesn't list the equipment of each Japanese squadron at the time. Perhaps the records no longer exist, but this isn't stated. Similarly, there is no Japanese account of their own losses to verify the claims of the Doolittle raiders' gunners.
Aftermath
Although the author places the Doolittle raid in a strategic context and places justified emphasis on its important symbolic value and very tangible effect on Japanese public opinion and military conduct, those most immediately effected were the American crewmen and the Japanese servicemen and civilians killed in the course of the raid.
The fates of the crews are covered in some depth - from the majority who made it to China and embarked on a long journey home, through the crew of Capt. York's aircraft who endured internment in the USSR, inevitably to the unfortunate crews of "Green Hornet" and "Bat Out Of Hell", who were captured in Japanese-occupied China and placed on trial for war crimes. Confessions were tortured out of the men, who were all initially sentenced to death. Hallmark, Farrow and Sparrow were executed, while the rest of the crews faced life imprisonment. All but one of these men (2nd Lt Robert Meder) survived 3 years of captivity before release at the end of the war.
On the Japanese side, accounts vary, but a report placed casualties at between three and four thousand - mostly civilians. These are press-releases and their accuracy isn't examined. There is no US post-raid analysis to counter them or to determine whether the raiders actually hit the industrial and military targets they set out to bomb. No impartial evidence is presented.
Against the casualties suffered by the combatants, the true shock is the appalling price paid by the Chinese for the Doolittle raid. Chiang Kai Shek had been opposed to letting US bombers land in China because he feared Japanese reprisals. Events proved him tragically correct; it's estimated that 1/4 million Chinese civilians were killed as a direct result of the raid and the subsequent Japanese expansion into China to preclude the possibility of further raids being mounted.
Conclusion
Clayton Chun's book packs an enormous amount of historical detail into a deceptively thin volume. It's appeal is definitely to historians rather than to modellers - and it does leave a number of unanswered questions - but it reveals many surprises and forms an excellent basis for further study of one of history's most famous bombing raids.
Contact details
Osprey Direct
PO Box 140
Wellingborough
Northants, NN8 2FA
United Kingdom
(01933) 443 863
Thank you to Osprey Publishing for kindly supplying the review sample.