The Kit
The kit is packed in a compact box with some very attractive box art.
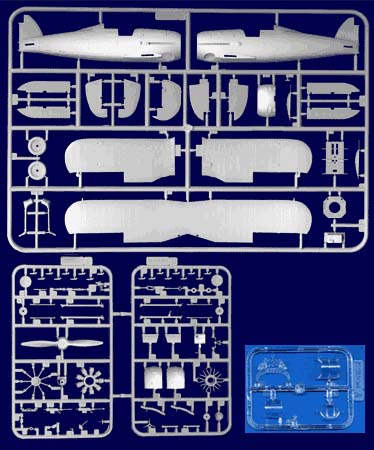
Two sprues of grey plastic contain all the parts for the kit with a clear sprue containing the three canopy parts. The molding is crisp and sharp and requires very little clean up when preparing parts aside from the occasional seam line from the molding process. If I remember correctly, there was an ejector pin mark on each of the cockpit sidewalls that needed repairing.
The instructions are in three languages but easy to follow and understand. A lengthy history of the Gladiator is contained on page one of the instructions which is quite nice because I like to know a little bit about the subject I'm building. A comprehensive paint chart is include on page two with color cross references to Humbrol, Testors, Gunze Sangyo and Lifecolor. The final five pages of the instructions contain the color schemes for five different aircraft and the decal options for each (more on decals later). Contained on the last page is probably one of the most important drawings-the rigging. This drawing is essential in planning out the rigging assembly (a Build Tips feature is forthcoming describing how I did the rigging).
Overall, no problems with the instructions.
Construction
Construction was hit and miss.
started with the engine assembly per the instructions. The cowling was somewhat difficult to assembl because it was comprised of three pieces forming a circle and the contact area between each piece was small. This made glueing difficult but after some trial and error was successful. The rest of the engine assembly was uneventful and straightforward as was the cockpit assembly.
This is where I started to run into some trouble. After placing the cockpit tub in one side of the cockpit followed by the instrument panel, a test fit was tried. The fuselage halves wouldn't fit together. After some delicate and time consuming trim work (along with a few choice words) I was able to trim the panel enough to get the fuselage halves to meet up. The contact area between the fuselage halves was also very small and the alignment pins molded into the kit didn't helpt too much so I made new ones with styrne stock to help align the fuselage halves and glue them together.
The only other areas causing trouble during assembly were the fuselage wing supports and landing gear struts. After glueing the wings in place it was found the fuselage wing supports were too long. This could be due to the fact the upper wing is sitting too low which would be caused by an incorrect angle of the outer wing supports. This could very well have been an error caused by me so I'm not sure it's a problem with the kit. I fabricated new fuselage supports from brass rod. The landing gear struts were molded to fit into holes in the fuselage which made their attachment difficult. The struts needed some adjustment to achieve a decent fit and then I needed to go back and fill some gaps but nothing too major.
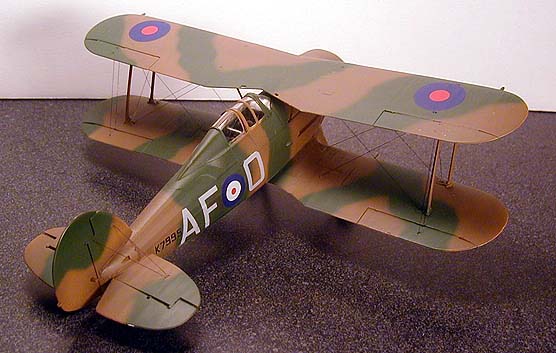
I painted my Gladiator in the sheme of K7995, No 607 "County of Durham" Sqn RAF, Flt Lt John Sample, Acklington, October 1939 as per one of the choices in the instructions.
Decaling came next and is where I encounted the bulk of my problems. The decals are very, very thin. They are so thin that removing them from the paper backing was difficult without tearing them-especially with the letters. A lot of time was spent realigning decals that tore during assembly. One advantage of the thin decals is that they snuggled down over the surface detail pretty good. The fact that decals were provided for five different planes is a great plus. Did I mention the decals were thin?
The Verdict
Overall, this is a pretty good kit. Though there were some problems encountered during the construction and decal application a great product can be made. I enjoyed building it because it did offer some challenges I wasn't accustomed to-namely the rigging.
I would recommend this kit to anyone wanting to build a Gloster Gladiator or biplane.
Thanks goes to
Hobby Terra for providing this review sample.