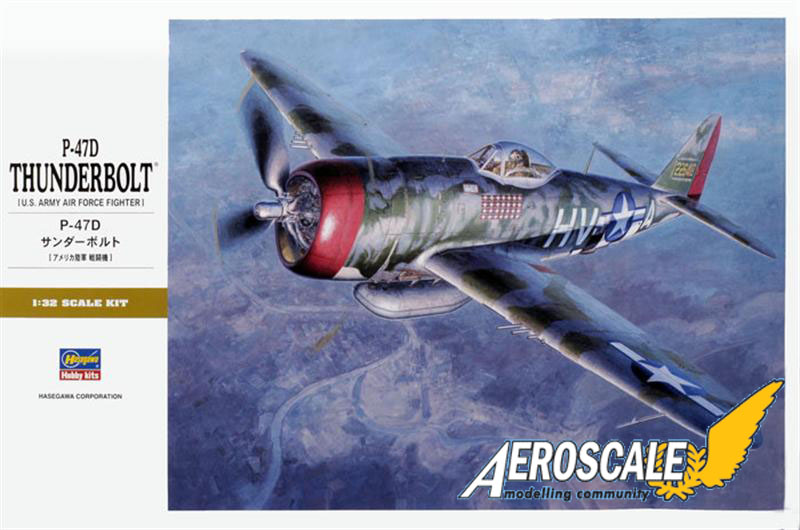
Leading the way in what looks like being a brace of 1:32 Thunderbolts in various guises to hit the shelves of the hobby shop comes this P-47D Bubbletop from Hasegawa. If this and Trumpeters recently released Razorback are anything to go by, then fans of 1:32 scale and Thunderbolts are going to have their workbenches occupied for months to come.
Whats In The Box?
After spending a few minutes admiring the excellent box art its time to open the box up and see whats on offer. What you find is a box filled to the brim with over 200 parts, mounted on eight sprues of light grey plastic and one sprue of clear parts and protected by 3 plastic bags. The instructions are a 12-page booklet and at the bottom of the box is a sheet of decals. In my kit, there was no protective sheet over the decals. Hopefully this is just a one off occurrence. Moulding is excellent, and the many sink marks are in places where they will not be seen when the model is assembled. The exception to this is slight depressions on each wing part, caused by moulded spars on the internal part of the wings. Whether these will need filling I will decide when I come to the primer stage of building the kit. I suspect that they wont be very noticeable on an olive drab finish, but may well need attention if your going for a natural metal finish. The only traces of flash on my example are around the propeller blades, but this is very thin and easily removed. Very few of the parts are not required for this kit, the most prominent of these being an upper fuselage fillet for a later P-47D or a P-47M. A later model gun sight is also included.
Assembly.
Section one, as you would expect covers the cockpit assembly. Detail is excellent, particularly on the instrument panel. For those who dont fancy hand painting this there is also a decal included. There are a few points to watch out for in this area. Firstly, the cockpit floor is smooth, and the first batch to receive this new floor was the P-47-D28. The two Gabreski decal options offered are for a P-47D-25, which had the corrugated cockpit floor. Rivet counters may want to replicate this with plastic rod to make a Gabreski P-47 100% accurate. The smooth floor is correct for the Eagleston scheme. If your going to include the pilot figure you need to leave out the rudder pedals. These need the two circular areas in the foot grip drilling out to be accurate. The pilot figure also has seat belts moulded on, so its worth investing in some AM seat belts or building your own if your going to present the finished model minus the pilot.
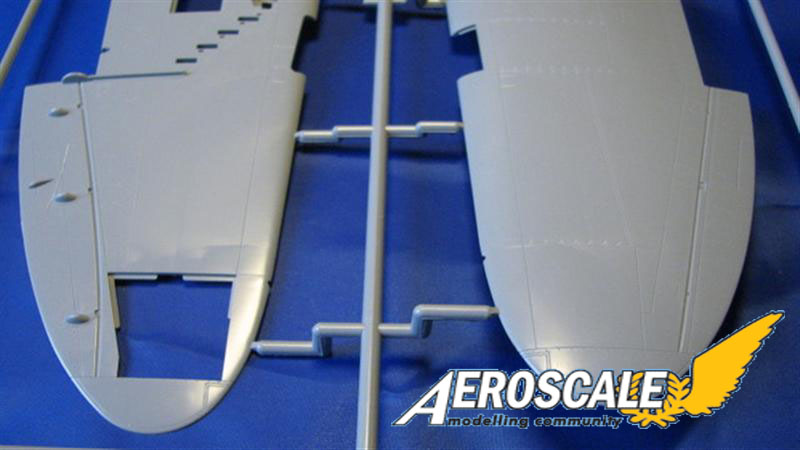
Sections two and three address the fuselage and tail assembly. A choice of open or closed inter-cooler doors is offered. There are two wing spars to give added strength to the wings and also assist in gaining the correct dihedral.
Wing assembly is dealt with in sections four and five, The wheel wells are separate sub assemblies and this should make the addition of hydraulic lines straight forward should you wish to include them. If you are going to add the under wing pylons for mounting ordnance holes need to be drilled before the wing halves are glued together. If you intend to build one of the Gabreski versions note that his plane wasnt fitted with these pylons. The wingtip navigation lights are moulded into the wing. If you want to fit the clear plastic parts supplied for these youll need to cut the moulded ones away, and this will be easier to do before the wing halves are joined. Clear plastic identification lights are supplied and these are also included in the decal sheet should you wish to use them.
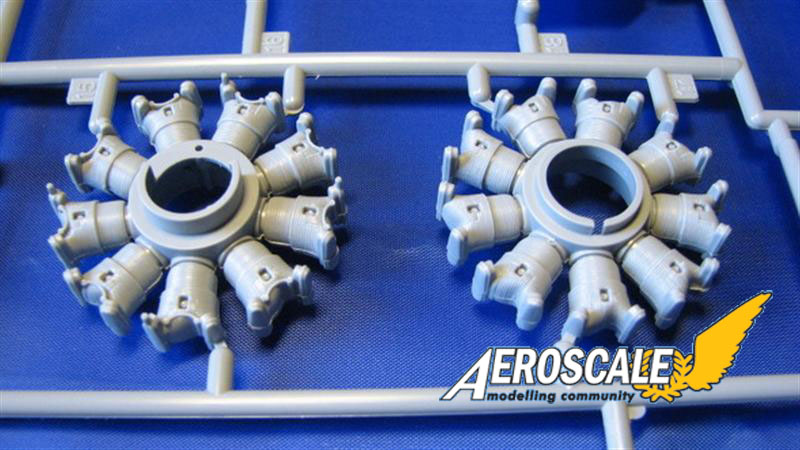
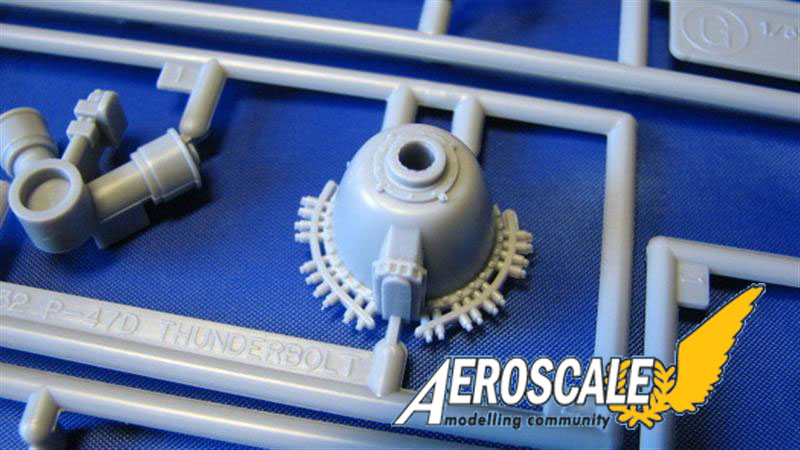
Sections six and seven cover the engine and cowling assembly. The engine comes in two banks of cylinders, with a separate part for the push-rods, making painting these a simple matter. No ignition harness is included and you may want to add one of these with fine wire. The moulded grill on the oil coolers doesnt match reference photos I have, but some fine gauze will really set them off. A choice of open or closed cowling flaps is offered, and the cowling itself comes in 4 sections. Care should be taken at this stage to get everything lined up properly. I would suggest fitting the engine to the main fuselage with the inner cowling ring attached and adding the cowling panels after, rather than building up the engine and cowling sub assembly separately as the instructions suggest. However the individual modeller chooses to tackle this, plenty of dry fitting is recommended.
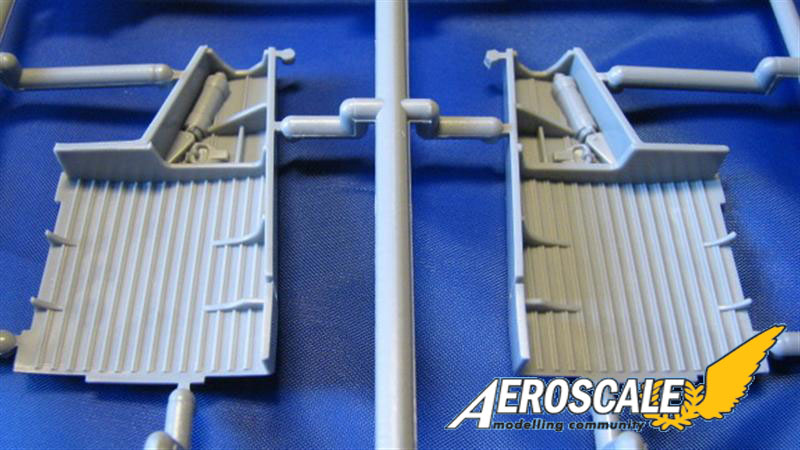
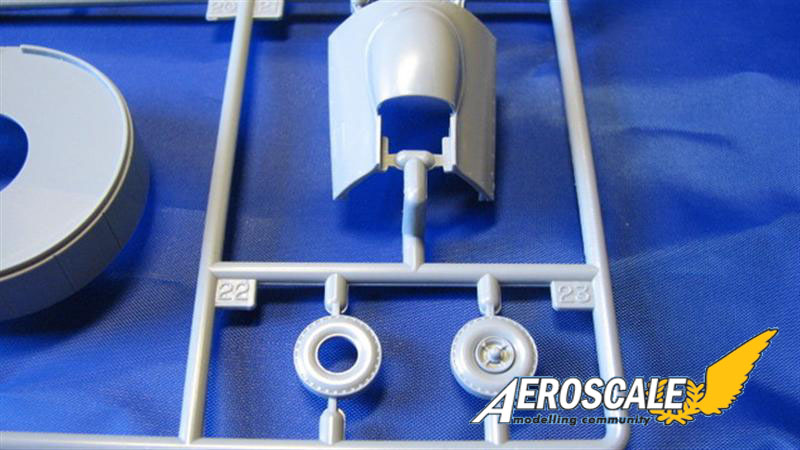
Sections eight and nine are the undercarriage sub assemblies. The main wheel doors are in separate parts so any sink marks are hidden. Again there is plenty of scope here for adding some hydraulic pipes. Both spoked and plain wheel hubs are supplied.
Section ten deals with the straightforward tail wheel and super charger duct assembly, while sections eleven and twelve detail the installation of the main wing flaps. Separate actuators are supplied, allowing the flaps to be displayed in the open or closed position.
Section thirteen deals with the addition of the ordnance. Two 500lb GP bombs are supplied and there are two different types of drop tank offered. The centre fuel tank is the flat 165 gallon type, but the two teardrop tanks for the under wing pylons were rarely used on P-47s in the ETO, apart from in Italy. These drop tanks are more appropriate for a Pacific theatre P-47 N, or a Burmese RAF Thunderbolt MKII.
The last 3 sections cover the propeller, pilot (if used), machine gun and cockpit. Both Curtiss and Hamilton propellers are supplied and you have a choice of canopies. A single closed canopy or, if you wish to display the cockpit open, front and back sections. The eight machine guns are just rods, and will require drilling out or replacing with AM items to look more realistic.
Painting And Decal Options.
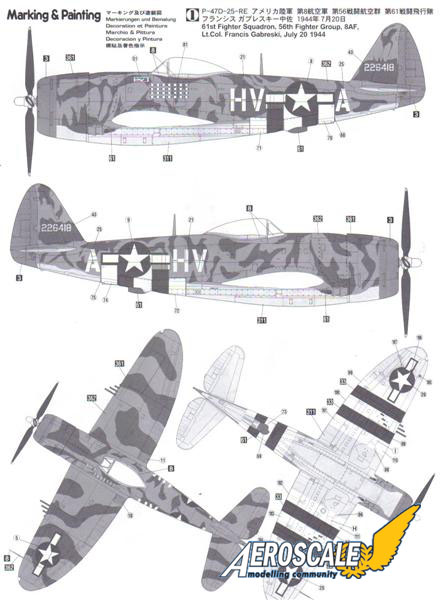
Three decal schemes are supplied with the kit. Two of which are for the same machine, 226418, the mount of top scoring ETO ace Francis Gabby Gabreski. 61st Fighter Squadron, 56th Fighter Group 8th Air Force. The schemes are dated July 5th, and the day that Gabreski force landed and was taken POW, July 20th 1944. The major differences in the two schemes being the kill markings, (27 for the 5th July version, 28 for the July 20th), and the invasion stripes. The invasion stripes carried on the earlier version have all been removed apart the rear lower fuselage section for the later scheme. Hasegawa only supply decals for the white areas of the invasion stripes, but I suspect most modellers will spray these on anyway. The decals will come in very useful for determining the correct width for the stripes though. Two separate kill marking decals are supplied for each of these versions, one with swastikas and one without, enabling modellers to easily build this version in countries where swastikas are illegal. Fans of Gabreskis Thunderbolts will probably be aware of photos taken in Feb 1944 showing Gabby in the cockpit of his Razorback, 42-75510, where his three most recent kill markings have yet to have the swastikas added, so these blank decals could come in very handy in the future. The third decal option is a NMF for 420473, the mount of Major Glenn Eagleston. 353rd Fighter Squadron, 354th Fighter Group, 9th Air Force. The kits smooth cockpit floor is correct for this later batch machine
Conclusion.
I hope youve got plenty of space to display this huge Thunderbolt! Each wing is the width of a 1:72 scale P-47. Beautifully moulded and, with the exception of the cowling area, assembly looks extremely straightforward. I'm really looking forward to building this Bubbletop. Although the cockpit floor is incorrect for two of the decal options this will only be an issue for a dedicated rivet counter, and the corrugated floor can be reproduced with plastic rod. Most people will want to replace the machine guns with AM or scratch built items, and there's plenty of scope to add some extra wiring and turn this excellent kit into a real show stopper.
SUMMARY
Highs: Excellent moulding and finely engraved panel lines.Lows: Wrong cockpit floor for a Gabreski Thunderbolt. AM seat belts required and a tricky cowling assembly process.Verdict: Straight from the box or with some extra detail added this is going to build up into an excellent, and huge P-47. Clear the workbench! Contender for kit of the year?
About Nigel Julian (lampie) FROM: ENGLAND - EAST MIDLANDS, UNITED KINGDOM
Restarted modelling in late 2005 after a break of over 20 years.Built a lot of armour as a teenager but now concentrating on WW2 aircraft.
Some skills are coming straight back to me and Im learning new ones everytime I log on to this site it seems.
Hi Carl.
Eduard have a couple of PE sets in their October release list. An interior and exterior set, both labelled as P-47-D25, so they could well include some corrective cockpit detail for the "Gabreski" schemes in this kit.
Eduard already market 1:32 pre painted seatbelts which are suitable for this, and Cammett have a range of metal tubes which will replace the kits gun barrels.
Weighted resin wheels,in both styles. are available from Spada Decals, and Black Box are planning to release a cockpit detail set with the earlier type corrugated floor.
Nige


Comments