Introduced in the Spring of 1917, the Albatros D.V was a modification of the successful D.III sesquiplane and was meant to be an improvement of the earlier design. It failed to live up to this promise. The main structural fault of the D.III was the narrow chord of it's lower wings and their inability to handle the stresses imposed by high speed maneuvering and dives. The resulting structural failure of the lower wing was usually fatal and did not foster confidence in the pilots who flew them. Mysteriously this fault was not addressed in the design of the D.V. The attempts to redress this oversight were only partially successful and robbed the aircraft of any advantages it may have had over the previous design. This does not mean that the design wasn't functional, it was. Many Allied aircraft were downed by the D.V and D.Va, but a pilot had to rely more heavily on his skills in order to compensate for the inferior performance of these machines when compared to contemporary Allied designs. The generally defensive nature of the German effort in the air during this period also helped the Jagdflieger to endure until better machines became available.
Onto the model.
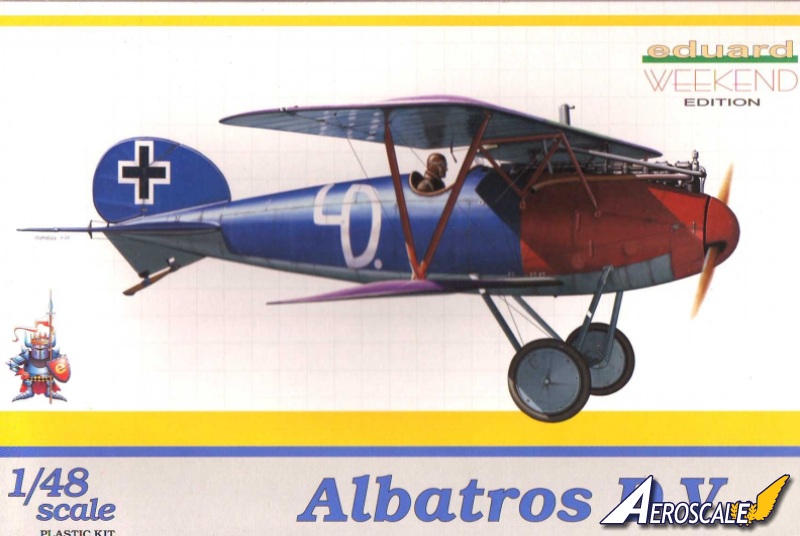
What can I say about my old friends, the Eduard Albatros D.V / D.Va series of kits? Like the actual aircraft themselves, they have beautiful lines and come in a nice variety of markings. The actual machines were about the most colorful operational aircraft to ever fly into battle and were painted in an almost infinite amount of schemes. Eduard has done us a favor and released many of the most popular of those color schemes with their kits. I know there are some who would argue that the Pfalz D.lll scouts are the most aesthetically appealing from the Great War but in my opinion, the title for that aircraft goes to the Albatros D.V and its variants.
I've built over twenty of these models so I'm quite familiar with their quirks. The good thing is that there are very few problems with the engineering of this kit regarding fit. No biplane model is a shake and bake affair but I have to say that with just a little prep, this kit can be built as quickly as your abilities and desire to detail it will let you.
For this review I will build the "Weekend" version of this kit mostly out of the box with only a few alterations besides the rigging. I'll comment on the steps as they're laid out in the instructions and point out what areas of the kit you may want to correct. I will also describe some of the remedies I have used to address some of the glitches while building so many of these kits.
One thing that will need to be addressed before assembly is a little mold shift that will show up mostly with the struts and the wheels. Careful use of a file and scraping with a blade will remedy this but it's a bit of work that shouldn't be necessary.
Interior
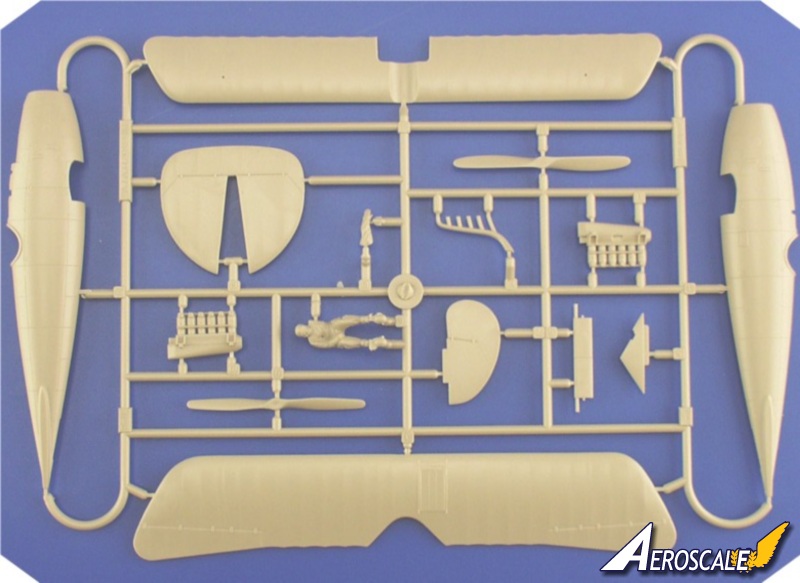
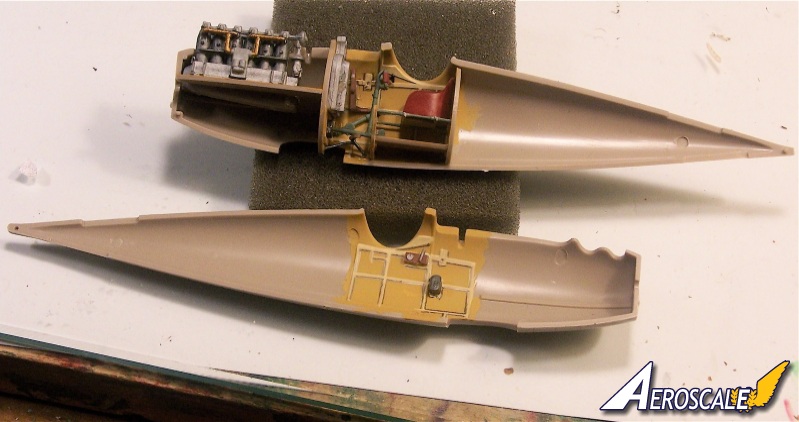
There are few surprises during construction of the interior. Just carefully follow the directional arrows on the instruction sheets for placement of the many small parts. There aren't many locator pins for alignment or for parts placement on the model but the instructions do a pretty good job of providing accurate illustrations to help make sure everything goes together correctly. One thing you should be aware of is how the ammunition container, B37, attaches to B 35. There is a notch in the fuselage half where this assembly is mounted. The feed from the ammo chute should fit into that notch a bit. This will help later on with the mounting of the Maxims and their alignment with the engine.
The engine will require some sanding after the block is assembled but goes together well. One thing I've noticed here is that the ignition wire tube that runs horizontally along the cylinders will prevent the carburetor / intake manifold piece from sitting flush in its mounting notch. Careful trimming of this tube, which is really a ridge, will allow the part to fit flush. Also, you can skip painting the oil basin as it will never be seen by the naked eye again once the fuselage is closed and the lower wing is attached. If anyone can see that then your model has suffered a catastrophe and that will be the least of its problems.
The Fuselage
The engine assembly and the cockpit interior fit well and will require only just a quick dry fit to identify where you may need to scrape off some excess paint. I used a regular pencil to accentuate the side wall details. I've also used darker paint to help for shadows on other kits. I close up the fuselage in two stages. First, I only apply liquid cement to where the halves meet forward of the wing on the bottom and around to the top where the nose meets the engine. I also apply cement to where the forward cockpit halves meet and let this dry. Step two will be to cement the rear half of the fuselage. I find this method avoids the need for clamping that may affect the alignment while the bonds set.
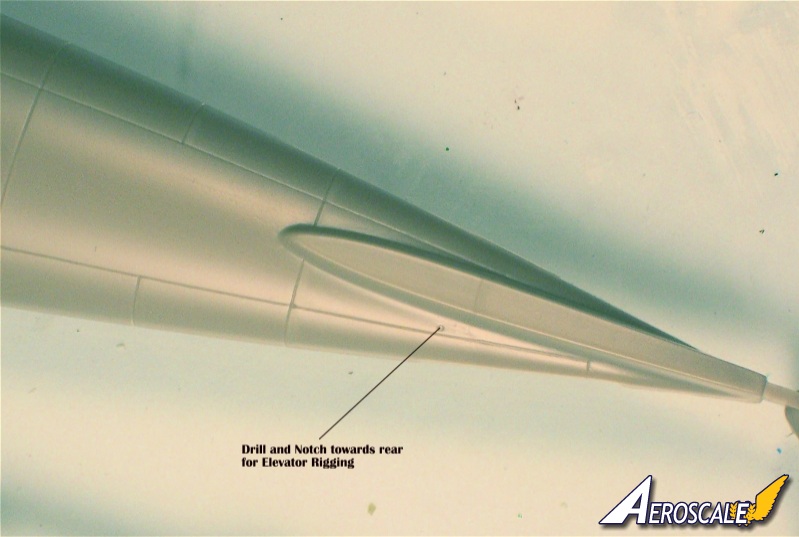
Once the fuselage welds are cured and the seams are smoothed I assemble the tail pieces and attach the bottom wing. The slot for the fin/rudder needs a little filing. The fit of the tailplane/elevator is tight near the end so some more filing is required for a better fit. I find that filing the tailplane near the elevator to widen that gap achieves the best fit, just keep dry fitting to make sure you haven't removed too much material. The bottom wing is then attached, minor filing on the wing and careful sanding in the fuselage will get a good fit. The dihedral is molded into the piece so no worries there. Be careful with the kit interior when fitting the lower wing. The rudder control bar is particularly vulnerable and difficult to reattach!
Once all this plastic welding is cured it's time to do some drilling if you want to reinforce the landing gear and add some rigging. I've included some pics of where you would want to drill. The kits landing gear is very fragile if not reinforced so that is recommended. There is also a pic of the landing gear after I drilled it out and inserted a small piece of floral wire. It's a bit blurry and I apologize but you get the idea.
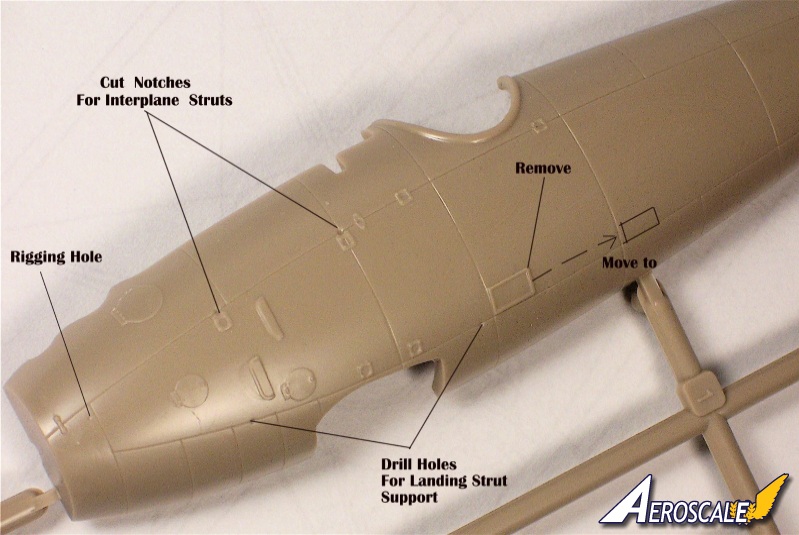
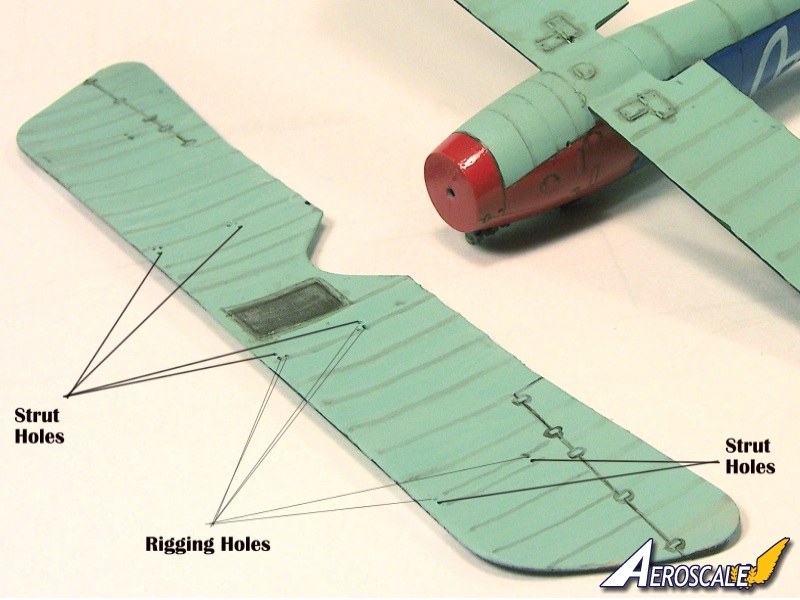
The attachment points for the cabane struts need some special attention. The holes in the top wing are sunk 90 degrees and need to be round filed closer to the center to allow a more accurate angle and a stronger fit. Just insert a small round file into the hole and pivot it towards the center, the angle looks closer to 45 degrees from plans found in the Osprey title on the Albatros, but this is a guess. The fuselage holes are small and not wide enough for the cabane strut attachment points. I don't recommend sanding the points to fit the holes, the material will melt when cemented which may affect your alignment. I cut notches into the fuselage plastic and smooth them with the round file. I also recommend you place the actual cabane strut piece against the fuselage holes to measure where to cut the notches, using the forward hole as the constant. This will insure a better and stronger fit.
There is one glaring error of this kit that I did not correct, the recess hatch for the pilot's mounting step on the port side of the fuselage. The kit's piece needs to be either sanded down and replaced with some plastic stock or carefully removed and placed further aft of it's current position by one panel. I have provided a pic of where it should be.
My method for rigging can be found on many websites including this one and I suggest a little time spent researching to find the one that suits you best. I drill anchor holes that are close to the actual anchoring points in the top wing. These holes are not drilled through but deep enough to insert the rigging material. Holes are then drilled through the bottom wing so the material passes through them. I used cyanoacrylate glue and two different rigging materials on this kit. High "E" guitar string is used for the tail and the undercarriage while 6mm mono filament fishing line is
used for the inter wing rigging.
Painting and Markings
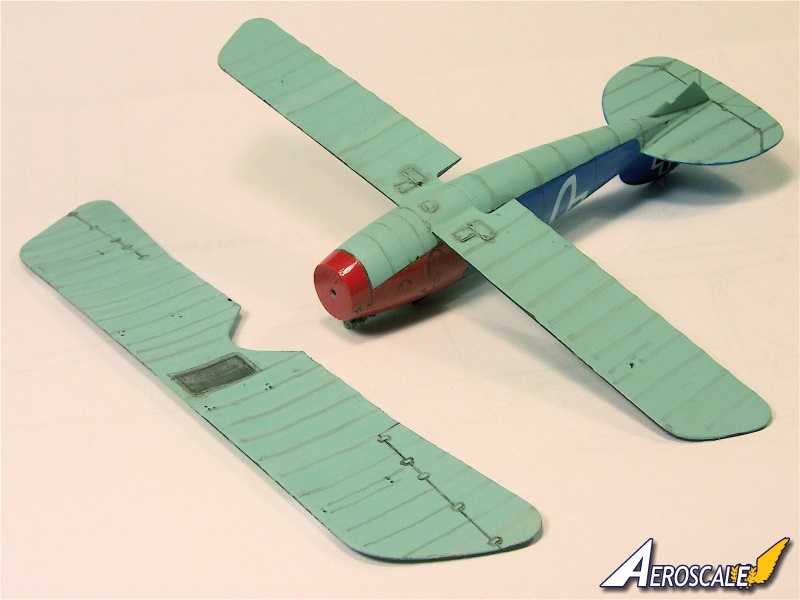
Once your drilling is done it's time to plan and execute your color scheme and markings. Biplanes require the finishing of some subassemblies before putting it all together. Once the wings are attached there is restricted access to many surfaces and it's not recommended to handle the kit too much once the top wing is joined.
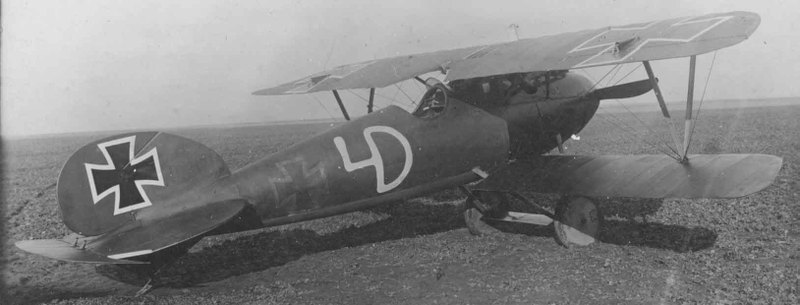
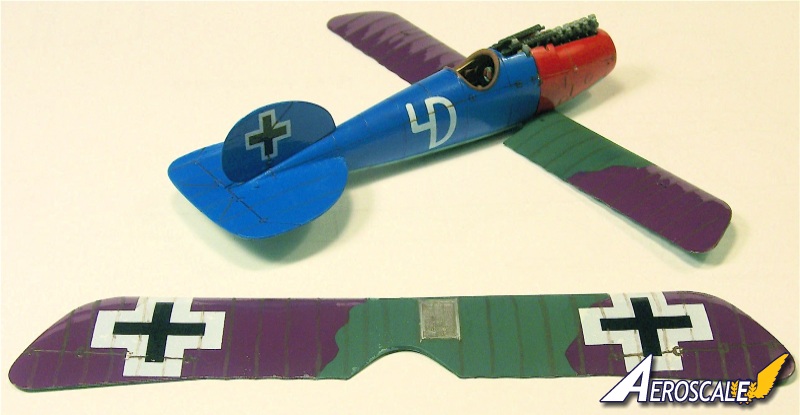
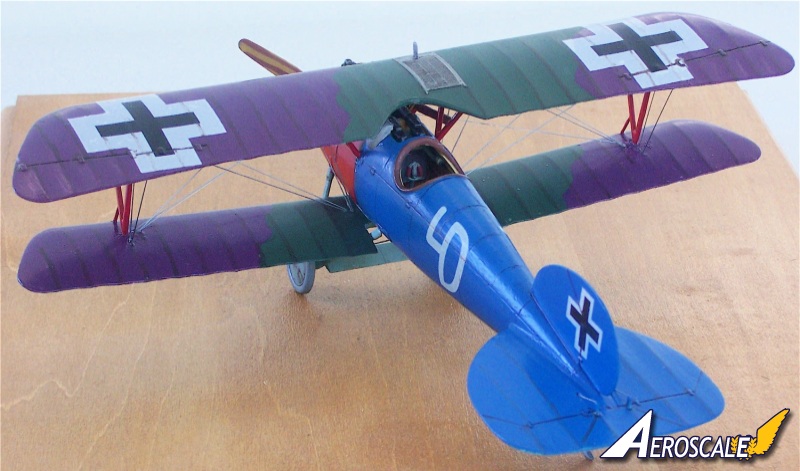
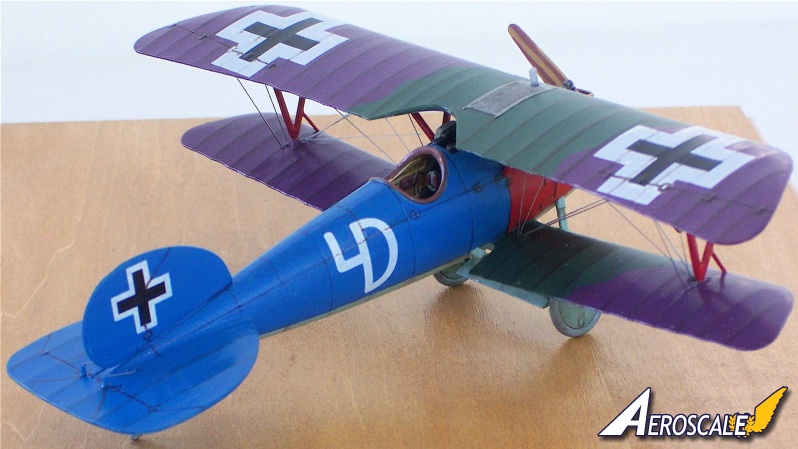
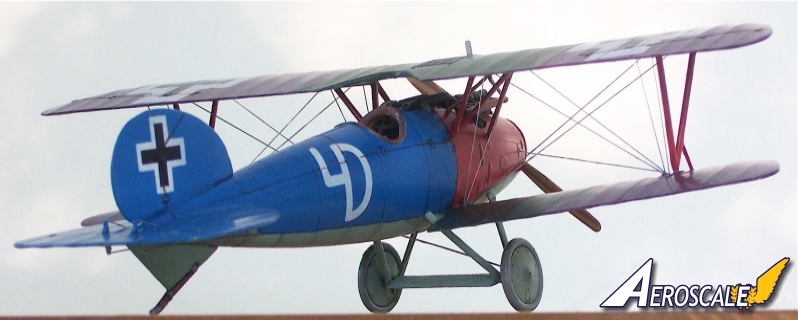
The markings of this weekend kit portray how Ltn Oliver Frhr von Beaulieu-Marconays Albatros D.V of Jasta 15 looked in the Spring of 1918. The description on the kit differs from the artwork and the decals provided. Eduard call this release a D.V but the artwork depicts an Albatros D.Va with the airleron control cables routed through the bottom wing. The Balkan style cross, which was mandated in March of 1918 only further emphasizes this. The probability of the earlier D.V version surviving that long into the Spring of 1918 is unlikely but not beyond the realm of possibility.
The only photo reference I could find in my collection was in the Osprey Elite edition featuring Jagdgeschwader II, by Greg VanWyngarden. There are two photos showing the lineup of Jasta 15 Albatros and Pfalz machines that feature the Balkan style cross. While the picture is small and not that sharp it is possible to discern the shrouds for the airleron cables on the Pfalz D llla of Bertholds machine in the foreground of one picture. I can't see them on any of the Albatros machines. I believe the confusion may lie with a depiction of this machine in Ospreys first Aircraft of the Aces book on the Albatros in which this machine is captioned as being a D.V from 1917. It's your choice to call it what you want but if it were a true D.V there should be airleron control shrouds on the upper wing and no rigging between the bottom wing and the airlerons.
I painted this kit using Humbrol #19 (Red), and Model Master French Blue on the fuselage. Humbrol #65 (Light Blue) was used for the under surfaces. Humbrol #30 (Dark Green) and #68 (Purple) for the upper surfaces of the wings. I applied these colors by hand using a brush. The Model Master colors tend to be on the thick side so I thinned it down and applied several coats because they become slightly translucent when thinned. Make sure you leave plenty of time for the bottom coat of paint to dry before applying follow up coats. I wanted to weather the model to give it that lived in look so I used Model Master burnt bienna thinned down to accentuate the panel lines and wing ribs of the Light Blue under surfaces as well as the upper surfaces of the wings. I also used it on the Red portion of the fuselage. For the Blue portion of the fuselage I used thinned Humbol #198 for the weathering.
Once the painting and weathering are complete I applied the decals supplied with the kit. These should be applied to a gloss surface and in the case of the paints chosen, the only place that I needed to apply a gloss coat was on the bottom wing. All the other surfaces had gloss paints applied. After they had cured I followed up with more Burnt Sienna to weather the decals where they intersected with panel lines and control surface gaps. You may want to apply a sealing coat to your sub assemblies at this point to protect the finish as you complete the construction of the kit. I brushed on a coat of Future acrylic floor polish for that purpose.
Secal quality
Just a word about the decals themselves. I've noticed that in some of Eduards latest releases they are copying the decal sheets printed by cartograf and there is some vestiges of the process. In particular the lines of the crosses have a pixilated look to them under close examination. In this kit it looks like they just enlarged the markings from their 1/72 scale release. You may want to use some aftermarket decals to remedy this situation.
Finishing
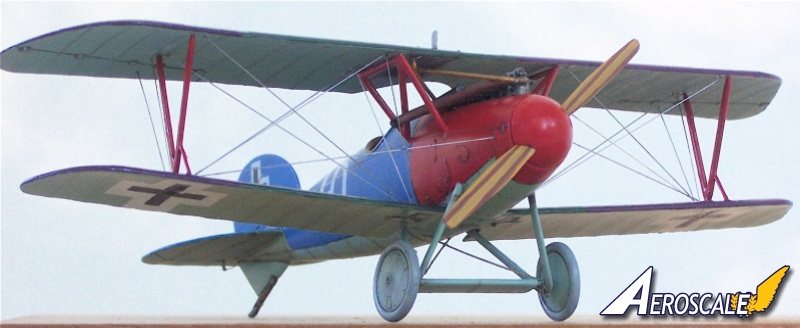
Once that sealing coat has dried it's time to finish this thing up. Mounting the top wing on a biplane is always a challenge but not that difficult. I lay the top wing flat, bottom up, and put cement in the strut mounting holes. I also apply cement to the tips of cabane and inter plane struts that are inserted into the upper wing. This help to get the chemical weld process started. Once the welds have been setting for a bit I adjust the angle of the cabane struts so they will attach properly to the fuselage. The inter plane struts stay 90 degrees to the wing. When I think the glue has set enough but still retains some play I will put cement in the fuselage notches that I cut and to the tips of the cabane struts. I'll let this work on the plastic a bit to make it sticky so the pieces will bond quicker. I always keep a little cyanoacrylate around at this point so that when I do have the wing in place I can reinforce the bonds. Then it's time put it on. This is where you will find that one of the inter plane struts fits perfectly and the other will need a little coaxing to align. This is fine and won't take a struggle to get straight afterwards. The one that fits will help stabilize the wing while the cabane strut bond cures. This is where you may want to reinforce the welds with some cyanoacrylate. I usually let that cure overnight.
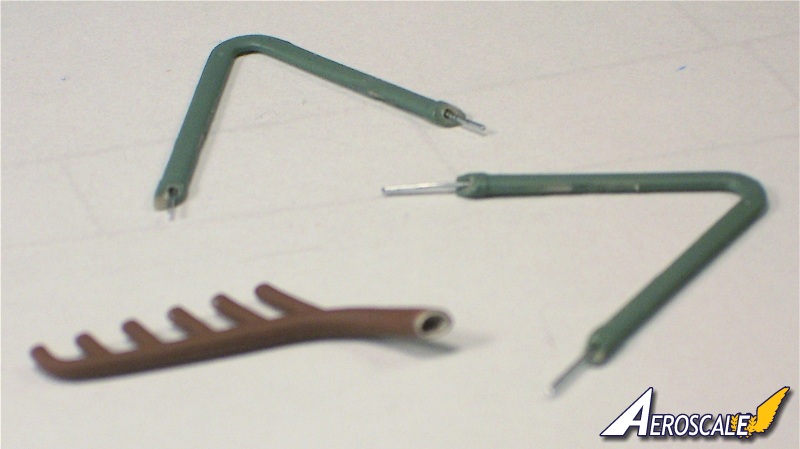
Once you align the remaining interplane struts and secure them, the rest of the kit falls into place. I hollow out the end of the exhaust manifold and attach the plumbing. The coolant pipes need to be sanded to fit properly into the radiator and I drill a hole partially into the lead cylinder of the engine to make for a secure bond of the coolant pipe. At this point i usually do the majority of the rigging with only the landing gear remaining. This is where your research will pay off and you can execute the method or mix of methods you have chosen.
The landing gear struts are another of the kits faults. They are to short (by 3mm). There are after market replacements available so you should decide at this point which to use. The kit pieces go together fairly easily when you reinforce the strut/fuselage junction. I highly recommend that this is done. In fact you may need to reinforce the after market replacements as well. The most important thing here is the angling required so that your model will sit flat. With the axle glued in place, the reinforced struts are pliable enough to adjust the sit of you kit. I further reinforce the landing gear by wrapping fine brass wire around the axle and the struts in almost the same fashion as the bungy cords actually used. I get the material from light gauge C or D acoustic wound guitar string. Just pick one up when you get the high E guitar string for the other rigging. I unravel the brass outer wrapping of the string and use that around the axle/strut joint. It can be wound pretty tight and if you use just a one or two wraps on each side you'll be surprised how sturdy the landing gear will get.
One cool thing about this kit is you get a pilot figure to add some animation to the model. He does require some surgery to correct a sucking chest wound but the patient usually survives and looks pretty descent with a nice paint job.
At this point you are pretty much done, just a few more pieces and it's assembled. Just some touch upto the finish and it's complete. Once you've been bitten by the Albatros bug it's hard to resist doing a bunch more. Just about every one of the famous Jastas had a line up these machines at one time. While it has a few faults and a newer mold of this kit in 1/48 would be most welcome, I can say that this kit goes together well and will reward the modeler with a very nice replica that can be added to your display case.
When contacting manufacturers and publishers please mention you saw this review at AEROSCALE
SUMMARY
Highs: Decent fit on all major assemblies with good instructions.Lows: Clean up required on some parts due to mold shift and a few inaccuracies. The decals work but the printing of them could be better.Verdict: This model has great potential but does not quite live up to the promise without a bit of work to correct it's flaws. Even with the faults it will reward the modelers efforts with a nice looking model.
Our Thanks to Eduard! This item was provided by them for the purpose of having it reviewed on this KitMaker Network site. If you would like your kit, book, or product reviewed, please contact us.


Comments