

1⁄35Fw 190D-9 Part 1
11
Comments
I WENT TO THE WHEEL WELL, ONCE - JERRY RUTMAN
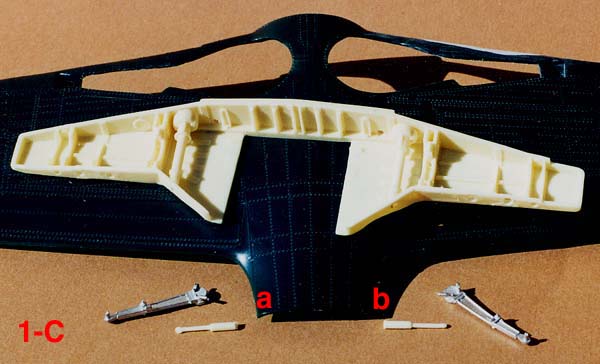
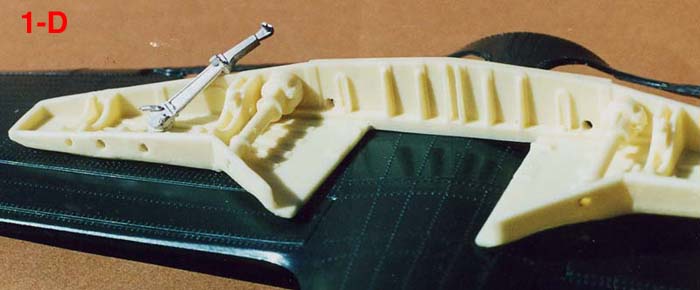
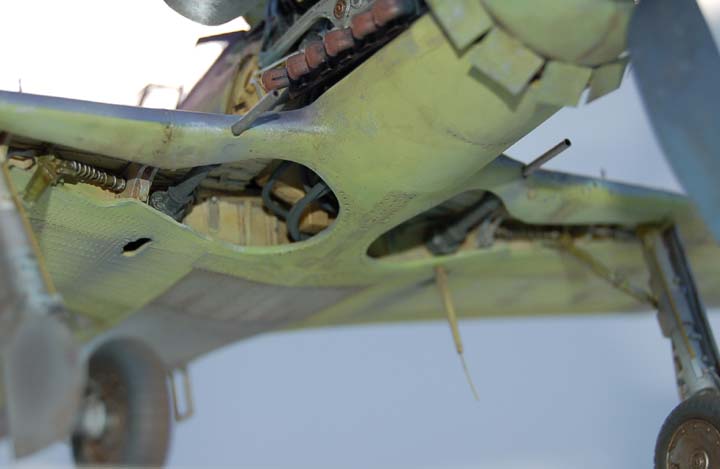
The Squadron Signal "Walk Around" book on the Dora, mentioned above, clearly show that the aft portion, or the "roof" of the wheel wells were open on the real aircraft. If you crouched down below the fuselage of a real Dora and looked up through the wheel wells, you could see the back end of the engine. Like several of the Dora kits available out there today, the old RevellUSA kit has the wheel wells closed in (the newer release in 1:32nd of the D-9 by Hasegawa has the opening in the wheel wells) as I think they would be on the radial- engined FW 190 A-8 aircraft. The photos I've seen make me feel you should be able to see the bottom of the engine, supercharger and oil tank if you look up through that opening from below, on the real aircraft. I realized that to change the kit wheel well area would be a major effort for building this kit. So I ordered the 1:32nd resin set for the Dora from Gerald Rutman. His web site will be listed at the end; Part One. (See Photo 1-C, 1-D, and 1-E) Photo 1-D shows a closer look at the resin wing mounted cannon. The cannon barrels pass right through the wheel wells.I removed all the kit wheel well plastic from the inside of the lower kit wing using a razor saw and a cutting bit in my Dremel Tool, the electric hand tool for drilling holes, sanding parts and chewing into wood and plastic with small steel bits. In Photo 1-C you can see the kit wing with the "inside" part of the wing facing down. The two cut out openings were where all the plastic was removed, so I could install the resin wheel well set. Also shown is the cream colored resin wheel well set. In the bottom of the photo are two white metal landing gear parts from the old Hasgawa kit, that on the real aircraft do the extending and retracting of the landing gear. Those small resin rods (marked lowercase "a" and "b" in red, on the photo) under both white metal extend/retract arms would be installed later. (In this build, I used quite a few of the white metal and PE parts from that old Hasegawa kit.) The two resin rods were pieces from the Rutman resin set. Those resin pieces are also part of the landing gear extend/retract mechanism. The rods are attached to the landing gear rotating drive and have springs (the added springs are not shown in this photo) around them. The springs around those rods were later fashioned from wire. (On pages 48 and 49 of the Squadron/Signal Walk Around book, you'll find excellent color pictures of the landing gear rotating drive and the extend/retract am on a real FW 190 D-9, restored.) Because of the thickness of the Rutman wheel well set from top to bottom, a lot of sanding and dry fitting, sanding and dry fitting, sanding and zzzz . . . was required on the kit upper and lower wings so that the kit wing halves would come together over the Rutman wheel well set allowing a good fit.
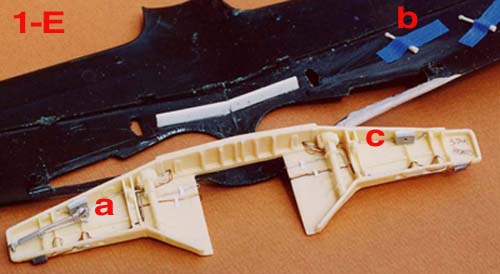
I should also mention that in Photo 1-E you see two white pieces of Plastruct styrene strips (Plastruct part number MS-419, size: 1.0mm x 4.8mm) that were glued in place on the interior of the lower wing. These Plastruct strips were necessary to keep the resin wheel well set from slipping backward out of alignment during the dry fitting and sanding process of getting the wheel well set to fit between the wing halves. This repetitive and mundane kind of back and forth work is where a lot of discipline is required. Twenty years ago? Ha! As an aircraft builder, I would have thrown the whole mess in the trash and mixed a pitcher of Martinis, sans olives. Hopefully, that liquid libation would improve my "outlook"? I now realize that "Nothing Worth Having Is Easily Achieved". And for me, at least, I try to apply the meaning of that short sentence in my contemplation of life and how to live it, as well as when I am building models.
LET'S NOT HAVE A FIT OVER THE FIT. PLEASE?
(Now look at photo 1-E) Points "a" and "c" in the wheel wells show the light gray sheet styrene rectangles actually several pieces of 30 thousandths sheet styrene laminated together with Tenax 7-R liquid glue. The liquid glue was applied liberally with a brush over two sheet styrene pieces. These two pieces were pressed and bonded together, like a sandwich. I repeated this process stacking the next styrene piece on top of the sandwich until I had the correct thickness. When the glue had cured - after a period of time, perhaps a day or two depending on humidity, weather conditions - I used a razor saw to cut the two laminated "spacers" the correct size and then sanded the edges.I had to add those port and starboard gray laminated "spacers" so that the two white metal extend/retract arms I was using from the Hasegawa kit, would fit against the back wall of the wheel wells and still be at the proper spacing distance once the landing gear legs were added. From a lot of dryfitting, I found that the white metal extend/retract arms were not going to join the landing gear legs at the correct location or angle, if I attached them to the aft walls of the resin wheel wells. So I had to do some problem solving. The plastic rectangle sandwich "spacers" were what I came up with.
Perhaps I should say here, that when I am building an aircraft model, I never add the propeller, landing gear, tail wheel, pitot tube, antenna boom, antenna wires, canaopy or any other part that could get broken off during the exterior puttying, sanding and painting of the model. Hense, the landing gear were not added until the model was almost completed.
Now back to photo 1-E to the place marked with a "b" in red. The red "b" indicates the location of one of the resin rods that I mentioned earlier. The other rod was cropped out of the picture. I used low tack blue masking tape to temperarily tape it to the wing. These little parts can easily disappear, if care is not taken. I believe a modeler should develop good working habits. Since I now take medicine, I keep the empty containers. So I have a lot of the clear plastic bottles with wide removable tops. I put all of my small parts for armor models and aircraft models, and for figures in these clear plastic see-through bottles - a better solution than tape. Again, it is wise to develop good working habits in modeling. I feel the same about developing good habits at home or the work place. When what we're involved in becomes habit, we don't forget to do it. But whoa Nellie, did it take years and years to practice what I am preaching. Later in my story, I hope to remember to tell about my friend, who can never find their TV remote!
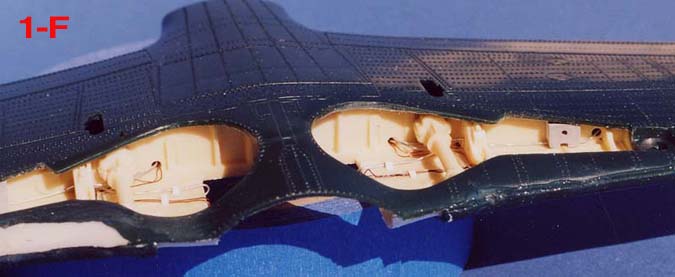
Photos 1-F and 1-G show the resin wheel well set installed and the wing halves glued together with Tenax 7-R in most areas. Super glue was used in some difficult to close seams. I let the glued wing halves set up overnight so the bond would be strong, the plastic hard and thus, easier for sanding. In these two photos you can see the electrial wire that I used in the wheel wells, following the excellent reference color and black and white photos in the Squadron/Signal Walk Around book. I tried steel wire and copper wire, found on the street or purchased from a hardware store. I was not happy with the results since it was so difficult to bend the steel or coper wires in an "L" bend without getting kinks in the straight part of the wire. A modeling friend in LA that I exchange email with, came to my rescue. He made a great suggestion to simulate aircraft electrical wire, hoses, conduit pipe, etc. However, I didn't get that information until months after the wing halves were glued together. I will explain all about my friend's suggestion that definitely solved the problem for other work in the engine compartment and the cockpit in the second installment of this article.
Reference Publications
Squadron/Signal Publications, Inc. USA; Walk Around Number 10; FW 190 D by E. Brown Ryle and Malcolm Laing; Copyright 1997; ISBN: 0 - 89747 - 347 - 4Marian Krzysan, Aircraft Monograph #6 FW 190 D/ Ta 152; Copyright 1997; AJ - Press of Warsaw, Poland
Scale Modeling products web sites:
Gerald Rutman web site: Gerald Rutman
You can get styrene plastic, rod, strips, tubing from many suppliers as well as from the manufacturing companies listed below:
Plastruct, 1020 South Wallace Plce, City of Industry, CA 91748, USA PH: 800 - 666 - 7015 - Web site: Plastruct - Volume 8 catalog available from download
Evergreen Scale Models, Woodinville, Washington, 98072, USA - Web site: Evergreen
 Photo 1-C
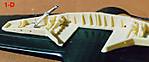 Photo 1-D
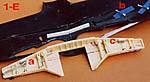 Photo 1-E
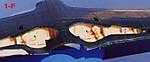 Photo 1-F
 Photo 1-G

About the Author


FROM: KANSAS, UNITED STATES
I am primarily a figure painter and have been painting figures about 3 years now; still consider myself a novice. However, I started building models in 1965 and as a retired newspaper artist, I now have time to build models all the time, just for the fun of it and as a way to express my creative inn...
Comments

Hi Rudi and Rowan:
@Rudi: Thanks for the kind remarks, my friend. Most appreciated. Hope
you had a chance to look at Steve's fine article on the Eduard boxing
of the Fok. DVII's. Very comprehensive and informative, plus great
pictures as well.
@Rowan: Sorry I haven't replied to your most welcomed email, Rowan.
Been real sick since last Thurs. and still quite weak. But I wanted to let
you know how pleased I am with the way you used the pictures and the
way you did the article layout. Part II is almost completed, only one more
colored pencil sketch to do and it will be on the way. Again, thank you.
Miami Jayhawk
OCT 01, 2006 - 04:47 PM

Hi Rick!
Thanks for writing a feature about such an interesting build! I can't wait to see part 2! And take care of yourself...
Jean-Luc
OCT 01, 2006 - 05:02 PM
Hello Jean-Luc:
It was so nice to read your remarks. And thanks for taking time to do so.
And let me take this opportunity to say thank you to you as well, Jean-Luc
for all the time you donate to Aeroscale as Associate Editor. I've enjoyed
and appreciated your posts and your reviews, articles. As model builders,
we are fortunate to have people like Rowan and you working hard to
make this site a place of solid and yet interesting information.
OCT 02, 2006 - 06:46 PM

Hi Rick
Sorry to read that you've been unwell - I really hope you're back on the way to feeling 100% again. Editing your article was both a delight and highly instructive - it's packed with good-sense advice for modellers at every level and it certainly had me re-evaluating my own outlook! I can't wait to see the future installments - that sort of weathered paint-job is something I really want to read more about...
All the best
Rowan
OCT 02, 2006 - 07:37 PM
Thanks Rowan for your response.
Most appreciated, my friend. A word about the fact that I painted and
weathered this model in such extreme measures: From reading and from
research, I knew that the Fw 190 D-9 near the end of the war, in many cases,
was pressed into service, flying many combat missions, out in the open on the
ground and susceptible to weather conditions etc. with no time for air crews
to do anything other than fill the fuel tanks and re-arm the weapons. . . and get the
aircraft back in the air. Many war time photos show this point to be true. And since
I wanted to learn how to show extreme fading and weathering of paint, I jumped into
this problem with both "small sized number 7" . . . feet. Now, whether this
experiment about weathering was successful or not? Well. . . I suggest
you read the other parts of the article. I'll go into detail about spraying on my
own aircraft markings with hand made templates, instead of using decals,
in the future parts of the article.
OCT 04, 2006 - 12:59 AM

Greetings Rick and all;
While I love a good challenge I have to doff my chapuea to the common sense attitude of the author, Rick Brownlee. I tend to go for detail but nothing repeat nothing beats basics, basics, basics. The most basic tenant of modeling is having fun. No matter what it is just a hobby and a model is just a model. There are well built highly detail builds but as Rick tells us we all started somewhere.
In a recent experience on a another general modeling website I have seen almost a coyote pack mentality. Here the average modeler gets a chance to grow like a local modeling club. Everyone is encouraged to participate and learn something. Thanks Rick. Model On!
OCT 04, 2006 - 05:49 AM
Greetings Jack Flash:
Hello Steve. I sincerely appreciate your comments about my article on
building the old Revell 1:32nd FW 190 D. It was gratifying to me that,
although you're a highly skilled modeler of much experience, you still
found something of interest to you in what I am writing. The thrust and
style of my "musings" is more aimed toward the beginners, but I was
hoping there might be something of value in the Part One, to modelers at
all experience levels.
Thanks again! The encouragement will help me to work with even
more enthusiasm, on the other parts of the article.
OCT 04, 2006 - 05:10 PM

I have to say that this is probably the best article Ive seen since I joined Aeroscale.
Congratulations on a fine piece of work Rick.Looking forward to the next instalment and get well soon.
Nige
OCT 04, 2006 - 09:31 PM

"Outstanding" is a word that comes to mind reading the article......
But, on the other hand, that is something that I have grown accustomed to reading articles and seeing the finished projects on these forums...
Keep it up lads!

OCT 04, 2006 - 09:43 PM
To Nigel Julian and Jan Bojarp:
@Nigel: I really appreciate your most gracious remarks, Nigel. Most
gratifying considering the amount of work in preparing a series like this.
My first try at more than a "one part article". Thanks again.
@Jan, a.k.a. Lucky 13: Oh my Jan, I guess a week from
today (Friday) you'll be in "thirteen-ers heaven"? Eh? Thanks
for taking the time to respond, in such a positive way. As you know,
most of us only comment when there is something wrong.
We kind of become the "silent majority" when it is
something we like. And you're right! The Big A is a great site and
demonstrates so emphatically the benefits of "effective communication".
OCT 05, 2006 - 03:57 PM
Copyright ©2021 by Rick Brownlee. Images also by copyright holder unless otherwise noted. The views and opinions expressed herein are solely the views and opinions of the authors and/or contributors to this Web site and do not necessarily represent the views and/or opinions of AeroScale, KitMaker Network, or Silver Star Enterrpises. Images also by copyright holder unless otherwise noted. Opinions expressed are those of the author(s) and not necessarily those of AeroScale. All rights reserved. Originally published on: 2006-10-01 00:00:00. Unique Reads: 8725

WEB HOSTING BY


Copyright ©2021 AeroScale and Kitmaker Network, a subsidiary of Silver Star Enterprises
All Rights Reserved. Please read our Conditions of Use and Privacy Policy.
All Rights Reserved. Please read our Conditions of Use and Privacy Policy.