_GOTOBOTTOM
Start Here (for Beginners)
This forum is for younger modelers or people just starting out in the hobby.
Help with paint for my Tamiya Spitfire MK.Vb?
tanky
_VISITCOMMUNITY
England - East Anglia, United Kingdom
Joined: February 03, 2006
KitMaker: 45 posts
AeroScale: 20 posts
Posted: Tuesday, November 20, 2007 - 05:15 AM UTC
HI this sort of follows on from another post I have but thought I would get better response from posting here.

I have a Tamiya Spitfire MK.Vb and could do with some advice on paint...I want to use Vallejo Model Colour or Air, but not sure on the best colour in their range?

I think what is adding to my confusion is the fact that Tamiya say to use for example for the underside XF-19:3 + XF-54:5 so do I find the match on Vallejo charts for both then mix them 3-5 and if I do this will it produce the correct colour ?
maybe I am just thinking to much I have a habbit of doing this

Anyway Tamiya say I Need for the cockpit interior XF-5 :1 + XF21 :3 + XF-65 :1 so in the vallego range I would need ???
they are saying the seat cushion X-18 control stick X-18and headrest ??

Underside colour XF-19 :3 +XF-54 :5

And the two tone camouflage
X-18 :1 + XF-21 :2 + XF-24 :2 & XF-58 :1 + XF-62 :5

So if anyone can give me a list of the paints I need in vallejo range or if thry have painted a spitfire with Vallejo colours and can give me advice it would be much appreciated.

Also they are saying seat assembly is same colour as interior and the a semi gloss balck for the padding is this correct ?

Any help greatly appreciated
Merlin
Staff MemberSenior Editor
AEROSCALE
#017
_VISITCOMMUNITY
United Kingdom
Joined: June 11, 2003
KitMaker: 17,582 posts
AeroScale: 12,795 posts
Posted: Tuesday, November 20, 2007 - 11:11 PM UTC
Hi Tanky

Tamiya's paint mixes can do your head in, can't they!

If you want to use Vallejo paints, I did a bit of cross-checking on their site and came up with these equivalents. I can't vouch for their absolute accuracy, as I've never used the paints, but they should be close:

Interior: Grey-Green - Model Color Model Air 71095

Topsides: Dark Green - Model Color 893 / Model Air 71016 and Ocean Grey - Model Color 869 / Model Air 71052

Undersides: Medium Sea Grey - Model Color 870 / Model Air 71048

I haven't got the kit instructions, but black padding for the seat sounds correct - just don't use pure black, unless you want to represent a brand-new machine, straight from the factory. Also, in general, pure black has a danger of looking a bit "toy-like" on a model - so a very, very, dark grey (maybe with a tiny touch of brown to take the edge off it) would be better in this case.

I hope this helps, all the best

Rowan
tanky
_VISITCOMMUNITY
England - East Anglia, United Kingdom
Joined: February 03, 2006
KitMaker: 45 posts
AeroScale: 20 posts
Posted: Wednesday, November 21, 2007 - 08:36 AM UTC
Hi Merlin,
Really appreciate your help on this, I ordered vellajo Model Air paints today also went for a few more colours just incase like "Duck egg Green 009" as a possible interior colour I may be way wrong on this but it seemed to match in some photos on the net,hard to say until they come but hopefully wont be to far out with the choices made.

thanks for the advice on black as well much appreciated I will post some pictures when she is all done so you can see end result

cheers
Adam
Merlin
Staff MemberSenior Editor
AEROSCALE
#017
_VISITCOMMUNITY
United Kingdom
Joined: June 11, 2003
KitMaker: 17,582 posts
AeroScale: 12,795 posts
Posted: Wednesday, November 21, 2007 - 09:05 AM UTC
Hi again

Even if it's not right for the cockpit, Duck Egg Green sounds like it should be a good match for RAF Sky, should you want to paint the fuselage band instead of using the kit's decal (if it has one). Here's looking forward to seeing how your Spitfire progresses!

All the best

Rowan
Holdfast
Staff MemberPresident
IPMS-UK KITMAKER BRANCH
#056
_VISITCOMMUNITY
England - South West, United Kingdom
Joined: September 30, 2002
KitMaker: 8,581 posts
AeroScale: 4,913 posts
Posted: Thursday, November 22, 2007 - 08:28 AM UTC
Hi, Tanky,

I have the Tamiya Spitfire Mk Vb and the Spitfire is my favourite aircraft, so if you want any help along the way with this just give me a shout. My Vb is a trop version and I'm adding a detailed cockpit, but it will be similar to yours (I'm guessing from the start of this thread that yours is a ETO (European Theatre of OperationS) aircraft?

Mal
tanky
_VISITCOMMUNITY
England - East Anglia, United Kingdom
Joined: February 03, 2006
KitMaker: 45 posts
AeroScale: 20 posts
Posted: Friday, November 23, 2007 - 09:24 AM UTC
Hi Holdfast,
Thanks for the offer of help much appreciated and yes mine will be ETO. One thing I am dreading is the "canopy" so any tips on this would be great painting and gluing?? also where did you get the detailed set from for the cockpit? I wont be getting one for this build but for the next, I like to build things at least twice I find I learn so much from mistakes on the first.

Cheers
Adam
Holdfast
Staff MemberPresident
IPMS-UK KITMAKER BRANCH
#056
_VISITCOMMUNITY
England - South West, United Kingdom
Joined: September 30, 2002
KitMaker: 8,581 posts
AeroScale: 4,913 posts
Posted: Friday, November 23, 2007 - 10:52 AM UTC
This is a Mk I but it will give you an insight into building the Spitfire Spitfire Mk I on the workbench . Ignore the antenna wire and IFF wires, the Mk V didn't have them. I use Parafilm-M for masking canopies which takes a little getting used to. Canopy masks can be a good place to start but I never use them Tamiya masking tape is probably the best medium to try. You can cut it into thin strips and lay it around the edges of the frames, then "fill in" with wider shorter pieces. When painting canopies paint the interior colour first, then the camo colour. This will show the interior colour on the inside and also help stop light shinning through, which will make the paint look lighter.
My detail set is by Cooper, it's good but requires quite a lot of work. There are easier to work with detail sets out there.
My Mk V has been on the go for quite some time and is now on the back burner (due to several things that have taken priority). I'll have to look for something else to build along with you, maybe the Tamiya Fw 190 A3, so your spitfire will have something to shoot down
Mal
Holdfast
Staff MemberPresident
IPMS-UK KITMAKER BRANCH
#056
_VISITCOMMUNITY
England - South West, United Kingdom
Joined: September 30, 2002
KitMaker: 8,581 posts
AeroScale: 4,913 posts
Posted: Sunday, December 16, 2007 - 07:49 AM UTC
Hi tanky, are you still there?
I have bought a Tamiya Spitfirte Mk V so I can now build along with you, if you like. I began by Spraying all the parts that are required to be interior green.
The sprues are amongst this lot as I also started a Tamiya Bf 109E and the Tamiya Fw190 A-3 that I said that I was going to build

Mal
EdgarBrooks
_VISITCOMMUNITY
England - South East, United Kingdom
Joined: June 03, 2006
KitMaker: 397 posts
AeroScale: 384 posts
Posted: Sunday, December 16, 2007 - 11:35 AM UTC
Spitfire seats, after the early Mk.1, were made from a resin mix, and were a dark red. IFF aerials were only deleted fairly late in the war, and were replaced by a bar aerial under the starboard wing. Unless your Mk.V is around 1943/4, the IFF aerials, from fuselage to tailplane should be there; this is, especially, true, if you have the large headrest, since it was deleted in July 1942.
Edgar
Holdfast
Staff MemberPresident
IPMS-UK KITMAKER BRANCH
#056
_VISITCOMMUNITY
England - South West, United Kingdom
Joined: September 30, 2002
KitMaker: 8,581 posts
AeroScale: 4,913 posts
Posted: Monday, December 17, 2007 - 09:11 AM UTC
Thanks for that Edgar, not knowing any different I (stupidly) assumed that the IFF wires were replaced with a different system when there was no longer a need for the HF? antenna wire
Tanky just so that you Know Edgar is a well known authority on the Spitfire
Mal
EdgarBrooks
_VISITCOMMUNITY
England - South East, United Kingdom
Joined: June 03, 2006
KitMaker: 397 posts
AeroScale: 384 posts
Posted: Monday, December 17, 2007 - 08:51 PM UTC
Thank you for the compliment; it's just a lifelong fascination, with the aircraft, plus access to the RAF Museum, and several others (some, sadly, now dead) who knew a heck of a lot more than me. The deletion of the aerial wire was due to the (fairly early) introduction of VHF radios, which needed a shorter aerial, which was accomodated inside the mast. I thought that they were simply shoved up inside, but they were a completely self-contained unit, with a socket, at the base, into which the radio was plugged. If you get a chance to look at a Spitfire's fuselage, which hasn't been rebuilt, you'll see that there are two holes, in the roundel, through which the IFF aerials passed. These had a fibre "washer," for insulation, and the wires went straight into the transmitter, which was, usually, up in the roof by the mast. Inside the fuselage, the aerial wires were kept tight by a couple of bungee cords.
The IFF transmitter was fitted with an explosive device, which could be detonated in two ways; the first was heavy impact (crash,) while the second was by the pilot, via the oblong box, that you can see on the starboard wall near the u/c lever. It had a hinged lid, with two buttons beneath. When pressed, simultaneously, they started a timer, which gave the pilot a few seconds to get clear before the explosion. Strangely, though, the Germans never seemed to catch on to the importance of the IFF, even though they did get some that were intact.
Edgar
Holdfast
Staff MemberPresident
IPMS-UK KITMAKER BRANCH
#056
_VISITCOMMUNITY
England - South West, United Kingdom
Joined: September 30, 2002
KitMaker: 8,581 posts
AeroScale: 4,913 posts
Posted: Tuesday, December 18, 2007 - 07:46 AM UTC
Well I don't feel so bad now as I did basically know everything that you mention apart from the fact that the Mk V had IFF wires. The part that I don't understand is why the headrest was deleted, was it just that it's position didn't suite most pilots or that it was just of no use? Again I thought that the headrest was deleted from, basically, the Mk IX so I've learnt something else
I'm always glad to have info on the Spitfire, thanks again Edgar

Still waiting for tanky to drop back in here but, and correct me if I'm wrong Edgar the elevetors on Spitfires up to I think the Mk XIV tended to droop (stick forward) when on the ground (although there are pictures of Spitfires with level(ish) elevators. Mk XIV (or after, or Griffon engined machines) I think I'm correct in saying turned up (stick back). I guess this was due to balance forces and, I reckon, that, in the early Spitfires, the pilot probably pushed the yoke forward to give himself more room to exit. So I will be dropping my elevators but you don't have to do that tanky.

Mal
EdgarBrooks
_VISITCOMMUNITY
England - South East, United Kingdom
Joined: June 03, 2006
KitMaker: 397 posts
AeroScale: 384 posts
Posted: Tuesday, December 18, 2007 - 12:22 PM UTC
The story, that I have, regarding the headrest, is that pilots saw their CO (Paddy Finucane, allegedly) dragged under the sea, when his parachute straps hooked on it, and wouldn't come free. It might be apocryphal, but it's certainly plausible.
All Spitfire elevators would droop, if left to their own devices, but there were clamps, which could be fitted to the stick, and stop the elevators flapping in a high wind, and possibly pitching the a/c up onto its nose. It clamped the ailerons, at the same time. It was also quite common to see the groundcrew wrap the seat belts around the stick, as a "make-do" temporary expedient.
Edgar
magnusf
_VISITCOMMUNITY
Stockholm, Sweden
Joined: May 02, 2006
KitMaker: 1,953 posts
AeroScale: 1,902 posts
Posted: Thursday, December 27, 2007 - 10:15 AM UTC

Quoted Text

The story, that I have, regarding the headrest, is that pilots saw their CO (Paddy Finucane, allegedly) dragged under the sea, when his parachute straps hooked on it, and wouldn't come free. It might be apocryphal, but it's certainly plausible.
All Spitfire elevators would droop, if left to their own devices, but there were clamps, which could be fitted to the stick, and stop the elevators flapping in a high wind, and possibly pitching the a/c up onto its nose. It clamped the ailerons, at the same time. It was also quite common to see the groundcrew wrap the seat belts around the stick, as a "make-do" temporary expedient.
Edgar


So that's the story behind the lack of headrest on my Spit XII! I was checking photos and noticed that there were none that I could see in the photos.

Locking the stick with the seat belt is standard practice in gliders. It has the added advantage that there is no external lock at the flying surfaces that can be forgotten no matter how long rbf-tags you put on them!

Regards

Magnus
Holdfast
Staff MemberPresident
IPMS-UK KITMAKER BRANCH
#056
_VISITCOMMUNITY
England - South West, United Kingdom
Joined: September 30, 2002
KitMaker: 8,581 posts
AeroScale: 4,913 posts
Posted: Friday, January 04, 2008 - 07:49 AM UTC
Well I hope that tanky finds his way back to this thread. In the meantime I have continued with the construction of Tamiya's Spitfire Mk Vb, I will split this over 3 or 4 posts, so that they don't take to long to load. So the first bits.

The Spitfire sprues on their own. The interior parts were given a coat of Klear (Johnsons Klear floor shine) to protect the paint from the wash of Davy Grey oil paint and Turps, that followed. Then I gave the parts a matt coat, to give the dry brushing something to bite on. I did the dry brushing with the original interior colour, interior green, first, then used Humbrol 80? which is their version of sky.


The instrument panel was painted matt black, as was the rear cushion on the seat, and when dry the instrumant faces were painted white. When the white was dry the instrument faces and the bezels were painted satin black, then immediately, using a sharp pin, I scratched through the satin black paint to indicate dial hands and numbers. It does have to be accurate and even painting gloss black will do if, like me you intend to close up the canopy. When the satin black paint was dry I "glazed" the dials with Klear. The seat was made from a resin mix which produced a dark red colour, I have seen them streeky in appearence. To replicate this I first of all applied Humbrols "leather" to the seat. When dry I mixed a little Cadmium Red with Burnt Umber artist oil paint, then diluted this, using turps, and applied this mix to the seat. You will be able to move the paint around, with the brush, to give the streeky effect.


The cockpit interior will slide up inside the fuselage halves after they are joined. Before doing this and besides the obvious of adding the verious bits that hang off the side walls, I wanted to drill the fuselage for the IFF wires (Thanks again Edgar ). To get the positioning correct I used Tamiya tape cut into thin strips. The wire enters the fuselage on a line basically in line with the centre of the tail plain, and just behind the panel line on the wing fillet, which is in line with the underside wing/fuselage joint. The tape that goes over the fuselage aligns the port and starboard holes, position it by eye. Use a 0.3mm drill, start at 90 degrees to the fuselage and once started angle the drill so that the hole is angled towards the tip of the tail. The real thing wasn't like this but if you don't angle the hole the wire will looks odd when you glue it in place (trust me )


I'll open another post.

Mal
Holdfast
Staff MemberPresident
IPMS-UK KITMAKER BRANCH
#056
_VISITCOMMUNITY
England - South West, United Kingdom
Joined: September 30, 2002
KitMaker: 8,581 posts
AeroScale: 4,913 posts
Posted: Friday, January 04, 2008 - 08:38 AM UTC
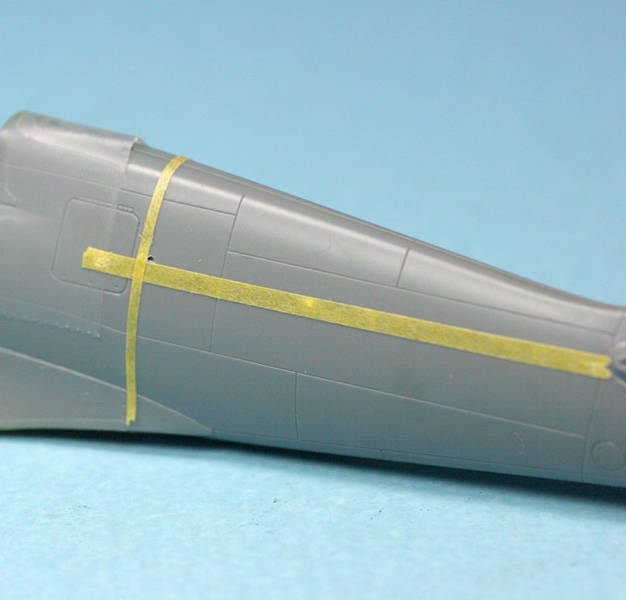
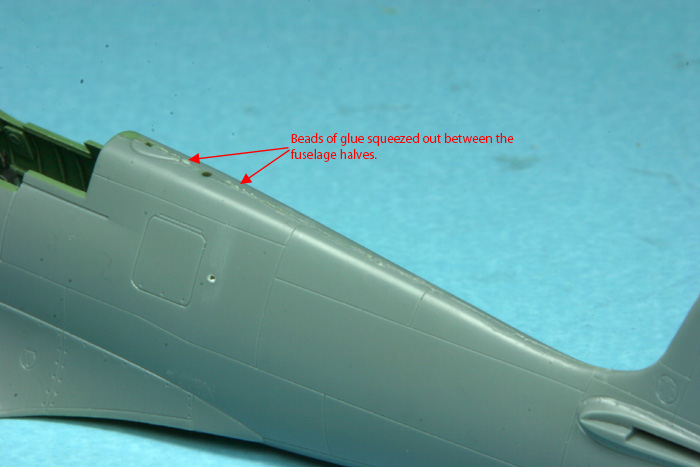
Next I joined the fuselage halves. First of all, as with everything, test fit. Check that everything fits as it should, if not find out why and fix the problem. The fuselage on this model presented no problems. Hold the halves together and us liquid glue applied with a small paint brush. Work along the fuselage and as you go squeeze the halves together so that the molten plastic oozes out as small beads. Tape along the fuselage, as you go, to keep things as they should be. A tip when doing this is to turn over a little of one end of the tape (the end which is placed last). Doing this will make the removale of the tape far, far easier (trust me ) Don't apply tape before gluing as the glue can run under it and spread.


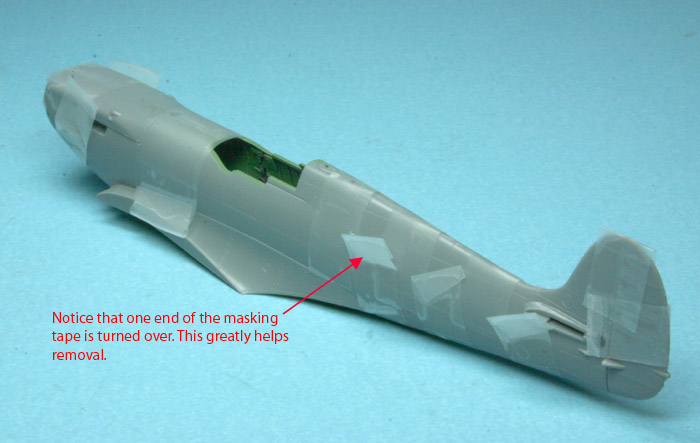
When the joint is dry, I usually leave thigs over night, remove the tape. You will see the benefit of turning over the end, or you will be cursing if you didn't The plastic that has oosed out of the joints will act as filler for them and just requires sanding away. Be careful not to loose the cross section of the fuselage by over zealous sanding. I scraped the dried beads off first, using the edge of a scalpel blade then, carfully sanded, using a fine and extra fine grit foam sanding sticks. After I had gone over the entire seam there were a couple of places that required more work. This was mainly due to the scars from cutting the pieces off the sprue tree. I brushed on Gunze "Mr Surfacer 1000", let it dry and sanded smooth, job done


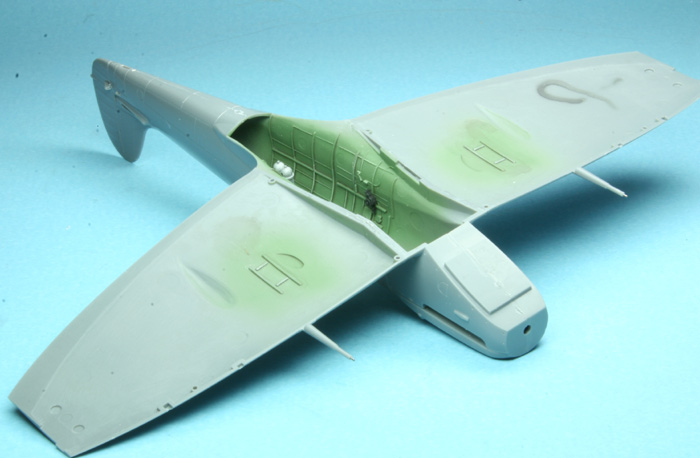
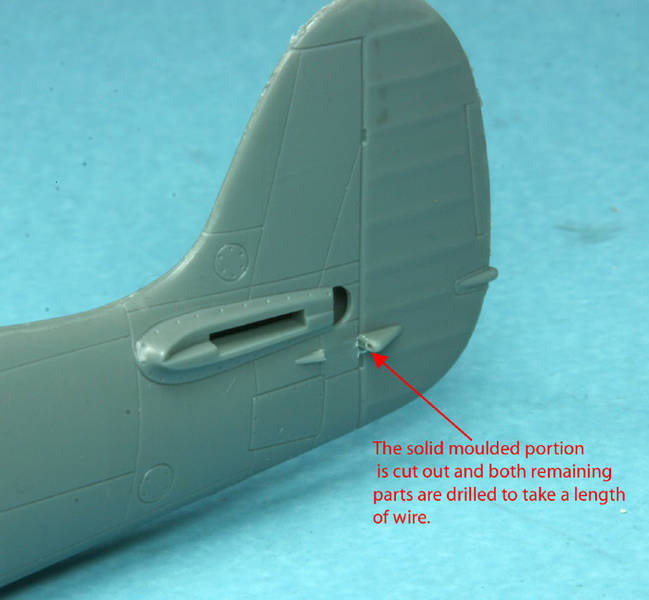
While waiting for the fuselage halves to dry I started fitting the cockpit interior tigether. I also cut away the solid plastic fillet between the fuselage and rudder, on the port side and drilled a hole in each of the remaining parts, to except a short piece of wire. This is a nice easy update. To drill the holes first of all mark the start position with a pointed tool, such as a compass needle. (trust me )


That wasn't all I did while waiting for the fuselage halves to dry. I like to show drooped Elevators on most of my Spitfire Models and this is an easy way to do it. First of all cut the elevetors away from the tail planes.


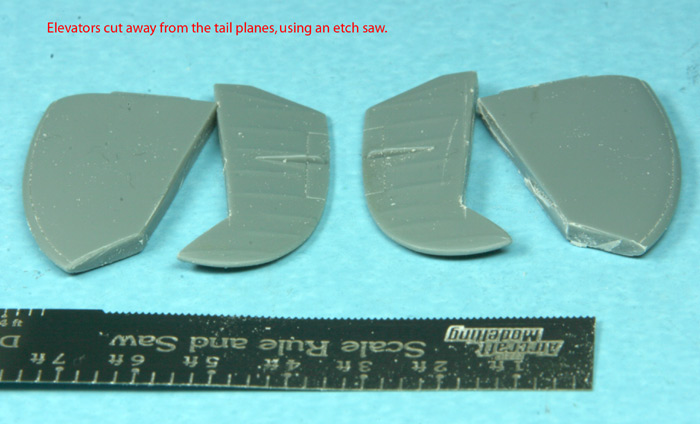
Next replace the hinge slots which would have been lost when cutting, use the edge of a flat file. Glue a thin piece of styrene strip to horn balance and a thicker piece, about 40 thou', to the long edge of the elevator. Using a triangular file cut a slot into the mating face of the tail plane. The edge of the opening needs to be nice and thin. You don't have to file until the outer edge is thin, you can just tilt the file to either side to thin it, otherwise you will go to deep (trust me ).

The dropped elevators aren't finished yet and, as yet, I have done nothing else to them. So a good time to skip to another post.

Mal

Holdfast
Staff MemberPresident
IPMS-UK KITMAKER BRANCH
#056
_VISITCOMMUNITY
England - South West, United Kingdom
Joined: September 30, 2002
KitMaker: 8,581 posts
AeroScale: 4,913 posts
Posted: Friday, January 04, 2008 - 08:48 AM UTC
With the fuselage seam cleaned up and the cockpit interior complete now would be the time to add the interior, but I have a cunning plan (trust me ) I haven't gone to town on the cockpit interior, just adding a seat harness from a Eduard Mosquito etch, which will be sufficiant as I am not having the cockpit open. If I were then I would either scratch build a harness or use a more detailed item.


Before fitting the cockpit interior I glued the upper wings to the fuselage. Doing it this way (rather than joining the upper wings to the lower wing then fitting all to the fuselage) enables you to totally illiminate the wing/fuselage seam which, if you filled and sanded, you would loose all the raised detail. Before adding the upper wings I replaced the cannon barrel ends with stainless tube. I cut off the existing barrel, then drilled out the faring to except the tube. A good tip, when drilling out gun barrels and the like, is to make a start point with a sharp tool such as a compass point. (trust me)


While the upper wings were drying I added the radiator and oil cooler to the bottom wing. I should also have cleaned up the sprue gate scars which were a bit more difficult to do after the wings were joined. They could have also interfeared with the fit.

Mal
Holdfast
Staff MemberPresident
IPMS-UK KITMAKER BRANCH
#056
_VISITCOMMUNITY
England - South West, United Kingdom
Joined: September 30, 2002
KitMaker: 8,581 posts
AeroScale: 4,913 posts
Posted: Saturday, January 05, 2008 - 04:44 AM UTC
I test fitted the cockpit interior prior to adding the top wings, so I knew that it was a good fit. It was slid into the cockpit, making sure that it was properly alligned, and secured with CA.


Next up, the upper wing is added, it fitted beautifully. The upper and lower wings were again secured with tape as I went round gluing. I had also checked that the wing tips would fit well enough not to have to worry about their fitting later.
[


As it was a good fit I attached the lower nose engine cover while the wing joint was drying. I also made up the carberetter intake, but did not fit it yet.


More soon.

Mal
Holdfast
Staff MemberPresident
IPMS-UK KITMAKER BRANCH
#056
_VISITCOMMUNITY
England - South West, United Kingdom
Joined: September 30, 2002
KitMaker: 8,581 posts
AeroScale: 4,913 posts
Posted: Tuesday, January 08, 2008 - 10:28 AM UTC
To continue, I'll let the pictures do the talking:


More tomorrow.

Mal
Holdfast
Staff MemberPresident
IPMS-UK KITMAKER BRANCH
#056
_VISITCOMMUNITY
England - South West, United Kingdom
Joined: September 30, 2002
KitMaker: 8,581 posts
AeroScale: 4,913 posts
Posted: Wednesday, January 09, 2008 - 08:46 AM UTC
To continue:


More soon.

Mal
AIRGUNNER
_VISITCOMMUNITY
England - South East, United Kingdom
Joined: September 27, 2006
KitMaker: 246 posts
AeroScale: 234 posts
Posted: Saturday, January 12, 2008 - 07:39 AM UTC
Hi Mal,

Another fine build!. I hear what you are saying about Halfords white primer, question is how did you use it?. I tried it on the underside of my B-24 as thought the Grey primer may be a bit dark. First up I shook the can for a couple of minutes and sprayed at room temperature and it was like water. Next up I warmed the can in water and tried again. awful again. Next plan, warm can, shook five minutes minimum, sprayed in a really warm room, result acceptable but not perfect. Any help please as I have an RAF P-51B that needs the underside grey so I will try again.

Also, what paint do you use for your interiors, its the closest match I have seen, off the shelf or your own mix?

Cheers

Steve

Holdfast
Staff MemberPresident
IPMS-UK KITMAKER BRANCH
#056
_VISITCOMMUNITY
England - South West, United Kingdom
Joined: September 30, 2002
KitMaker: 8,581 posts
AeroScale: 4,913 posts
Posted: Sunday, January 13, 2008 - 02:40 AM UTC
Hi Steve,
Give the can a good shake, as you did, for a couple of minutes. I usually spray this stuff outside, but you need a windless day. Room temperature is good for spraying, but I actually sprayed this model at well below room temp. It did cause a few problems, like it didn't want to spray well, but I didn't try and cover in one go. I was also using a can that was almost empty which didn't help. I sprayed this in my spray booth, which is located at the back of my outdoor workshop. There is a heater in there and, at this time of year, I usually stand tins of hobby paint in front of it to warm up the paint a liitle. I didn't do that with the primer rattle can and, as the primer is stored in the spray booth so it gets very cold, that may have compounded the problems that I had. I am going to store my primer indoors from now on.

So to answer your question:
1. Shake for a good couple of minutes, longer for a new can.
2. Spray at around room temperature.
3. Spary at the correct distance. Now I can't give you a "correct distance" as I think that the first 2 have some influence on it, well 2 does anyway. Basically it is, I believe, the temperator at which you spray it that influences the pressure. The pressure in turn dictates the distance from the model you should spray. The correct distance, therefore, is that which allows the paint to hit the model without instantly over covering and flooding detail (too close) and landing and drying in droplets on the surface (too far away). I spray on a mist coat, from about a 12 inches or more (I've never thought about the distance) and this is why you need a windless day, if you spray outside.

I hope that that makes sense. The grey primer is just the same and something else to remember is that this primer will react to hobby paints (certainly enamel) so if, like me, you spray your undercarriage bays first, you must remove any overspray. Also, if attaching canopies and painting their frames, before spraying the primer, protect those frames from the primer. It is also not a good idea to spray the canopy, with primer, as it shows as a white/grey line, sandwhiched between the interior and exterior colours.

Mal
Holdfast
Staff MemberPresident
IPMS-UK KITMAKER BRANCH
#056
_VISITCOMMUNITY
England - South West, United Kingdom
Joined: September 30, 2002
KitMaker: 8,581 posts
AeroScale: 4,913 posts
Posted: Sunday, January 13, 2008 - 03:16 AM UTC
With the primer coat on we are about ready for painting, but there are a couple of thigs to do first. The gunsight has been painted and added and the canopy parts have been masked. I use Parafilm-M.
The canopy parts are first given a thorough clean by agitating them, individually (otherwise you will scratch them) in a container of Isopropynol.


When dry each part is dipped in Klear. Hold the part by a frame using pointed tweezers. Touch the corner of the coated piece to a tissue, to remove the excess and leave on a tissue, under cover, until dry.


To use Parafilm follow this sequence:


When the canopy is masked it is glued into position. There is a little remedial seam filling (just Mr Surfacer 1000), then it's off to the spray booth.


Next up the camoflage colours are applied.

Mal
 _GOTOTOP