

Early Aviation
Discuss World War I and the early years of aviation thru 1934.
Discuss World War I and the early years of aviation thru 1934.
Hosted by Jim Starkweather
1:32 Roden GB 2008 Se5a - Stephen

JackFlash

Joined: January 25, 2004
KitMaker: 11,669 posts
AeroScale: 11,011 posts
Posted: Monday, September 29, 2008 - 06:14 PM UTC
Finally! Now that the lozenge thing is caught up for the moment, on with this build! The radiator shutters need to be finished. The RAF wires is a question I may have solved. More on that later. I have another need to finish the plumbing on the instrument panel facade.

MerlinV

Joined: November 26, 2006
KitMaker: 608 posts
AeroScale: 602 posts

Posted: Monday, September 29, 2008 - 06:19 PM UTC
Quoted Text
The RAF wires is a question I may have solved. More on that later.
Etched Brass?
Orthodontist Wire?
BTW, that Lewis looks almost real!
Cheers,
Hugh
JackFlash
Joined: January 25, 2004
KitMaker: 11,669 posts
AeroScale: 11,011 posts
Posted: Thursday, October 02, 2008 - 03:16 PM UTC
The PoP radiator shutters are coming along a few each night. They are too fragile to get frustrated with.
Hatter50
Joined: June 17, 2006
KitMaker: 478 posts
AeroScale: 391 posts

Posted: Friday, October 03, 2008 - 11:22 AM UTC
 Waiting to see your Radiator Shutters.............
Regards
Steve


Repainted

Joined: April 04, 2006
KitMaker: 1,058 posts
AeroScale: 1,004 posts
Posted: Friday, October 03, 2008 - 10:23 PM UTC
Quoted Text
Yea, good work there Stephen, I must say this build will be real nice when you say it´s over and done.
The wire and pulley bays on every wing is a setback for all modeller, for what I can see from the pics you grind the holes. I cut my way thrue and used a thin plasticard on the underside. Nice to see diffrent way´s attacking the same problem.
Larsa
JackFlash
Joined: January 25, 2004
KitMaker: 11,669 posts
AeroScale: 11,011 posts
Posted: Thursday, October 16, 2008 - 06:22 PM UTC
Quoted Text
Yea, good work there Stephen, I must say this build will be real nice when you say it´s over and done. The wire and pulley bays on every wing is a setback for all modeller, for what I can see from the pics you grind the holes. I cut my way thrue and used a thin plasticard on the underside. Nice to see diffrent way´s attacking the same problem. Larsa
Greetings Larsa, Yes I had thought of just cutting through the wing and building it up as you mentioned. But it was pretty easy just carving out the triangular niches to that is what I did. If I have to do the Hispano-Suiza machine I may try your way.
JackFlash
Joined: January 25, 2004
KitMaker: 11,669 posts
AeroScale: 11,011 posts
Posted: Thursday, October 23, 2008 - 04:05 PM UTC
Almost finished with the radiator. Then I finish rigging the cockpit rudder bars & control column. Then I'll take some photos. Just when I get the hang of doing it its over. The radiator shutters have been very tedious. If you do try them do just a few at a time. The space between them is sooooo tight just releasing one by opening your tweezers can undo and hour's worth of work when it caves in the 6 previously done pieces.
JackFlash
Joined: January 25, 2004
KitMaker: 11,669 posts
AeroScale: 11,011 posts
Posted: Monday, October 27, 2008 - 04:27 PM UTC
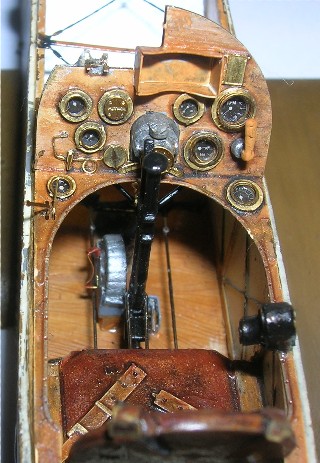
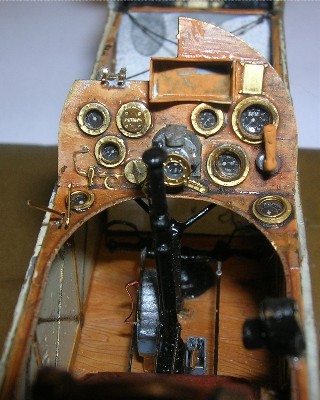
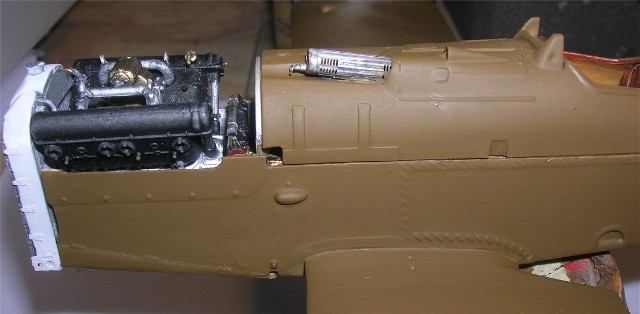
Huzzah! The radiator is completed. At least the shutters are in place and drying. I'll try to get some images up. So while it was curing up last night I worked on som bits and pieces. The grease gun / hydraulic pump, flarecartige rack, flare gun, and metal holster, Ammo drum & it's metal floor holster, starter magneto, electric switches to the engine mags and some wiring. All finished and ready for paint. I will of course wait to add the hand crank outside the cockpit. It is too fragile in light of the outside work yet to do. Note to self -must remember to drill the exterior hole over the item inside the cockpit to match the location.

RAGIII
Joined: June 19, 2007
KitMaker: 604 posts
AeroScale: 600 posts
Posted: Tuesday, October 28, 2008 - 11:18 AM UTC
Stephen,
Looking forward to those pics!
RAGIII
Looking forward to those pics!
RAGIII
JackFlash
Joined: January 25, 2004
KitMaker: 11,669 posts
AeroScale: 11,011 posts
Posted: Tuesday, October 28, 2008 - 04:28 PM UTC
Greetings all;
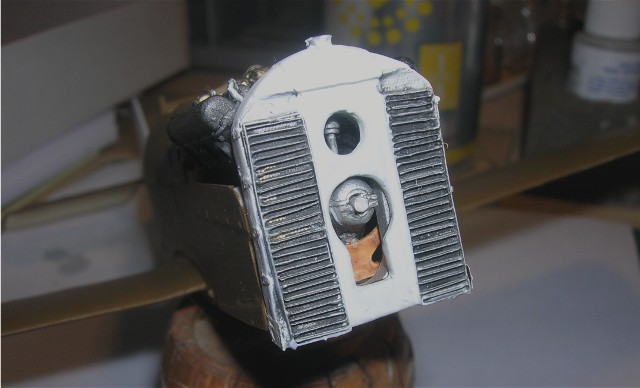
Here is the long awaited radiator. I can see some flaws that I will have to go back and fix but now that it is all together I can risk it. Bits and pieces on the left.

Note to Part of Poland. next time just do it as 1 piece and we can go in and twist the shutters open or leave them closed.
Here is the long awaited radiator. I can see some flaws that I will have to go back and fix but now that it is all together I can risk it. Bits and pieces on the left.
Note to Part of Poland. next time just do it as 1 piece and we can go in and twist the shutters open or leave them closed.
Hatter50
Joined: June 17, 2006
KitMaker: 478 posts
AeroScale: 391 posts
Posted: Tuesday, October 28, 2008 - 10:37 PM UTC
AAhhhhhhhhhhhhhhhh................  The long awaited shutters. I've been trying in my little brain to figure a better way of engineering them, I think they are too "deep for twisting" I am going to have to get a set of real skinny teweezers. These are going to keep me busy til next year!
The long awaited shutters. I've been trying in my little brain to figure a better way of engineering them, I think they are too "deep for twisting" I am going to have to get a set of real skinny teweezers. These are going to keep me busy til next year! JackFlash
Joined: January 25, 2004
KitMaker: 11,669 posts
AeroScale: 11,011 posts
Posted: Wednesday, October 29, 2008 - 12:18 AM UTC
Quoted Text
". . .I've been trying in my little brain to figure a better way of engineering them, I think they are too "deep for twisting. . ."
If they re-engineered them where they were 1/3 narrower at the back edge it would give you just the gap you need between all shutters then have them attached like Eduard did their PE Alb. D. III - V & Va radiator shutters. One attachment point on each side. Fold the edges forward to create two edges to slide within the outer frame rectangle and viola! You could not see the short back edge even if they were mostly shut.
Hatter50
Joined: June 17, 2006
KitMaker: 478 posts
AeroScale: 391 posts
Posted: Wednesday, October 29, 2008 - 12:31 AM UTC
Brilliant............great idea.
That was the only idea i could come up with also. They would have to "mark" the wrap around frame a little better. But then you wouldn't be having all this "modelling fun".
Regards
Steve
That was the only idea i could come up with also. They would have to "mark" the wrap around frame a little better. But then you wouldn't be having all this "modelling fun".
Regards
Steve

thegirl

Joined: January 19, 2008
KitMaker: 6,743 posts
AeroScale: 6,151 posts
Posted: Wednesday, October 29, 2008 - 01:07 AM UTC
The rad looks great Stephen , that would have taken me into my retirement years on building just that one part .
Repainted
Joined: April 04, 2006
KitMaker: 1,058 posts
AeroScale: 1,004 posts
Posted: Wednesday, October 29, 2008 - 02:49 AM UTC
Quoted Text
The rad looks great Stephen , that would have taken me into my retirement years on building just that one part .
Me to
still trying to find all those words in my lexocon
This will be one for the book Stephen. The book of the best builds
Larsa
thegirl
Joined: January 19, 2008
KitMaker: 6,743 posts
AeroScale: 6,151 posts
Posted: Tuesday, November 04, 2008 - 02:06 PM UTC
now that Lars and I know what we will be doing until our retirement years , just wondering how goes the battle ?
JackFlash
Joined: January 25, 2004
KitMaker: 11,669 posts
AeroScale: 11,011 posts
Posted: Tuesday, November 04, 2008 - 06:08 PM UTC
I have been focusing on adding a few detail items up around the pilot's shoulder area. Wiring and linkages. . . etc. (And several other Aeroscale projects as well.)
JackFlash
Joined: January 25, 2004
KitMaker: 11,669 posts
AeroScale: 11,011 posts
Posted: Monday, December 01, 2008 - 03:09 PM UTC
So much happening has let me ignore some of the minor progress I have made here. But I am closing up the cockpit in the next two days. More paint and then the top wing. Images later.
RAGIII
Joined: June 19, 2007
KitMaker: 604 posts
AeroScale: 600 posts
Posted: Monday, December 01, 2008 - 03:28 PM UTC
Stephen, Just wondering if anyone has bothered to add up the number of "Looks" at the build threads? Seems to me that these builds have generated a lot of interest, not just for the Roden kits we are building ,but for WW1 modeling in general! By the way, looking forward to your updates!
RAGIII
RAGIII
JackFlash
Joined: January 25, 2004
KitMaker: 11,669 posts
AeroScale: 11,011 posts
Posted: Thursday, December 11, 2008 - 06:58 AM UTC
Greetings Rick;
I have gathered some stats to send to Roden and I'll post them here too when we are done. The Se 5a is almost ready for me to close up now but I am reviewing everything to make sure I don't do it prematurely. Accounting for all items to make sure I added them. I have well over 120 pieces in the cockpit alone. Was tired one day and almost dropped it. Eeeeek!
I have gathered some stats to send to Roden and I'll post them here too when we are done. The Se 5a is almost ready for me to close up now but I am reviewing everything to make sure I don't do it prematurely. Accounting for all items to make sure I added them. I have well over 120 pieces in the cockpit alone. Was tired one day and almost dropped it. Eeeeek!
MerlinV
Joined: November 26, 2006
KitMaker: 608 posts
AeroScale: 602 posts
Posted: Thursday, December 11, 2008 - 09:22 AM UTC
Quoted Text
I have well over 120 pieces in the cockpit alone. Was tired one day and almost dropped it. Eeeeek!
Been there, done that, bought the show bag and the T-shirt.
Now that I am within a few paint strokes of finishing the F1, I am being ultra careful!
Looking forward to seeing your progress Stephen.
Cheers,
Hugh.
JackFlash
Joined: January 25, 2004
KitMaker: 11,669 posts
AeroScale: 11,011 posts
Posted: Tuesday, December 16, 2008 - 03:21 PM UTC
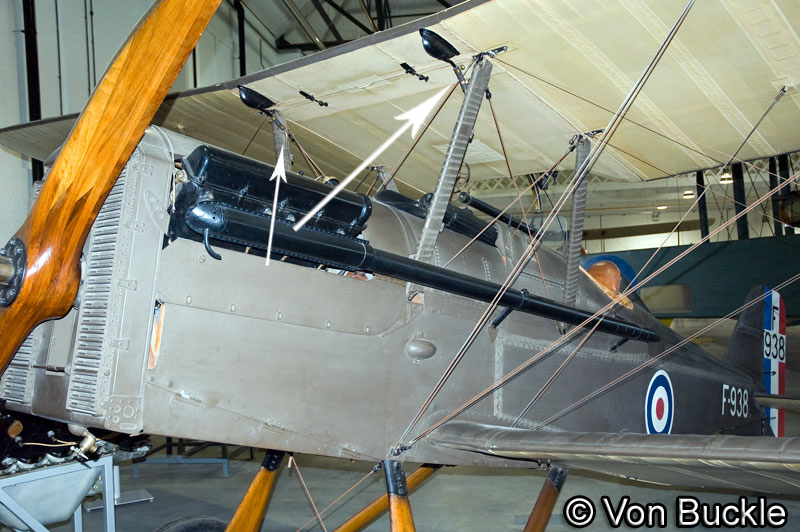
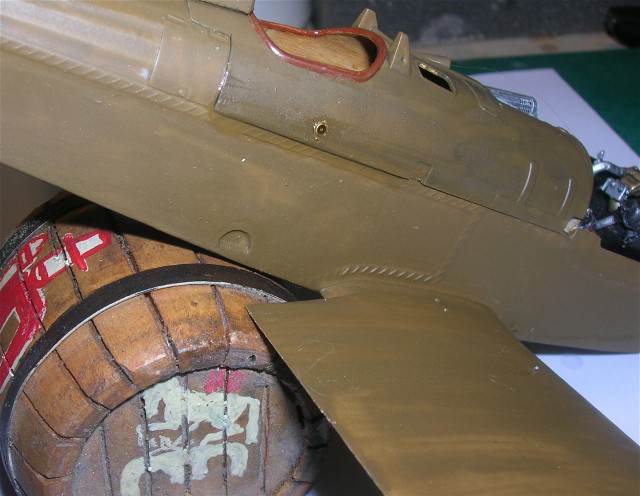
Doing some research for the next steps. I gleaned this from Dan San Abbott. "The leading edge of the center-section was two tanks, the one on the left was auxiliary gravity fuel tank and the one on the right half was an radiator overflow expansion tank. Copper overflow lines ran from each tank to the trailing edge of the center section.
The plumbing from the bowl on the bottom of the auxiliary gravity tank went to the left front cabane strut and to the fuel selector cocks on the instrument board.
The radiator overflow plumbing ran from the radiator header to the right front cabane strut up the strut to the bowl on the bottom of the leading edge radiator expansion tank. An over flow copper lne ran from the top of the tank to the right trailing edge of the center-section.
All four cabane struts were steel tubes with leading and trailing wood fairings. The fairings were hollowed out fron and rear to reduce the weight. Holes were drilled in the top and bottom of the front fairing of the front cabane struts for the entry and exit of the copper plumbing. After the fairings were fixed the the strut tube, the strut was wrapped with a strip of linen fabric which was glued the wood fairings.
Merry Christmas,"
Hatter50
Joined: June 17, 2006
KitMaker: 478 posts
AeroScale: 391 posts
Posted: Tuesday, December 16, 2008 - 10:14 PM UTC
Thanks for that info Stephen..........and the photo. I will have to modify my "pre-shading" to follow the photo.
Regards
Steve
Regards
Steve
JackFlash
Joined: January 25, 2004
KitMaker: 11,669 posts
AeroScale: 11,011 posts
Posted: Thursday, December 18, 2008 - 09:41 PM UTC
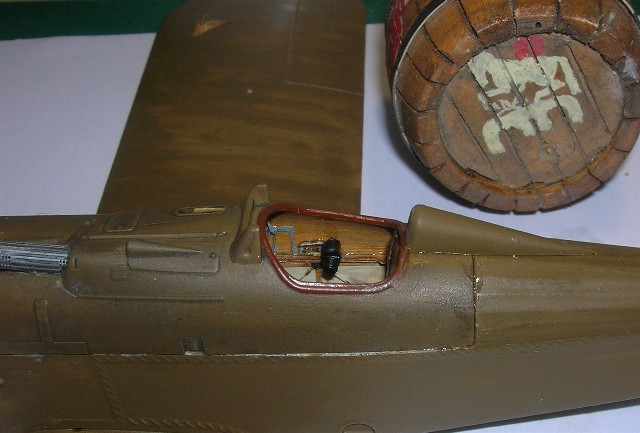
No worries Steve. Now to show the recent wrap up to closing the fuselage.
JackFlash
Joined: January 25, 2004
KitMaker: 11,669 posts
AeroScale: 11,011 posts
Posted: Friday, December 19, 2008 - 09:22 PM UTC
Second coat of PC10 applied and radiator is attached.
 |

WEB HOSTING BY


Copyright ©2021 AeroScale and Kitmaker Network, a subsidiary of Silver Star Enterprises
All Rights Reserved. Please read our Conditions of Use and Privacy Policy.
All Rights Reserved. Please read our Conditions of Use and Privacy Policy.