1:32 Roden GB 2008 Fokker Dr.I
Mendoza, Argentina
Joined: June 14, 2006
KitMaker: 222 posts
AeroScale: 219 posts
Posted: Sunday, December 14, 2008 - 07:32 PM UTC
I'm still working with the interior after solving some problems with the ammo boxes and guns installation.
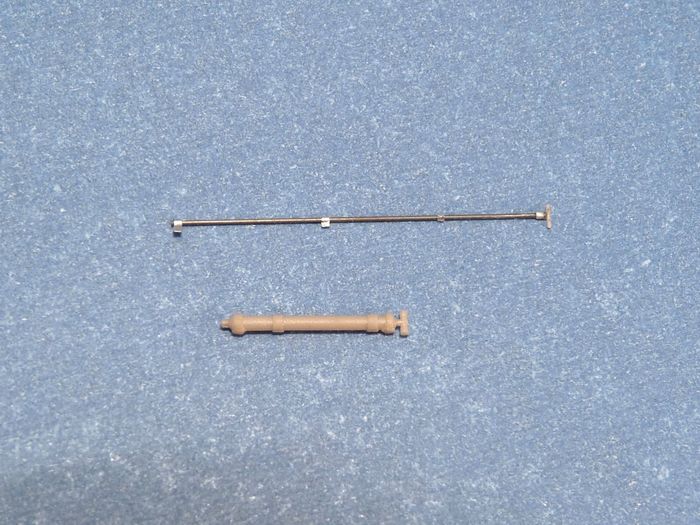
I discovered that the fuel pump provided by the kit is correct for a Fokker D.VII but not for a Dr.1. I replaced it and made a new one with a 0.4 mm steel wire and stretched sprue.
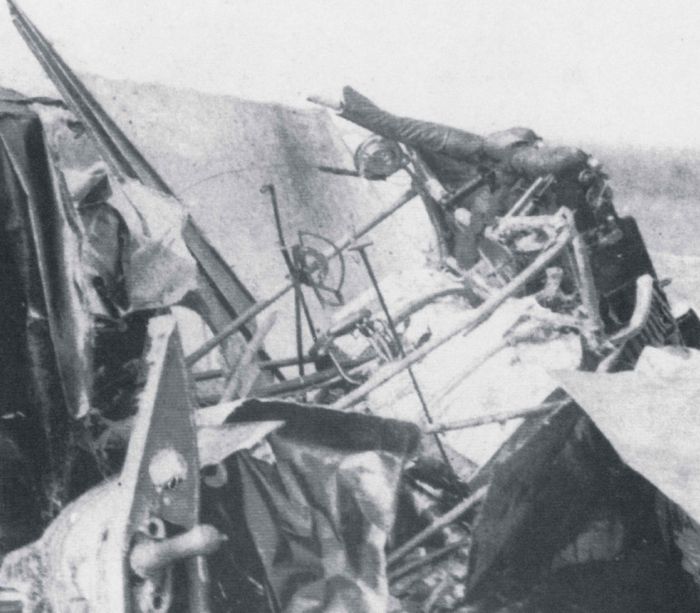
Here is a picture of the wreck of Fokker Dr.1 591/17 that clearly shows the fuel pump:
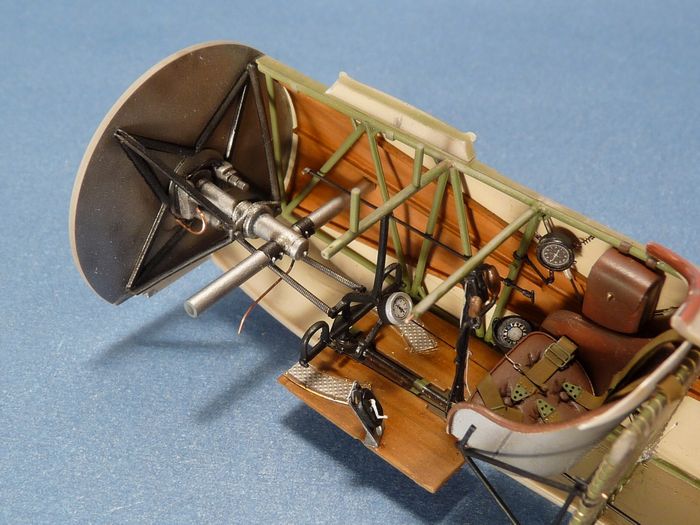
On the right side I attached the throttle control rod, the fuel regulation lever and the magneto switch with its corresponding wiring.

I tried to replicate the "whirled" effect often seen on the metal parts of the Fokker's products by painting the ammo and the empty cartridge boxes gloss white. Then, with a permanent marker I made the characteristics "worms". Next, I painted both parts with highly thinned aluminum paint and I added a homemade decal of a table to the ammo box. I don't know the purpose of the original table but I'm sure that Stephen knows...

and to complete the cockpit.... the floor. I detailed the control column, starting mag and compass. The RPM indicator was scratchbuilt.

More to follow!

I have always imagined that Paradise will be a kind of library.
Siempre imagine que el paraíso sería algún tipo de biblioteca.
Jorge Luis Borges
Victoria, Australia
Joined: November 26, 2006
KitMaker: 608 posts
AeroScale: 602 posts
Posted: Sunday, December 14, 2008 - 11:12 PM UTC
Wow!
I am humbled.
Cheers,
Hugh
Alberta, Canada
Joined: January 19, 2008
KitMaker: 6,743 posts
AeroScale: 6,151 posts
Posted: Monday, December 15, 2008 - 01:50 AM UTC
Kalt you are the master , very , very impressive !
Östergötland, Sweden
Joined: April 04, 2006
KitMaker: 1,058 posts
AeroScale: 1,004 posts
Posted: Monday, December 15, 2008 - 04:22 AM UTC
Impressive,Impressive
That trick with the permanent marker I liked alot, and got to try it on the next
Larsa Q
West Virginia, United States
Joined: December 18, 2006
KitMaker: 1,121 posts
AeroScale: 1,063 posts
Posted: Monday, December 15, 2008 - 04:59 AM UTC
Absolutely stunning work. What kind of paint do you use for your metalic surfaces? Thanks for sharing, Kalt!
Mark
Mendoza, Argentina
Joined: June 14, 2006
KitMaker: 222 posts
AeroScale: 219 posts
Posted: Monday, December 15, 2008 - 07:11 PM UTC
Thanks guys and girl !, I really appreciate your comments.
Quoted Text
What kind of paint do you use for your metallic surfaces?
Mark: I used Model Master's Aluminum Plate (buffing paint)
Regards,
Claudio
I have always imagined that Paradise will be a kind of library.
Siempre imagine que el paraíso sería algún tipo de biblioteca.
Jorge Luis Borges
Colorado, United States
Joined: January 25, 2004
KitMaker: 11,669 posts
AeroScale: 11,011 posts
Posted: Monday, December 15, 2008 - 11:06 PM UTC
Excellent Claudio! I like the over all clean appearance for this build.
". . .The most important thing is to know why you build and then get the most that you can out of building." via D.D.
Mendoza, Argentina
Joined: June 14, 2006
KitMaker: 222 posts
AeroScale: 219 posts
Posted: Wednesday, December 24, 2008 - 02:33 AM UTC
Thanks Stephen,
I found some time and I managed to advance with the build. I finally closed the fuselage!
I made the forward gun mountings with 0,5 mm steel wire but I still have to add the adjustable rear gun mounts. Here are some pictures:
Merry Christmas ! Féliz Navidad !
I have always imagined that Paradise will be a kind of library.
Siempre imagine que el paraíso sería algún tipo de biblioteca.
Jorge Luis Borges
Alberta, Canada
Joined: January 19, 2008
KitMaker: 6,743 posts
AeroScale: 6,151 posts
Posted: Wednesday, December 24, 2008 - 02:48 AM UTC
AWESOME craftmanship Kalt ! Your painting skills are very clean and realistic ! I always look forward to your builds .
Question though , I don't recall there being the magt/switch being on the floor in the cockpit on the left side ? What made you decide to place it there ?
Mendoza, Argentina
Joined: June 14, 2006
KitMaker: 222 posts
AeroScale: 219 posts
Posted: Wednesday, December 24, 2008 - 03:20 AM UTC
Thanks Terri, I'm glad you liked it!
Quoted Text
Question though , I don't recall there being the magt/switch being on the floor in the cockpit on the left side ? What made you decide to place it there ?
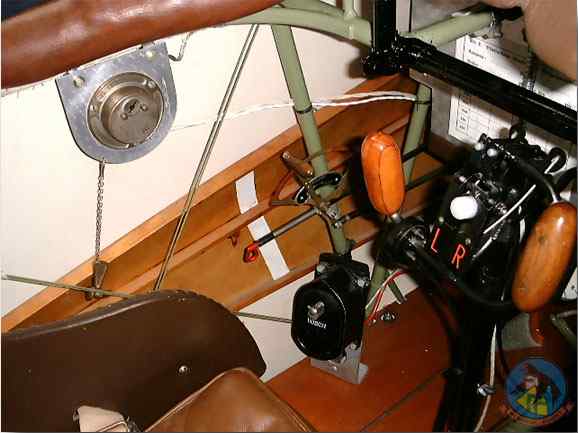
Actually, I don't have pictures that show the location of the starting magneto in original Dr.1s, I just followed Part instructions and the Memorial Flight excellent replica, here is a picture:
Merry Christmas!
I have always imagined that Paradise will be a kind of library.
Siempre imagine que el paraíso sería algún tipo de biblioteca.
Jorge Luis Borges
Joined: January 28, 2007
KitMaker: 17 posts
AeroScale: 3 posts
Posted: Wednesday, December 24, 2008 - 08:49 AM UTC
Claudio,
I've been following your build very closely since I'm just beginning my own Dr.I (today actually). I'm glad you started posting again. Looking back, is there any area you would handle differently if you did it over? Looking to some more pics. Merry Christmas.
Kurt
Mendoza, Argentina
Joined: June 14, 2006
KitMaker: 222 posts
AeroScale: 219 posts
Posted: Saturday, December 27, 2008 - 05:03 AM UTC
Hello Kurt,
Quoted Text
Looking back, is there any area you would handle differently if you did it over?
Actually no, but if you are planning to use the Part etched set you will have some problems with the ammo and spent cartridge boxes. I spent a lot of time attaching these parts.
About your question at the Aerodrome, I glued thin stripes of plasticard then I sanded them down to achieve the correct profile of the rudder and elevators. I also used the plans sent to me by Gary Sewall.
I hope this helps,
I have always imagined that Paradise will be a kind of library.
Siempre imagine que el paraíso sería algún tipo de biblioteca.
Jorge Luis Borges
Joined: January 28, 2007
KitMaker: 17 posts
AeroScale: 3 posts
Posted: Saturday, December 27, 2008 - 05:05 PM UTC
Gary has an amazing amount of information!
Alberta, Canada
Joined: January 19, 2008
KitMaker: 6,743 posts
AeroScale: 6,151 posts
Posted: Thursday, January 01, 2009 - 01:47 PM UTC
How goes the build so far Kalt ?
Mendoza, Argentina
Joined: June 14, 2006
KitMaker: 222 posts
AeroScale: 219 posts
Posted: Friday, January 09, 2009 - 05:12 PM UTC
Quoted Text
How goes the build so far Kalt ?
Now, I'm working in the engine and experimenting different techniques for the Fokker streaked paint.
Also, I'm finishing a 1/48 Piper L-4H for a local contest.....
I have always imagined that Paradise will be a kind of library.
Siempre imagine que el paraíso sería algún tipo de biblioteca.
Jorge Luis Borges
Mendoza, Argentina
Joined: June 14, 2006
KitMaker: 222 posts
AeroScale: 219 posts
Posted: Sunday, January 25, 2009 - 01:37 AM UTC
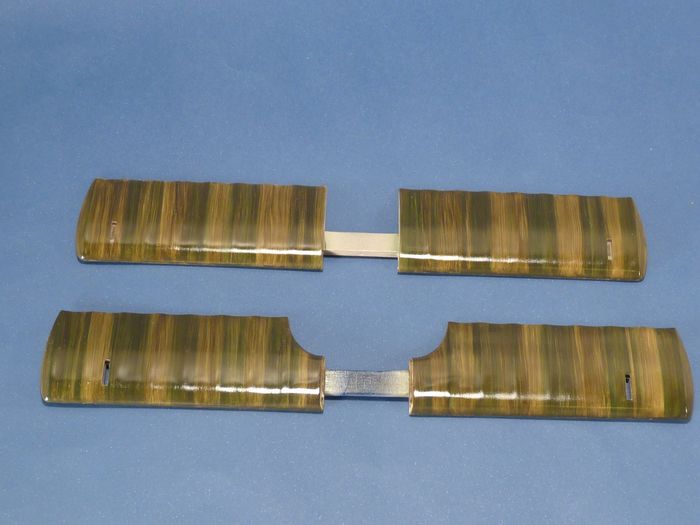
I've been working extra time lately trying to finish the Fokker. I am a bit ashamed because I am the only one, of the original GB, who didn't finish their assigned kit yet

Anyway, I made the "cut outs" for the correct attachment of the landing gear, I finished the engine and I painted all major components.
Here are some pictures:


I'm not fully satisfied with "my" Fokker streaked finish but I think it is Ok for being the first time I try to apply it...
Stripes, stripes and more stripes... I spent two days masking and I still have to retouch some sections :
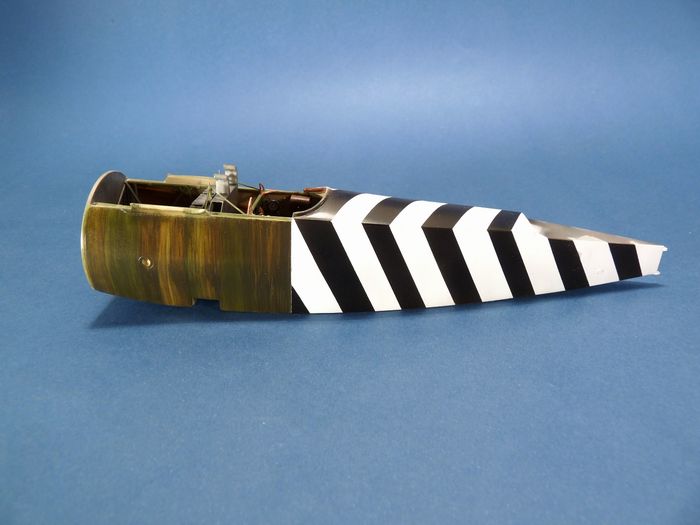

No, I'm not planning to replicate a plane flown by the International Red Cross. They are just vinyl masks. I will remove them once the weathering of the upper wing is ready, by doing this I'm planning to get the effect of newly painted crosses over the old striped scheme. I will follow the same procedure with the fuselage crosses.
I can't believe it, but I think I can see the end of the build....

I have always imagined that Paradise will be a kind of library.
Siempre imagine que el paraíso sería algún tipo de biblioteca.
Jorge Luis Borges
Alberta, Canada
Joined: January 19, 2008
KitMaker: 6,743 posts
AeroScale: 6,151 posts
Posted: Sunday, January 25, 2009 - 02:14 AM UTC
I Like it , I like it a lot ! Very impressive Kalt ! For your first time at doing the streaking , turn out very well and I just love those stripes !
England - South East, United Kingdom
Joined: November 06, 2005
KitMaker: 1,667 posts
AeroScale: 1,551 posts
Posted: Sunday, January 25, 2009 - 02:57 AM UTC
this is such an impressive build, I just stare at the pics wondering how the heck you manage it....awesome isnt misused here.....awesome.
Keith
Still can't cure the AMS even with sausage finger implants & olde eyes.
Colorado, United States
Joined: January 25, 2004
KitMaker: 11,669 posts
AeroScale: 11,011 posts
Posted: Sunday, January 25, 2009 - 06:02 AM UTC
Well done Claudio! Model on!
". . .The most important thing is to know why you build and then get the most that you can out of building." via D.D.
South Australia, Australia
Joined: August 14, 2007
KitMaker: 5,926 posts
AeroScale: 2,201 posts
Posted: Sunday, January 25, 2009 - 06:53 AM UTC
Amazing work Claudio. Much higher level than my humble P-38! I finished my Dr.I a while ago but found I can't see much of the detail I put into the cockpit with everything else around it. Again, great work.
You may be right, I may be crazy.
Tennessee, United States
Joined: April 28, 2006
KitMaker: 286 posts
AeroScale: 45 posts
Posted: Sunday, January 25, 2009 - 08:56 AM UTC
Claudio
You have done an exceptional job on this ,very nice work

Victoria, Australia
Joined: November 26, 2006
KitMaker: 608 posts
AeroScale: 602 posts
Posted: Sunday, January 25, 2009 - 11:29 AM UTC
Wow! I like your streaking! And the stripes look sensational.
This will be a beauty.
Cheers,
Hugh
North Carolina, United States
Joined: June 19, 2007
KitMaker: 604 posts
AeroScale: 600 posts
Posted: Monday, January 26, 2009 - 11:32 AM UTC
Quoted Text
Wow! I like your streaking! And the stripes look sensational.
This will be a beauty.
Cheers,
Hugh
I have to agree 100% Beautiful! Streaking is excellent!! WELL DONE
RAGIII
Queensland, Australia
Joined: August 30, 2006
KitMaker: 285 posts
AeroScale: 281 posts
Posted: Monday, January 26, 2009 - 10:45 PM UTC
Very nice streaking Claudio - Fokker streaking is one of the reasons I don't really build Fokkers... I can never get it even close to right.
I thought however that the streaking on the wings was supposed to be at an angle to the line of flight, or is this just the picture angle?
BC
Östergötland, Sweden
Joined: April 04, 2006
KitMaker: 1,058 posts
AeroScale: 1,004 posts
Posted: Tuesday, January 27, 2009 - 05:56 AM UTC
I like it and I like it real hard,crisp and impressive.
you turn this into a gem..

Larsa Q


